标签:
按照之前博客的风格,首先看下实现效果。

想起之前看到的Yalantis/uCrop效果比较绚,但是研究源码之后发现在定制界面方面还是有一点的限制,于是在它的基础上做了修改Android-Crop,把定制界面独立出来,让用户去自由设置。下图为使用Android-Crop实现的模仿微信选择图片并裁剪Demo。

<?xml version="1.0" encoding="utf-8"?>
<RelativeLayout xmlns:android="http://schemas.android.com/apk/res/android"
    android:layout_width="fill_parent"
    android:layout_height="wrap_content"
    android:gravity="center_horizontal"
    android:orientation="vertical">

    <LinearLayout
        android:id="@+id/pop_layout"
        android:layout_width="match_parent"
        android:layout_height="wrap_content"
        android:layout_alignParentBottom="true"
        android:background="#444"
        android:gravity="center_horizontal"
        android:orientation="vertical">

        <Button
            android:id="@+id/picture_selector_take_photo_btn"
            android:layout_width="match_parent"
            android:layout_height="wrap_content"
            android:layout_marginLeft="10dip"
            android:layout_marginRight="10dip"
            android:layout_marginTop="10dp"
            android:background="#4d69ff"
            android:padding="10dp"
            android:text="拍照"
            android:textColor="#CEC9E7"
            android:textSize="18sp"
            android:textStyle="bold" />

        <Button
            android:id="@+id/picture_selector_pick_picture_btn"
            android:layout_width="match_parent"
            android:layout_height="wrap_content"
            android:layout_marginLeft="10dip"
            android:layout_marginRight="10dip"
            android:layout_marginTop="5dp"
            android:background="#4d69ff"
            android:padding="10dp"
            android:text="从相册选择"
            android:textColor="#CEC9E7"
            android:textSize="18sp"
            android:textStyle="bold" />

        <Button
            android:id="@+id/picture_selector_cancel_btn"
            android:layout_width="match_parent"
            android:layout_height="wrap_content"
            android:layout_marginBottom="15dip"
            android:layout_marginLeft="10dip"
            android:layout_marginRight="10dip"
            android:layout_marginTop="20dp"
            android:background="@android:color/white"
            android:padding="10dp"
            android:text="取消"
            android:textColor="#373447"
            android:textSize="18sp"
            android:textStyle="bold" />
    </LinearLayout>

</RelativeLayout>
public SelectPicturePopupWindow(Context context) {
    super(context);
    LayoutInflater inflater = (LayoutInflater) context.getSystemService(Context.LAYOUT_INFLATER_SERVICE);
    mMenuView = inflater.inflate(R.layout.layout_picture_selector, null);
    takePhotoBtn = (Button) mMenuView.findViewById(R.id.picture_selector_take_photo_btn);
    pickPictureBtn = (Button) mMenuView.findViewById(R.id.picture_selector_pick_picture_btn);
    cancelBtn = (Button) mMenuView.findViewById(R.id.picture_selector_cancel_btn);
    // 设置按钮监听
    takePhotoBtn.setOnClickListener(this);
    pickPictureBtn.setOnClickListener(this);
    cancelBtn.setOnClickListener(this);
}/**
* 选择监听接口
*/
public interface OnSelectedListener {
void OnSelected(View v, int position);
}
回调的参数为点击的按钮View以及当前按钮的索引,那么只要在选择监听里面返回接口的回调就可以啦。
@Override
public void onClick(View v) {
    switch (v.getId()) {
        case R.id.picture_selector_take_photo_btn:
            if(null != mOnSelectedListener) {
                mOnSelectedListener.OnSelected(v, 0);
            }
            break;
        case R.id.picture_selector_pick_picture_btn:
            if(null != mOnSelectedListener) {
                mOnSelectedListener.OnSelected(v, 1);
            }
            break;
        case R.id.picture_selector_cancel_btn:
            if(null != mOnSelectedListener) {
                mOnSelectedListener.OnSelected(v, 2);
            }
            break;
    }
}
/**
 * 把一个View控件添加到PopupWindow上并且显示
 *
 * @param activity
 */
public void showPopupWindow(Activity activity) {
    popupWindow = new PopupWindow(mMenuView,    // 添加到popupWindow
    ViewGroup.LayoutParams.MATCH_PARENT, ViewGroup.LayoutParams.WRAP_CONTENT);
    popupWindow.setBackgroundDrawable(new ColorDrawable(Color.TRANSPARENT));
    popupWindow.showAtLocation(activity.getWindow().getDecorView(), Gravity.CENTER | Gravity.BOTTOM, 0, 0);
    popupWindow.setAnimationStyle(android.R.style.Animation_InputMethod);   // 设置窗口显示的动画效果
    popupWindow.setFocusable(false);                                        // 点击其他地方隐藏键盘 popupWindow
    popupWindow.update();
}
/**
* 移除PopupWindow
*/
public void dismissPopupWindow() {
if (popupWindow != null && popupWindow.isShowing()) {
popupWindow.dismiss();
popupWindow = null;
}
}
OK,到这里选择框的实现就完成了。
mSelectPicturePopupWindow = new SelectPicturePopupWindow(mContext);
mSelectPicturePopupWindow.setOnSelectedListener(this);
@Override
public void OnSelected(View v, int position) {
    switch (position) {
        case 0:
            // TODO: "拍照"按钮被点击了
            break;
        case 1:
            // TODO: "从相册选择"按钮被点击了
            break;
        case 2:
            // TODO: "取消"按钮被点击了
            break;
    }
}
@Override
public void OnSelected(View v, int position) {
    switch (position) {
        case 0:
            // "拍照"按钮被点击了
            mSelectPicturePopupWindow.dismissPopupWindow();
            Intent takeIntent = new Intent(MediaStore.ACTION_IMAGE_CAPTURE);
            //下面这句指定调用相机拍照后的照片存储的路径
            takeIntent.putExtra(MediaStore.EXTRA_OUTPUT, Uri.fromFile(new File(mTempPhotoPath)));
            startActivityForResult(takeIntent, CAMERA_REQUEST_CODE);
            break;
        case 1:
            // TODO: "从相册选择"按钮被点击了
            break;
        case 2:
            // TODO: "取消"按钮被点击了
            break;
    }
}
这里的指定位置为sd卡本目录下
mTempPhotoPath = Environment.getExternalStorageDirectory() + File.separator + "photo.jpeg";
@Override
public void onActivityResult(int requestCode, int resultCode, Intent data) {
    if (resultCode == mActivity.RESULT_OK) {
        switch (requestCode) {
            case CAMERA_REQUEST_CODE:
                // TODO: 调用相机拍照
                break;
        }
    }
    super.onActivityResult(requestCode, resultCode, data);
}
@Override
public void OnSelected(View v, int position) {
    switch (position) {
        case 0:
            // "拍照"按钮被点击了
            mSelectPicturePopupWindow.dismissPopupWindow();
            Intent takeIntent = new Intent(MediaStore.ACTION_IMAGE_CAPTURE);
            // 下面这句指定调用相机拍照后的照片存储的路径
            takeIntent.putExtra(MediaStore.EXTRA_OUTPUT, Uri.fromFile(new File(mTempPhotoPath)));
            startActivityForResult(takeIntent, CAMERA_REQUEST_CODE);
            break;
        case 1:
            // "从相册选择"按钮被点击了
            mSelectPicturePopupWindow.dismissPopupWindow();
            Intent pickIntent = new Intent(Intent.ACTION_PICK, null);
            // 如果限制上传到服务器的图片类型时可以直接写如:"image/jpeg 、 image/png等的类型"
            pickIntent.setDataAndType(MediaStore.Images.Media.EXTERNAL_CONTENT_URI, "image/*");
            startActivityForResult(pickIntent, GALLERY_REQUEST_CODE);
            break;
        case 2:
           // TODO: "取消"按钮被点击了
            break;
    }
}
当拍选择图片完成时会回调到onActivityResult,在这里处理选择的返回结果。
@Override
public void onActivityResult(int requestCode, int resultCode, Intent data) {
    if (resultCode == mActivity.RESULT_OK) {
        switch (requestCode) {
            case CAMERA_REQUEST_CODE:
                // TODO: 调用相机拍照
                break;
            case GALLERY_REQUEST_CODE:
                // TODO: 直接从相册获取
                break;
        }
    }
    super.onActivityResult(requestCode, resultCode, data);
}
/**
 * 裁剪图片方法实现
 *
 * @param uri
 */
public void startCropActivity(Uri uri) {
    UCrop.of(uri, mDestinationUri)
            .withAspectRatio(1, 1)
            .withMaxResultSize(512, 512)
            .withTargetActivity(CropActivity.class)
            .start(mActivity, this);
}
CropActiivty裁剪完成时会回调到onActivityResult,在这里处理选择的返回结果。
@Override
public void onActivityResult(int requestCode, int resultCode, Intent data) {
    if (resultCode == mActivity.RESULT_OK) {
        switch (requestCode) {
            case CAMERA_REQUEST_CODE:   // 调用相机拍照
                File temp = new File(mTempPhotoPath);
                startCropActivity(Uri.fromFile(temp));
                break;
            case GALLERY_REQUEST_CODE:  // 直接从相册获取
                startCropActivity(data.getData());
                break;
            case UCrop.REQUEST_CROP:
                // TODO: 裁剪图片结果
                break;
            case UCrop.RESULT_ERROR:
                // TODO: 裁剪图片错误
                break;
        }
    }
    super.onActivityResult(requestCode, resultCode, data);
}
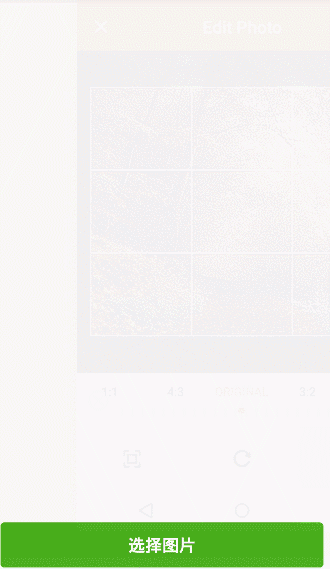
CropActivity的界面如下所示:


<RelativeLayout xmlns:android="http://schemas.android.com/apk/res/android"
    xmlns:fab="http://schemas.android.com/apk/res-auto"
    android:layout_width="match_parent"
    android:layout_height="match_parent"
    android:clipToPadding="true"
    android:fitsSystemWindows="true">

    <include layout="@layout/toolbar_layout" />

    <FrameLayout
        android:layout_width="match_parent"
        android:layout_height="match_parent"
        android:layout_below="@+id/toolbar"
        android:background="#000">

        <com.kevin.crop.view.UCropView
            android:id="@+id/weixin_act_ucrop"
            android:layout_width="match_parent"
            android:layout_height="match_parent"
            android:visibility="invisible" />

    </FrameLayout>

    <android.support.design.widget.CoordinatorLayout
        android:layout_width="match_parent"
        android:layout_height="match_parent">

        <android.support.design.widget.FloatingActionButton
            android:id="@+id/crop_act_save_fab"
            android:layout_width="wrap_content"
            android:layout_height="wrap_content"
            android:layout_gravity="bottom|right"
            android:layout_margin="@dimen/fab_margin"
            android:src="@mipmap/ic_done_white"
            fab:fabSize="normal" />
    </android.support.design.widget.CoordinatorLayout>


</RelativeLayout>
@Override
protected void initViews() {
	initToolBar();

	mGestureCropImageView = mUCropView.getCropImageView();
	mOverlayView = mUCropView.getOverlayView();

	// 设置允许缩放
	mGestureCropImageView.setScaleEnabled(true);
	// 设置禁止旋转
	mGestureCropImageView.setRotateEnabled(false);
	// 设置外部阴影颜色
	mOverlayView.setDimmedColor(Color.parseColor("#AA000000"));
	// 设置周围阴影是否为椭圆(如果false则为矩形)
	mOverlayView.setOvalDimmedLayer(false);
	// 设置显示裁剪边框
	mOverlayView.setShowCropFrame(true);
	// 设置不显示裁剪网格
	mOverlayView.setShowCropGrid(false);

	final Intent intent = getIntent();
	setImageData(intent);
}
private void setImageData(Intent intent) {
Uri inputUri = intent.getParcelableExtra(UCrop.EXTRA_INPUT_URI);
mOutputUri = intent.getParcelableExtra(UCrop.EXTRA_OUTPUT_URI);
if (inputUri != null && mOutputUri != null) {
try {
mGestureCropImageView.setImageUri(inputUri);
} catch (Exception e) {
setResultException(e);
finish();
}
} else {
setResultException(new NullPointerException("Both input and output Uri must be specified"));
finish();
}
// 设置裁剪宽高比
if (intent.getBooleanExtra(UCrop.EXTRA_ASPECT_RATIO_SET, false)) {
float aspectRatioX = intent.getFloatExtra(UCrop.EXTRA_ASPECT_RATIO_X, 0);
float aspectRatioY = intent.getFloatExtra(UCrop.EXTRA_ASPECT_RATIO_Y, 0);
if (aspectRatioX > 0 && aspectRatioY > 0) {
mGestureCropImageView.setTargetAspectRatio(aspectRatioX / aspectRatioY);
} else {
mGestureCropImageView.setTargetAspectRatio(CropImageView.SOURCE_IMAGE_ASPECT_RATIO);
}
}
// 设置裁剪的最大宽高
if (intent.getBooleanExtra(UCrop.EXTRA_MAX_SIZE_SET, false)) {
int maxSizeX = intent.getIntExtra(UCrop.EXTRA_MAX_SIZE_X, 0);
int maxSizeY = intent.getIntExtra(UCrop.EXTRA_MAX_SIZE_Y, 0);
if (maxSizeX > 0 && maxSizeY > 0) {
mGestureCropImageView.setMaxResultImageSizeX(maxSizeX);
mGestureCropImageView.setMaxResultImageSizeY(maxSizeY);
} else {
Log.w(TAG, "EXTRA_MAX_SIZE_X and EXTRA_MAX_SIZE_Y must be greater than 0");
}
}
}
private void cropAndSaveImage() {
	OutputStream outputStream = null;
	try {
		final Bitmap croppedBitmap = mGestureCropImageView.cropImage();
		if (croppedBitmap != null) {
			outputStream = getContentResolver().openOutputStream(mOutputUri);
			croppedBitmap.compress(Bitmap.CompressFormat.JPEG, 85, outputStream);
			croppedBitmap.recycle();

			setResultUri(mOutputUri, mGestureCropImageView.getTargetAspectRatio());
			finish();
		} else {
			setResultException(new NullPointerException("CropImageView.cropImage() returned null."));
		}
	} catch (Exception e) {
		setResultException(e);
		finish();
	} finally {
		BitmapLoadUtils.close(outputStream);
	}
}
PictureSelectFragment处理裁剪成功的返回值
/**
 * 处理剪切成功的返回值
 *
 * @param result
 */
private void handleCropResult(Intent result) {
    deleteTempPhotoFile();
    final Uri resultUri = UCrop.getOutput(result);
    if (null != resultUri && null != mOnPictureSelectedListener) {
        Bitmap bitmap = null;
        try {
            bitmap = MediaStore.Images.Media.getBitmap(mActivity.getContentResolver(), resultUri);
        } catch (FileNotFoundException e) {
            e.printStackTrace();
        } catch (IOException e) {
            e.printStackTrace();
        }
        mOnPictureSelectedListener.onPictureSelected(resultUri, bitmap);
    } else {
        Toast.makeText(mContext, "无法剪切选择图片", Toast.LENGTH_SHORT).show();
    }
}
处理裁剪失败的返回值
/**
 * 处理剪切失败的返回值
 *
 * @param result
 */
private void handleCropError(Intent result) {
    deleteTempPhotoFile();
    final Throwable cropError = UCrop.getError(result);
    if (cropError != null) {
        Log.e(TAG, "handleCropError: ", cropError);
        Toast.makeText(mContext, cropError.getMessage(), Toast.LENGTH_LONG).show();
    } else {
        Toast.makeText(mContext, "无法剪切选择图片", Toast.LENGTH_SHORT).show();
    }
}/**
* 图片选择的回调接口
*/
public interface OnPictureSelectedListener {
/**
* 图片选择的监听回调
*
* @param fileUri
* @param bitmap
*/
void onPictureSelected(Uri fileUri, Bitmap bitmap);
}
// 设置图片点击监听
mPictureIv.setOnClickListener(new View.OnClickListener() {
    @Override
    public void onClick(View v) {
        selectPicture();
    }
});
// 设置裁剪图片结果监听
setOnPictureSelectedListener(new OnPictureSelectedListener() {
@Override
public void onPictureSelected(Uri fileUri, Bitmap bitmap) {
mPictureIv.setImageBitmap(bitmap);
String filePath = fileUri.getEncodedPath();
String imagePath = Uri.decode(filePath);
Toast.makeText(mContext, "图片已经保存到:" + imagePath, Toast.LENGTH_LONG).show();
}
});
标签:
原文地址:http://blog.csdn.net/xuehuayous/article/details/51324656


