标签:
RecyclerView 已经推出了一年多了,日常开发中也已经彻底从 ListView 迁移到了 RecyclerView,但前两天有人在一个安卓群里面问了个关于最顶上的 item view 加蒙层的问题,被人用 ItemDecoration 完美解决。此时我发现自己对 RecyclerView 的使用一直太过基本,更深入更强大的功能完全没有涉及,像 ItemDecoration, ItemAnimator, SmoothScroller, OnItemTouchListener, LayoutManager 之类,以及 RecyclerView 重用 view 的原理。网上也有很多对 RecyclerView 使用的讲解博客,要么讲的内容非常少,要么提到了高级功能,但是并没讲代码为什么这样写,每个方法和参数的含义是什么,像张鸿洋的博客,也讲了 ItemDecoration 的使用,但是看了仍然云里雾里,只能把他的代码拿来用,并不能根据自己的需求编写自己的 ItemDecoration。
在这个系列中,我将对上述各个部分进行深入研究,目标就是看了这一系列的文章之后,开发者可以清楚快捷的根据自己的需求,编写自己需要的各个高级模块。本系列第一篇就聚焦在:RecyclerView.ItemDecoration。本文涉及到的完整代码可以在 Github 获取。
这个类包含三个方法 1:
onDraw(Canvas c, RecyclerView parent, State state)onDrawOver(Canvas c, RecyclerView parent, State state)getItemOffsets(Rect outRect, View view, RecyclerView parent, State state)官方样例的 DividerItemDecoration 里面是这样实现的:
|
1
2
3
4
5
|
if (mOrientation == VERTICAL_LIST) { outRect.set(0, 0, 0, mDivider.getIntrinsicHeight());} else { outRect.set(0, 0, mDivider.getIntrinsicWidth(), 0);} |
这个outRect设置的四个值是什么意思呢?先来看看它是在哪里调用的,它在RecyclerView中唯一被调用的地方就是 getItemDecorInsetsForChild(View child) 函数。
|
01
02
03
04
05
06
07
08
09
10
11
12
13
14
15
16
17
18
19
20
|
Rect getItemDecorInsetsForChild(View child) { final LayoutParams lp = (LayoutParams) child.getLayoutParams(); if (!lp.mInsetsDirty) { return lp.mDecorInsets; } final Rect insets = lp.mDecorInsets; insets.set(0, 0, 0, 0); final int decorCount = mItemDecorations.size(); for (int i = 0; i < decorCount; i++) { mTempRect.set(0, 0, 0, 0); mItemDecorations.get(i).getItemOffsets(mTempRect, child, this, mState); insets.left += mTempRect.left; insets.top += mTempRect.top; insets.right += mTempRect.right; insets.bottom += mTempRect.bottom; } lp.mInsetsDirty = false; return insets;} |
可以看到,getItemOffsets 函数中设置的值被加到了 insets 变量中,并被该函数返回,那么 insets 又是啥呢?
根据Inset Drawable文档,它的使用场景是:当一个view需要的背景小于它的边界时。例如按钮图标较小,但是我们希望按钮有较大的点击热区,一种做法是使用ImageButton,设置background="@null",把图标资源设置给src属性,这样ImageButton可以大于图标,而不会导致图标也跟着拉伸到ImageButton那么大。那么使用Inset drawable也能达到这样的目的。但是相比之下有什么优势呢?src属性也能设置selector drawable,所以点击态也不是问题。也许唯一的优势就是更“优雅”吧 :)
回到正题,getItemDecorInsetsForChild 函数中会重置 insets 的值,并重新计算,计算方式就是把所有 ItemDecoration 的 getItemOffsets 中设置的值累加起来 2,而这个 insets 实际上是 RecyclerView 的 child 的 LayoutParams 中的一个属性,它会在 getTopDecorationHeight,getBottomDecorationHeight 等函数中被返回,那么这个 insets 的意义就很明显了,它记录的是所有 ItemDecoration 所需要的 3尺寸的总和。
而在 RecyclerView 的 measureChild(View child, int widthUsed, int heightUsed) 函数中,调用了 getItemDecorInsetsForChild,并把它算在了 child view 的 padding 中。
|
01
02
03
04
05
06
07
08
09
10
11
12
13
14
15
16
|
public void measureChild(View child, int widthUsed, int heightUsed) { final LayoutParams lp = (LayoutParams) child.getLayoutParams(); final Rect insets = mRecyclerView.getItemDecorInsetsForChild(child); widthUsed += insets.left + insets.right; heightUsed += insets.top + insets.bottom; final int widthSpec = getChildMeasureSpec(getWidth(), getWidthMode(), getPaddingLeft() + getPaddingRight() + widthUsed, lp.width, canScrollHorizontally()); final int heightSpec = getChildMeasureSpec(getHeight(), getHeightMode(), getPaddingTop() + getPaddingBottom() + heightUsed, lp.height, canScrollVertically()); if (shouldMeasureChild(child, widthSpec, heightSpec, lp)) { child.measure(widthSpec, heightSpec); }} |
上面这段代码中调用 getChildMeasureSpec 函数的第三个参数就是 child view 的 padding,而这个参数就把 insets 的值算进去了。那么现在就可以确认了,getItemOffsets 中为 outRect 设置的4个方向的值,将被计算进所有 decoration 的尺寸中,而这个尺寸,被计入了 RecyclerView 每个 item view 的 padding 中。
这一步测试主要是对 getItemOffsets 函数传入的 outRect 参数各个值的设置,以证实上述分析的结论。
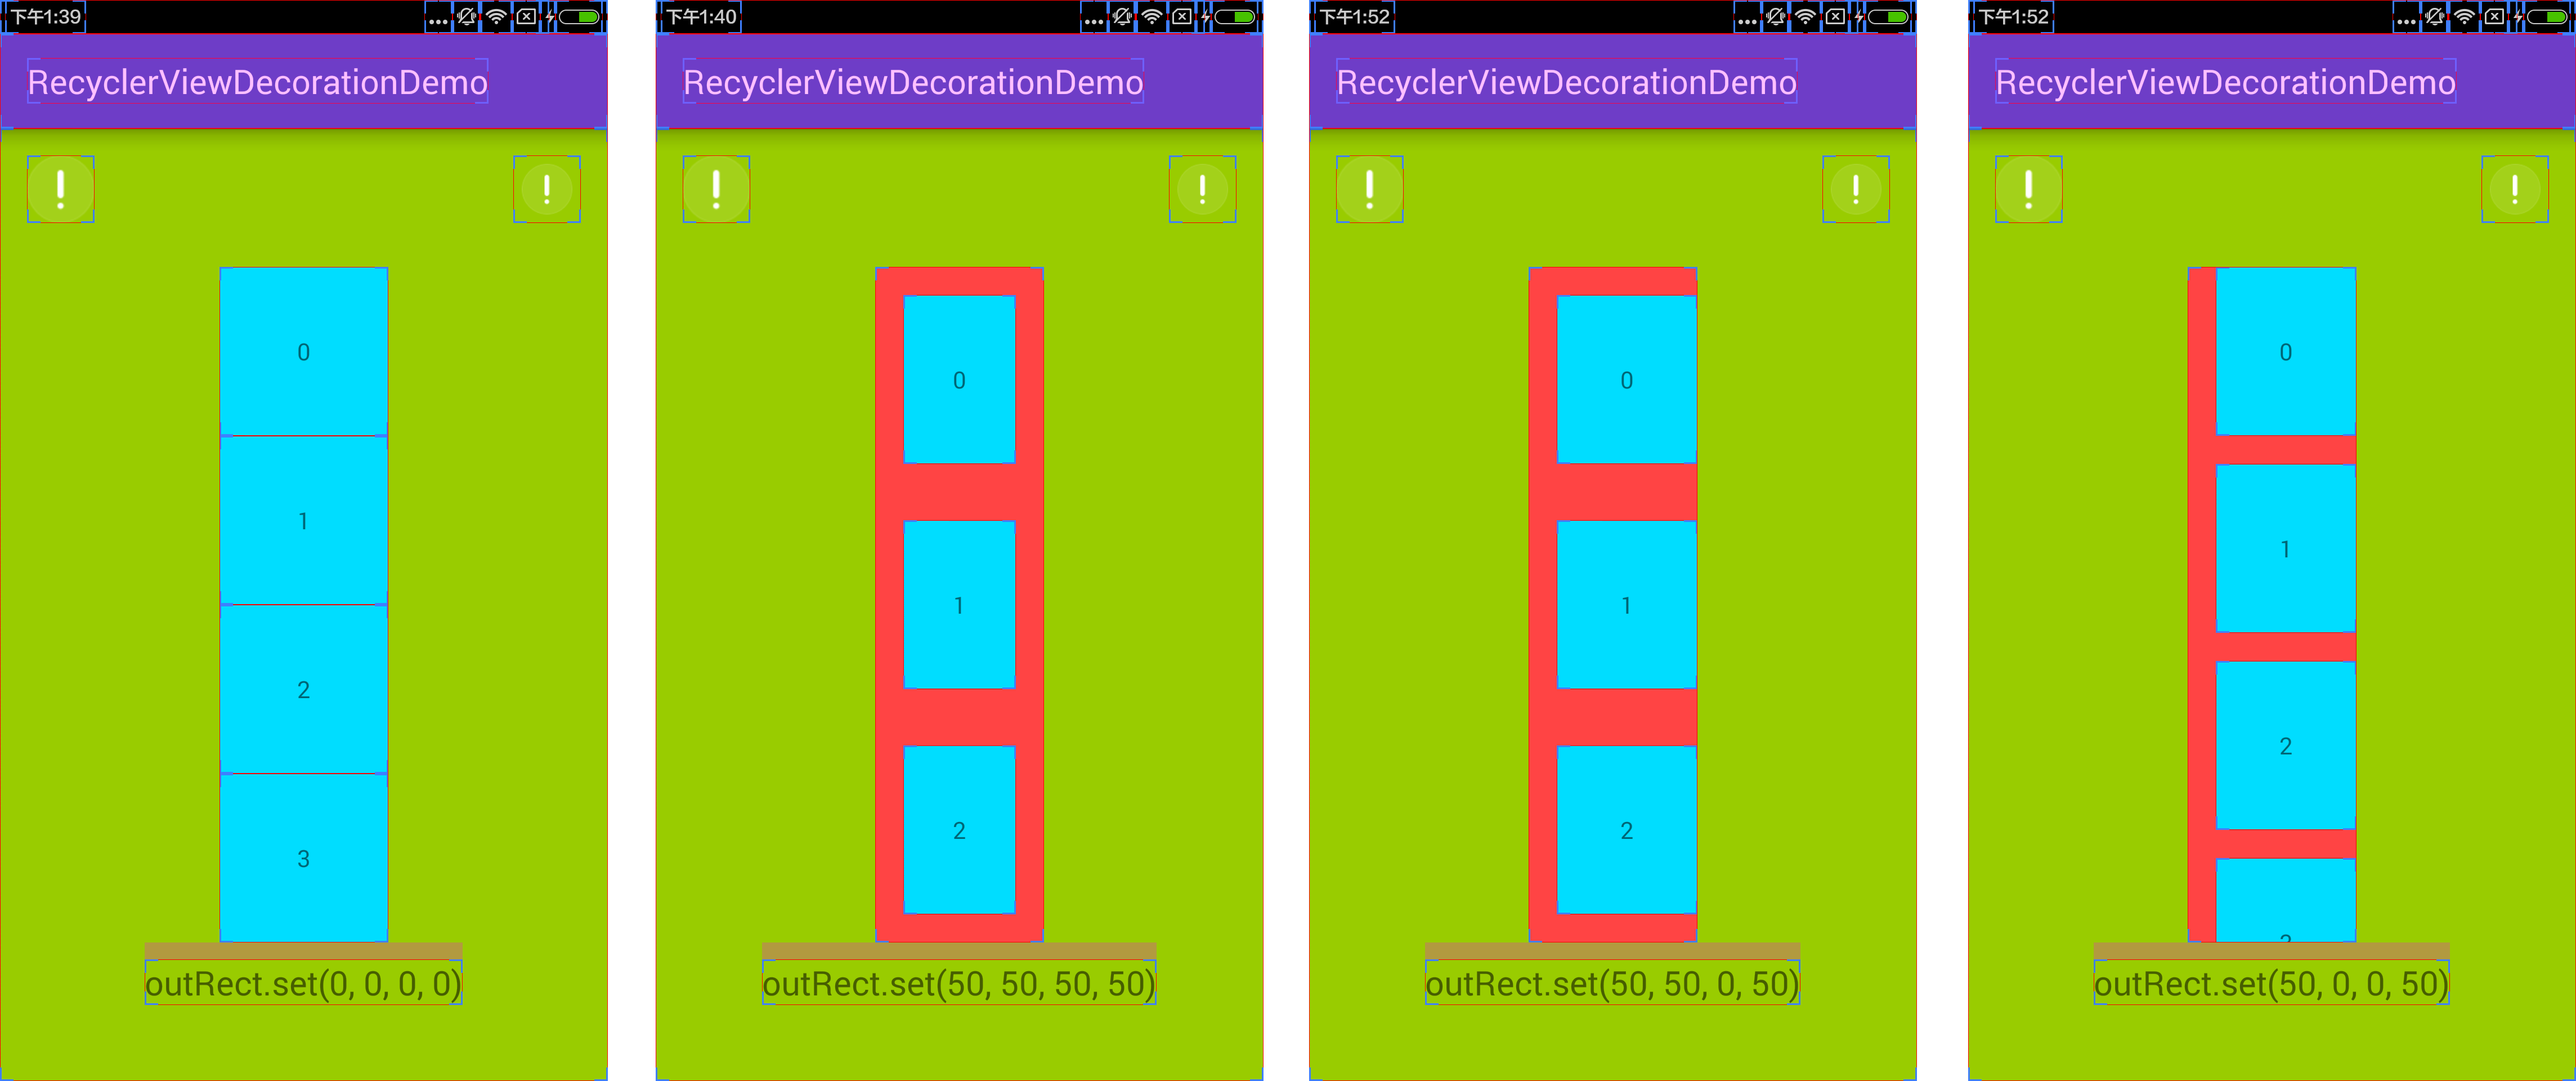
可以看到,当 left, top, right, bottom 全部设置为50时,RecyclerView 的每个 item view 各个方向的 padding 都增加了,对比各种情况,确实 getItemOffsets 中为 outRect 设置的值都将被计入 RecyclerView 每个 item view 的 padding 中。
先来看看官方样例的 DividerItemDecoration 实现:
|
01
02
03
04
05
06
07
08
09
10
11
12
13
14
15
|
public void drawVertical(Canvas c, RecyclerView parent) { final int left = parent.getPaddingLeft(); final int right = parent.getWidth() - parent.getPaddingRight(); final int childCount = parent.getChildCount(); for (int i = 0; i < childCount; i++) { final View child = parent.getChildAt(i); final RecyclerView.LayoutParams params = (RecyclerView.LayoutParams) child .getLayoutParams(); final int top = child.getBottom() + params.bottomMargin + Math.round(ViewCompat.getTranslationY(child)); final int bottom = top + mDivider.getIntrinsicHeight(); mDivider.setBounds(left, top, right, bottom); mDivider.draw(c); }} |
drawVertical 是为纵向的 RecyclerView 绘制 divider,遍历每个 child view 4 ,把 divider 绘制到 canvas 上,而 mDivider.setBounds 则设置了 divider 的绘制范围。其中,left 设置为 parent.getPaddingLeft(),也就是左边是 parent 也就是 RecyclerView 的左边界加上 paddingLeft 之后的位置,而 right 则设置为了 RecyclerView 的右边界减去 paddingRight 之后的位置,那这里左右边界就是 RecyclerView 的内容区域 5了。top 设置为了 child 的 bottom 加上 marginBottom 再加上 translationY,这其实就是 child view 的下边界 6,bottom 就是 divider 绘制的下边界了,它就是简单地 top 加上 divider 的高度。
这一步测试主要是对 onDraw 函数中对 divider 的绘制边界的设置。
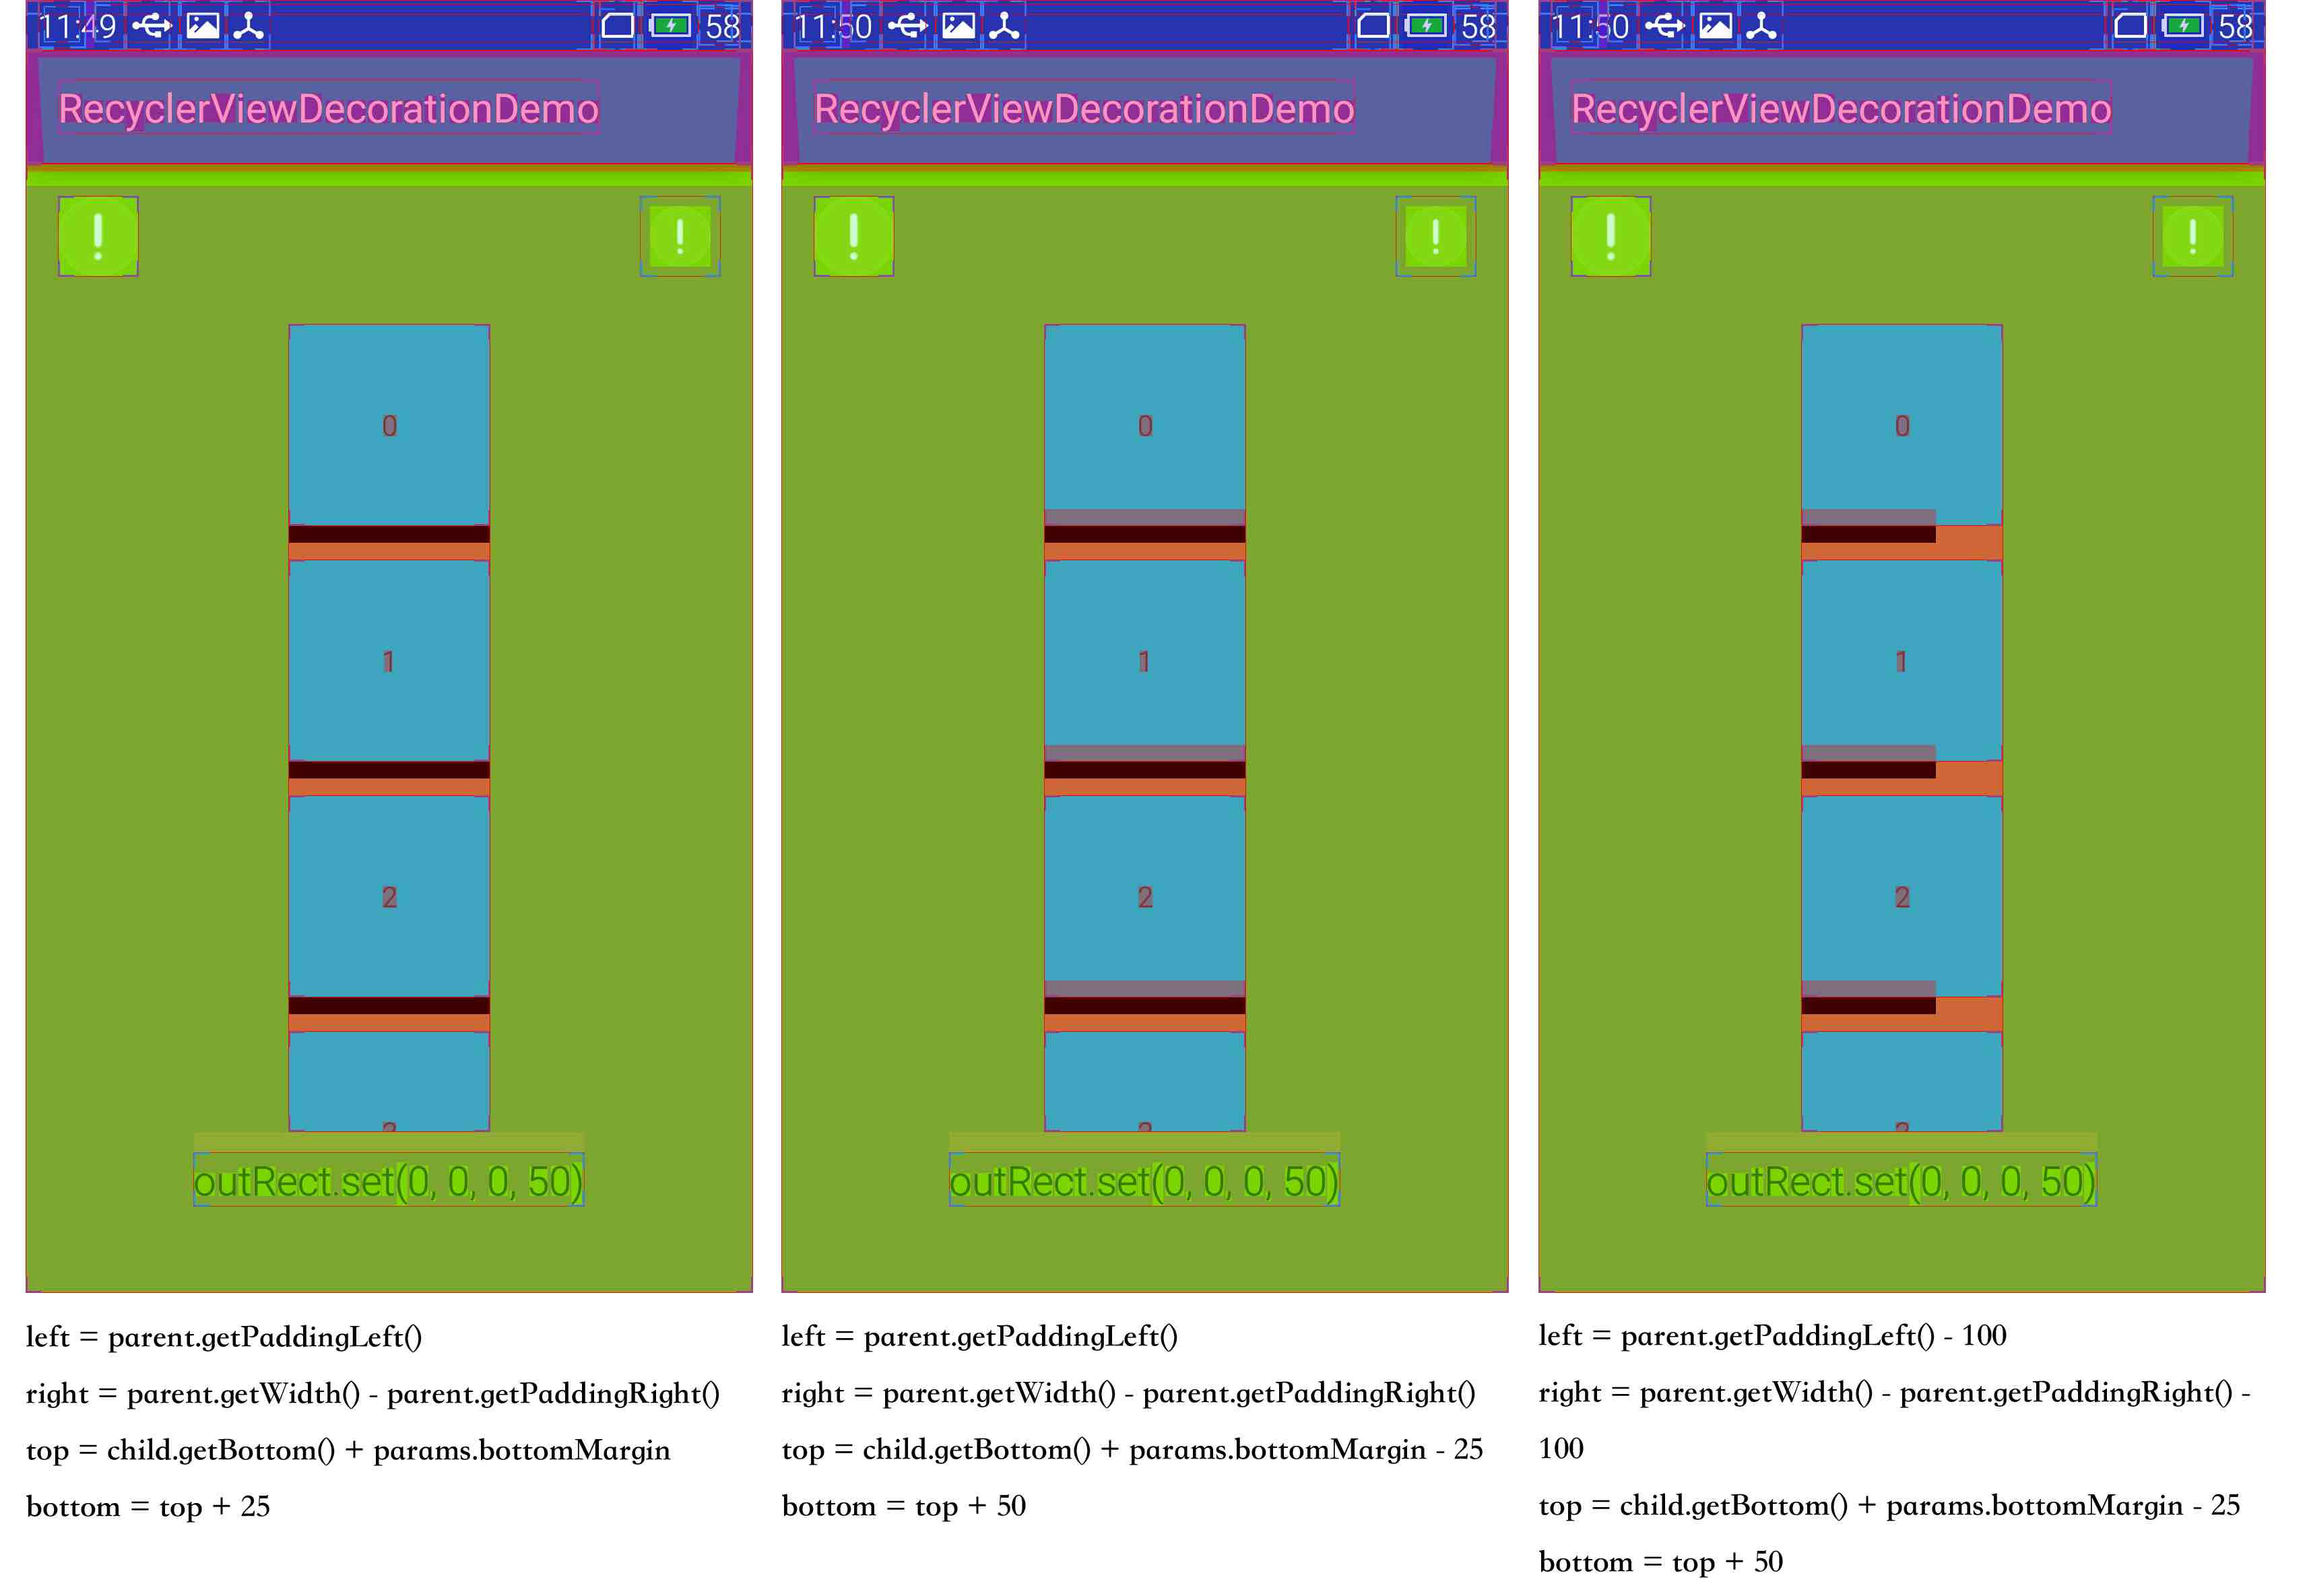
可以看到,当我们把 left, right, top 7 设置得和官方样例一样,bottom 设置为 top + 25,注意,这里 getItemOffsets 对 outSets 的设置只有 bottom = 50,也就是 decoration 高度为50,我们可以看到,decoration 的上半部分就绘制为黑色了,下半部分没有绘制。而如果设置top = child.getBottom() + params.bottomMargin - 25,bottom = top + 50,就会发现 child view 的底部出现了 overdraw。所以这里我们可以得出结论:在 onDraw 为 divider 设置绘制范围,并绘制到 canvas 上,而这个绘制范围可以超出在 getItemOffsets 中设置的范围,但由于 decoration 是绘制在 child view 的底下,所以并不可见,但是会存在 overdraw。
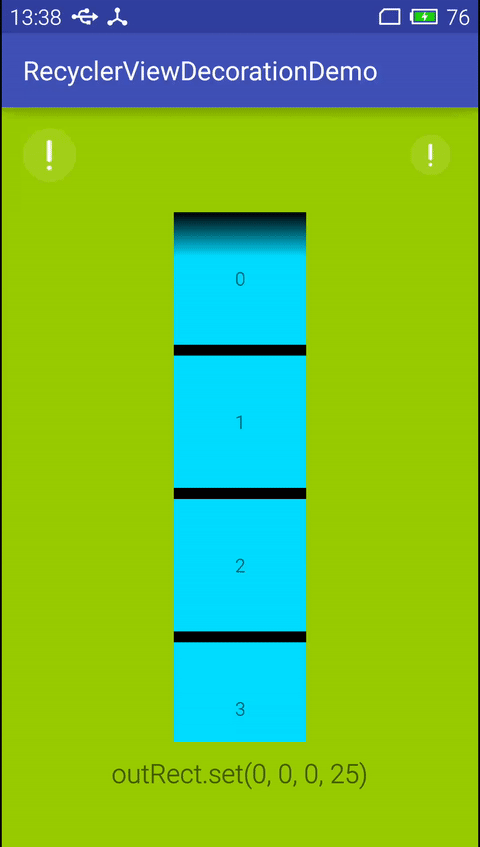
有一点需要注意:decoration 的 onDraw,child view 的 onDraw,decoration 的 onDrawOver,这三者是依次发生的。而由于 onDrawOver 是绘制在最上层的,所以它的绘制位置并不受限制(当然,decoration 的 onDraw 绘制范围也不受限制,只不过不可见),所以利用 onDrawOver 可以做很多事情,例如为 RecyclerView 整体顶部绘制一个蒙层,或者为特定的 item view 绘制蒙层。这里就不单独进行测试了,请见下一节的整体效果。
实现的效果:除了最后一个 item view,底部都有一个高度为25的黑色 divider,为整个 RecyclerView 的顶部绘制了一个渐变的蒙层。效果图如下:
不算被 Deprecated 的方法
把 left, top, right, bottom 4个属性分别累加
也就是在 getItemOffsets 函数中为 outRect 参数设置的4个属性值
child view,并不是 adapter 的每一个 item,只有可见的 item 才会绘制,才是 RecyclerView 的 child view
可以类比 CSS 的盒子模型,一个 view 包括 content, padding, margin 三个部分,content 和 padding 加起来就是 view 的尺寸,而 margin 不会增加 view 的尺寸,但是会影响和其他 view 的位置间距,但是安卓的 view 没有 margin 的合并
bottom 就是 content 的下边界加上 paddingBottom,而为了不“吃掉” child view 的底部边距,所以就加上 marginBottom,而 view 还能设置 translation 属性,用于 layout 完成之后的再次偏移,同理,为了不“吃掉”这个偏移,所以也要加上 translationY
这里由于并没有对 child view 设置 translation,为了代码简短,就没有减去 translationY,实际上是需要的
继续深入理解:深入理解 RecyclerView 系列之二:ItemAnimator
深入理解 RecyclerView 系列之一:ItemDecoration
标签:
原文地址:http://www.cnblogs.com/apkbus/p/5506301.html