标签:android style blog http color java os strong
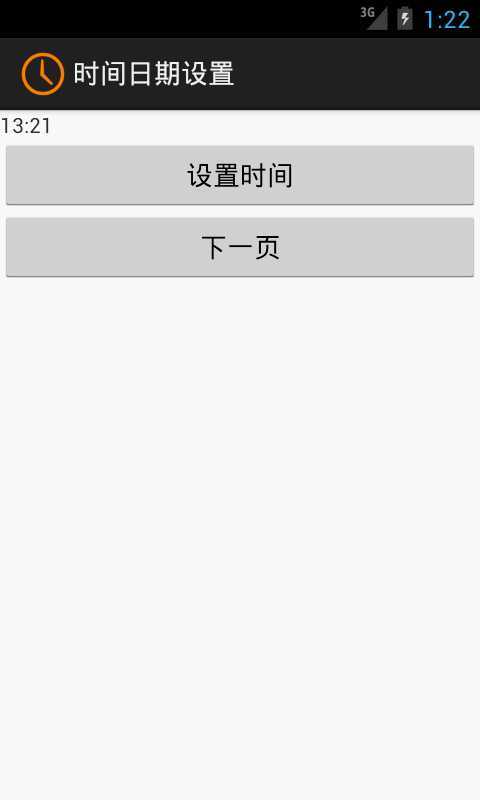
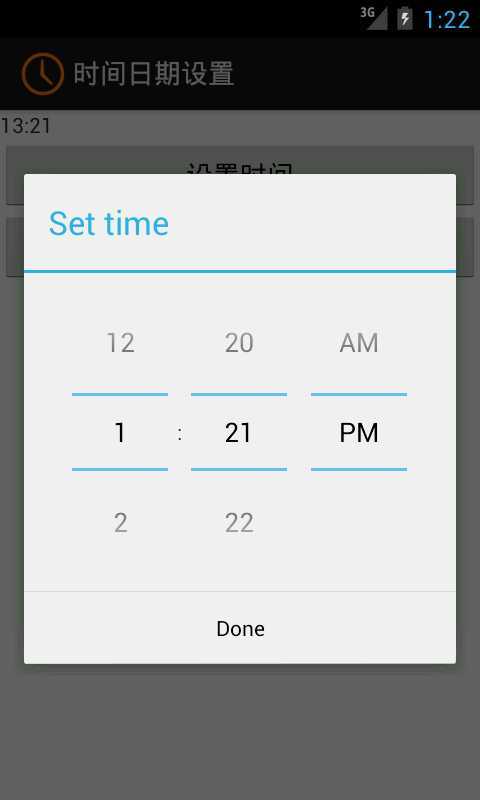
对于手机的时间日期设置估计大家一定都不陌生吧,今天做了一个关于时间日期设置的小例子,其中遇到一个问题,求指导,如何使设置的时间日期和手机系统同步?还望高手指点一二。
先不说这个了,分享一下我的小例子,看对你是否有帮助。
首先是时间设置:
.java文件(MainActivity.java):
package com.example.activity_time_date;

import java.util.Calendar;

import android.app.Activity;
import android.app.Dialog;
import android.app.TimePickerDialog;
import android.content.Intent;
import android.os.Bundle;
import android.view.Menu;
import android.view.MenuItem;
import android.view.View;
import android.view.View.OnClickListener;
import android.widget.Button;
import android.widget.TextView;
import android.widget.TimePicker;

public class MainActivity extends Activity {

	private TextView mytext = null;
	private Button mybutton1 = null;
	private Button mybutton2 = null;

	private int mHour;
	private int mMinute;

	static final int TIME_DIALOG_ID = 0;

	private TimePickerDialog.OnTimeSetListener mTimeSetListener = new TimePickerDialog.OnTimeSetListener() {

		@Override
		public void onTimeSet(TimePicker view, int hourOfDay, int minute) {
			// TODO Auto-generated method stub

			mHour = hourOfDay;
			mMinute = minute;

			updateDisplay();

		}
	};

	@Override
	protected void onCreate(Bundle savedInstanceState) {
		super.onCreate(savedInstanceState);
		setContentView(R.layout.activity_main);

		mytext = (TextView)findViewById(R.id.textview);
		mybutton1 = (Button)findViewById(R.id.button1);
		mybutton2 = (Button)findViewById(R.id.button2);

		mybutton1.setOnClickListener(new OnClickListener() {

			@Override
			public void onClick(View v) {
				// TODO Auto-generated method stub
				showDialog(TIME_DIALOG_ID);
			}
		});

		mybutton2.setOnClickListener(new OnClickListener() {

			@Override
			public void onClick(View v) {
				// TODO Auto-generated method stub
				MainActivity.this.startActivity(new Intent(MainActivity.this, dateActivity.class));
			}
		});

		final Calendar cal = Calendar.getInstance();
		mHour = cal.get(Calendar.HOUR_OF_DAY);
		mMinute = cal.get(Calendar.MINUTE);

		updateDisplay();
	}

	private void updateDisplay(){
		mytext.setText(new StringBuilder().append(pad(mHour)).append(":")
				.append(pad(mMinute)));
	}
	private static String pad(int i){
		if (i >= 10)
			return String.valueOf(i);
		else
			return "0" + String.valueOf(i);
	}

	@Override
	protected Dialog onCreateDialog(int id) {
		switch (id) {
		case TIME_DIALOG_ID:
			return new TimePickerDialog(this, mTimeSetListener, mHour, mMinute,
					false);
		}
		return null;
	}

}
布局文件(activity_main.xml):
<RelativeLayout xmlns:android="http://schemas.android.com/apk/res/android"
    xmlns:tools="http://schemas.android.com/tools"
    android:layout_width="match_parent"
    android:layout_height="match_parent"
    tools:context="${relativePackage}.${activityClass}" >
<LinearLayout
     android:layout_width="fill_parent"
     android:layout_height="fill_parent"
     android:orientation="vertical"
    >
    <TextView
        android:id="@+id/textview"
        android:layout_width="wrap_content"
        android:layout_height="wrap_content"
        />
	<Button
	    android:id="@+id/button1"
        android:layout_width="fill_parent"
        android:layout_height="wrap_content"
        android:text="设置时间"
	    />
	<Button
	    android:id="@+id/button2"
        android:layout_width="fill_parent"
        android:layout_height="wrap_content"
        android:text="下一页"
	    />
</LinearLayout>
</RelativeLayout>
日期设置和时间设置基本一致;在此不再赘述,如需源代码请留言联系。
标签:android style blog http color java os strong
原文地址:http://www.cnblogs.com/AndroidJotting/p/3888908.html