标签:
前言:
先介绍一下nginx:
Nginx是一款轻量级的Web 服务器/反向代理服务器及电子邮件(IMAP/POP3)代理服务器,并在一个BSD-like 协议下发行。其特点是占有内存少,并发能力强,事实上nginx的并发能力确实在同类型的网页服务器中表现较好。
下面介绍具体的安装细节:
1、在安装nginx之前要安装好依赖和软件工具包:(如果系统存在工具包可忽略此步骤,可在命令行下输入命令测试命令是否可用)
(1)安装make:
# yum -y install gcc automake autoconf libtool make
(2)安装g++:
# yum install gcc gcc-c++
其他的比如tar等命令工具包没有的自行下载安装。
2、安装开发组和所依赖的软件包(开发工具、服务器平台开发)
# yum groupinstall -y "Development Tools" "Server Platform Development"
# yum install -y openssl-devel pcre-devel
3、开始安装nginx:
首先添加用户nginx,实现以之运行nginx服务进程:
# groupadd -r nginx
# useradd -r -g nginx nginx
然后使用wget从网上直接下载nginx压缩包:
# yum install wget
# wget http://nginx.org/download/nginx-1.4.7.tar.gz
解压后,进行编译:先进入目录下
# tar xf nginx-1.4.7.tar.gz
# cd nginx-1.4.7
接着开始编译和安装:
# ./configure --prefix=/usr --sbin-path=/usr/sbin/nginx --conf-path=/etc/nginx/nginx.conf --error-log-path=/var/log/nginx/error.log --http-log-path=/var/log/nginx/access.log --pid-path=/var/run/nginx/nginx.pid --lock-path=/var/lock/nginx.lock --user=nginx --group=nginx --with-http_ssl_module --with-http_flv_module --with-http_stub_status_module --with-http_gzip_static_module --http-client-body-temp-path=/var/tmp/nginx/client/ --http-proxy-temp-path=/var/tmp/nginx/proxy/ --http-fastcgi-temp-path=/var/tmp/nginx/fcgi/ --http-uwsgi-temp-path=/var/tmp/nginx/uwsgi --http-scgi-temp-path=/var/tmp/nginx/scgi --with-pcre
然后:
# make && make install
4、为nginx提供SysV init脚本
新建文件/etc/rc.d/init.d/nginx,内容如下:

#!/bin/sh
#
# nginx - this script starts and stops the nginx daemon
#
# chkconfig:   - 85 15
# description:  Nginx is an HTTP(S) server, HTTP(S) reverse #               proxy and IMAP/POP3 proxy server
# processname: nginx
# config:      /etc/nginx/nginx.conf
# config:      /etc/sysconfig/nginx
# pidfile:     /var/run/nginx.pid

# Source function library.
. /etc/rc.d/init.d/functions

# Source networking configuration.
. /etc/sysconfig/network

# Check that networking is up.
[ "$NETWORKING" = "no" ] && exit 0

nginx="/usr/sbin/nginx"
prog=$(basename $nginx)

NGINX_CONF_FILE="/etc/nginx/nginx.conf"

[ -f /etc/sysconfig/nginx ] && . /etc/sysconfig/nginx

lockfile=/var/lock/subsys/nginx

make_dirs() {
   # make required directories
   user=`nginx -V 2>&1 | grep "configure arguments:" | sed ‘s/[^*]*--user=
[]∗
.*/\1/g‘ -`
   options=`$nginx -V 2>&1 | grep ‘configure arguments:‘`
   for opt in $options; do
       if [ `echo $opt | grep ‘.*-temp-path‘` ]; then
           value=`echo $opt | cut -d "=" -f 2`
           if [ ! -d "$value" ]; then
               # echo "creating" $value
               mkdir -p $value && chown -R $user $value
           fi
       fi
   done
}

start() {
    [ -x $nginx ] || exit 5
    [ -f $NGINX_CONF_FILE ] || exit 6
    make_dirs
    echo -n $"Starting $prog: "
    daemon $nginx -c $NGINX_CONF_FILE
    retval=$?
    echo
    [ $retval -eq 0 ] && touch $lockfile
    return $retval
}

stop() {
    echo -n $"Stopping $prog: "
    killproc $prog -QUIT
    retval=$?
    echo
    [ $retval -eq 0 ] && rm -f $lockfile
    return $retval
}

restart() {
    configtest || return $?
    stop
    sleep 1
    start
}

reload() {
    configtest || return $?
    echo -n $"Reloading $prog: "
    killproc $nginx -HUP
    RETVAL=$?
    echo
}

force_reload() {
    restart
}

configtest() {
  $nginx -t -c $NGINX_CONF_FILE
}

rh_status() {
    status $prog
}

rh_status_q() {
    rh_status >/dev/null 2>&1
}

case "$1" in
    start)
        rh_status_q && exit 0
        $1
        ;;
    stop)
        rh_status_q || exit 0
        $1
        ;;
    restart|configtest)
        $1
        ;;
    reload)
        rh_status_q || exit 7
        $1
        ;;
    force-reload)
        force_reload
        ;;
    status)
        rh_status
        ;;
    condrestart|try-restart)
        rh_status_q || exit 0
            ;;
    *)
       echo $"Usage: $0 {start|stop|status|restart|condrestart|try-restart|reload|force-reload|configtest}"
        exit 2
esac
而后为此脚本赋予执行权限:
# chmod +x /etc/rc.d/init.d/nginx
添加至服务管理列表,并让其开机自动启动:
# chkconfig --add nginx
# chkconfig nginx on
5、加入环境变量并测试
# yum install vim
# vim /etc/profile.d/nginx.sh
export PATH=/usr/local/nginx/sbin/:$PATH
然后启动服务并测试:
# service nginx start
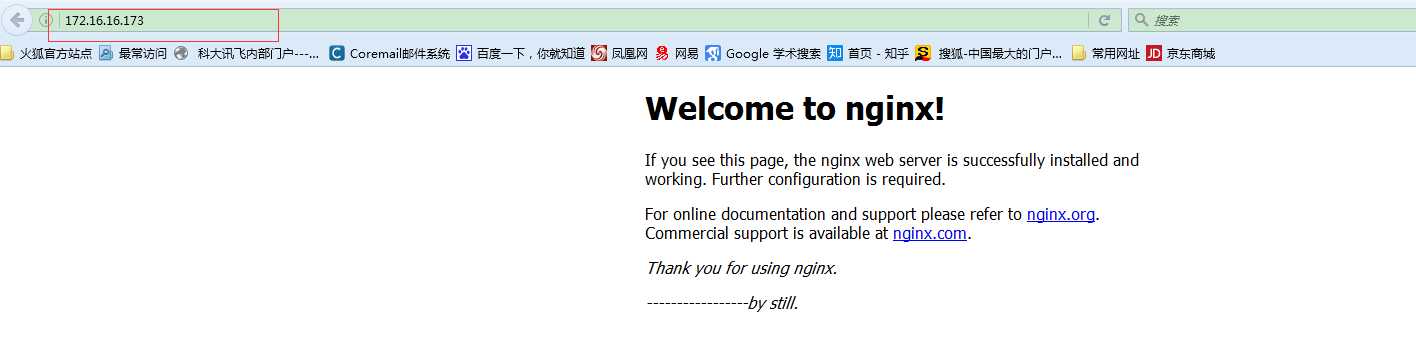
在网站输入服务器IP地址:http://172.16.16.173/
6、将php配置进人nginx中:
首先配置nginx的nginx.conf文件:
在终端下输入: # find / -name nginx.conf
找到nginx.conf的配置文件,利用vim进入修改:(如果没有vim的话 yum install vim进行下载安装)

然后在server里面加入如下内容:
location ~ \.php$ {
              root         /usr/html;
              fastcgi_pass   127.0.0.1:9000;
              fastcgi_index  index.php;
              fastcgi_param  SCRIPT_FILENAME  $document_root$fastcgi_script_name;
              include        fastcgi_params;
          }
黄色部分为web的存放的目录,在浏览器里可直接访问的。
还要注意的是:编译php时必须确保系统中拥有libxml2与libxml2-dev这俩个软件包,因为php默认会将xml的功能编译进去,所以xml的支持是必不可少的。
所以使用: # yum install libxml2
# yum install libxml2-dev 下载安装好依赖包。
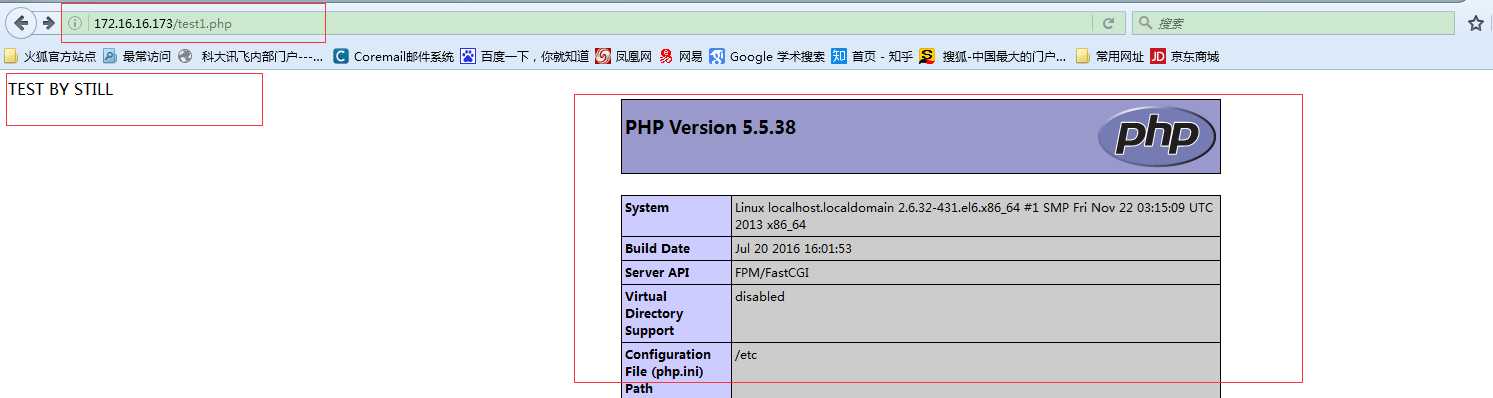
然后进入/usr/html的目录下,vim test1.php,进行编辑:
<?php
    echo "TEST BY STILL";
    phpinfo();
?>
重新启动nginx服务:
# service nginx restart
然后在浏览器里查看结果:
标签:
原文地址:http://www.cnblogs.com/ygh1229/p/5750229.html
