标签:
二三四五还没写,先写六吧(有道友说想看看插件部分)。
这里是一 从零开始编写属于我的CMS:(一)前言
新建类库,WangCms.PluginInterface

新建两个类,一个实体Models.cs,一个接口IPlugin.cs
Models是插件所用到的实体集合类;IPlugin是为第三方预定义接口,所有插件必须实现该接口。
实体Models代码如下
 1 namespace WangCms.PluginInterface
 2 {
 3     public class PluginInfo
 4     {
 5         /// <summary>
 6         /// Code
 7         /// </summary>
 8         public string Code { get; set; }
 9         /// <summary>
10         /// 插件名称
11         /// </summary>
12         public string Name { get; set; }
13         /// <summary>
14         /// 作者
15         /// </summary>
16         public string Author { get; set; }
17         /// <summary>
18         /// 插件版本
19         /// </summary>
20         public string Version { get; set; }
21         /// <summary>
22         /// 适用cms版本
23         /// </summary>
24         public string ApplyVersion { get; set; }
25         /// <summary>
26         /// 描述信息
27         /// </summary>
28         public string Description { get; set; }
29
30
31         //附加信息
32         public string Area { get; set; }
33         public string AdminController { get; set; }
34         public string AdminAction { get; set; }
35         public string AdminQueryString { get; set; }
36     }
37     public class ResultOptin<T>
38     {
39         public bool State { get; set; }
40         public string Msg { get; set; }
41
42         public T Result { get; set; }
43     }
44 }
接口IPlufin代码如下
 1 namespace WangCms.PluginInterface
 2 {
 3     public interface IPlugin
 4     {
 5         /// <summary>
 6         /// 插件注册
 7         /// </summary>
 8         /// <returns></returns>
 9         ResultOptin<PluginInfo> Register();
10         /// <summary>
11         /// 插件安装
12         /// </summary>
13         /// <param name="model"></param>
14         /// <returns></returns>
15         ResultOptin<string> Install();
16         /// <summary>
17         /// 插件卸载
18         /// </summary>
19         /// <returns></returns>
20         ResultOptin<string> Uninstall();
21     }
22 }
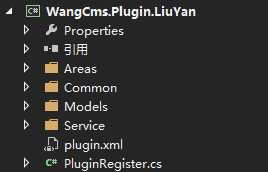
新建一个插件项目(类库),WangCms.Plugin.LiuYan
然后添加相关引用(MVC、WangCms.PluginInterface)等。
首先实现插件接口,新建PluginRegister.cs继承IPlugin,主要为了实现插件的注册、安装以及卸载功能的实现。
PluginRegister代码如下
 1 namespace WangCms.Plugin.LiuYan
 2 {
 3     public class PluginRegister : IPlugin
 4     {
 5         #region 实现接口
 6         public ResultOptin<PluginInfo> Register()
 7         {
 8             ResultOptin<PluginInfo> result = new ResultOptin<PluginInfo>();
 9             try
10             {
11                 PluginInfo model = new PluginInfo();
12                 //后台管理入口
13                 model.Area = "LiuYan";
14                 model.AdminController = "LiuYanAdmin";
15                 model.AdminAction = "Index";
16                 model.AdminQueryString = null;
17
18                 //插件基本信息
19                 model.Code = "48a3619327c64a9aa68645007037b451";
20                 model.Name = "在线留言";
21                 model.Author = "千年";
22                 model.Version = "1.0.0";
23                 model.ApplyVersion = "1.0.0";
24                 model.Description = "";
25
26                 //状态  特别重要
27                 result.State = true;
28                 result.Result = model;
29             }
30             catch(Exception ex)
31             {
32                 result.State = false;
33                 result.Msg = ex.Message;
34             }
35             return result;
36         }
37
38         public ResultOptin<string> Install()
39         {
40             ResultOptin<string> result = new ResultOptin<string>();
41             try
42             {
43                 //安装插件
44                 //比如执行sql(创建表,插入数据等),创建目录,创建文件等
45                 string sql =
46     @"create table LiuYan(
47   Id varchar(50) primary key,
48   Title varchar(50),
49   Name varchar(50),
50   Contact varchar(50),
51   Content text
52 );";
53                 LiuYanService.Instance.Excute(sql);
54                 result.State = true;
55             }
56             catch(Exception ex)
57             {
58                 result.State = false;
59                 result.Msg = ex.Message;
60             }
61             return result;
62         }
63
64         public ResultOptin<string> Uninstall()
65         {
66             ResultOptin<string> result = new ResultOptin<string>();
67             try
68             {
69                 //卸载插件
70                 //比如执行sql(删除表,删除数据等),删除目录,删除文件等
71                 string sql = @"drop table LiuYan;";
72                 LiuYanService.Instance.Excute(sql);
73                 result.State = true;
74             }
75             catch(Exception ex)
76             {
77                 result.State = false;
78                 result.Msg = ex.Message;
79             }
80             return result;
81         }
82         #endregion
83     }
84 }
其实,只要实现了接口插件就算完成了,只是该插件还不具备任何实用功能,根据插件名字我想大家知道这个是干嘛的了吧,这就是在线留言的插件,下面就是很简单的留言业务逻辑以及功能的实现了。
插件区域,就是MVC的区域,我们用不同区域来区分和管理插件。
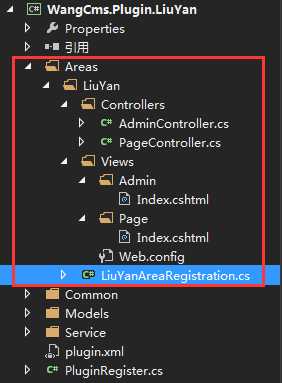
MVC区域,不熟悉的同学可以在园子里搜搜相关文章。
在区域里面可以建Controller和View,还有比较重要的就是区域注册,就是区域的路由吧。
LiuYanAreaRegistration.cs
 1 namespace WangCms.Plugin.LiuYan
 2 {
 3     public class LiuYanAreaRegistration : AreaRegistration
 4     {
 5         public override string AreaName
 6         {
 7             get
 8             {
 9                 return "LiuYan";
10             }
11         }
12
13         public override void RegisterArea(AreaRegistrationContext context)
14         {
15             context.MapRoute(
16                 "LiuYan_default",
17                 "LiuYan/{controller}/{action}/{id}",
18                 new { action = "Index", id = UrlParameter.Optional },
19                 new string[] { "WangCms.Plugin.LiuYan.Controllers" }
20             );
21         }
22     }
23 }
然后,就是功能实现了,这部分就略过吧。
在线留言后台管理,新建一个控制器AdminController.cs以及相应的视图。
在线留言前台功能,新建一个控制器PageController.cs以及相应的视图。
主项目如何使用插件呢?
首先将编译好的插件,上传至主项目下,结构如图。
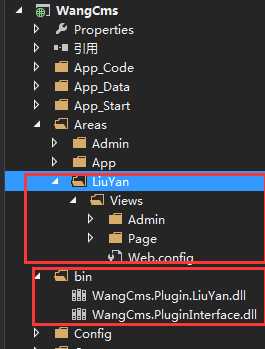
视图文件和插件时路径一致,WangCms.Plugin.LiuYan.dll上传至主项目bin下。
3.1 获取插件列表
 1 private List<Plugin> GetPluginList()
 2         {
 3             List<Plugin> list = new List<Plugin>();
 4             string path = Server.MapPath("/bin/");
 5             FileInfo[] files = (new DirectoryInfo(path)).GetFiles("*.dll");
 6             foreach (var item in files)
 7             {
 8                 try
 9                 {
10                     if (!item.Name.StartsWith("WangCms.Plugin.")) continue;
11                     Plugin model = new Plugin();
12                     Assembly ass = Assembly.LoadFile(item.FullName);
13                     Type tp = ass.GetType(item.Name.Replace(".dll", "") + "." + "PluginRegister");  //获取类名,必须 命名空间+类名
14                     Object obj = Activator.CreateInstance(tp);  //建立实例
15                     MethodInfo meth = tp.GetMethod("Register");  //获取方法
16                     object t = meth.Invoke(obj, null);  //Invoke调用方法
17
18                     PluginInterface.ResultOptin<PluginInterface.PluginInfo> result = (PluginInterface.ResultOptin<PluginInterface.PluginInfo>)t;
19                     if (result.State)//插件注册成功
20                     {
21                         ToPlugin(result.Result, ref model);
22                         model.Type = tp;
23                         list.Add(model);
24                     }
25                 }
26                 catch { }
27             }
28
29
30             return list;
31         }
这里有一个插件类转换的方法。

 1 private void ToPlugin(PluginInterface.PluginInfo t, ref Plugin p)
 2         {
 3             if (t != null)
 4             {
 5                 p.Code = t.Code;
 6                 p.Name = t.Name;
 7                 p.Author = t.Author;
 8                 p.Version = t.Version;
 9                 p.ApplyVersion = t.ApplyVersion;
10                 p.Description = t.Description;
11                 p.AdminController = t.AdminController;
12                 p.AdminAction = t.AdminAction;
13                 p.AdminQueryString = t.AdminQueryString;
14             }
15         }
3.2 安装插件
 1         public ActionResult plugin_install(string code)
 2         {
 3             var list = GetPluginList();
 4
 5             var o = list.FirstOrDefault(op => op.Code == code);
 6             if (o != null)
 7             {
 8                 //执行安装方法
 9                 Object obj = Activator.CreateInstance(o.Type);  //建立实例
10                 MethodInfo meth = o.Type.GetMethod("Install");  //获取方法
11                 object t = meth.Invoke(obj, null);  //Invoke调用方法
12
13                 PluginInterface.ResultOptin<string> result = (PluginInterface.ResultOptin<string>)t;
14                 if (result.State)
15                 {
16                     //记录数据
17                     PluginService.Instance.UpdateOrInsert(o);
18                 }
19                 else
20                 {
21                     return Content(result.Msg);
22                 }
23             }
24             return RedirectToAction("plugin_list");
25         }
3.3 卸载插件
 1        public ActionResult plugin_uninstall(string code)
 2         {
 3             var list = GetPluginList();
 4
 5             var o = list.FirstOrDefault(op => op.Code == code);
 6             if (o != null)
 7             {
 8                 //执行安装方法
 9                 Object obj = Activator.CreateInstance(o.Type);  //建立实例
10                 MethodInfo meth = o.Type.GetMethod("Uninstall");  //获取方法
11                 object t = meth.Invoke(obj, null);  //Invoke调用方法
12
13                 PluginInterface.ResultOptin<string> result = (PluginInterface.ResultOptin<string>)t;
14                 if (result.State)
15                 {
16                     //删除数据
17                     PluginService.Instance.DeleteByCode(o.Code);
18                 }
19                 else
20                 {
21                     return Content(result.Msg);
22                 }
23             }
24             return RedirectToAction("plugin_list");
25         }
插件源码下载
标签:
原文地址:http://www.cnblogs.com/deeround/p/5789026.html
