标签:
查看libvirtd的状态:
[root@super67 ~]# /etc/init.d/libvirtd status
libvirtd (pid 2503) is running...
安装vnc:
[root@super67 ~]# yum install -y tigervnc
[root@super67 ~]# yum install -y virt-viewer
查看虚拟机状态:
[root@super67 ~]# virsh list --all
Id Name State
----------------------------------------------------
- www.linux1.cn shut off
准备镜像文件:
[root@super67 ~]# ll /var/lib/libvirt/images/ubuntu-16.04-desktop-amd64.iso
创建磁盘:
[root@super67 ~]# mkdir /var/lib/libvirt/disk/ -p
[root@super67 ~]# qemu-img create -f raw /var/lib/libvirt/disk/unbuntu16.raw 10G
Formatting ‘/var/lib/libvirt/disk/unbuntu16.raw‘, fmt=raw size=10737418240
安装虚拟机:
[root@super67 ~]# virt-install --name ubuntu16 --ram 1024 --vcpu=1 --disk path=/var/lib/libvirt/disk/unbuntu16.raw --accelerate --cdrom=/var/lib/libvirt/images/ubuntu-16.04-desktop-amd64.iso --network bridge=br0 --graphics vnc
"""
--name=ubuntu16 #指定guest的名字
--ram=1024 #指定内存大小
--vcpus=1 #指定cpu个数
--disk path=/xx/xx.xx #指定磁盘
--accelerate #加速
--cdrom /xx/xx.iso 指定镜像
--network bridge=br0 #bridge=xx , network:name ,user
--graphics vnc
--location= #directory ,nfs:host:/path ,http://host/path ,ftp://host/path
"""
配置vnc:
[root@super67 ~]# grep -Ev "^$|^#" /etc/libvirt/qemu.conf
vnc_listen = "0.0.0.0"
[root@super67 ~]# /etc/init.d/libvirtd restart
Stopping libvirtd daemon: [ OK ]
Starting libvirtd daemon: [ OK ]
[root@super67 ~]# netstat -antup|grep 5900
tcp 0 0 0.0.0.0:5900 0.0.0.0:* LISTEN 18413/qemu-kvm
(如果vnc只是监听127.0.0.1那么其他机器是无法使用vnc客户端连接进来的)
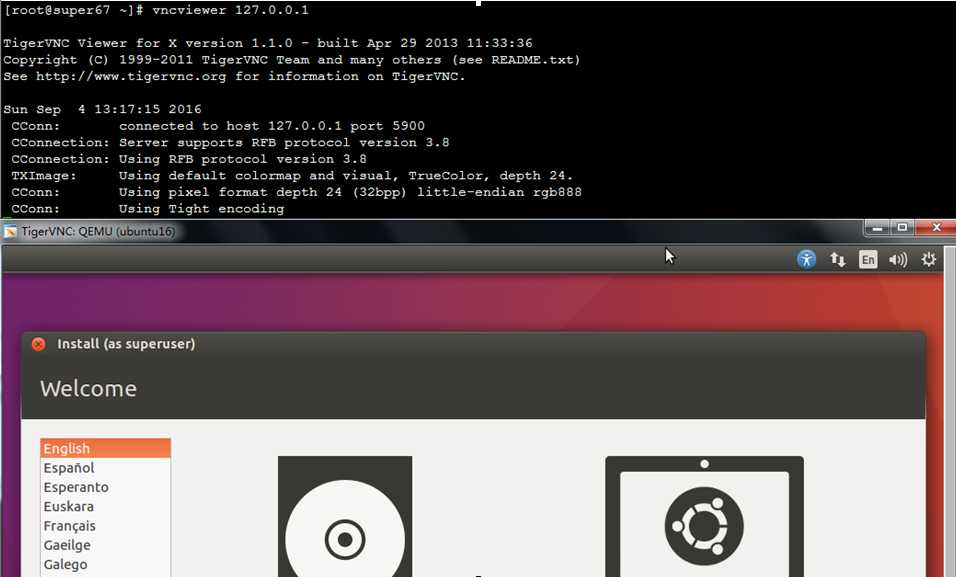
vnc远程连接:5900
[root@super67 ~]# vncviewer 127.0.0.1:5900
配置文件:
[root@super67 qemu]# pwd
/etc/libvirt/qemu
[root@super67 qemu]# ll
total 16
drwxr-xr-x 2 root root 4096 Sep 4 10:31 autostart #开机启动相关
drwx------ 3 root root 4096 Sep 4 09:46 networks #网络相关
-rw------- 1 root root 2290 Sep 4 13:13 ubuntu16.xml #虚拟机配置文件 .xml
-rw------- 1 root root 2574 Sep 4 10:32 www.linux1.cn.xml
虚拟机配置文件:
[root@super67 ~]# vim /etc/libvirt/qemu/ubuntu16.xml
<!--
WARNING: THIS IS AN AUTO-GENERATED FILE. CHANGES TO IT ARE LIKELY TO BE
OVERWRITTEN AND LOST. Changes to this xml configuration should be made using:
virsh edit ubuntu16
or other application using the libvirt API.
-->
<domain type=‘kvm‘>
<name>ubuntu16</name>
<uuid>729109f3-6bcc-2f44-b1d3-4f9f6bface83</uuid>
<memory unit=‘KiB‘>1048576</memory>
<currentMemory unit=‘KiB‘>1048576</currentMemory>
<vcpu placement=‘static‘>1</vcpu>
<os>
<type arch=‘x86_64‘ machine=‘rhel6.5.0‘>hvm</type>
<boot dev=‘hd‘/>
</os>
<features>
<acpi/>
<apic/>
<pae/>
</features>
<clock offset=‘utc‘/>
<on_poweroff>destroy</on_poweroff>
<on_reboot>restart</on_reboot>
<on_crash>restart</on_crash>
<devices>
<emulator>/usr/libexec/qemu-kvm</emulator>
<disk type=‘file‘ device=‘disk‘>
<driver name=‘qemu‘ type=‘raw‘ cache=‘none‘/>
<source file=‘/var/lib/libvirt/disk/unbuntu16.raw‘/>
<target dev=‘hda‘ bus=‘ide‘/>
<address type=‘drive‘ controller=‘0‘ bus=‘0‘ target=‘0‘ unit=‘0‘/>
</disk>
<disk type=‘block‘ device=‘cdrom‘>
<driver name=‘qemu‘ type=‘raw‘/>
<target dev=‘hdc‘ bus=‘ide‘/>
<readonly/>
<address type=‘drive‘ controller=‘0‘ bus=‘1‘ target=‘0‘ unit=‘0‘/>
</disk>
<controller type=‘usb‘ index=‘0‘>
<address type=‘pci‘ domain=‘0x0000‘ bus=‘0x00‘ slot=‘0x01‘ function=‘0x2‘/>
</controller>
<controller type=‘ide‘ index=‘0‘>
<address type=‘pci‘ domain=‘0x0000‘ bus=‘0x00‘ slot=‘0x01‘ function=‘0x1‘/>
</controller>
<interface type=‘bridge‘>
<mac address=‘52:54:00:b0:48:17‘/>
<source bridge=‘br0‘/>
<address type=‘pci‘ domain=‘0x0000‘ bus=‘0x00‘ slot=‘0x03‘ function=‘0x0‘/>
</interface>
<serial type=‘pty‘>
<target port=‘0‘/>
</serial>
<console type=‘pty‘>
<target type=‘serial‘ port=‘0‘/>
</console>
<input type=‘mouse‘ bus=‘ps2‘/>
<graphics type=‘vnc‘ port=‘-1‘ autoport=‘yes‘/>
<video>
<model type=‘cirrus‘ vram=‘9216‘ heads=‘1‘/>
<address type=‘pci‘ domain=‘0x0000‘ bus=‘0x00‘ slot=‘0x02‘ function=‘0x0‘/>
</video>
<memballoon model=‘virtio‘>
<address type=‘pci‘ domain=‘0x0000‘ bus=‘0x00‘ slot=‘0x04‘ function=‘0x0‘/>
</memballoon>
</devices>
</domain>
标签:
原文地址:http://www.cnblogs.com/fanxuanhui/p/5839186.html