标签:des style blog http color 使用 os io
问题一:如何创建一个控制器?
UIStoryboard *storyboard = [UIStoryboard storyboardWithName:@"Test" bundle:nil];
WHBViewController *vc = [storyboard instantiateInitialViewController];
WHBViewController *vc = [storyboard instantiateViewControllerWithIdentifier:@”vc"];
WHBViewController *vc = [[WHBViewController alloc] init];
WHBViewController *vc = [[WHBViewController alloc] initWithNibName:@"WHBViewController" bundle:nil];
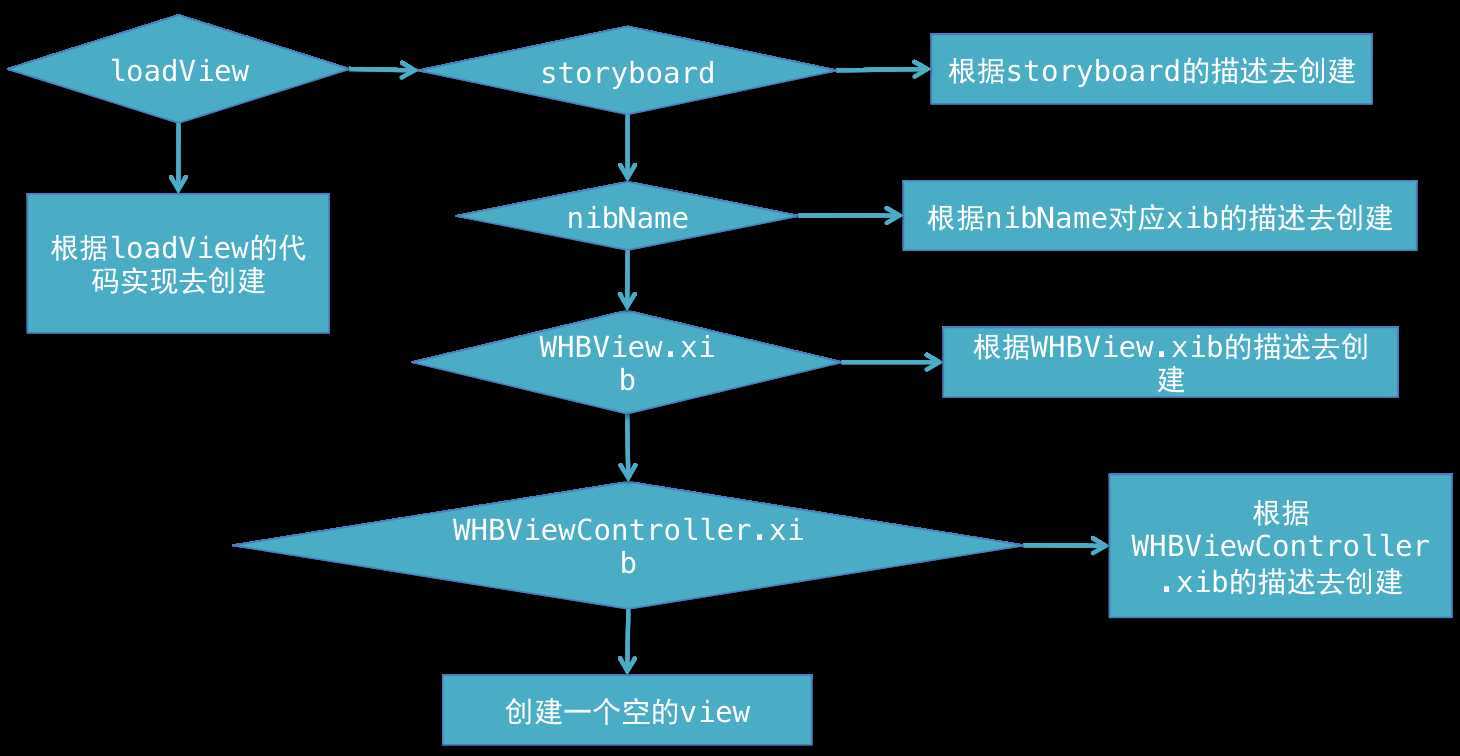
问题二:view的多种创建方式优先级?
ps:控制器view的延迟加载

@interface UIView : UIResponder<NSCoding, UIAppearance, UIAppearanceContainer, UIDynamicItem>

/**
 *  通过一个frame来初始化一个UI控件
 */
- (id)initWithFrame:(CGRect)frame;

// YES:能够跟用户进行交互
@property(nonatomic,getter=isUserInteractionEnabled) BOOL userInteractionEnabled;  // default is YES

// 控件的一个标记(父控件可以通过tag找到对应的子控件)
@property(nonatomic)                                 NSInteger tag;                // default is 0

// 图层(可以用来设置圆角效果\阴影效果)
@property(nonatomic,readonly,retain)                 CALayer  *layer;

@end

@interface UIView(UIViewGeometry)
// 位置和尺寸(以父控件的左上角为坐标原点(0, 0))
@property(nonatomic) CGRect            frame;

// 位置和尺寸(以自己的左上角为坐标原点(0, 0))
@property(nonatomic) CGRect            bounds;

// 中点(以父控件的左上角为坐标原点(0, 0))
@property(nonatomic) CGPoint           center;

// 形变属性(平移\缩放\旋转)
@property(nonatomic) CGAffineTransform transform;   // default is CGAffineTransformIdentity

// YES:支持多点触摸
@property(nonatomic,getter=isMultipleTouchEnabled) BOOL multipleTouchEnabled;   // default is NO
@end

@interface UIView(UIViewHierarchy)
// 父控件
@property(nonatomic,readonly) UIView       *superview;

// 子控件(新添加的控件默认都在subviews数组的后面, 新添加的控件默认都显示在最上面\最顶部)
@property(nonatomic,readonly,copy) NSArray *subviews;

// 获得当前控件所在的window
@property(nonatomic,readonly) UIWindow     *window;

// 从父控件中移除一个控件
- (void)removeFromSuperview;

// 添加一个子控件(可以将子控件插入到subviews数组中index这个位置)
- (void)insertSubview:(UIView *)view atIndex:(NSInteger)index;

// 交换subviews数组中所存放子控件的位置
- (void)exchangeSubviewAtIndex:(NSInteger)index1 withSubviewAtIndex:(NSInteger)index2;

// 添加一个子控件(新添加的控件默认都在subviews数组的后面, 新添加的控件默认都显示在最上面\最顶部)
- (void)addSubview:(UIView *)view;

// 添加一个子控件view(被挡在siblingSubview的下面)
- (void)insertSubview:(UIView *)view belowSubview:(UIView *)siblingSubview;

// 添加一个子控件view(盖在siblingSubview的上面)
- (void)insertSubview:(UIView *)view aboveSubview:(UIView *)siblingSubview;

// 将某个子控件拉到最上面(最顶部)来显示
- (void)bringSubviewToFront:(UIView *)view;

// 将某个子控件拉到最下面(最底部)来显示
- (void)sendSubviewToBack:(UIView *)view;

/**系统自动调用(留给子类去实现)**/
- (void)didAddSubview:(UIView *)subview;
- (void)willRemoveSubview:(UIView *)subview;

- (void)willMoveToSuperview:(UIView *)newSuperview;
- (void)didMoveToSuperview;
- (void)willMoveToWindow:(UIWindow *)newWindow;
- (void)didMoveToWindow;
/**系统自动调用**/

// 是不是view的子控件或者子控件的子控件(是否为view的后代)
- (BOOL)isDescendantOfView:(UIView *)view;  // returns YES for self.

// 通过tag获得对应的子控件(也可以或者子控件的子控件)
- (UIView *)viewWithTag:(NSInteger)tag;     // recursive search. includes self

/**系统自动调用(留给子类去实现)**/
// 控件的frame发生改变的时候就会调用,一般在这里重写布局子控件的位置和尺寸
// 重写了这个写方法后,一定调用[super layoutSubviews];
- (void)layoutSubviews;

@end

@interface UIView(UIViewRendering)
// YES : 超出控件边框范围的内容都剪掉
@property(nonatomic)                 BOOL              clipsToBounds;

// 背景色
@property(nonatomic,copy)            UIColor          *backgroundColor; // default is nil

// 透明度(0.0~1.0)
@property(nonatomic)                 CGFloat           alpha;                      // default is 1.0

// YES:不透明  NO:透明
@property(nonatomic,getter=isOpaque) BOOL              opaque;                     // default is YES

// YES : 隐藏  NO : 显示
@property(nonatomic,getter=isHidden) BOOL              hidden;

// 内容模式
@property(nonatomic)                 UIViewContentMode contentMode;                // default is UIViewContentModeScaleToFill
@end

@interface UIView(UIViewAnimationWithBlocks)
+ (void)animateWithDuration:(NSTimeInterval)duration delay:(NSTimeInterval)delay options:(UIViewAnimationOptions)options animations:(void (^)(void))animations completion:(void (^)(BOOL finished))completion;
+ (void)animateWithDuration:(NSTimeInterval)duration animations:(void (^)(void))animations completion:(void (^)(BOOL finished))completion;

+ (void)animateWithDuration:(NSTimeInterval)duration animations:(void (^)(void))animations;
+ (void)animateWithDuration:(NSTimeInterval)duration delay:(NSTimeInterval)delay usingSpringWithDamping:(CGFloat)dampingRatio initialSpringVelocity:(CGFloat)velocity options:(UIViewAnimationOptions)options animations:(void (^)(void))animations completion:(void (^)(BOOL finished))completion;
@end
@property(nonatomic,copy) NSArray *viewControllers;
@property(nonatomic,readonly) NSArray *childViewControllers;
- (void)pushViewController:(UIViewController *)viewController animated:(BOOL)animated;
- (UIViewController *)popViewControllerAnimated:(BOOL)animated;
- (NSArray *)popToViewController:(UIViewController *)viewController animated:(BOOL)animated;
- (NSArray *)popToRootViewControllerAnimated:(BOOL)animated;
@property(nonatomic,retain) UIBarButtonItem *backBarButtonItem;
@property(nonatomic,retain) UIView *titleView;
@property(nonatomic,copy) NSString *title;
@property(nonatomic,retain) UIBarButtonItem *leftBarButtonItem;
@property(nonatomic,retain) UIBarButtonItem *rightBarButtonItem;
问题一:什么是Segue?
007-多控制器管理及其控制器间的数据传递,布布扣,bubuko.com
标签:des style blog http color 使用 os io
原文地址:http://www.cnblogs.com/lszwhb/p/3906096.html
