标签:
背景
iOS10 新特性一出,各个大神就早已研究新特性能给场景智能化所带来的好处(唉,可惜我只是一个小白)。我也被安排适配iOS10的推送工作!
Apple 表示这是 iOS 有史以来最大的升级(our biggest release yet),更加智能开放的 Siri 、强化应用对 3D Touch 支持、 HomeKit 、电话拦截及全新设计的通知等等…
iOS 10 中将之前繁杂的推送通知统一成UserNotifications.framework 来集中管理和使用通知功能,还增加一些实用的功能——撤回单条通知、更新已展示通知、中途修改通知内容、在通知中显示多媒体资源、自定义UI等功能,功能着实强大!
本文主要是针对iOS 10的消息通知做介绍,所以很多代码没有对iOS 10之前做添加适配。
基本原理
iOS推送分为Local Notifications(本地推送) 和 Remote Notifications(远程推送)(原理图来源于网络,如有侵权请告知,我会添加来源,我怕我赔不起)
Local Notifications(本地推送)
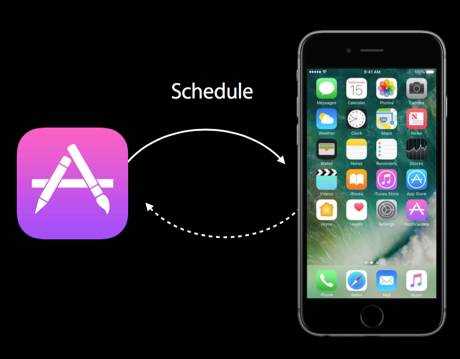
App本地创建通知,加入到系统的Schedule里,
如果触发器条件达成时会推送相应的消息内容
Remote Notifications(远程推送)

图中,Provider是指某个iPhone软件的Push服务器,这篇文章我将使用我花了12块大洋(心疼)买的 APNS Pusher 作为我的推送源。
APNS 是Apple Push Notification Service(Apple Push服务器)的缩写,是苹果的服务器。
上图可以分为三个阶段:
第一阶段:APNS Pusher应用程序把要发送的消息、目的iPhone的标识打包,发给APNS。
第二阶段:APNS在自身的已注册Push服务的iPhone列表中,查找有相应标识的iPhone,并把消息发到iPhone。
第三阶段:iPhone把发来的消息传递给相应的应用程序, 并且按照设定弹出Push通知。
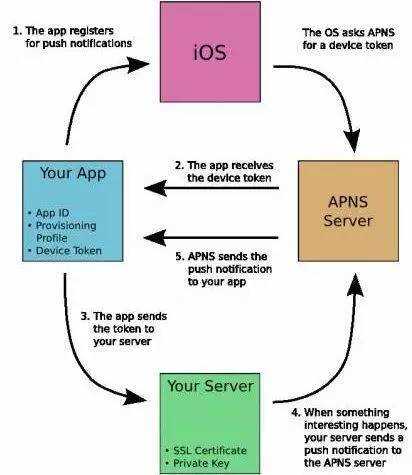
从上图我们可以看到:
首先是应用程序注册消息推送。
IOS跟APNS Server要deviceToken。应用程序接受deviceToken。
应用程序将deviceToken发送给PUSH服务端程序。
服务端程序向APNS服务发送消息。
APNS服务将消息发送给iPhone应用程序。
基本配置和基本方法
如果只是简单的本地推送,跳过1 2 步骤,直接到3
1、 如果你的App有远端推送的话,那你需要开发者账号的,需要新建一个对应你bundle的push 证书。证书这一块我就不说了,如果针对证书有什么问题可以给我留言,我会单独把证书相关的知识点整理起来!当然本人是非常喜欢的分享的(又装逼),如果你没有账号,我可以把我测试用的证书发给你,用于你的测试和学习,私聊我。
2、 Capabilities中打开Push Notifications 开关
在XCode7中这里的开关不打开,推送也是可以正常使用的,但是在XCode8中,这里的开关必须要打开,不然会报错:
Error Domain=NSCocoaErrorDomain Code=3000 "未找到应用程序的“aps-environment”的授权字符串" UserInfo={NSLocalizedDescription=未找到应用程序的“aps-environment”的授权字符串}
打开后会自动在项目里生成entitlements文件。
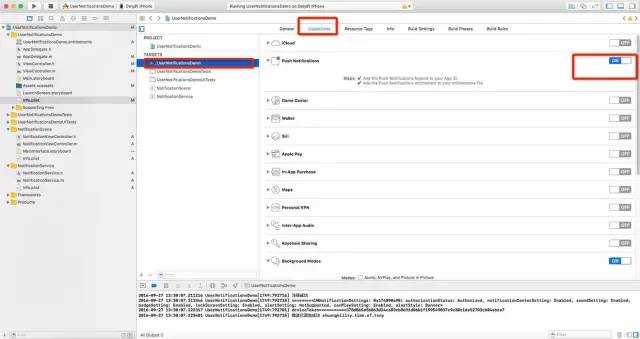
Push Notification开关.png

entitlements文件.png
3、 推送的注册
第一步: 导入 #import
且要遵守的协议,在Appdelegate.m中。
这里需要注意,我们最好写成这种形式(防止低版本找不到头文件出现问题)
#ifdef NSFoundationVersionNumber_iOS_9_x_Max
#import
#endif
第二步:我们需要在
- (BOOL)application:(UIApplication *)application didFinishLaunchingWithOptions:(NSDictionary *)launchOptions中注册通知,代码如下
- (BOOL)application:(UIApplication *)application didFinishLaunchingWithOptions:(NSDictionary *)launchOptions {
[self replyPushNotificationAuthorization:application];
return YES;
}
#pragma mark - 申请通知权限
// 申请通知权限
- (void)replyPushNotificationAuthorization:(UIApplication *)application{
if (IOS10_OR_LATER) {
//iOS 10 later
UNUserNotificationCenter *center = [UNUserNotificationCenter currentNotificationCenter];
//必须写代理,不然无法监听通知的接收与点击事件
center.delegate = self;
[center requestAuthorizationWithOptions:(UNAuthorizationOptionBadge | UNAuthorizationOptionSound | UNAuthorizationOptionAlert) completionHandler:^(BOOL granted, NSError * _Nullable error) {
if (!error && granted) {
//用户点击允许
NSLog(@"注册成功");
}else{
//用户点击不允许
NSLog(@"注册失败");
}
}];
// 可以通过 getNotificationSettingsWithCompletionHandler 获取权限设置
//之前注册推送服务,用户点击了同意还是不同意,以及用户之后又做了怎样的更改我们都无从得知,现在 apple 开放了这个 API,我们可以直接获取到用户的设定信息了。注意UNNotificationSettings是只读对象哦,不能直接修改!
[center getNotificationSettingsWithCompletionHandler:^(UNNotificationSettings * _Nonnull settings) {
NSLog(@"========%@",settings);
}];
}else if (IOS8_OR_LATER){
//iOS 8 - iOS 10系统
UIUserNotificationSettings *settings = [UIUserNotificationSettings settingsForTypes:UIUserNotificationTypeAlert | UIUserNotificationTypeBadge | UIUserNotificationTypeSound categories:nil];
[application registerUserNotificationSettings:settings];
}else{
//iOS 8.0系统以下
[application registerForRemoteNotificationTypes:UIRemoteNotificationTypeBadge | UIRemoteNotificationTypeAlert | UIRemoteNotificationTypeSound];
}
//注册远端消息通知获取device token
[application registerForRemoteNotifications];
}
上面需要注意:
1. 必须写代理,不然无法监听通知的接收与点击事件
center.delegate = self;
下面是我在项目里定义的宏
#define IOS10_OR_LATER ([[[UIDevice currentDevice] systemVersion] floatValue] >= 10.0)
#define IOS9_OR_LATER ([[[UIDevice currentDevice] systemVersion] floatValue] >= 9.0)
#define IOS8_OR_LATER ([[[UIDevice currentDevice] systemVersion] floatValue] >= 8.0)
#define IOS7_OR_LATER ([[[UIDevice currentDevice] systemVersion] floatValue] >= 7.0)
2. 之前注册推送服务,用户点击了同意还是不同意,以及用户之后又做了怎样的更改我们都无从得知,现在 apple 开放了这个 API,我们可以直接获取到用户的设定信息了。注意UNNotificationSettings是只读对象哦,不能直接修改!只能通过以下方式获取
[center getNotificationSettingsWithCompletionHandler:^(UNNotificationSettings * _Nonnull settings) {
NSLog(@"========%@",settings);
}];
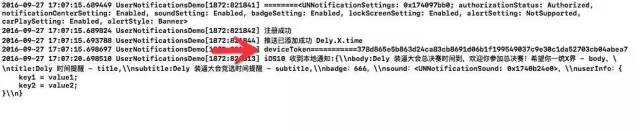
打印信息如下:
========
4、 远端推送需要获取设备的Device Token的方法是没有变的,代码如下
#pragma mark - 获取device Token
//获取DeviceToken成功
- (void)application:(UIApplication *)application didRegisterForRemoteNotificationsWithDeviceToken:(NSData *)deviceToken{
//解析NSData获取字符串
//我看网上这部分直接使用下面方法转换为string,你会得到一个nil(别怪我不告诉你哦)
//错误写法
//NSString *string = [[NSString alloc] initWithData:deviceToken encoding:NSUTF8StringEncoding];
//正确写法
NSString *deviceString = [[deviceToken description] stringByTrimmingCharactersInSet:[NSCharacterSet characterSetWithCharactersInString:@""]];
deviceString = [deviceString stringByReplacingOccurrencesOfString:@" " withString:@""];
NSLog(@"deviceToken===========%@",deviceString);
}
//获取DeviceToken失败
- (void)application:(UIApplication *)application didFailToRegisterForRemoteNotificationsWithError:(NSError *)error{
NSLog(@"[DeviceToken Error]:%@\n",error.description);
}
5、这一步吊了,这是iOS 10系统更新时,苹果给了我们2个代理方法来处理通知的接收和点击事件,这两个方法在的协议中,大家可以查看下。
@protocol UNUserNotificationCenterDelegate
@optional
// The method will be called on the delegate only if the application is in the foreground. If the method is not implemented or the handler is not called in a timely manner then the notification will not be presented. The application can choose to have the notification presented as a sound, badge, alert and/or in the notification list. This decision should be based on whether the information in the notification is otherwise visible to the user.
- (void)userNotificationCenter:(UNUserNotificationCenter *)center willPresentNotification:(UNNotification *)notification withCompletionHandler:(void (^)(UNNotificationPresentationOptions options))completionHandler __IOS_AVAILABLE(10.0) __TVOS_AVAILABLE(10.0) __WATCHOS_AVAILABLE(3.0);
// The method will be called on the delegate when the user responded to the notification by opening the application, dismissing the notification or choosing a UNNotificationAction. The delegate must be set before the application returns from applicationDidFinishLaunching:.
- (void)userNotificationCenter:(UNUserNotificationCenter *)center didReceiveNotificationResponse:(UNNotificationResponse *)response withCompletionHandler:(void(^)())completionHandler __IOS_AVAILABLE(10.0) __WATCHOS_AVAILABLE(3.0) __TVOS_PROHIBITED;
@end
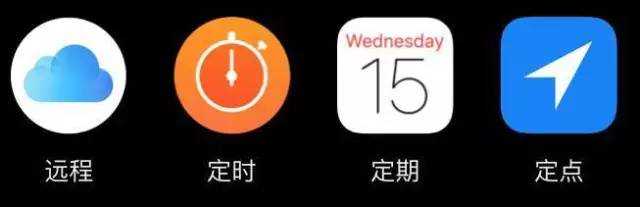
此外,苹果把本地通知跟远程通知合二为一。区分本地通知跟远程通知的类是UNPushNotificationTrigger.h类中,UNPushNotificationTrigger的类型是新增加的,通过它,我们可以得到一些通知的触发条件 ,解释如下:
UNPushNotificationTrigger (远程通知) 远程推送的通知类型
UNTimeIntervalNotificationTrigger (本地通知) 一定时间之后,重复或者不重复推送通知。我们可以设置timeInterval(时间间隔)和repeats(是否重复)。
UNCalendarNotificationTrigger(本地通知) 一定日期之后,重复或者不重复推送通知 例如,你每天8点推送一个通知,只要dateComponents为8,如果你想每天8点都推送这个通知,只要repeats为YES就可以了。
UNLocationNotificationTrigger (本地通知)地理位置的一种通知,
当用户进入或离开一个地理区域来通知。
现在先提出来,后面我会一一代码演示出每种用法。还是回到两个很吊的代理方法吧
#pragma mark - iOS10 收到通知(本地和远端) UNUserNotificationCenterDelegate
//App处于前台接收通知时
- (void)userNotificationCenter:(UNUserNotificationCenter *)center willPresentNotification:(UNNotification *)notification withCompletionHandler:(void (^)(UNNotificationPresentationOptions))completionHandler{
//收到推送的请求
UNNotificationRequest *request = notification.request;
//收到推送的内容
UNNotificationContent *content = request.content;
//收到用户的基本信息
NSDictionary *userInfo = content.userInfo;
//收到推送消息的角标
NSNumber *badge = content.badge;
//收到推送消息body
NSString *body = content.body;
//推送消息的声音
UNNotificationSound *sound = content.sound;
// 推送消息的副标题
NSString *subtitle = content.subtitle;
// 推送消息的标题
NSString *title = content.title;
if([notification.request.trigger isKindOfClass:[UNPushNotificationTrigger class]]) {
//此处省略一万行需求代码。。。。。。
NSLog(@"iOS10 收到远程通知:%@",userInfo);
}else {
// 判断为本地通知
//此处省略一万行需求代码。。。。。。
NSLog(@"iOS10 收到本地通知:{\\\\nbody:%@,\\\\ntitle:%@,\\\\nsubtitle:%@,\\\\nbadge:%@,\\\\nsound:%@,\\\\nuserInfo:%@\\\\n}",body,title,subtitle,badge,sound,userInfo);
}
// 需要执行这个方法,选择是否提醒用户,有Badge、Sound、Alert三种类型可以设置
completionHandler(UNNotificationPresentationOptionBadge|
UNNotificationPresentationOptionSound|
UNNotificationPresentationOptionAlert);
}
//App通知的点击事件
- (void)userNotificationCenter:(UNUserNotificationCenter *)center didReceiveNotificationResponse:(UNNotificationResponse *)response withCompletionHandler:(void (^)())completionHandler{
//收到推送的请求
UNNotificationRequest *request = response.notification.request;
//收到推送的内容
UNNotificationContent *content = request.content;
//收到用户的基本信息
NSDictionary *userInfo = content.userInfo;
//收到推送消息的角标
NSNumber *badge = content.badge;
//收到推送消息body
NSString *body = content.body;
//推送消息的声音
UNNotificationSound *sound = content.sound;
// 推送消息的副标题
NSString *subtitle = content.subtitle;
// 推送消息的标题
NSString *title = content.title;
if([response.notification.request.trigger isKindOfClass:[UNPushNotificationTrigger class]]) {
NSLog(@"iOS10 收到远程通知:%@",userInfo);
//此处省略一万行需求代码。。。。。。
}else {
// 判断为本地通知
//此处省略一万行需求代码。。。。。。
NSLog(@"iOS10 收到本地通知:{\\\\nbody:%@,\\\\ntitle:%@,\\\\nsubtitle:%@,\\\\nbadge:%@,\\\\nsound:%@,\\\\nuserInfo:%@\\\\n}",body,title,subtitle,badge,sound,userInfo);
}
//2016-09-27 14:42:16.353978 UserNotificationsDemo[1765:800117] Warning: UNUserNotificationCenter delegate received call to -userNotificationCenter:didReceiveNotificationResponse:withCompletionHandler: but the completion handler was never called.
completionHandler(); // 系统要求执行这个方法
}
需要注意的:
1.下面这个代理方法,只会是app处于前台状态 前台状态 and 前台状态下才会走,后台模式下是不会走这里的
- (void)userNotificationCenter:(UNUserNotificationCenter *)center willPresentNotification:(UNNotification *)notification withCompletionHandler:(void (^)(UNNotificationPresentationOptions))completionHandler
2.下面这个代理方法,只会是用户点击消息才会触发,如果使用户长按(3DTouch)、Action等并不会触发。
- (void)userNotificationCenter:(UNUserNotificationCenter *)center didReceiveNotificationResponse:(UNNotificationResponse *)response withCompletionHandler:(void (^)())completionHandler
3.点击代理最后需要执行:completionHandler(); // 系统要求执行这个方法
不然会报:
2016-09-27 14:42:16.353978 UserNotificationsDemo[1765:800117] Warning: UNUserNotificationCenter delegate received call to -userNotificationCenter:didReceiveNotificationResponse:withCompletionHandler: but the completion handler was never called.
4.不管前台后台状态下。推送消息的横幅都可以展示出来!后台状态不用说,前台时需要在前台代理方法中设置 ,设置如下:
// 需要执行这个方法,选择是否提醒用户,有Badge、Sound、Alert三种类型可以设置
completionHandler(UNNotificationPresentationOptionBadge|
UNNotificationPresentationOptionSound|
UNNotificationPresentationOptionAlert);
6、 iOS 10之前接收通知的兼容方法
#pragma mark -iOS 10之前收到通知
- (void)application:(UIApplication *)application didReceiveRemoteNotification:(NSDictionary *)userInfo {
NSLog(@"iOS6及以下系统,收到通知:%@", userInfo);
//此处省略一万行需求代码。。。。。。
}
- (void)application:(UIApplication *)application didReceiveRemoteNotification:(NSDictionary *)userInfo fetchCompletionHandler:(void (^)(UIBackgroundFetchResult))completionHandler {
NSLog(@"iOS7及以上系统,收到通知:%@", userInfo);
completionHandler(UIBackgroundFetchResultNewData);
//此处省略一万行需求代码。。。。。。
}
段结:是不是以为就结束了?NO NO NO(你以为离开了幻境,其实才刚刚踏入幻境!)上面的介绍了基本原理、基本配置以及基本方法说明,现在做完这些工作,我们的学习才刚刚开始!现在天时、地利、人和、可以开始下面推送coding的学习和测试了。
在用户日常生活中会有很多种情形需要通知,比如:新闻提醒、定时吃药、定期体检、到达某个地方提醒用户等等,这些功能在 UserNotifications 中都提供了相应的接口。
我们先学会基本的技能简单的推送(爬),后面在学习进阶定制推送(走),最后看看能不能高级推送(飞不飞起来看个人了,我是飞不起来):
基本Local Notifications(本地推送) 和 Remote Notifications(远程推送)
一、 基本的本地推送
本地推送生成主要流程就是:
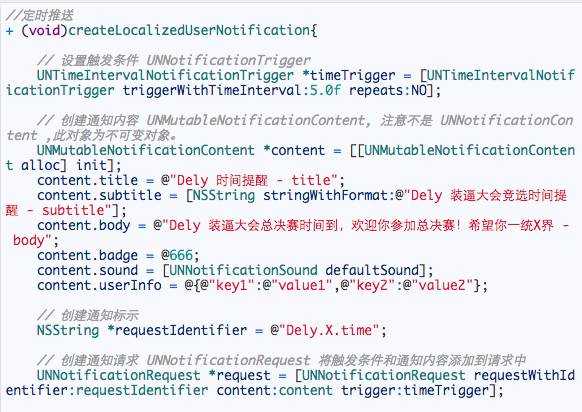
1. 创建一个触发器(trigger)
2. 创建推送的内容(UNMutableNotificationContent)
3. 创建推送请求(UNNotificationRequest)
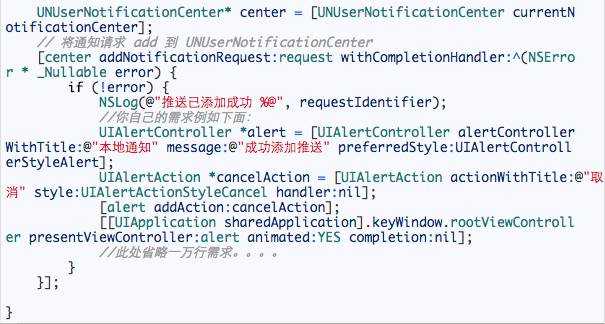
4. 推送请求添加到推送管理中心(UNUserNotificationCenter)中
1、新功能trigger可以在特定条件触发,有三类:UNTimeIntervalNotificationTrigger、UNCalendarNotificationTrigger、UNLocationNotificationTrigger
1.1、 UNTimeIntervalNotificationTrigger:一段时间后触发(定时推送)
//timeInterval:单位为秒(s) repeats:是否循环提醒
//50s后提醒
UNTimeIntervalNotificationTrigger *trigger1 = [UNTimeIntervalNotificationTrigger triggerWithTimeInterval:50 repeats:NO];
1.2 UNCalendarNotificationTrigger :调用
+ (instancetype)triggerWithDateMatchingComponents:(NSDateComponents *)dateComponents repeats:(BOOL)repeats;进行注册;时间点信息用 NSDateComponents.(定期推送)
//在每周一的14点3分提醒
NSDateComponents *components = [[NSDateComponents alloc] init];
components.weekday = 2;
components.hour = 16;
components.minute = 3;
// components 日期
UNCalendarNotificationTrigger *calendarTrigger = [UNCalendarNotificationTrigger triggerWithDateMatchingComponents:components repeats:YES];
1.3、UNLocationNotificationTrigger:调用
+ (instancetype)triggerWithRegion:(CLRegion *)region repeats:(BOOL)repeats;
进行注册,地区信息使用CLRegion的子类CLCircularRegion,可以配置region属性 notifyOnEntry和notifyOnExit,是在进入地区、从地区出来或者两者都要的时候进行通知,这个测试过程专门从公司跑到家时刻关注手机有推送嘛,果然是有的(定点推送)
//首先得导入#import ,不然会regin创建有问题。
// 创建位置信息
CLLocationCoordinate2D center1 = CLLocationCoordinate2DMake(39.788857, 116.5559392);
CLCircularRegion *region = [[CLCircularRegion alloc] initWithCenter:center1 radius:500 identifier:@"经海五路"];
region.notifyOnEntry = YES;
region.notifyOnExit = YES;
// region 位置信息 repeats 是否重复 (CLRegion 可以是地理位置信息)
UNLocationNotificationTrigger *locationTrigger = [UNLocationNotificationTrigger triggerWithRegion:region repeats:YES];
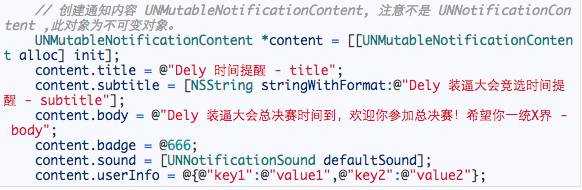
2、创建推送的内容(UNMutableNotificationContent)
UNNotificationContent:属性readOnly
UNMutableNotificationContent:属性有title、subtitle、body、badge、sound、lauchImageName、userInfo、attachments、categoryIdentifier、threadIdentifier
| 本地消息内容 | 内容限制大小 | 展示 |
|---|---|---|
| title | NSString | 限制在一行,多出部分省略号 |
| subtitle | NSString | 限制在一行,多出部分省略号 |
| body | NSString | 通知栏出现时,限制在两行,多出部分省略号;预览时,全部展示 |
注意点: body中printf风格的转义字符,比如说要包含%,需要写成%% 才会显示,\同样
3、创建完整的本地推送请求Demo
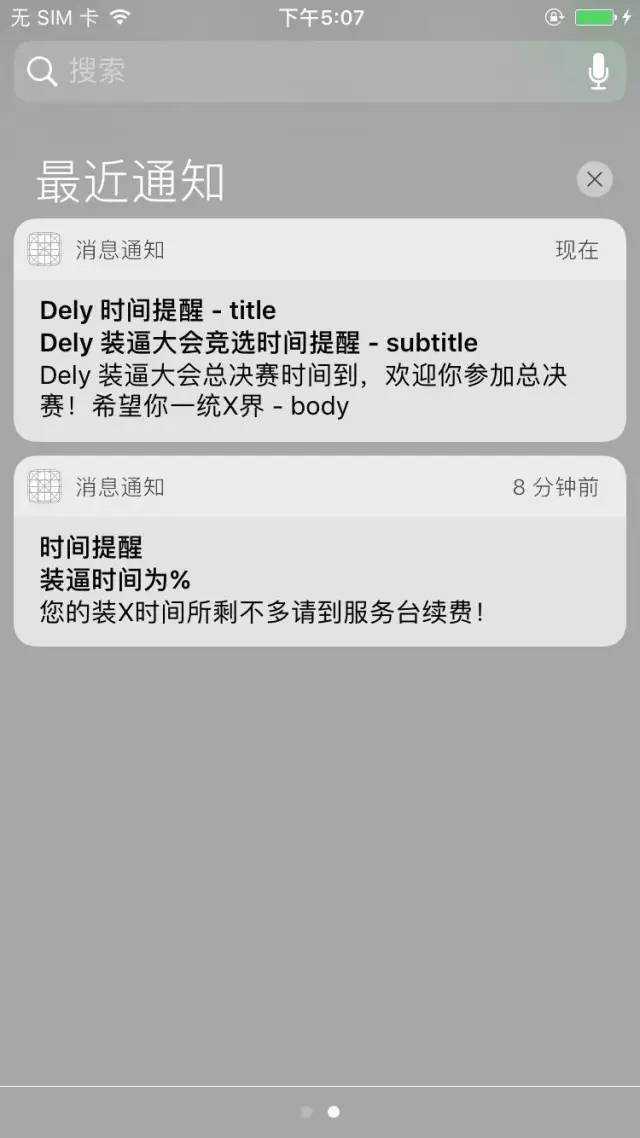
运行结果如下:
二、 基本的远端推送
如果你想模拟远端推送,按照我前面介绍的配置基本环境、证书、push开关和基本方法就可以模拟远端的基本远端推送。
1、运行工程则会拿到设备的Device Token,后面会用到。
2、现在我们需要一个推送服务器给APNS发送信息。我前面说了我花了12块大洋(心疼死我了)买了一个APNS pusher 来模拟远端推送服务,当然你可以不花钱也可以用到,例如:
NWPusher
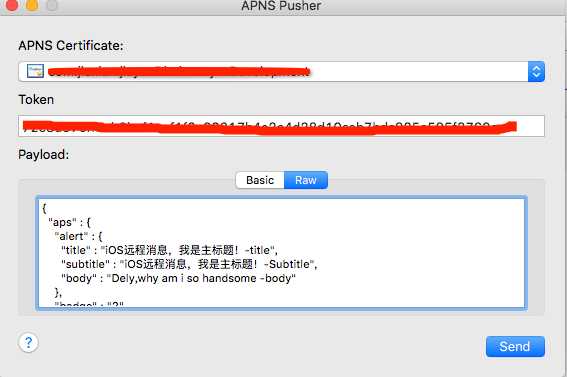
3、你需要把你刚刚获取的device token填到相应位置,同时你要配置好push证书哦。
4、需要添加aps内容了,然后点击send就OK了
{
"aps" : {
"alert" : {
"title" : "iOS远程消息,我是主标题!-title",
"subtitle" : "iOS远程消息,我是主标题!-Subtitle",
"body" : "Dely,why am i so handsome -body"
},
"badge" : "2"
}
}
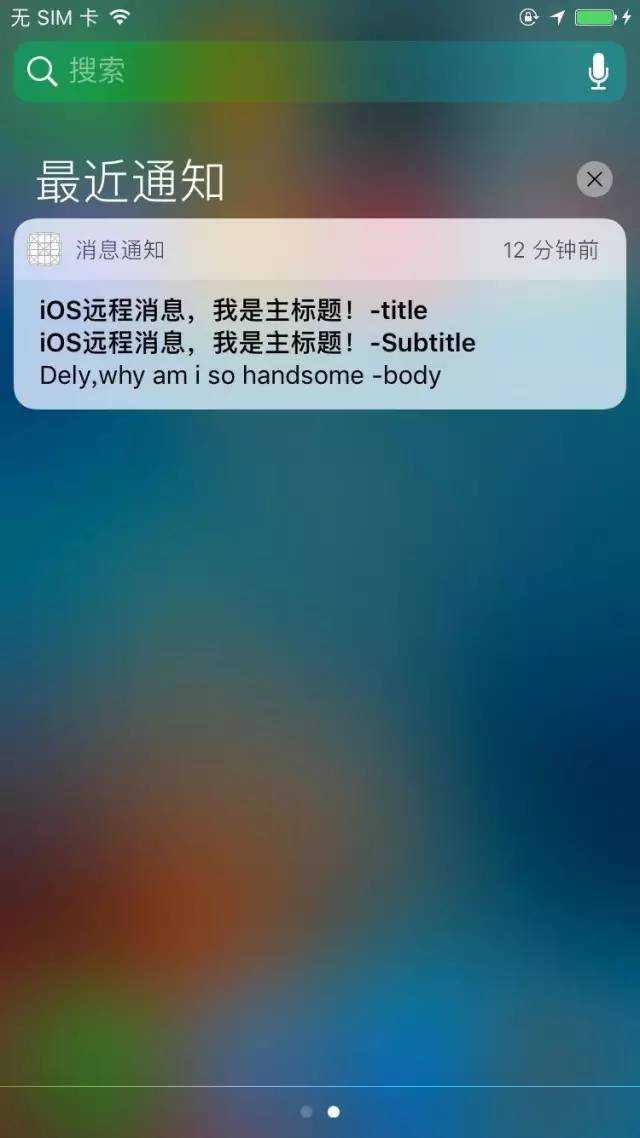
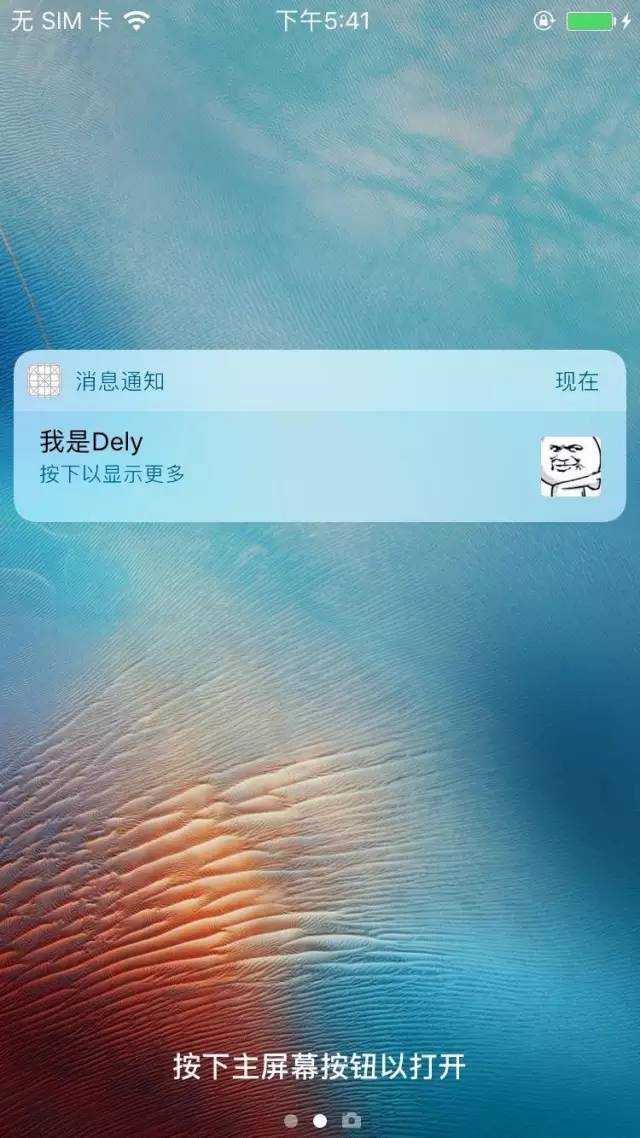
5、稍纵即逝你就收到了远端消息了
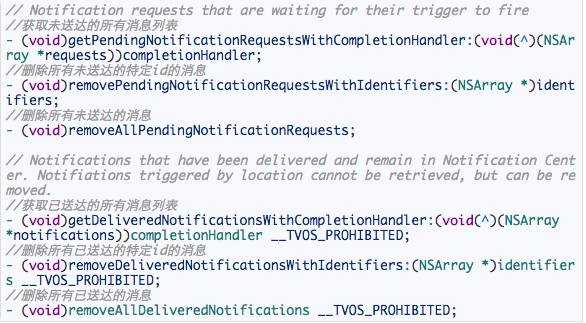
6、Notification Management
对推送进行查、改、删。都需要一个必需的参数requestIdentifier
1、更新通知
Local Notification需要通过更新request.相同的requestIdentifier,重新添加到推送center就可以了,说白了就是重新创建local Notification request(只要保证requestIdentifier就ok了),应用场景如图
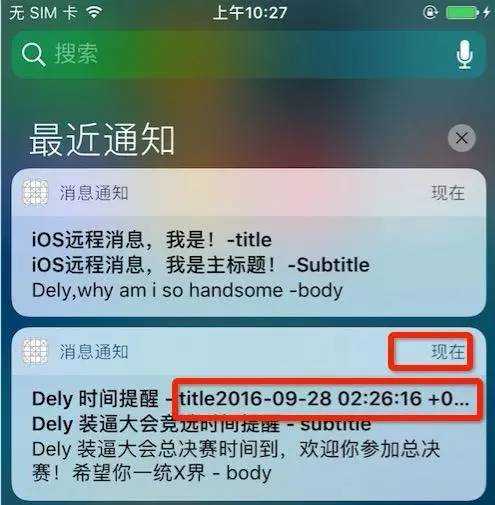
Local Notification更新前.png
Local Notification更新后.png
Remote Notification 更新需要通过新的字段apps-collapse-id来作为唯一标示,我前面用的APNS pusher暂不支持这个字段,不过github上有很多这样的工具:
https://github.com/KnuffApp/Knuff
这样remote 也可以更新推送消息
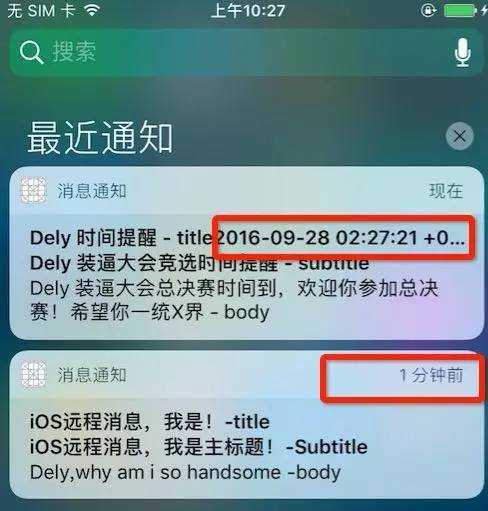
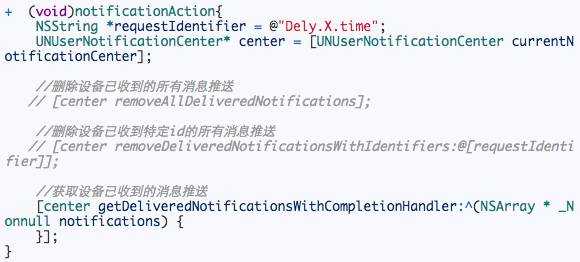
2、推送消息的查找和删除
测试如下:
段结: 收到通知时你需要在appdelegate里面的代理方法里处理你的需求逻辑,这个需要你自己写了。到目前为止你掌握了基本的本地推送和基本的远端推送!
不知不觉写了这么多字(全是TM废话)、本来继续打算写进阶的本地和远端推送(Media Attachments、Notification Actions、自定义推送界面等),留着下一篇博客继续分享吧,欲知后事如何,且听下会装X!
如果你喜欢可以点个喜欢^_^(竟有如此厚颜无耻之人)
下集预告:
参考资料:
https://developer.apple.com/reference/usernotifications
http://www.jianshu.com/p/b74e52e866fc
http://www.jianshu.com/p/b74e52e866fc
http://blog.csdn.net/he317165264/article/details/52574934
http://qoofan.com/read/PnEaMEZonD.html
http://www.qingpingshan.com/rjbc/ios/140921.html
iOS 10 消息推送(UserNotifications)秘籍总结(一)
标签:
原文地址:http://www.cnblogs.com/fengmin/p/5958975.html