标签:android style blog http color java os io
推送可以及时,主动的与用户发起交互
});
// 这是来自 JPush Example 的设置别名的 Activity 里的代码。一般 App 的设置的调用入口,在任何方便的地方调用都可以。private void setAlias() { EditText aliasEdit = (EditText) findViewById(R.id.et_alias); String alias = aliasEdit.getText().toString().trim(); if (TextUtils.isEmpty(alias)) { Toast.makeText(PushSetActivity.this,R.string.error_alias_empty, Toast.LENGTH_SHORT).show(); return; } if (!ExampleUtil.isValidTagAndAlias(alias)) { Toast.makeText(PushSetActivity.this,R.string.error_tag_gs_empty, Toast.LENGTH_SHORT).show(); return; } // 调用 Handler 来异步设置别名 mHandler.sendMessage(mHandler.obtainMessage(MSG_SET_ALIAS, alias));}private final TagAliasCallback mAliasCallback = new TagAliasCallback() { @Override public void gotResult(int code, String alias, Set<String> tags) { String logs ; switch (code) { case 0: logs = "Set tag and alias success"; Log.i(TAG, logs); // 建议这里往 SharePreference 里写一个成功设置的状态。成功设置一次后,以后不必再次设置了。 break; case 6002: logs = "Failed to set alias and tags due to timeout. Try again after 60s."; Log.i(TAG, logs); // 延迟 60 秒来调用 Handler 设置别名 mHandler.sendMessageDelayed(mHandler.obtainMessage(MSG_SET_ALIAS, alias), 1000 * 60); break; default: logs = "Failed with errorCode = " + code; Log.e(TAG, logs); } ExampleUtil.showToast(logs, getApplicationContext()); }}; private static final int MSG_SET_ALIAS = 1001;private final Handler mHandler = new Handler() { @Override public void handleMessage(android.os.Message msg) { super.handleMessage(msg); switch (msg.what) { case MSG_SET_ALIAS: Log.d(TAG, "Set alias in handler."); // 调用 JPush 接口来设置别名。 JPushInterface.setAliasAndTags(getApplicationContext(), (String) msg.obj, null, mAliasCallback); break; default: Log.i(TAG, "Unhandled msg - " + msg.what); } }}; 自定义通知栏的样式自定义样式放在init()之后.
CustomPushNotificationBuilder builder=new CustomPushNotificationBuilder(MainActivity.this, R.layout.my_push, R.id.iv_push, R.id.tv_title, R.id.tv_content);
builder.statusBarDrawable=R.drawable.ic_category_2;//最顶层状态栏小图标
builder.layoutIconDrawable=R.drawable.ic_category_2; //下拉状态时显示的通知图标.
JPushInterface.setPushNotificationBuilder(2, builder);
JPushInterface.setDefaultPushNotificationBuilder(builder); //设置该对话框为默认.
自定义消息:所接收的消息不再局限于Notification,而是可以直接取出消息中的内容,从而用自己的方式显示给用户.
此时需要自定义一个MyReceiver继承自BroadcastReceiver.
public class MyReceiver extends BroadcastReceiver {
@Override
public void onReceive(Context ctx, Intent intent) {
Bundle bundle =intent.getExtras(); //接受到消息
Log.e("info", "[MyReceiver] onReceive - " + intent.getAction() + ", extras: " + printBundle(bundle));
if (JPushInterface.ACTION_REGISTRATION_ID.equals(intent.getAction())) {
String regId = bundle.getString(JPushInterface.EXTRA_REGISTRATION_ID);
Log.d("info", "[MyReceiver] 接收Registration Id : " + regId);
//send the Registration Id to your server...
} else if (JPushInterface.ACTION_MESSAGE_RECEIVED.equals(intent.getAction())) {
Log.d("info", "[MyReceiver] 接收到推送下来的自定义消息: " + bundle.getString(JPushInterface.EXTRA_MESSAGE));
// processCustomMessage(ctx, bundle);
} else if (JPushInterface.ACTION_NOTIFICATION_RECEIVED.equals(intent.getAction())) {
Log.d("info", "[MyReceiver] 接收到推送下来的通知");
int notifactionId = bundle.getInt(JPushInterface.EXTRA_NOTIFICATION_ID);
Log.d("info", "[MyReceiver] 接收到推送下来的通知的ID: " + notifactionId);
} else if (JPushInterface.ACTION_NOTIFICATION_OPENED.equals(intent.getAction())) {
Log.d("info", "[MyReceiver] 用户点击打开了通知");
JPushInterface.reportNotificationOpened(ctx, bundle.getString(JPushInterface.EXTRA_MSG_ID));
// //打开自定义的Activity
Intent i = new Intent(ctx, TwoActivity.class);
i.putExtras(bundle);
i.setFlags(Intent.FLAG_ACTIVITY_NEW_TASK);
ctx.startActivity(i);
}
}
// 打印所有的 intent extra 数据
private static String printBundle(Bundle bundle) {
StringBuilder sb = new StringBuilder();
for (String key : bundle.keySet()) {
if (key.equals(JPushInterface.EXTRA_NOTIFICATION_ID)) {
sb.append("\nkey:" + key + ", value:" + bundle.getInt(key));
} else {
sb.append("\nkey:" + key + ", value:" + bundle.getString(key));
}
}
return sb.toString();
}
在类中接收完消息后,还需要在AndroidManifest.xml中添加
<!--自定义接收 -->
<receiver
android:name="com.lj.pushdemo1.MyReceiver"
android:enabled="true">
<intent-filter>
<action android:name="cn.jpush.android.intent.REGISTRATION" />
<action android:name="cn.jpush.android.intent.MESSAGE_RECEIVED" />
<action android:name="cn.jpush.android.intent.NOTIFICATION_RECEIVED" />
<action android:name="cn.jpush.android.intent.NOTIFICATION_OPENED" />
<category android:name="com.lj.pushdemo1" />
</intent-filter>
</receiver>
获取 RegistrationID API集成了JPush SDK的应用程序第一次注册到JPush服务器时,服务器会返回一个唯一的该设备的标识:RegistertionID.
String id=JPushInterface.getRegistrationID(MainActivity.this);
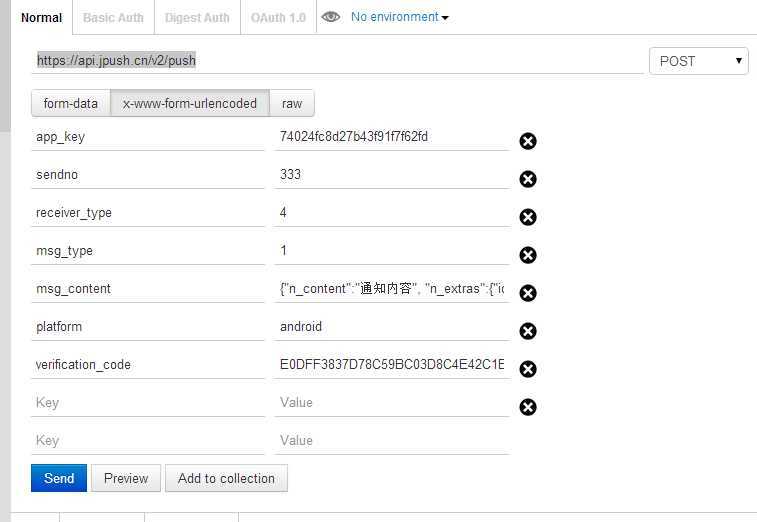
调用网络接口来发送消息

sendno:发送的编号.
app_key: 应用程序的appKey
receiver_type:接受者的类型 ----2.指定tag----3.指定alias----4.广播----5.根据registrationId进行推送.
msg_content:发送的内容,在这里必须要JSON格式.
platform:要发送的平台
verfication_code:将sendno+receiver_typ+receiver_values+API MasterSecret(在应用的详细信息里面)字符串拼接起来后,用md5加密
|
android极光推送初步了解...,布布扣,bubuko.com
标签:android style blog http color java os io
原文地址:http://www.cnblogs.com/aibuli/p/c783e4855a387c03d10a828e70621c3e.html