标签:ade bcp 搭建 jar包 mon frame one https ann
准备工作:
下载整合所需的jar包 点击此处下载
使用MyBatis Generator生成dao接口、映射文件和实体类 如何生成
搭建过程:
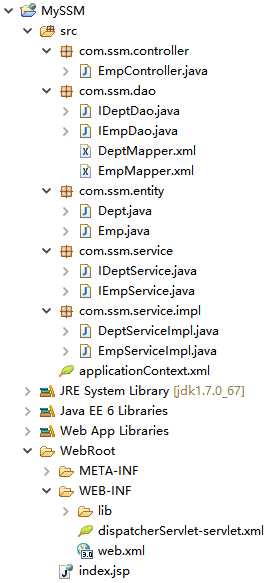
先来看一下项目的 目录结构
1.配置dispatcherServlet-servlet.xml,将此文件放于WEB-INF下
<?xml version="1.0" encoding="UTF-8"?>
<beans xmlns="http://www.springframework.org/schema/beans"
    xmlns:xsi="http://www.w3.org/2001/XMLSchema-instance" xmlns:context="http://www.springframework.org/schema/context"
    xmlns:mvc="http://www.springframework.org/schema/mvc"
    xsi:schemaLocation="http://www.springframework.org/schema/mvc http://www.springframework.org/schema/mvc/spring-mvc-3.1.xsd
        http://www.springframework.org/schema/beans http://www.springframework.org/schema/beans/spring-beans-3.0.xsd
        http://www.springframework.org/schema/context http://www.springframework.org/schema/context/spring-context-3.0.xsd">

    <!-- 自动扫描Controller包 -->
    <context:component-scan base-package="com.ssm.controller"/>


    <!-- 默认的注解映射的支持 -->
    <mvc:annotation-driven />


    <!-- 视图解释配置 -->
    <bean
        class="org.springframework.web.servlet.view.InternalResourceViewResolver">
        <property name="prefix" value="/" />
        <!--可为空,方便实现自已的依据扩展名来选择视图解释类的逻辑 -->
        <property name="suffix" value="" />
    </bean>


</beans>
2.配置web.xml
<?xml version="1.0" encoding="UTF-8"?>
<web-app version="3.0" xmlns="http://java.sun.com/xml/ns/javaee"
    xmlns:xsi="http://www.w3.org/2001/XMLSchema-instance"
    xsi:schemaLocation="http://java.sun.com/xml/ns/javaee
    http://java.sun.com/xml/ns/javaee/web-app_3_0.xsd">
    <display-name></display-name>


    <!-- 欢迎页面 -->
    <welcome-file-list>
        <welcome-file>login.jsp</welcome-file>
    </welcome-file-list>

    <!-- spring mvc的配置 -->
    <servlet>
        <servlet-name>dispatcherServlet</servlet-name>
        <servlet-class>org.springframework.web.servlet.DispatcherServlet</servlet-class>
        <load-on-startup>1</load-on-startup>
    </servlet>
    <servlet-mapping>
        <servlet-name>dispatcherServlet</servlet-name>
        <url-pattern>/</url-pattern>
    </servlet-mapping>

    <!-- 解决访问静态资源问题 -->
    <servlet-mapping>
        <servlet-name>default</servlet-name>
        <url-pattern>*.css</url-pattern>
    </servlet-mapping>
    <servlet-mapping>
        <servlet-name>default</servlet-name>
        <url-pattern>*.gif</url-pattern>
    </servlet-mapping>
    <servlet-mapping>
        <servlet-name>default</servlet-name>
        <url-pattern>*.jpg</url-pattern>
    </servlet-mapping>
    <servlet-mapping>
        <servlet-name>default</servlet-name>
        <url-pattern>*.js</url-pattern>
    </servlet-mapping>

    <!-- 解决中文乱码 -->
    <filter>
        <filter-name>characterEncodingFilter</filter-name>
        <filter-class>org.springframework.web.filter.CharacterEncodingFilter</filter-class>
        <init-param>
            <param-name>encoding</param-name>
            <param-value>UTF-8</param-value>
        </init-param>
        <init-param>
            <param-name>forceEncoding</param-name>
            <param-value>true</param-value>
        </init-param>
    </filter>
    <filter-mapping>
        <filter-name>characterEncodingFilter</filter-name>
        <url-pattern>/*</url-pattern>
    </filter-mapping>

    <!-- 加载Spring配置文件 -->
    <context-param>
        <param-name>contextConfigLocation</param-name>
        <param-value>classpath:applicationContext.xml</param-value>
    </context-param>
    <listener>
        <listener-class>org.springframework.web.context.ContextLoaderListener</listener-class>
    </listener>

</web-app>
3.配置applicationContext.xml,并 将自动生成的dao实现类交给Spring管理
<?xml version="1.0" encoding="UTF-8"?>
<beans xmlns="http://www.springframework.org/schema/beans"
    xmlns:xsi="http://www.w3.org/2001/XMLSchema-instance" xmlns:p="http://www.springframework.org/schema/p"
    xmlns:context="http://www.springframework.org/schema/context"
    xmlns:aop="http://www.springframework.org/schema/aop"
    xsi:schemaLocation="http://www.springframework.org/schema/beans http://www.springframework.org/schema/beans/spring-beans-3.0.xsd
        http://www.springframework.org/schema/context
    http://www.springframework.org/schema/context/spring-context-3.1.xsd
        http://www.springframework.org/schema/aop
    http://www.springframework.org/schema/aop/spring-aop-3.1.xsd">

    <!-- 定义dbcp数据源 -->
    <bean id="dataSource" class="org.apache.commons.dbcp.BasicDataSource">
        <!-- 指定JDBC驱动类 -->
        <property name="driverClassName" value="com.mysql.jdbc.Driver">
        </property>
        <!-- 提供连接数据库的URL地址 -->
        <property name="url" value="jdbc:mysql://localhost:3306/easybuy">
        </property>
        <!-- 提供连接数据库的用户名和密码 -->
        <property name="username" value="root"></property>
        <property name="password" value="pengxiongpengdi"></property>
    </bean>

    <!-- 定义SessionFactory Bean -->
    <bean id="sqlSessionFactory" class="org.mybatis.spring.SqlSessionFactoryBean">
        <property name="dataSource">
            <ref bean="dataSource" />
        </property>
        <property name="mapperLocations" value="classpath:com/buy/dao/*.xml"></property>
    </bean>


    <!-- 此处 将自动生成的dao实现类交给Spring管理 -->
    <bean class="org.mybatis.spring.mapper.MapperScannerConfigurer">
        <property name="basePackage" value="com.buy.dao"></property>
    </bean>


    <!--开启注解 将com.jbit包中所有使用了注解的类扫描,然后创建成对象 -->
    <context:component-scan base-package="com.buy" />
</beans>
4.将service实现类交给Spring管理
@Service("userService")
public class UserServiceImpl implements IUserService {

    @Autowired  // 此处使用ByType自动装配 dao实现类
    private UserEntityMapper userDao;

    @Override
    public UserEntity login(UserEntity user) {
        return userDao.getByNameAndPwd(user);
    }

    @Override
    @Transactional  // 使用该注解实现事务管理
    public void delById(String id) {
        userDao.delByid(id);
    }
}
5.创建Controller
@Controller
@RequestMapping(value="/emp")
public class EmpController {

    @Autowired  // 使用ByType装配private IEmpService empService;

    @RequestMapping(value="/queryEmps")
    public String queryEmps(HttpServletRequest request){
        List<Emp> list = empService.queryAll();
        request.getSession().setAttribute("list",list );
        return "index.jsp";
    }
6.现在就可以使用 http://localhost:8080/ProjectName/emp/queryEmps访问到上述Controller
SSM框架整合(注解)-Spring+SpringMVC+MyBatis+MySql
标签:ade bcp 搭建 jar包 mon frame one https ann
原文地址:http://www.cnblogs.com/hnlictmso/p/6308775.html