标签:安装 键值 code relative host branch 文件夹 cap original
参考:
http://www.jianshu.com/p/a67792d93682
http://jingyan.baidu.com/article/d8072ac47aca0fec95cefd2d.html
https://help.github.com/articles/cloning-a-repository/
http://lijialalala.github.io/2016/04/05/hexoxo-usage/
首先注册个GitHub的帐号
好注册完成后新建一个项目过程如下:
点击New repository

新建项目时,关于项目的名称一定要按照"你的GitHub用户名.github.io"的格式,切记、切记、切记。重要的事情说三遍!


Launch automatic page generator按钮。


6.以上都配置完成后,GitHub端的配置就结束了,此时你输入[yourGitHubName].github.io就应该看到如下的界面,如果看到了恭喜你,第一阶段的配置您已经完成了~

安装Hexo
安装好Node.js以后使用它的命令行编译器:

然后执行以下这条安装Hexo的命令
$ npm install -g hexo-cli
初始化
安装完成后,需要建立一个文件夹(如hexo),执行以下指令(在hexo路径下),Hexo 即会自动在目标文件夹建立网站所需要的所有文件。
hexo init
修改hexo配置的文件,在新建的hexo文件夹下找到_config.yml这个文件,然后使用如notepad++之类的文本编辑器打开。该文件夹需要修改的位置如下所示:
Under your repository name, click Clone or download. 
In the Clone with HTTPs section, click to copy the clone URL for the repository. 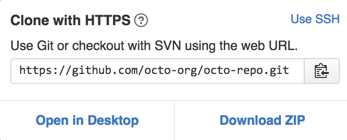
# Hexo Configuration
## Docs: https://hexo.io/docs/configuration.html
## Source: https://github.com/hexojs/hexo/

# Site
title: Notes For Yin Qin
subtitle:
description:
author: Sylar Yin
language: zh-CN
timezone:

# URL
## If your site is put in a subdirectory, set url as ‘http://yoursite.com/child‘ and root as ‘/child/‘
url: http://yoursite.com
root: /
permalink: :year/:month/:day/:title/
permalink_defaults:

# Directory
source_dir: source
public_dir: public
tag_dir: tags
archive_dir: archives
category_dir: categories
code_dir: downloads/code
i18n_dir: :lang
skip_render:

# Writing
new_post_name: :title.md # File name of new posts
default_layout: post
titlecase: false # Transform title into titlecase
external_link: true # Open external links in new tab
filename_case: 0
render_drafts: false
post_asset_folder: false
relative_link: false
future: true
highlight:
  enable: true
  line_number: true
  auto_detect: false
  tab_replace:

# Category & Tag
default_category: uncategorized
category_map:
tag_map:

# Date / Time format
## Hexo uses Moment.js to parse and display date
## You can customize the date format as defined in
## http://momentjs.com/docs/#/displaying/format/
date_format: YYYY-MM-DD
time_format: HH:mm:ss

# Pagination
## Set per_page to 0 to disable pagination
per_page: 10
pagination_dir: page

# Extensions
## Plugins: https://hexo.io/plugins/
## Themes: https://hexo.io/themes/
theme: landscape

# Deployment
## Docs: https://hexo.io/docs/deployment.html
deploy:
  type: git
  repository: https://github.com/NotesForYQ/NotesForYQ.github.io.git
  branch: master
这里强调一下配置文件编写的时候一定是键值对的形式,":"冒号后有一个空格,切记、切记、切记!这里提供一个网站用于检测你输入的语法是否正确。
$ hexo generate和$ hexo server,以下是命令的简写形式:
hexo g
hexo s
输入命令以后在浏览器器中输入 localhost:4000 就可以看见预览的静态网页了,此时在命令行编译器中使用 Ctrl+C 就可以退出预览。
最后将编译好的网页代码部署到GitHub中就大功告成了。命令为 $ hexo deploy
hexo d
此时可能会提醒你Git命令不能识别之类的错误,这就是我说的安装配置时的最后一个坑,此时你需要在命令行中输入以下语句来完成Install hexo-deployer-git.
$ npm install hexo-deployer-git --save
好执行完成以后,你再使用$ hexo deploy就可以部署到你的GitHub仓中了,小伙伴们部署完以后赶紧查看一下自己的域名,网页已经变化了啊~
标签:安装 键值 code relative host branch 文件夹 cap original
原文地址:http://www.cnblogs.com/ys-wuhan/p/6390235.html