标签:art 方式 start 实现 enum enqueue print 准备 ems
申明:该文档只是记录我的编写和理解过程,代码部分参考了较多的文章,如有意见请联系我删除,谢谢。
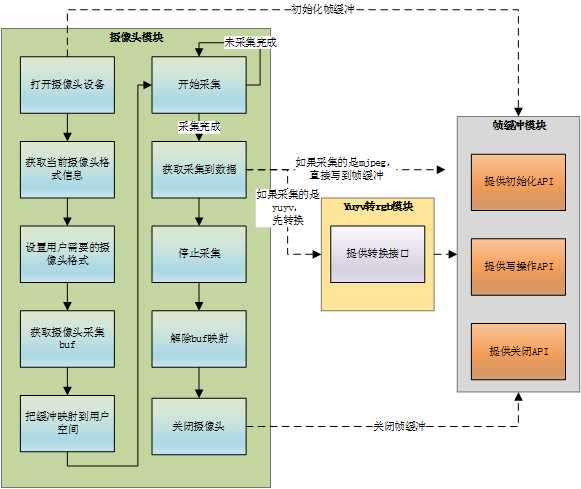
使用v4l2提供API,完成摄像头视频采集,并使用帧缓存显示。
必须使用循环buf,否则摄像头采集图像显示不会连续。
摄像头的分辨率和帧缓冲的分辨率不相同,不能套用同一个宽高,需要区别对待,否则会导致显示花屏或其他未知后果。
yuyv:4个字节,表示2个像素(uv共用),也就是说一个像素2个字节。
rgb24:3个字节,表示1个像素
rgb32:4个字节,表示1个像素
YUV到RGB的转换有如下公式:
R = 1.164*(Y-16) + 1.159*(V-128);
G = 1.164*(Y-16) - 0.380*(U-128)+ 0.813*(V-128);
B = 1.164*(Y-16) + 2.018*(U-128));
举例:一个yuyv的转换到rgb32如下:
1、先从yuyv中取出第一个像素点: y0 u v
2、可以用公式计算出 R0 G0 B0 的值。
3、组装成RGB32的第一个像素点: rgb32_0[4]={R0,G0,B0,0}
4、再从yuyv中取出第二个像素点: y1 u v (注意这里uv共用)
5、可以用公式计算出 R1 G1 B1 的值。
6、组装成RGB32的第二个像素点: rgb32_1[4]={R0,G0,B0,0}
为了方便,全部代码都放到一个文件中。最好的方式是按功能拆分成多个文件,这里为了理解方便,就不拆分了。
黑色是摄像头模块(v4l2) 蓝色是帧缓冲模块
 1 void main()
 2 {
 3     //打开摄像头设备
 4     open_cameral(MY_CAMERA);
 5     //初始化帧缓冲
 6     init_FrameBuffer();
 7     //获取当前摄像头的格式信息
 8     get_camInfo();
 9     //设置用户需要的摄像头格式信息(分辨率和图形格式)
10     set_format();
11     //获取摄像头采集图片buf
12     get_buf();
13     //映射buf到用户空间
14     map_buf();
15     //开始采集
16     startcon();
17     while(1) //这里可以优化成select,就不会阻塞了
18     {
19         //获取采集到的数据
20         get_picture(bmp);
21         //把采集数据写入帧缓冲
22         write_data_to_fb(FrameBuffer, Frame_fd, bmp, cam_width, cam_hight, Framebpp);
23     }
24
25     //停止采集
26     stopcon();
27     //解除映射
28     bufunmap();
29     //关闭帧缓冲
30     exit_Framebuffer();
31     //关闭摄像头设备
32     close_cameral();
33 }
这里为了通用,把摄像头设备路径作为入参传入。
1 //打开摄像头设备
2 int open_cameral(char* path)
3 {
4     fd=open(path,O_RDWR);
5     if (fd < 0) {
6         printf("Open /dev/video0 failed\n");
7         return -1;
8     }
9 }
一般usb摄像头,插入后,会直接生成设备文件:/dev/videox,这里的x范围[0~n],表示第几个usb摄像头设备,我的测试环境由于只有1个,所以是/dev/video0。
这里刚开始我也很困惑,这里获取摄像头信息有什么用。后面自己分析了下,主要原因是获取当前摄像头支持的图片格式,防止后面设置的时候设置不正确。
有些老式的摄像头,只有yuyv格式,后面采集就只能采集成yuyv格式,再转换下。
 1 //获取摄像头信息
 2 void get_camInfo(void)
 3 {
 4     struct v4l2_format fmt;
 5     fmt.type=V4L2_BUF_TYPE_VIDEO_CAPTURE;
 6     //获取当前摄像头的宽高
 7     ioctl(fd, VIDIOC_G_FMT, &fmt);
 8     printf("Current data format information:\n\twidth:%d\n\theight:%d\n",fmt.fmt.pix.width,fmt.fmt.pix.height);
 9
10     struct v4l2_fmtdesc fmtdesc;
11     fmtdesc.index=0;
12     fmtdesc.type=V4L2_BUF_TYPE_VIDEO_CAPTURE;
13     //获取当前摄像头支持的格式
14     while(ioctl(fd,VIDIOC_ENUM_FMT,&fmtdesc)!=-1)
15     {
16         if(fmtdesc.pixelformat & fmt.fmt.pix.pixelformat)
17         {
18             printf("\tformat:%s\n",fmtdesc.description);
19             break;
20         }
21         fmtdesc.index++;
22     }
23 }
这里我只是通过打印来查看,没有直接在代码里面比较,可以在后期优化中添加。
这里需要注意,选择格式的时候,一定要确认你的摄像头是否支持。这里格式有2种yuyv和mjpeg,可以通过上面的接口 get_camInfo 来查看。我的设备只支持yuyv,所以这里选择V4L2_PIX_FMT_YUYV。
如果摄像头支持mjpeg,建议直接选择V4L2_PIX_FMT_MJPEG,避免后面转换。
 1 //设置摄像头具体格式
 2 int set_format()
 3 {
 4     struct v4l2_format fmt;
 5     fmt.type                = V4L2_BUF_TYPE_VIDEO_CAPTURE; //这里必须填这个
 6     fmt.fmt.pix.width       = cam_width;   //用户希望设置的宽
 7     fmt.fmt.pix.height      = cam_hight;   //用户希望设置的高
 8     fmt.fmt.pix.pixelformat = V4L2_PIX_FMT_YUYV;//选择格式:V4L2_PIX_FMT_YUYV或V4L2_PIX_FMT_MJPEG
 9     fmt.fmt.pix.field       = V4L2_FIELD_INTERLACED;
10     int ret = ioctl(fd, VIDIOC_S_FMT, &fmt);
11     if (ret < 0) {
12         printf("VIDIOC_S_FMT failed (%d)\n", ret);
13         return -1;
14     }
15     //如果用户传入超过了实际摄像头支持大小,摄像头会自动缩小成最大支持。这里把摄像头当前支持的宽高情况反馈给用户。
16     cam_width = fmt.fmt.pix.width;
17     cam_hight = fmt.fmt.pix.height;
18
19     printf("------------VIDIOC_S_FMT---------------\n");
20     printf("Stream Format Informations:\n");
21     printf(" type: %d\n", fmt.type);
22     printf(" width: %d\n", fmt.fmt.pix.width);
23     printf(" height: %d\n", fmt.fmt.pix.height);
24     return 0;
25 }
由于摄像头采集数据是放在内部的buf中的,我们需要申请内部buf存放采集数据。一般选择4个内部buf,构造成一个简单的循环buf,方便图片的循环显示。
 1 //获取摄像头图片采集的缓存buf
 2 int get_buf(void)
 3 {
 4     struct v4l2_requestbuffers req;
 5     memset(&req, 0, sizeof (req));
 6     req.count = CBUF_NUM;  //摄像头图片缓存buf个数,这里一般设置4个
 7     req.type = V4L2_BUF_TYPE_VIDEO_CAPTURE;
 8     req.memory = V4L2_MEMORY_MMAP;
 9     if (ioctl(fd,VIDIOC_REQBUFS,&req) <0)
10     {
11         perror("VIDIOC_REQBUFS error \n");
12         return -1;
13     }
14     return 0;
15 }
这里不构造循环队列,后面映射的时候再构造。
将申请到的buf映射到用户空间,这样就可以直接操作采集到的帧了,而不必去复制,提升性能。
 1 //映射buf到用户空间
 2 void map_buf(void)
 3 {
 4     int numBufs = 0;
 5     struct v4l2_buffer tmp_buf ;   //摄像头缓冲buf临时保存buf
 6     for (numBufs = 0; numBufs < CBUF_NUM; numBufs++)
 7     {
 8         memset( &tmp_buf, 0, sizeof(tmp_buf) );
 9         tmp_buf.type =  V4L2_BUF_TYPE_VIDEO_CAPTURE ;
10         tmp_buf.memory = V4L2_MEMORY_MMAP ;
11         tmp_buf.index = numBufs;
12         //获取内部buf信息到tmp_buf
13         if (ioctl(fd, VIDIOC_QUERYBUF, &tmp_buf) < 0)
14         {
15             printf("VIDIOC_QUERYBUF (%d) error\n",numBufs);
16             return;
17         }
18         pic_buffers[numBufs].length = tmp_buf.length;
19         pic_buffers[numBufs].offset = (size_t) tmp_buf.m.offset;
20         //开始映射
21         pic_buffers[numBufs].start = mmap (NULL, tmp_buf.length,PROT_READ | PROT_WRITE, MAP_SHARED, fd, tmp_buf.m.offset);
22         if (pic_buffers[numBufs].start == MAP_FAILED)
23         {
24             perror("pic_buffers error\n");
25             //return -1;
26         }
27         //把设置好的buf入队列
28         if (ioctl (fd, VIDIOC_QBUF, &tmp_buf) < 0)
29         {
30             printf("VIDIOC_QBUF error\n");
31             //return -1;
32         }
33     }
34     //初始化入队出队
35     enqueue.type = V4L2_BUF_TYPE_VIDEO_CAPTURE ;
36     dequeue.type = V4L2_BUF_TYPE_VIDEO_CAPTURE ;
37     enqueue.memory = V4L2_MEMORY_MMAP ;
38     dequeue.memory = V4L2_MEMORY_MMAP ;
39 }
 1 //开始采集
 2 void startcon()
 3 {
 4     enum v4l2_buf_type type;
 5     type = V4L2_BUF_TYPE_VIDEO_CAPTURE;
 6     if (ioctl (fd, VIDIOC_STREAMON, &type) < 0)
 7     {
 8         printf("VIDIOC_STREAMON error\n");
 9         // return -1;
10     }
11 }
 1 //获取采集到的数据
 2 int get_picture(char *buffer)
 3 {
 4     int ret ;
 5     //把采集到图片的缓冲出队
 6     ret = ioctl(fd , VIDIOC_DQBUF , &dequeue);
 7     if(ret != 0)
 8     {
 9         perror("dequeue fail");
10         return -1 ;
11     }
12
13     //把图片数据放到buffer中
14     memcpy(buffer , pic_buffers[dequeue.index].start , pic_buffers[dequeue.index].length);
15
16     //由于当前出队的缓冲数据已经拷贝到用户buffer中,这里可以重新入队用于后面的数据保存,构造起循环队列。
17     enqueue.index = dequeue.index ;
18     ret = ioctl(fd , VIDIOC_QBUF , &enqueue);
19     if(ret != 0)
20     {
21         perror("enqueue fail");
22         return -2 ;
23     }
24     return 0 ;
25 }
 1 int stopcon(void)
 2 {
 3     //停止摄像头
 4     int ret ;
 5     int off= 1 ;
 6     ret = ioctl(fd , VIDIOC_STREAMOFF, &off);
 7     if(ret != 0)
 8     {
 9         perror("stop Cameral fail");
10         return -1 ;
11     }
12     return 0 ;
13 }
1 int bufunmap(void)
2 {
3     int i ;
4     for(i = 0 ; i < CBUF_NUM ; i++)
5     {
6         munmap(pic_buffers[i].start , pic_buffers[i].length);
7     }
8     return 0 ;
9 }
1 //关闭摄像头
2 void close_cameral(void)
3 {
4     close(fd);
5 }
 1 //初始化framebuffer
 2 int init_FrameBuffer(void)
 3 {
 4
 5     struct fb_var_screeninfo vinfo;
 6     struct fb_fix_screeninfo finfo;
 7     Frame_fd = open("/dev/fb0" , O_RDWR);
 8     if(-1 == Frame_fd)
 9     {
10         perror("open frame buffer fail");
11         return -1 ;
12     }
13
14     // Get fixed screen information
15     if (ioctl(Frame_fd, FBIOGET_FSCREENINFO, &finfo))
16     {
17         printf("Error reading fixed information.\n");
18         exit(0);
19     }
20
21     // Get variable screen information
22     if (ioctl(Frame_fd, FBIOGET_VSCREENINFO, &vinfo))
23     {
24         printf("Error reading variable information.\n");
25         exit(0);
26     }
27     //这里把整个显存一起初始化(xres_virtual 表示显存的x,比实际的xres大,bits_per_pixel位深)
28     screensize = vinfo.xres_virtual * vinfo.yres_virtual * vinfo.bits_per_pixel / 8;
29     //获取实际的位色,这里很关键,后面转换和填写的时候需要
30     Framebpp = vinfo.bits_per_pixel;
31     printf("%dx%d, %dbpp  screensize is %ld\n", vinfo.xres_virtual, vinfo.yres_virtual, vinfo.bits_per_pixel,screensize);
32
33     //映射出来,用户直接操作
34     FrameBuffer = mmap(0, screensize, PROT_READ | PROT_WRITE , MAP_SHARED , Frame_fd ,0 );
35     if(FrameBuffer == (void *)-1)
36     {
37         perror("memory map fail");
38         return -2 ;
39     }
40     return 0 ;
41 }
 1 //写入framebuffer   fbp:帧缓冲首地址   fbfd:帧缓冲fd   img_buf:采集到的图片首地址  width:用户的宽 height:用户的高  bits:帧缓冲的位深
 2 int write_data_to_fb(void *fbp, int fbfd, void *img_buf, unsigned int img_width, unsigned int img_height, unsigned int img_bits)
 3 {
 4     int row, column;
 5     int num = 0;        //img_buf 中的某个像素点元素的下标
 6     rgb32_frame *rgb32_fbp = (rgb32_frame *)fbp;
 7     rgb32 *rgb32_img_buf = (rgb32 *)img_buf;
 8
 9     //防止摄像头采集宽高比显存大
10     if(screensize < img_width * img_height * img_bits / 8)
11     {
12         printf("the imgsize is too large\n");
13         return -1;
14     }
15
16     /*不同的位深度图片使用不同的显示方案*/
17     switch (img_bits)
18     {
19         case 32:
20             for(row = 0; row < img_height; row++)
21                 {
22                     for(column = 0; column < img_width; column++)
23                     {
24                         //由于摄像头分辨率没有帧缓冲大,完成显示后,需要强制换行,帧缓冲是线性的,使用row * vinfo.xres_virtual换行
25                         rgb32_fbp[row * Framex + column].r = rgb32_img_buf[num].r;
26                         rgb32_fbp[row * Framex + column].g = rgb32_img_buf[num].g;
27                         rgb32_fbp[row * Framex + column].b = rgb32_img_buf[num].b;
28
29                         num++;
30                     }
31                 }
32             break;
33         default:
34             break;
35     }
36
37     return 0;
38 }
这里有个关键点:帧缓冲存放的格式是bgr,不能直接rgb拷贝,需要转换下,否则显示颜色不对。
由于我是是32位的,所以只写了32位,具体的目标板上可能是24位的,需要修改对应的结构rgb32_frame和rgb32。 rgb24和rgb32的区别,请自行百度。
如下是32位的:
 1 //rgb结构
 2 typedef struct {
 3 uint_8 r; // 红色分量
 4 uint_8 g; // 绿色分量
 5 uint_8 b; // 蓝色分量
 6 uint_8 rgbReserved; // 保留字节(用作Alpha通道或忽略)
 7 } rgb32;
 8
 9 //帧缓冲中的rgb结构
10 typedef struct {
11 uint_8 b; // 蓝色分量
12 uint_8 g; // 绿色分量
13 uint_8 r; // 红色分量
14 uint_8 rgbReserved; // 保留字节(用作Alpha通道或忽略)
15 } rgb32_frame;
如下是24位的:
 1 //rgb结构
 2 typedef struct {
 3 uint_8 r; // 红色分量
 4 uint_8 g; // 绿色分量
 5 uint_8 b; // 蓝色分量
 6 } rgb24;
 7
 8 //帧缓冲中的rgb结构
 9 typedef struct {
10 uint_8 b; // 蓝色分量
11 uint_8 g; // 绿色分量
12 uint_8 r; // 红色分量
13 } rgb24_frame;
1 //退出framebuffer
2 int exit_Framebuffer(void)
3 {
4     munmap(FrameBuffer , screensize);
5     close(Frame_fd);
6     return 0 ;
7 }
//yuyv转rgb32的算法实现
static int sign3 = 1;
/*
YUV到RGB的转换有如下公式:
R = 1.164*(Y-16) + 1.159*(V-128);
G = 1.164*(Y-16) - 0.380*(U-128)+ 0.813*(V-128);
B = 1.164*(Y-16) + 2.018*(U-128));
*/
int yuvtorgb(int y, int u, int v)
{
     unsigned int pixel32 = 0;
     unsigned char *pixel = (unsigned char *)&pixel32;
     int r, g, b;
     static long int ruv, guv, buv;

     if(1 == sign3)
     {
         sign3 = 0;
         ruv = 1159*(v-128);
         guv = -380*(u-128) + 813*(v-128);
         buv = 2018*(u-128);
     }

     r = (1164*(y-16) + ruv) / 1000;
     g = (1164*(y-16) - guv) / 1000;
     b = (1164*(y-16) + buv) / 1000;

     if(r > 255) r = 255;
     if(g > 255) g = 255;
     if(b > 255) b = 255;
     if(r < 0) r = 0;
     if(g < 0) g = 0;
     if(b < 0) b = 0;

     pixel[0] = r;
     pixel[1] = g;
     pixel[2] = b;

     return pixel32;
}

int yuyv2rgb32(unsigned char *yuv, unsigned char *rgb, unsigned int
width, unsigned int height)
{
     unsigned int in, out;
     int y0, u, y1, v;
     unsigned int pixel32;
     unsigned char *pixel = (unsigned char *)&pixel32;
     //分辨率描述像素点个数,而yuv2个像素点占有4个字符,所以这里计算总的字符个数,需要乘2
     unsigned int size = width*height*2;

     for(in = 0, out = 0; in < size; in += 4, out += 8)
     {
          y0 = yuv[in+0];
          u  = yuv[in+1];
          y1 = yuv[in+2];
          v  = yuv[in+3];

          sign3 = 1;
          pixel32 = yuvtorgb(y0, u, v);
          rgb[out+0] = pixel[0];
          rgb[out+1] = pixel[1];
          rgb[out+2] = pixel[2];
          rgb[out+3] = 0;  //32位rgb多了一个保留位

          pixel32 = yuvtorgb(y1, u, v);
          rgb[out+4] = pixel[0];
          rgb[out+5] = pixel[1];
          rgb[out+6] = pixel[2];
          rgb[out+7] = 0;

     }
     return 0;
}
标签:art 方式 start 实现 enum enqueue print 准备 ems
原文地址:http://www.cnblogs.com/aquafly/p/6474555.html