标签:绝对路径 protected 数字 显示 city private hand flash protect
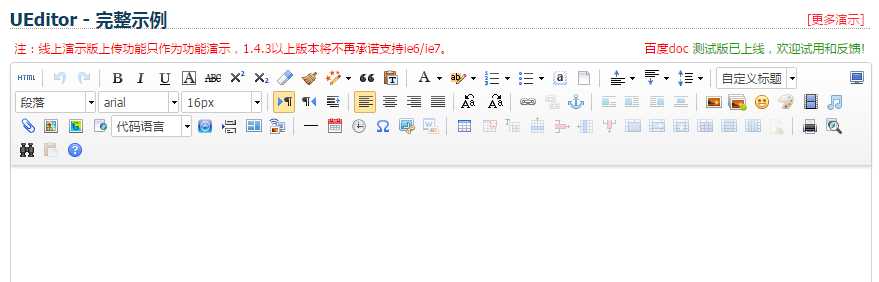
【百度编辑器】
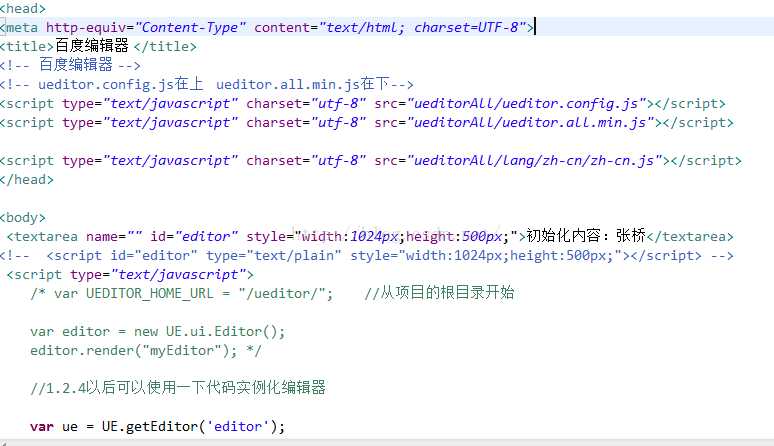
2. 页面引入js文件
<script type="text/javascript"src="ueditor/ueditor.config.js"></script>
<script type="text/javascript"src="ueditor/ueditor.all.js"></script>
3. 页面添加编辑器控件
<textarea type="textarea" name="content" id="myEditor"></textarea>
<scripttypescripttype="text/javascript">
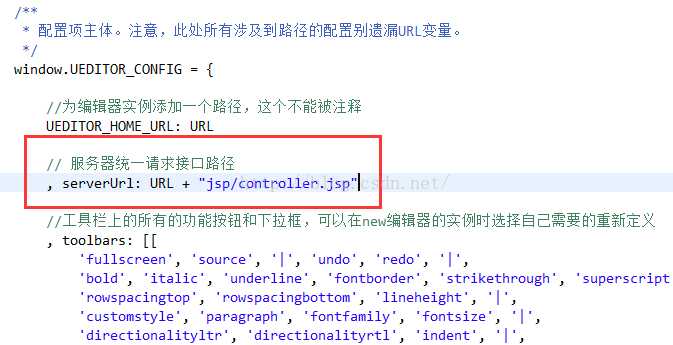
UEDITOR_CONFIG.UEDITOR_HOME_URL = ‘./ueditor/‘; //一定要用这句话,否则你需要去 ueditor.config.js修改路径的配置信息
UE.getEditor(‘myEditor‘);
</script>
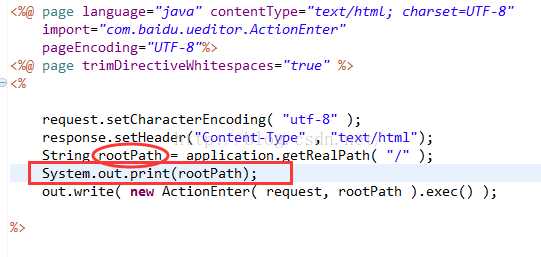
4. ueditor支持图片、文档、音乐等文件上传功能,如果你想要配置上传路径,可以修改 ueditor/jsp/config.json。
/* 上传图片配置项 */
"imageActionName": "uploadimage", /* 执行上传图片的action名称 */
"imageFieldName": "upfile", /* 提交的图片表单名称 */
"imageMaxSize": 2048000, /* 上传大小限制,单位B */
"imageAllowFiles": [".png", ".jpg",".jpeg", ".gif", ".bmp"], /* 上传图片格式显示 */
"imageCompressEnable": true, /* 是否压缩图片,默认是true*/
"imageCompressBorder": 1600, /* 图片压缩最长边限制 */
"imageInsertAlign": "none", /* 插入的图片浮动方式 */
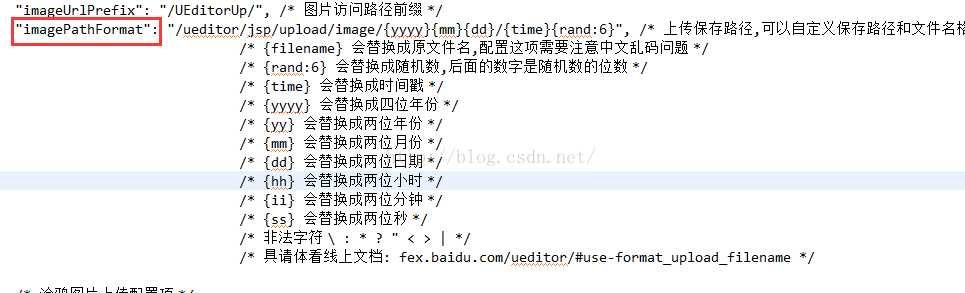
"imageUrlPrefix": "", /* 图片访问路径前缀 */
"imagePathFormat":"_images/image/{yyyy}{mm}{dd}/{time}{rand:6}", /* 上传保存路径,可以自定义保存路径和文件名格式 */
5. ueditor支持自定义功能,界面上显示的功能都是可配置的,只要在ueditor/ueditor.config.js的toolbar中删改配置即可,代码如下:
//工具栏上的所有的功能按钮和下拉框,可以在new编辑器的实例时选择自己需要的从新定义 , toolbars: [[
‘fullscreen‘, ‘source‘, ‘|‘, ‘undo‘, ‘redo‘, ‘|‘,
‘bold‘, ‘italic‘, ‘underline‘, ‘fontborder‘, ‘strikethrough‘, ‘superscript‘, ‘subscript‘, ‘removeformat‘, ‘formatmatch‘, ‘autotypeset‘, ‘blockquote‘, ‘pasteplain‘, ‘|‘, ‘forecolor‘, ‘backcolor‘, ‘insertorderedlist‘, ‘insertunorderedlist‘, ‘selectall‘, ‘cleardoc‘, ‘|‘,
‘rowspacingtop‘, ‘rowspacingbottom‘, ‘lineheight‘, ‘|‘,
‘customstyle‘, ‘paragraph‘, ‘fontfamily‘, ‘fontsize‘, ‘|‘,
‘directionalityltr‘, ‘directionalityrtl‘, ‘indent‘, ‘|‘,
‘justifyleft‘, ‘justifycenter‘, ‘justifyright‘, ‘justifyjustify‘, ‘|‘, ‘touppercase‘, ‘tolowercase‘, ‘|‘,
‘link‘, ‘unlink‘, ‘anchor‘, ‘|‘, ‘imagenone‘, ‘imageleft‘, ‘imageright‘, ‘imagecenter‘, ‘|‘,
‘simpleupload‘, ‘insertimage‘, ‘emotion‘, ‘scrawl‘, ‘insertvideo‘, ‘music‘, ‘attachment‘, ‘map‘, ‘gmap‘, ‘insertframe‘, ‘insertcode‘, ‘pagebreak‘, ‘template‘, ‘background‘, ‘|‘,
‘horizontal‘, ‘date‘, ‘time‘, ‘spechars‘, ‘snapscreen‘, ‘wordimage‘, ‘|‘,
‘inserttable‘, ‘deletetable‘, ‘insertparagraphbeforetable‘, ‘insertrow‘, ‘deleterow‘, ‘insertcol‘, ‘deletecol‘, ‘mergecells‘, ‘mergeright‘, ‘mergedown‘, ‘splittocells‘, ‘splittorows‘, ‘splittocols‘, ‘charts‘, ‘|‘,
‘searchreplace‘, ‘help‘, ‘drafts‘
]]
1)获取编辑器里面的内容(html代码): GetEditor().getContent();
2)设置编辑器里面的内容(支持html代码): GetEditor().setContent("李啸天", boolean是否追加);
3)获取编辑器里面的纯文本: GetEditor().getContentTxt();
4)获取编辑器带格式的纯文本(也就是包含一些<img>等标签的文本,但是不包含文本的格式,上一个方法不包含<ima>等标签): GetEditro()..getPlainTxt();
5)判断编辑器是否有内容返回true或者false GetEditor().hasContents();
6)使编辑器获取焦点: GetEditor().focus();
7)判断编辑器是否获取焦点 :GetEditor().isFocus();
8)使编辑器失去焦点:GetEditor().blur();
11)是编辑器可以编辑:GetEditor().setEnabled();
12)显示隐藏编辑器方法为:setShow(), setHide()
13)设置编辑器高度:setHeight(Number heigth);
输出结果例子为:E:\workspace\.metadata\.plugins\org.eclipse.wst.server.core\tmp1\wtpwebapps\UEditorUp\ (本地项目存放位置)
我们启动项目:http://localhost:8081/UEditorUp
打开本地路径:E:\workspace\.metadata\.plugins\org.eclipse.wst.server.core\tmp1\wtpwebapps\UEditorUp\ueditor\jsp\upload\image\20161020
我们上传的图片就保存在这里,后面绿色部分哪里来的呢?
打开jsp下的config.json文件:就是在下图这默认配置生成的
·
【ckeditor】
step 1:
首先,还是image.js这个文件,搜索“upload”可以找到这一段
id:‘Upload‘,hidden:true
实际上上传功能被隐藏了,把上面的true改成false,再打开编辑器,就能找到上传功能了。
step 2:
上面的只是一个上传页面。也就相当于一个HTML的form表单,要配置点击“上传到服务器上”按钮后请求的Action。可以在ckeditor/config.js中配置。
加入:
config.filebrowserUploadUrl="actions/ckeditorUpload";
"ckeditorUpload"是请求的URL,也就是点击这个按钮就会post到ckeditorUpload地址进行处理,这里指向的是Struts 2的一个Action。当然,也可以用servlet或者ASP、PHP等来处理请求。
- <package name="actions" extends="struts-default" namespace="/actions">
- <action name="ckeditorUpload" class="com.xxx.CkeditorUpload ">
- </action>
- </package>
step 3:
文件上传的控件相当于<input type="file" name="upload" .../>,其name是”upload”,知道了name那么就可以在Action中获取这个文件。
- private File upload; //文件
- private String uploadContentType; //文件类型
- private String uploadFileName; //文件名
以上三个私有变量都要有set方法。如果不了解的话可以先学习一下Struts 2文件上传。
step 4:
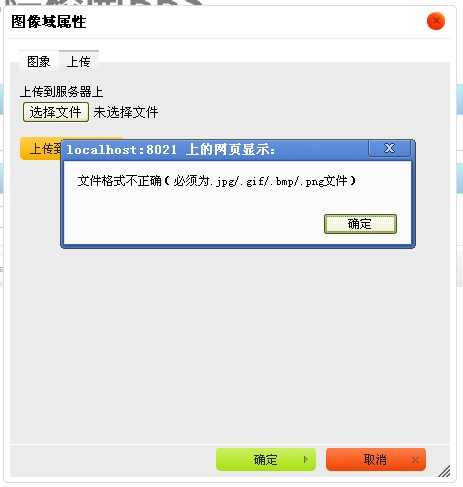
如果上传的图片格式不正确,可以在上传界面进行提示。
这个提示不是ckeditor提示的,要在Action中响应。
- String callback = ServletActionContext.getRequest().getParameter("CKEditorFuncNum");
- if([判断条件]){
- out.println("<script type=\"text/javascript\">");
- out.println("window.parent.CKEDITOR.tools.callFunction(" + callback + ",‘‘," + "‘文件格式不正确(必须为.jpg/.gif/.bmp/.png文件)‘);");
- out.println("</script>");
- return null;
- }
step 5:
- InputStream is = new FileInputStream(upload);
- String uploadPath = ServletActionContext.getServletContext().getRealPath("/img/postImg");
- String fileName = java.util.UUID.randomUUID().toString(); //采用UUID的方式随即命名
- fileName += expandedName; // 加上后缀名
- File toFile = new File(uploadPath, fileName);
- OutputStream os = new FileOutputStream(toFile);
- byte[] buffer = new byte[1024];
- int length = 0;
- while ((length = is.read(buffer)) > 0) {
- os.write(buffer, 0, length);
- }
- is.close();
- os.close();
这段代码是Struts 2上传图片的核心代码,把图片上传后保存在项目的某个目录下,并随机重命名。
step 6:
图片上传成功,在目录下也可以看到图片,至此图片上传成功。但是如何将图片发到编辑器中呢?
点“确定”按钮会有以下提示。
到这里,要在Action中返回一段JS脚本。
- String callback =ServletActionContext.getRequest().getParameter("CKEditorFuncNum");
- out.println("<script type=\"text/javascript\">");
- out.println("window.parent.CKEDITOR.tools.callFunction("+ callback + ",‘" +"img/postImg/"+ fileName + "‘,‘‘)");
- out.println("</script>");
有了这段代码,图片上传成功后,根据这里的
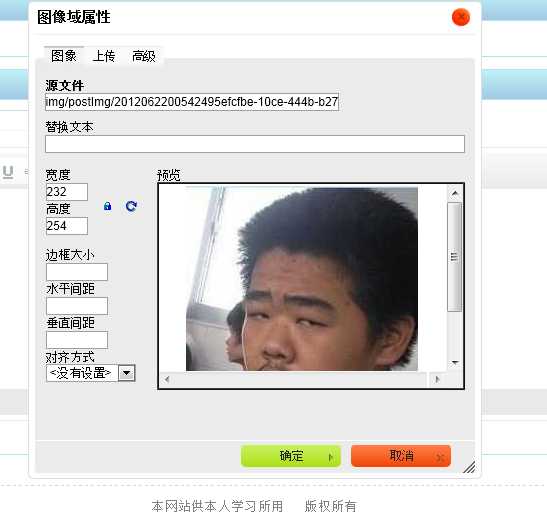
"img/postImg/" + filename
相对地址,就可以使用这个图片,直接转到“图像”页面。
一、使用方法:
1、在页面<head>中引入ckeditor核心文件ckeditor.js
<script type="text/javascript" src="ckeditor/ckeditor.js"></script>
2、在使用编辑器的地方插入HTML控件<textarea>
<textarea id="TextArea1" cols="20" rows="2" class="ckeditor"></textarea>
如果是ASP.NET环境,也可用服务器端控件<TextBox>
<asp:TextBox ID="tbContent" runat="server" TextMode="MultiLine" class="ckeditor"></asp:TextBox>
注意在控件中加上 class="ckeditor" 。
3、将相应的控件替换成编辑器代码
<script type="text/javascript"> CKEDITOR.replace(‘TextArea1‘); //如果是在ASP.NET环境下用的服务器端控 件<TextBox> CKEDITOR.replace(‘tbContent‘); //如 果<TextBox>控件在母版页中,要这样写 CKEDITOR.replace(‘<%=tbContent.ClientID.Replace("_","$") %>‘); </script>
4、配置编辑器
ckeditor的配置都集中在 ckeditor/config.js 文件中,下面是一些常用的配置参数:
// 界面语言,默认为 ‘en‘ config.language = ‘zh-cn‘; // 设置宽高 config.width = 400; config.height = 400; // 编辑器样式,有三种:‘kama‘(默认)、‘office2003‘、‘v2‘ config.skin = ‘v2‘; // 背景颜色 config.uiColor = ‘#FFF‘; // 工具栏(基础‘Basic‘、全能‘Full‘、自定义)plugins/toolbar/plugin.js config.toolbar = ‘Basic‘; config.toolbar = ‘Full‘; 这将配合: config.toolbar_Full = [ [‘Source‘,‘-‘,‘Save‘,‘NewPage‘,‘Preview‘,‘-‘,‘Templates‘], [‘Cut‘,‘Copy‘,‘Paste‘,‘PasteText‘,‘PasteFromWord‘,‘-‘,‘Print‘, ‘SpellChecker‘, ‘Scayt‘], [‘Undo‘,‘Redo‘,‘-‘,‘Find‘,‘Replace‘,‘-‘,‘SelectAll‘,‘RemoveFormat‘], [‘Form‘, ‘Checkbox‘, ‘Radio‘, ‘TextField‘, ‘Textarea‘, ‘Select‘, ‘Button‘, ‘ImageButton‘, ‘HiddenField‘], ‘/‘, [‘Bold‘,‘Italic‘,‘Underline‘,‘Strike‘,‘-‘,‘Subscript‘,‘Superscript‘], [‘NumberedList‘,‘BulletedList‘,‘-‘,‘Outdent‘,‘Indent‘,‘Blockquote‘], [‘JustifyLeft‘,‘JustifyCenter‘,‘JustifyRight‘,‘JustifyBlock‘], [‘Link‘,‘Unlink‘,‘Anchor‘], [‘Image‘,‘Flash‘,‘Table‘,‘HorizontalRule‘,‘Smiley‘,‘SpecialChar‘,‘PageBreak‘], ‘/‘, [‘Styles‘,‘Format‘,‘Font‘,‘FontSize‘], [‘TextColor‘,‘BGColor‘] ]; //工具栏是否可以被收缩 config.toolbarCanCollapse = true; //工具栏的位置 config.toolbarLocation = ‘top‘;//可选:bottom //工具栏默认是否展开 config.toolbarStartupExpanded = true; // 取消 “拖拽以改变尺寸”功能 plugins/resize/plugin.js config.resize_enabled = false; //改变大小的最大高度 config.resize_maxHeight = 3000; //改变大小的最大宽度 config.resize_maxWidth = 3000; //改变大小的最小高度 config.resize_minHeight = 250; //改变大小的最小宽度 config.resize_minWidth = 750; // 当提交包含有此编辑器的表单时,是否自动更新元素内的数据 config.autoUpdateElement = true; // 设置是使用绝对目录还是相对目录,为空为相对目录 config.baseHref = ‘‘ // 编辑器的z-index值 config.baseFloatZIndex = 10000; //设置快捷键 config.keystrokes = [ [ CKEDITOR.ALT + 121 /*F10*/, ‘toolbarFocus‘ ], //获取焦点 [ CKEDITOR.ALT + 122 /*F11*/, ‘elementsPathFocus‘ ], //元素焦点 [ CKEDITOR.SHIFT + 121 /*F10*/, ‘contextMenu‘ ], //文本菜单 [ CKEDITOR.CTRL + 90 /*Z*/, ‘undo‘ ], //撤销 [ CKEDITOR.CTRL + 89 /*Y*/, ‘redo‘ ], //重做 [ CKEDITOR.CTRL + CKEDITOR.SHIFT + 90 /*Z*/, ‘redo‘ ], // [ CKEDITOR.CTRL + 76 /*L*/, ‘link‘ ], //链接 [ CKEDITOR.CTRL + 66 /*B*/, ‘bold‘ ], //粗体 [ CKEDITOR.CTRL + 73 /*I*/, ‘italic‘ ], //斜体 [ CKEDITOR.CTRL + 85 /*U*/, ‘underline‘ ], //下划线 [ CKEDITOR.ALT + 109 /*-*/, ‘toolbarCollapse‘ ] ] //设置快捷键 可能与浏览器快捷键冲突 plugins/keystrokes/plugin.js. config.blockedKeystrokes = [ CKEDITOR.CTRL + 66 /*B*/, CKEDITOR.CTRL + 73 /*I*/, CKEDITOR.CTRL + 85 /*U*/ ] //设置编辑内元素的背景色的取值 plugins/colorbutton/plugin.js. config.colorButton_backStyle = { element : ‘span‘, styles : { ‘background-color‘ : ‘#(color)‘ } } //设置前景色的取值 plugins/colorbutton/plugin.js config.colorButton_colors = ‘000,800000,8B4513,2F4F4F,008080,000080,4B0082,696969,B22222,A52A2A,DAA520,006400,40E0D0,0000CD,800080,808080,F00,FF8C00,FFD700,008000,0FF,00F,EE82EE,A9A9A9,FFA07A,FFA500,FFFF00,00FF00,AFEEEE,ADD8E6,DDA0DD,D3D3D3,FFF0F5,FAEBD7,FFFFE0,F0FFF0,F0FFFF,F0F8FF,E6E6FA,FFF’ //是否在选择颜色时显示“其它颜色”选项 plugins/colorbutton/plugin.js config.colorButton_enableMore = false //区块的前景色默认值设置 plugins/colorbutton/plugin.js config.colorButton_foreStyle = { element : ‘span‘, styles : { ‘color‘ : ‘#(color)‘ } }; //所需要添加的CSS文件 在此添加 可使用相对路径和网站的绝对路径 config.contentsCss = ‘./contents.css‘; //文字方向 config.contentsLangDirection = ‘rtl‘; //从左到右 //CKeditor的配置文件 若不想配置 留空即可 CKEDITOR.replace( ‘myfiled‘, { customConfig : ‘./config.js‘ } ); //界面编辑框的背景色 plugins/dialog/plugin.js config.dialog_backgroundCoverColor = ‘#fffefd‘; //可设置参考 config.dialog_backgroundCoverColor = ‘white‘ //默认 //背景的不透明度 数值应该在:0.0~1.0 之间 plugins/dialog/plugin.js config.dialog_backgroundCoverOpacity = 0.5 //移动或者改变元素时 边框的吸附距离 单位:像素 plugins/dialog/plugin.js config.dialog_magnetDistance = 20; //是否拒绝本地拼写检查和提示 默认为拒绝 目前仅firefox和safari支持 plugins/wysiwygarea/plugin.js. config.disableNativeSpellChecker = true //进行表格编辑功能 如:添加行或列 目前仅firefox支持 plugins/wysiwygarea/plugin.js config.disableNativeTableHandles = true; //默认为不开启 //是否开启 图片和表格 的改变大小的功能 config.disableObjectResizing = true; config.disableObjectResizing = false //默认为开启 //设置HTML文档类型 config.docType = ‘<!DOCTYPE html PUBLIC "-//W3C//DTD XHTML 1.0 Transitional//EN" "http://www.w3.org/TR/xhtml1/DTD/xhtml1-transitional.dtd%22‘ ; //是否对编辑区域进行渲染 plugins/editingblock/plugin.js config.editingBlock = true; //编辑器中回车产生的标签 config.enterMode = CKEDITOR.ENTER_P; //可选:CKEDITOR.ENTER_BR或CKEDITOR.ENTER_DIV //是否使用HTML实体进行输出 plugins/entities/plugin.js config.entities = true; //定义更多的实体 plugins/entities/plugin.js config.entities_additional = ‘#39‘; //其中#代替了& //是否转换一些难以显示的字符为相应的HTML字符 plugins/entities/plugin.js config.entities_greek = true; //是否转换一些拉丁字符为HTML plugins/entities/plugin.js config.entities_latin = true; //是否转换一些特殊字符为ASCII字符 如"This is Chinese: 汉语."转换为"This is Chinese: 汉语." plugins/entities/plugin.js config.entities_processNumerical = false; //添加新组件 config.extraPlugins = ‘myplugin‘; //非默认 仅示例 //使用搜索时的高亮色 plugins/find/plugin.js config.find_highlight = { element : ‘span‘, styles : { ‘background-color‘ : ‘#ff0‘, ‘color‘ : ‘#00f‘ } }; //默认的字体名 plugins/font/plugin.js config.font_defaultLabel = ‘Arial‘; //字体编辑时的字符集 可以添加常用的中文字符:宋体、楷体、黑体等 plugins/font/plugin.js config.font_names = ‘Arial;Times New Roman;Verdana‘; //文字的默认式样 plugins/font/plugin.js config.font_style = { element : ‘span‘, styles : { ‘font-family‘ : ‘#(family)‘ }, overrides : [ { element : ‘font‘, attributes : { ‘face‘ : null } } ] }; //字体默认大小 plugins/font/plugin.js config.fontSize_defaultLabel = ‘12px‘; //字体编辑时可选的字体大小 plugins/font/plugin.js config.fontSize_sizes =‘8/8px;9/9px;10/10px;11/11px;12/12px;14/14px;16/16px;18/18px;20/20px;22/22px;24/24px;26/26px;28/28px;36/36px;48/48px;72/72px‘ //设置字体大小时 使用的式样 plugins/font/plugin.js config.fontSize_style = { element : ‘span‘, styles : { ‘font-size‘ : ‘#(size)‘ }, overrides : [ { element : ‘font‘, attributes : { ‘size‘ : null } } ] }; //是否强制复制来的内容去除格式 plugins/pastetext/plugin.js config.forcePasteAsPlainText =false //不去除 //是否强制用“&”来代替“&”plugins/htmldataprocessor/plugin.js config.forceSimpleAmpersand = false; //对address标签进行格式化 plugins/format/plugin.js config.format_address = { element : ‘address‘, attributes : { class : ‘styledAddress‘ } }; //对DIV标签自动进行格式化 plugins/format/plugin.js config.format_div = { element : ‘div‘, attributes : { class : ‘normalDiv‘ } }; //对H1标签自动进行格式化 plugins/format/plugin.js config.format_h1 = { element : ‘h1‘, attributes : { class : ‘contentTitle1‘ } }; //对H2标签自动进行格式化 plugins/format/plugin.js config.format_h2 = { element : ‘h2‘, attributes : { class : ‘contentTitle2‘ } }; //对H3标签自动进行格式化 plugins/format/plugin.js config.format_h1 = { element : ‘h3‘, attributes : { class : ‘contentTitle3‘ } }; //对H4标签自动进行格式化 plugins/format/plugin.js config.format_h1 = { element : ‘h4‘, attributes : { class : ‘contentTitle4‘ } }; //对H5标签自动进行格式化 plugins/format/plugin.js config.format_h1 = { element : ‘h5‘, attributes : { class : ‘contentTitle5‘ } }; //对H6标签自动进行格式化 plugins/format/plugin.js config.format_h1 = { element : ‘h6‘, attributes : { class : ‘contentTitle6‘ } }; //对P标签自动进行格式化 plugins/format/plugin.js config.format_p = { element : ‘p‘, attributes : { class : ‘normalPara‘ } }; //对PRE标签自动进行格式化 plugins/format/plugin.js config.format_pre = { element : ‘pre‘, attributes : { class : ‘code‘ } }; //用分号分隔的标签名字 在工具栏上显示 plugins/format/plugin.js config.format_tags = ‘p;h1;h2;h3;h4;h5;h6;pre;address;div‘; //是否使用完整的html编辑模式 如使用,其源码将包含:<html><body></body></html>等标签 config.fullPage = false; //是否忽略段落中的空字符 若不忽略 则字符将以“”表示 plugins/wysiwygarea/plugin.js config.ignoreEmptyParagraph = true; //在清除图片属性框中的链接属性时 是否同时清除两边的<a>标签 plugins/image/plugin.js config.image_removeLinkByEmptyURL = true; //一组用逗号分隔的标签名称,显示在左下角的层次嵌套中 plugins/menu/plugin.js. config.menu_groups =‘clipboard,form,tablecell,tablecellproperties,tablerow,tablecolumn,table,anchor,link,image,flash,checkbox,radio,textfield,hiddenfield,imagebutton,button,select,textarea‘; //显示子菜单时的延迟,单位:ms plugins/menu/plugin.js config.menu_subMenuDelay = 400; //当执行“新建”命令时,编辑器中的内容 plugins/newpage/plugin.js config.newpage_html = ‘‘; //当从word里复制文字进来时,是否进行文字的格式化去除 plugins/pastefromword/plugin.js config.pasteFromWordIgnoreFontFace = true; //默认为忽略格式 //是否使用<h1><h2>等标签修饰或者代替从word文档中粘贴过来的内容 plugins/pastefromword/plugin.js config.pasteFromWordKeepsStructure = false; //从word中粘贴内容时是否移除格式 plugins/pastefromword/plugin.js config.pasteFromWordRemoveStyle = false; //对应后台语言的类型来对输出的HTML内容进行格式化,默认为空 config.protectedSource.push( /<"?["s"S]*?"?>/g ); // PHP Code config.protectedSource.push( //g ); // ASP Code config.protectedSource.push( /(]+>["s|"S]*?<"/asp:[^">]+>)|(]+"/>)/gi ); // ASP.Net Code //当输入:shift+Enter时插入的标签 config.shiftEnterMode = CKEDITOR.ENTER_P; //可选:CKEDITOR.ENTER_BR或CKEDITOR.ENTER_DIV //可选的表情替代字符 plugins/smiley/plugin.js. config.smiley_descriptions = [ ‘:)‘, ‘:(‘, ‘;)‘, ‘:D‘, ‘:/‘, ‘:P‘, ‘‘, ‘‘, ‘‘, ‘‘, ‘‘, ‘‘, ‘‘, ‘;(‘, ‘‘, ‘‘, ‘‘, ‘‘, ‘‘, ‘:kiss‘, ‘‘ ]; //对应的表情图片 plugins/smiley/plugin.js config.smiley_images = [ ‘regular_smile.gif‘,‘sad_smile.gif‘,‘wink_smile.gif‘,‘teeth_smile.gif‘,‘confused_smile.gif‘,‘tounge_smile.gif‘, ‘embaressed_smile.gif‘,‘omg_smile.gif‘,‘whatchutalkingabout_smile.gif‘,‘angry_smile.gif‘,‘angel_smile.gif‘,‘shades_smile.gif‘, ‘devil_smile.gif‘,‘cry_smile.gif‘,‘lightbulb.gif‘,‘thumbs_down.gif‘,‘thumbs_up.gif‘,‘heart.gif‘, ‘broken_heart.gif‘,‘kiss.gif‘,‘envelope.gif‘]; //表情的地址 plugins/smiley/plugin.js config.smiley_path = ‘plugins/smiley/images/‘; //页面载入时,编辑框是否立即获得焦点 plugins/editingblock/plugin.js plugins/editingblock/plugin.js. config.startupFocus = false; //载入时,以何种方式编辑 源码和所见即所得 "source"和"wysiwyg" plugins/editingblock/plugin.js. config.startupMode =‘wysiwyg‘; //载入时,是否显示框体的边框 plugins/showblocks/plugin.js config.startupOutlineBlocks = false; //是否载入样式文件 plugins/stylescombo/plugin.js. config.stylesCombo_stylesSet = ‘default‘; //以下为可选 config.stylesCombo_stylesSet = ‘mystyles‘; config.stylesCombo_stylesSet = ‘mystyles:/editorstyles/styles.js‘; config.stylesCombo_stylesSet = ‘mystyles:http://www.example.com/editorstyles/styles.js‘; //起始的索引值 config.tabIndex = 0; //当用户键入TAB时,编辑器走过的空格数,( ) 当值为0时,焦点将移出编辑框 plugins/tab/plugin.js config.tabSpaces = 0; //默认使用的模板 plugins/templates/plugin.js. config.templates = ‘default‘; //用逗号分隔的模板文件plugins/templates/plugin.js. config.templates_files = [ ‘plugins/templates/templates/default.js‘ ] //当使用模板时,“编辑内容将被替换”框是否选中 plugins/templates/plugin.js config.templates_replaceContent = true; //主题 config.theme = ‘default‘; //撤销的记录步数 plugins/undo/plugin.js config.undoStackSize =20; // 在 CKEditor 中集成 CKFinder,注意 ckfinder 的路径选择要正确。 //CKFinder.SetupCKEditor(null, ‘/ckfinder/‘);
二、 一些使用技巧
1、在页面中即时设置编辑器
<script type="text/javascript"> // 示例1:设置工具栏为基本工具栏,高度为70 CKEDITOR.replace(‘<%=tbLink.ClientID.Replace("_","$") %>‘, { toolbar:‘Basic‘, height:70 }); //示例2:工具栏为自定义类型 CKEDITOR.replace( ‘editor1‘, { toolbar : [ //加粗 斜体, 下划线 穿过线 下标字 上标字 [‘Bold‘,‘Italic‘,‘Underline‘,‘Strike‘,‘Subscript‘,‘Superscript‘], // 数字列表 实体列表 减小缩进 增大缩进 [‘NumberedList‘,‘BulletedList‘,‘-‘,‘Outdent‘,‘Indent‘], //左对 齐 居中对齐 右对齐 两端对齐 [‘JustifyLeft‘,‘JustifyCenter‘,‘JustifyRight‘,‘JustifyBlock‘], //超链接 取消超链接 锚点 [‘Link‘,‘Unlink‘,‘Anchor‘], //图片 flash 表格 水平线 表情 特殊字符 分页符 [‘Image‘,‘Flash‘,‘Table‘,‘HorizontalRule‘,‘Smiley‘,‘SpecialChar‘,‘PageBreak‘], ‘/‘, // 样式 格式 字体 字体大小 [‘Styles‘,‘Format‘,‘Font‘,‘FontSize‘], //文本颜色 背景颜色 [‘TextColor‘,‘BGColor‘], //全屏 显示区块 [‘Maximize‘, ‘ShowBlocks‘,‘-‘] ] } ); </script>
三、精简ckeditor
在部署到Web服务器上时,下列文件夹和文件都可以删除:
/_samples :示例文件夹;
/_source :未压缩源程序;
/lang文件夹下除 zh-cn.js、en.js 以外的文件(也可以根据需要保留其他语言文件);
根目录下的 changes.html(更新列表),install.html(安装指向),license.html(使用许可);
/skins 目录下不需要的皮肤,一般用V2(简单,朴素) ,如果只保留V2则必须在config.js中指定皮肤。
四, 版本问题
在CKEditor的官方网站上下载,最要下载全部功能,最后得到的压缩包是ckeditor_4.1.1_full.zip,如果选择simple或者standed,可能会有些功能不能用,比如字体颜色,背景颜色,这下功能在standed版本里面就不支持。所以你会很奇怪明明设置了[‘TextColor‘,‘BGColor‘],但是文本颜色和背景颜色选项就是不显示。
五,去掉默认的段落标记
去除CKEditor自动添加的<p></p>标签的方法,其实很简单,有两种办法:
1.在ckeditor目录下的config.js添加以下配置参数即可:
config.enterMode = CKEDITOR.ENTER_BR: 屏蔽换行符<br> config.shiftEnterMode = CKEDITOR.ENTER_P:屏蔽段落<p>
2.直接更改编辑器默认模式为源代码模式,在ckeditor目录下的config.js添加以下配置:
config.startupMode = ‘source‘;
六,和kcfinder搭配使用
默认情况下CKEditor是没有上传图片功能的,可以在编辑器中粘贴图片,这样的话保存在数据库中的是图片的源文件,这很容易出现问题,即使字段是text格式的也很容易就超出最大范围了,所以要配合kcfinder来上传文件。一个是ck一个是kc真实一对好兄弟。
在配置CKEditor的配置文件ckeditor\config.js中添加以下配置
config.filebrowserBrowseUrl = ‘kcfinder/browse.php?type=files‘; config.filebrowserImageBrowseUrl = ‘kcfinder/browse.php?type=images‘; config.filebrowserFlashBrowseUrl = ‘kcfinder/browse.php?type=flash‘; config.filebrowserUploadUrl = ‘kcfinder/upload.php?type=files‘; config.filebrowserImageUploadUrl = ‘kcfinder/upload.php?type=images‘; config.filebrowserFlashUploadUrl = ‘kcfinder/upload.php?type=flash‘;
WEB文本编辑器
标签:绝对路径 protected 数字 显示 city private hand flash protect
原文地址:http://www.cnblogs.com/Lichuntao/p/6653399.html