标签:resources 依赖 setimage font att source stream 复杂 listener
项目的github地址:https://github.com/Qunter/SearchAndCall
------------------------------------------------------------------------
之前几天因为竞赛一直没做,得,今天开始接着完成这玩意
上次把架子给搭好了,今天开始就要填内容了,那么我们就从左往右依次做吧
首先是学校资讯界面
还是老规矩,先上效果图
那么可以看到主要是有两个地方有改变,第一个是标题栏随着fragment的切换而改变,第二个就是学校资讯里面有列表以显示学校资讯
首先第一个,很简单,只需要在MainActivity里动动手,每次切换的时候修改标题栏内的textview里的text就行了
protected void initViews() {
        //标题栏标题textview初始化
        TitleTv = (TextView) findViewById(R.id.toolbarTitleTv);
        fragments.add(SchoolInfoFragmActivity.newInstance());
        fragments.add(EventInfoFragmActivity.newInstance());
        fragments.add(FriendInfoFragmActivity.newInstance());
        fragments.add(UserInfoFragmActivity.newInstance());

        showFragment(fragments.get(0));
        //标题栏内容随fragment切换而改变
        TitleTv.setText(TitleString[0]);
        initBottomNav();

    }
再发一下改完了之后最终的MainActivity吧(因为日子过的久了,这是在竞赛前做完的,不记得是否还有其他改动了)
MainActivity.java
public class MainActivity extends AppCompatActivity {
    private AHBottomNavigation bottomNavigationView;
    private List<Fragment> fragments = new ArrayList<>();
    private int currentTabIndex;
    private TextView TitleTv;
    private String TitleString[] = {"学校资讯","周边活动","我的好友","我的设置"};

    @Override
    protected void onCreate(@Nullable Bundle savedInstanceState) {
        super.onCreate(savedInstanceState);
        setContentView(R.layout.activity_main);
        initViews();
    }

    protected void initViews() {
        //标题栏标题textview初始化
        TitleTv = (TextView) findViewById(R.id.toolbarTitleTv);
        fragments.add(SchoolInfoFragmActivity.newInstance());
        fragments.add(EventInfoFragmActivity.newInstance());
        fragments.add(FriendInfoFragmActivity.newInstance());
        fragments.add(UserInfoFragmActivity.newInstance());

        showFragment(fragments.get(0));
        //标题栏内容随fragment切换而改变
        TitleTv.setText(TitleString[0]);
        initBottomNav();

    }
    private void initBottomNav() {
        bottomNavigationView = (AHBottomNavigation) findViewById(R.id.bottom_navigation_view);
        AHBottomNavigationItem item1 = new AHBottomNavigationItem(TitleString[0],
                R.drawable.ic_tab_temporary);
        AHBottomNavigationItem item2 = new AHBottomNavigationItem(TitleString[1],
                R.drawable.ic_tab_temporary);
        AHBottomNavigationItem item3 = new AHBottomNavigationItem(TitleString[2],
                R.drawable.ic_tab_temporary);
        AHBottomNavigationItem item4 = new AHBottomNavigationItem(TitleString[3],
                R.drawable.ic_tab_temporary);

        bottomNavigationView.addItem(item1);
        bottomNavigationView.addItem(item2);
        bottomNavigationView.addItem(item3);
        bottomNavigationView.addItem(item4);

        bottomNavigationView.setColored(false);
        bottomNavigationView.setForceTint(false);
        bottomNavigationView.setBehaviorTranslationEnabled(true);
        bottomNavigationView.setTitleState(AHBottomNavigation.TitleState.ALWAYS_SHOW);
        bottomNavigationView.setAccentColor(getResources().getColor(R.color.black_90));
        bottomNavigationView.setInactiveColor(getResources().getColor(R.color.nav_text_color_mormal));
        bottomNavigationView.setCurrentItem(0);
        bottomNavigationView.setDefaultBackgroundColor(
                getResources().getColor(R.color.bottom_tab_bar_color));
        bottomNavigationView.setOnTabSelectedListener(new AHBottomNavigation.OnTabSelectedListener() {
            @Override
            public boolean onTabSelected(int position, boolean wasSelected) {
                if (currentTabIndex != position) {
                    FragmentTransaction trx = getSupportFragmentManager().beginTransaction();
                    trx.hide(fragments.get(currentTabIndex));
                    if (!fragments.get(position).isAdded()) {
                        trx.add(R.id.content, fragments.get(position));
                    }
                    trx.show(fragments.get(position)).commit();
                    TitleTv.setText(TitleString[position]);
                }
                currentTabIndex = position;
                return true;
            }
        });
    }
    private void showFragment(Fragment fragment) {
        getSupportFragmentManager()
                .beginTransaction()
                .replace(R.id.content, fragment)
                .commit();
    }
}
那么到这里,随着fragment的切换修改标题就完事了,很简单,那么接下来做第二个
这个说来话就有点长,简单来说,首先从学校网站上获取信息(我就暂时用我自己学校的吧,也怕乱爬会惹出什么事来),然后后面就简单了,把爬来的内容丢进一个recyclerview里就是了
那么一步一步来吧:
1,从学校官网上获取信息
分两个方面,首先我们肯定要打开学校官网看看前端代码是怎么写的,以便解析,然后获取网站数据,我们就要用到爬虫
首先是学校官网
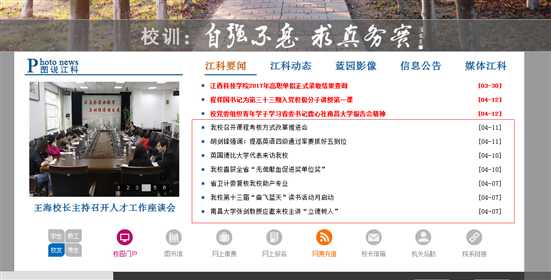
就不全截取网页了,图太大,截取这部分看看就行了
我们获取的信息就是江科要闻,可以看到江科要闻里有三个红色标题,排在第一位的是一个查询页面,和我们无关,我们就只获取后面的两个红色标题里的内容以及下面的用红色框标注出的黑色标题里的内容
怎么解析一下这个前端代码呢,我们首先查看一下源码,这里我用的是QQ浏览器,在该页面下,选择菜单——工具——开发者工具,打开程序,如下图
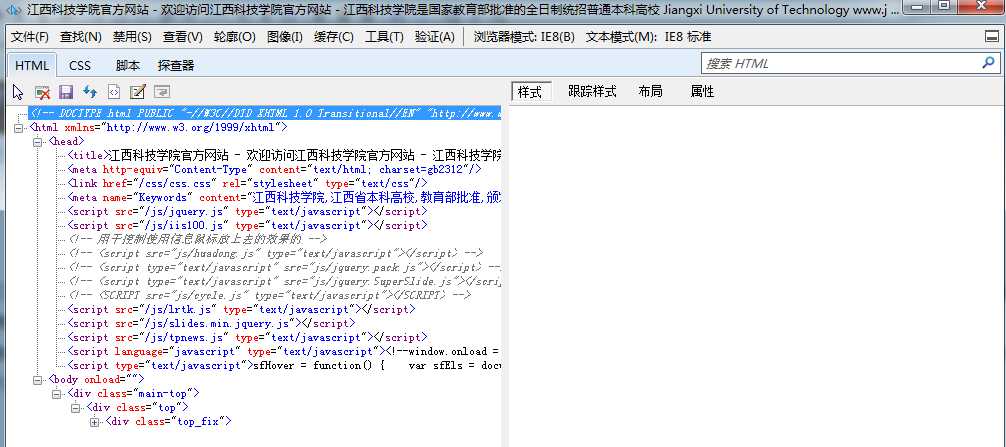
别看看起来好像东西不多,等会每个展开够找的了,那么如何快速找到我们需要的内容呢,简单,刚刚不是有标题吗,我们直接把标题复制过来,粘贴到右边的搜索栏里,搜索一下
在这里我们不管右边那些宋体啊,字号之类的东西,这与我们无关,我们只需要知道,在dt标签下,有我们需要的内容,但是仔细一想,这还不够啊,我们一没有图片,二没有该标题对应的链接,这光有一个标题,后续完善recyclerview的时候实现不了功能
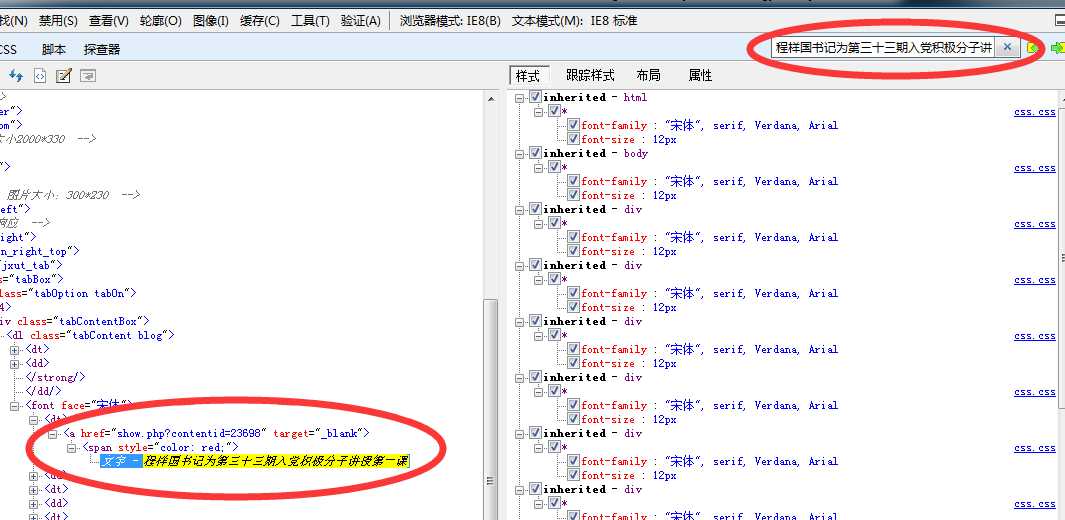
但是其实这里已经有链接了,链接就是上面的这个show.php?contentid=23698
其实也很简单,我们自己点击一下那个标题,进入那个标题对应的网页,发现链接是http://www.jxut.edu.cn/show.php?contentid=23698
一对照结果就出来了,那么我们还需要一张图片,图片应该是这个链接里的第一张图,我们用来做列表中的图示
过程就不说了,和这个类似,不过图片有点难搜索,好在网页不大,咱们一个一个点一下,排除法用一下就出来了
那么有了这些素材,我们需要把素材给从网上拿下来,就跟在银行有存款一样,需要用钱的时候也得拿出来再用
这里我们要用到爬虫,本着不重复造轮子的原则,直接用jsoup就行,当然,自己写也是可以的,爬虫并不算复杂,并且我们需要的内容也非常简单
首先添加爬虫依赖
//jsoup爬虫依赖
    compile ‘org.jsoup:jsoup:1.10.2‘
然后我们在SchoolInfoFragmActivity中写这么个方法,使用爬虫获取数据
/**
     * 使用jsoup获取学校官网数据
     */
    private void getJsoupContent(){
        String url = "http://www.jxut.edu.cn/";
        Connection conn = Jsoup.connect(url);
        // 修改http包中的header,伪装成浏览器进行抓取
        conn.header("User-Agent", "Mozilla/5.0 (X11; Linux x86_64; rv:32.0) Gecko/    20100101 Firefox/32.0");
        Document doc = null;
        try {
            doc = conn.get();
        } catch (IOException e) {
            e.printStackTrace();
        }
        Elements elements = doc.select("[class=tabContent blog]");
        Elements elements1 = elements.select("font");
        Elements elements2 = elements1.select("a");
        Document dt = null;
        for(Element element : elements2){
            String Title = element.text();
            String PageUrl = element.attr("abs:href");
            Connection ct = Jsoup.connect(PageUrl);
            ct.header("User-Agent", "Mozilla/5.0 (X11; Linux x86_64; rv:32.0) Gecko/    20100101 Firefox/32.0");
            try {
                dt = ct.get();
            } catch (IOException e) {
                e.printStackTrace();
            }
            Elements elements3 = dt.select("[class=listpicabs_text_show]");
            String ImgUrl = "";
            if(elements3.select("img").first()==null){
            }else{
                ImgUrl = elements3.select("img").first().absUrl("src");
            }

            schoolInfoList.add(new SchoolInfo(Title,PageUrl,ImgUrl));
            Log.e("mytag", Title);
            Log.e("mytag", PageUrl );
            Log.e("mytag", ImgUrl );
        }
        handler.sendEmptyMessage(INITRECYLERVIEW);
    }
其实要吐槽的是这个命名并不规范,不应该是这样123命名,很容易造成看不懂,不过后续我应该会再封装,所以这里实现功能就行
至于类似select("font"),attr("abs:href")之类的,都是一些匹配表达式,这里就不赘述了,多了解一下jsoup,或者仔细看看那个网页源码就行了,这里只提一句,我们总不能把所有数据都直接弄下来然后直接使用吧(当然,其实确实是全弄下来了,但是使用的时候总不能动不动就用这一长串吧?),所以要有选择性的筛选一下,这些就相当于筛子
但是这样还是不够的,因为我们不能直接在主线程里使用这个方法,要不然会报异常
所以我们开个线程
Runnable runnable = new Runnable() {
        @Override
        public void run() {
            getJsoupContent();
        }
    };
开个线程是可以了,但是什么时候用线程呢,我们用老方法,handler传递一个参数进去
private Handler handler = new Handler(){
        @Override
        public void handleMessage(Message msg) {
            super.handleMessage(msg);
            switch (msg.what){
                case GETJSOUPCONTENT:
                    new Thread(runnable).start();
                    break;
            }
        }
    };
至于这个GETJSOUPCONTENT,我们自己定义一个常量来表示就行,不一定说非得是什么什么
private final int GETJSOUPCONTENT=0x00
那么这样就算是基本实现爬取了,跑一下的话,会发现log已经将需要的内容打印出来了(之前在方法里有写log,故而会打印出来,并不是自带log)
E/mytag: 程样国书记为第三十三期入党积极分子讲授第一课
E/mytag: http://www.jxut.edu.cn/show.php?contentid=23698
E/mytag: http://www.jxut.edu.cn/uploadfile/2017/0412/20170412113009539.jpg
E/mytag: 校党委组织青年学子学习省委书记鹿心社南昌大学报告会精神
E/mytag: http://www.jxut.edu.cn/show.php?contentid=23697
E/mytag: http://www.jxut.edu.cn/uploadfile/2017/0412/20170412082735748.jpg
E/mytag: 我校召开课程考核方式改革推进会
E/mytag: http://www.jxut.edu.cn/show.php?contentid=23691
E/mytag: http://www.jxut.edu.cn/uploadfile/2017/0411/20170411102017731.jpg
E/mytag: 胡剑锋强调:提高英语四级通过率要抓好五到位
E/mytag: http://www.jxut.edu.cn/show.php?contentid=23692
E/mytag: http://www.jxut.edu.cn/uploadfile/2017/0411/20170411102846589.jpg
E/mytag: 英国德比大学代表来访我校
E/mytag: http://www.jxut.edu.cn/show.php?contentid=23687
E/mytag: http://www.jxut.edu.cn/uploadfile/2017/0410/20170410055825319.jpg
E/mytag: 我校喜获全省“无偿献血促进奖单位奖”
E/mytag: http://www.jxut.edu.cn/show.php?contentid=23685
E/mytag: http://www.jxut.edu.cn/uploadfile/2017/0410/20170410031942124.jpg
E/mytag: 省卫计委复核我校助产专业
E/mytag: http://www.jxut.edu.cn/show.php?contentid=23672
E/mytag: http://www.jxut.edu.cn/uploadfile/2017/0407/20170407073220317.jpg
E/mytag: 我校第十三届“奋飞蓝天”读书活动月启动
E/mytag: http://www.jxut.edu.cn/show.php?contentid=23670
E/mytag: http://www.jxut.edu.cn/uploadfile/2017/0407/20170407110834662.jpg
E/mytag: 南昌大学张剑教授应邀来校主讲“立德树人”
E/mytag: http://www.jxut.edu.cn/show.php?contentid=23669
E/mytag: http://www.jxut.edu.cn/uploadfile/2017/0407/20170407033431769.jpg
那么到这里,爬取就完事了,但是光有数据还不够,因为我们还必须要做一个recyclerview
首先在布局里给他塞一个recyclerview
activity_school_info_fragm.xml
<?xml version="1.0" encoding="utf-8"?>
<android.support.v4.widget.SwipeRefreshLayout android:id="@+id/swipe_refresh_school"
    xmlns:android="http://schemas.android.com/apk/res/android"
    android:layout_width="match_parent"
    android:layout_height="match_parent">
    <android.support.v7.widget.RecyclerView
        android:id="@+id/recycler_view_school"
        android:layout_width="match_parent"
        android:layout_height="match_parent"
        android:overScrollMode="never"
        android:scrollbars="vertical" />
</android.support.v4.widget.SwipeRefreshLayout>
注意这里是需要添加v7依赖的,印象里之前好像添加过吧,提一句,不再说了
然后我们做一个item的布局
item_school_info.xml
<?xml version="1.0" encoding="utf-8"?>
<android.support.v7.widget.CardView android:id="@+id/card_view"
    xmlns:android="http://schemas.android.com/apk/res/android"
    xmlns:app="http://schemas.android.com/apk/res-auto"
    android:layout_width="match_parent"
    android:layout_height="100dp"
    android:layout_marginBottom="10dp"
    android:layout_marginTop="10dp"
    android:clickable="true"
    app:cardBackgroundColor="@color/card_view_background_dark"
    app:cardCornerRadius="0dp"
    app:cardElevation="2dp">


    <RelativeLayout
        android:id="@+id/item_layout"
        android:layout_width="match_parent"
        android:layout_height="wrap_content"
        android:padding="10dp">


        <TextView
            android:id="@+id/item_title"
            android:layout_width="match_parent"
            android:layout_height="match_parent"
            android:layout_centerInParent="true"
            android:layout_marginEnd="10dp"
            android:layout_toStartOf="@+id/item_image"
            android:lineSpacingExtra="2dp"
            android:maxLines="3"
            android:padding="2dp"
            android:textColor="@color/font_normal"
            android:textSize="18sp" />

        <ImageView
            android:id="@+id/item_image"
            android:layout_width="80dp"
            android:layout_height="80dp"
            android:layout_alignParentEnd="true"
            android:layout_centerInParent="true"
            android:scaleType="fitCenter"
            android:src="@drawable/account_avatar" />

        <ImageView
            android:id="@+id/item_more_pic"
            android:layout_width="wrap_content"
            android:layout_height="wrap_content"
            android:layout_alignParentBottom="true"
            android:layout_alignParentRight="true"
            android:src="@drawable/home_pic"
            android:visibility="gone" />

    </RelativeLayout>


</android.support.v7.widget.CardView>
然后我们做recyclerview,我们得要一个adapter
在adapter包下新建一个SchoolInfoListAdapter
这里说一句,其实应该建个基类然后大家一起用,或者说直接写一个通用的adapter的,但是我觉得还是先实现功能再重构吧(好吧,其实是我自己也没太想好后面需要什么样的数据和效果,这样做的话改起来会很费劲,所以先单例模式做效果出来吧)
SchoolInfoListAdapter.java
public class SchoolInfoListAdapter extends RecyclerView.Adapter<SchoolInfoListAdapter.ViewHolder>  {
    private List<SchoolInfo> schoolInfoList;
    private LruCache<String, Bitmap> mImageCache;
    private Context context;
    private RecyclerView recyclerView;


    static class ViewHolder extends RecyclerView.ViewHolder{
        TextView schoolInfoTitle;
        ImageView schoolInfoImg;
        public ViewHolder(View view){
            super(view);
            schoolInfoTitle = (TextView) view.findViewById(R.id.item_title);
            schoolInfoImg = (ImageView) view.findViewById(R.id.item_image);
        }
    }
    public SchoolInfoListAdapter(Context context,List<SchoolInfo> list,RecyclerView recyclerView){
        this.context = context;
        this.schoolInfoList = list;
        this.recyclerView = recyclerView;
        int maxCache = (int) Runtime.getRuntime().maxMemory();
        int cacheSize = maxCache / 8;
        mImageCache = new LruCache<String, Bitmap>(cacheSize) {
            @Override
            protected int sizeOf(String key, Bitmap value) {
                return value.getByteCount();
            }
        };
    }
    @Override
    public ViewHolder onCreateViewHolder(ViewGroup parent, int viewType) {
        View view = LayoutInflater.from(parent.getContext()).inflate(R.layout.item_school_info,parent,false);
        ViewHolder holder = new ViewHolder(view);
        return holder;
    }

    @Override
    public void onBindViewHolder(ViewHolder holder, int position) {
        holder.setIsRecyclable(false);
        SchoolInfo schoolInfo = schoolInfoList.get(position);
        holder.schoolInfoTitle.setText(schoolInfo.getTitle());
        holder.schoolInfoImg.setTag(schoolInfo.getImgUrl());
        Log.e("schoolimgurl", schoolInfo.getImgUrl());
        Log.e("tag", position+"");
        if (mImageCache.get(schoolInfo.getImgUrl()) != null) {
            holder.schoolInfoImg.setImageBitmap(mImageCache.get(schoolInfo.getImgUrl()));
        } else {
            ImageTask it = new ImageTask();
            it.execute(schoolInfo.getImgUrl());
        }
    }

    @Override
    public int getItemCount() {
        return schoolInfoList.size();
    }

    class ImageTask extends AsyncTask<String, Void, Bitmap> {

        private String imageUrl;

        @Override
        protected Bitmap doInBackground(String... params) {
            Bitmap bitmap;
            if (params[0].equals("")){
                bitmap = BitmapFactory.decodeResource(context.getResources(),R.drawable.account_avatar);

                return bitmap;
            }
            imageUrl = params[0];
            //Log.e("tag", imageUrl);
            bitmap = downloadImage();
            if (mImageCache.get(imageUrl) == null){
                mImageCache.put(imageUrl, bitmap);
            }
            //if(bitmap!=null)
                //Log.e("tag", "notnull");
            return bitmap;
        }

        @Override
        protected void onPostExecute(Bitmap result) {
            // 通过Tag找到ImageView,如果该ImageView所在的item已被移出页面,就会直接返回null
            //Log.e("tag", "img url is "+imageUrl);
            ImageView iv = (ImageView) recyclerView.findViewWithTag(imageUrl);
            if (iv != null && result != null) {
                iv.setImageBitmap(result);
                //Log.e("tag", "setbitmap");
            }
        }
        /**
         * 根据url从网络上下载图片
         */
        private Bitmap downloadImage() {
            HttpURLConnection con = null;
            Bitmap bitmap = null;
            try {
                URL url = new URL(imageUrl);
                con = (HttpURLConnection) url.openConnection();
                con.setConnectTimeout(5 * 1000);
                con.setReadTimeout(10 * 1000);
                bitmap = BitmapFactory.decodeStream(con.getInputStream());
            } catch (MalformedURLException e) {
                e.printStackTrace();
            } catch (IOException e) {
                e.printStackTrace();
            } finally {
                if (con != null) {
                    con.disconnect();
                }
            }
            return bitmap;
        }
    }
}
这里说一句
holder.setIsRecyclable(false);
这条语句,如果不加,会出现只能完美加载第一面,也就是进程序之后可视的那些item,至于下面的,不能完美加载,我也不能够完全理解这个问题的产生,但是我清楚这和recyclerview的复用机制有关
当然了,使用其他的框架来进行图片显示以及加载,可以解决这个问题,在这里我之所以用这些比较原始的东西,也是为了更深理解一下recyclerview,后面可能会换成别的框架来实现这个玩意
那么话说回来,在创建adapter的时候,我们需要把数据传输进去
隔了有几天了,不浪费时间,不按顺序写了,直接发最终的样子吧
SchoolInfoFragmActivity.java
public class SchoolInfoFragmActivity extends Fragment {
    private List<SchoolInfo> schoolInfoList = new ArrayList<>();
    private final int GETJSOUPCONTENT=0x00,INITRECYLERVIEW=0x01;
    private SwipeRefreshLayout schoolSwipeRefreshLayout;
    private RecyclerView schoolRecyclerView;
    private Handler handler = new Handler(){
        @Override
        public void handleMessage(Message msg) {
            super.handleMessage(msg);
            switch (msg.what){
                case GETJSOUPCONTENT:
                    new Thread(runnable).start();
                    break;
                case INITRECYLERVIEW:
                    SchoolInfoListAdapter adapter = new SchoolInfoListAdapter(getContext(),schoolInfoList,schoolRecyclerView);
                    schoolRecyclerView.setAdapter(adapter);
                    break;
            }
        }
    };
    public static SchoolInfoFragmActivity newInstance() {
        return new SchoolInfoFragmActivity();
    }


    @Nullable
    @Override
    public View onCreateView(LayoutInflater inflater, @Nullable ViewGroup container, @Nullable Bundle savedInstanceState) {
        handler.sendEmptyMessage(GETJSOUPCONTENT);
        View view = inflater.inflate(R.layout.activity_school_info_fragm, container, false);
        schoolSwipeRefreshLayout = (SwipeRefreshLayout) view.findViewById(R.id.swipe_refresh_school);
        schoolRecyclerView = (RecyclerView) view.findViewById(R.id.recycler_view_school);
        LinearLayoutManager layoutManager = new LinearLayoutManager(getActivity());
        schoolRecyclerView.setLayoutManager(layoutManager);
        return view;

    }

    Runnable runnable = new Runnable() {
        @Override
        public void run() {
            getJsoupContent();
        }
    };
    /**
     * 使用jsoup获取学校官网数据
     */
    private void getJsoupContent(){
        String url = "http://www.jxut.edu.cn/";
        Connection conn = Jsoup.connect(url);
        // 修改http包中的header,伪装成浏览器进行抓取
        conn.header("User-Agent", "Mozilla/5.0 (X11; Linux x86_64; rv:32.0) Gecko/    20100101 Firefox/32.0");
        Document doc = null;
        try {
            doc = conn.get();
        } catch (IOException e) {
            e.printStackTrace();
        }
        Elements elements = doc.select("[class=tabContent blog]");
        Elements elements1 = elements.select("font");
        Elements elements2 = elements1.select("a");
        Document dt = null;
        for(Element element : elements2){
            String Title = element.text();
            String PageUrl = element.attr("abs:href");
            Connection ct = Jsoup.connect(PageUrl);
            ct.header("User-Agent", "Mozilla/5.0 (X11; Linux x86_64; rv:32.0) Gecko/    20100101 Firefox/32.0");
            try {
                dt = ct.get();
            } catch (IOException e) {
                e.printStackTrace();
            }
            Elements elements3 = dt.select("[class=listpicabs_text_show]");
            String ImgUrl = "";
            if(elements3.select("img").first()==null){
            }else{
                ImgUrl = elements3.select("img").first().absUrl("src");
            }

            schoolInfoList.add(new SchoolInfo(Title,PageUrl,ImgUrl));
            Log.e("mytag", Title);
            Log.e("mytag", PageUrl );
            Log.e("mytag", ImgUrl );
        }
        handler.sendEmptyMessage(INITRECYLERVIEW);
    }
    /**
     * 加载下拉刷新组件
     */
    private void initSwipeRefreshLayout(){

    }
}
那么到这里就实现了图片中的效果了,下一步应该是明天,会实现这个recyclerview的点击效果,效果应该是显示对应item中链接里的内容
标签:resources 依赖 setimage font att source stream 复杂 listener
原文地址:http://www.cnblogs.com/Qunter/p/6701718.html