标签:nav input ide submit 密码 open from fetch .com
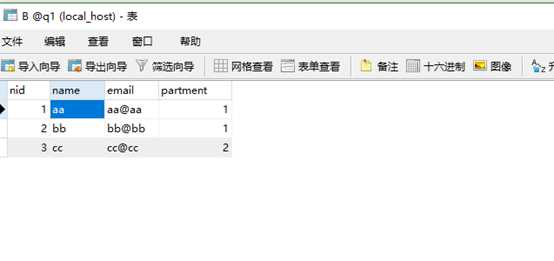
要完成下面的情况,A中partment中的1都属于研发部,2属于开发部,让两张表产生联系

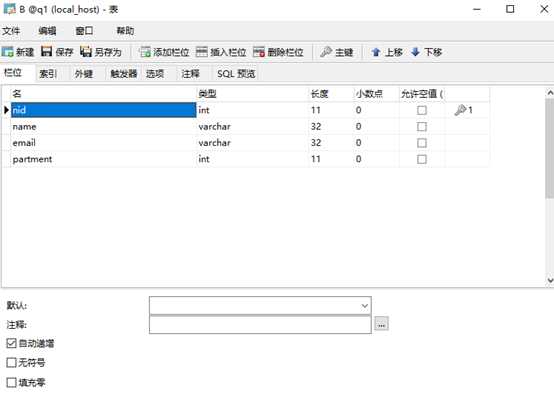
nid   name     email         partment
1     aa       aa@aa.com     1
2     bb       bb@bb.com      1
3     vv       vv@vv.com      1
4     dd       dd@dd.com     2
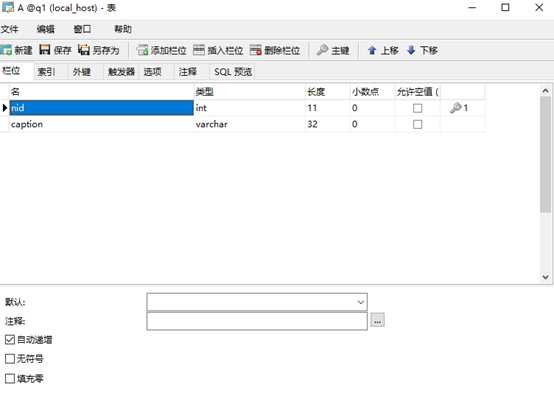
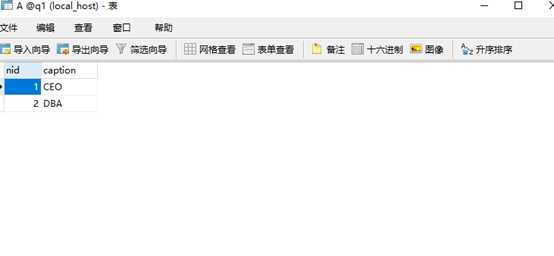
nid      caption
1       研发部
2       开发部
A中partment中的1都属于研发部,2属于开发部。A和B就是一种关联。A对B就有约束力,即B中如果添加一条A中没有的数据,那么就会报错A中的外键就是B中的主键
数据库表一对多有如下特点:
外键就是另一张表的主键,注意这里的外键和主键必须是同一样的类型
认为创建关联
并且有约束
创建外键
1、首先创建两张表单
创建表B作为内容,让nid递增
创建第二张表A注意这里的主键类型要和上一张的外键的类型要一样
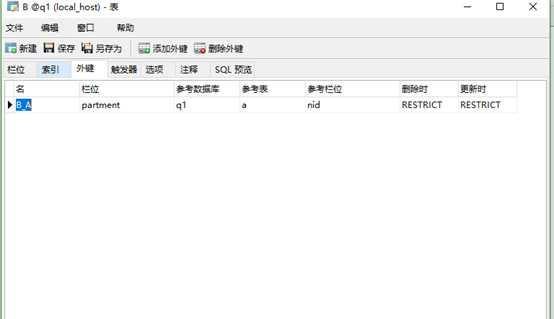
2、在B中创建外键,设计表,注意前面栏位是B中要设置的外键,后面的参考栏位是A中的主键
3、首先在A中填写主键和内容,之后再在B中填写外键
在B中填写内容
这样就完成了外键的创建
create table part1(
nid int not null auto_increment primary key,
caption varchar(32) not null
);
create table person1(
nid int auto_increment not null,
name varchar(32) not null,
email varchar(32) not null,
part1_nid int not null,
PRIMARY KEY (nid),
CONSTRAINT fk_person1_part1 FOREIGN KEY (part1_nid) REFERENCES part1(nid)
);
CONSTRAINT fk_person1_part1 FOREIGN KEY (part1_nid) REFERENCES part1(nid)
fk_person1_part1:这个是自定义的名字
FOREIGN KEY (part1_nid):设置关键外键
REFERENCES part1(nid):设置关联另一张表的主键
alter table 从表 add constraint 外键名称(形如:FK_从表_主表) foreign key 从表(外键字段) references 主表(主键字段);
删除外键:
alter table 表名 drop foreign key 外键名称

如:
alter table person1 drop foreign key fk_person1_part1;  删除了创建的外键
alter table person1 add constraint fk_person1_part1 foreign key(part1_nid) references part1(nid);创建了外键
问题:
如何在part中拿到ceo所有人的名字?
思想:
列出B中的名字,和A中要查找的职位,在B和A组合的合集中让B中的外键和A中的主键相关联,在A中的职位做对照
mysql>     select
B.name,
A.caption
from B left join A on B.partment=A.nid
where
A.caption="CEO";
+------+---------+
| name | caption |
+------+---------+
| aa   | CEO     |
| bb   | CEO     |
+------+---------+
2 rows in set (0.01 sec)
1、连单个表
a(外键) left join b(主键) on a.xx=b.xx
以a为主,将a中所有的数据罗列出来
对于b则显示于a相对应的数据
b(主键)) left join a(外键)on a.xx=b.xx
这样的则和上面的相反
a(外键) right join  b(主键) on a.xx=b.xx
以B为主,以A为辅,将B中的数据罗列出来
a inner join b on a.xx=b.xx
自动忽略未建立关系的数据
2、连接多个表
如果在外键这个表中有数据,然后系想再建立一个链表,连接一个主键的表,这个时候在外键这个表创建外键的时候要允许这个值为空,
不然连接主键会报错
ERROR 1452 : Cannot add or update a child row: a foreign key constraint fails
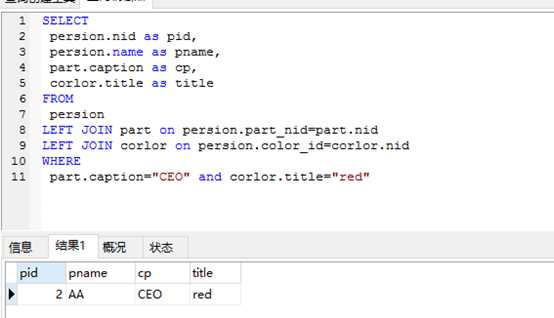
ELECT
 persion.nid as pid,
 persion.name as pname,
 part.caption as cp,
 corlor.title as title
FROM
 persion
LEFT JOIN part on persion.part_nid=part.nid
LEFT JOIN corlor on persion.color_id=corlor.nid
WHERE
 part.caption="CEO" and corlor.title="red"
(解析:上面展示出pid pname cp title 从(persion和part中的persion.part_nid=part.nid以及persion和color中的persion.color_id=color.nid)的数据)
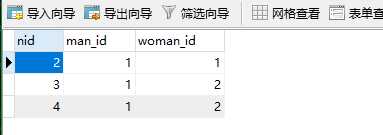
多对多思想:创建第三种表。然第三张表中的外键分别对应前两张表的主键
A:
1    aa
2    bb
3    dd
B
1    a
2    b
3    c
如何让A和B之间能够选择多个呢?
C
A的ID    B的ID
1          2
1          1
2          2
2          1
上面就是A中的1对应B中的1和2
分别在这三张表中插入数据
-- INSERT INTO man(name) values("xxoo")
-- INSERT INTO woman(name) values("xxoo")
INSERT INTO man_to_woman(man_id,woman_id) VALUES(1,2)
这里创建man表
下面woman表
第三张表
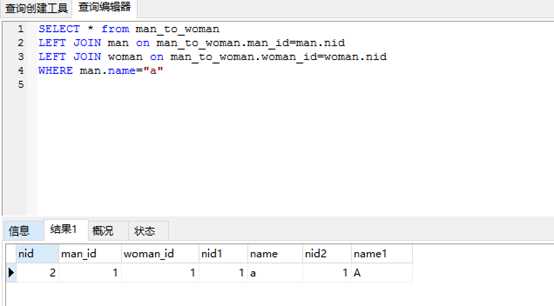
需求:找到aa所对应B中的内容
SELECT * from man_to_woman
LEFT JOIN man on man_to_woman.man_id=man.nid
LEFT JOIN woman on man_to_woman.woman_id=woman.nid
WHERE man.name="a"
如果下面代码中用的字符串拼接,随便输入下面内容
pyrene ‘ – a    a
ad ‘ or 1=1 – d    a
就会登录成功
出现了上面的原因是因为后台做了字符串拼接,这个是所有语言中都会出现的问题
pymysql里面其实已经做了一部分处理
直接用cursor.execute(“select name from userinfo where name=’%s’ and password=’%s’”,(username,pwd)),这样能防止sql注入
原因是因为pysql在里面做了去掉 (’)引号和后面特殊字符的作用:
select name from userinfo where name=‘‘ad \‘ or 1=1 -- a‘‘ and password=‘‘a‘‘
下面是pymysql登录注册代码
<!DOCTYPE html>
<html lang="en">
<head>
    <meta charset="UTF-8">
    <title></title>
</head>
<body>
    <form action="/index" method="post">
        <input type="text" name="username" placeholder="用户名"/>
        <input type="text" name="password" placeholder="密码"/>
        <input type="submit"/>
    </form>
</body>
</html>
#/usr/bin/env python
import tornado.ioloop
import tornado.web
import pymysql

class loginHandler(tornado.web.RequestHandler):
    def get(self):
        self.render("index.html")
    def post(self,*args,**kwargs):
        username=self.get_argument("username")
        pwd=self.get_argument("password")

        conn = pymysql.connect(host="127.0.0.1",port=3306,user="root",password="123456",db="db1")
        cursor=conn.cursor()
        # temp="select name from userinfo where name=‘%s‘ and password=‘%s‘" %(username,pwd)
        # #做了字符串拼接
        # print(temp)
        # effect_row=cursor.execute(temp)

        #上面是因为字符串拼接造成了能够sql注入
        effect_row=cursor.execute("select name from userinfo where name=‘%s‘ and password=‘%s‘", (username,pwd))
        #如果匹配下面就登录成功
        result=cursor.fetchone()
        conn.commit()
        cursor.close()
        conn.close()
        if result:
            self.write("登录成功")
        else:
            self.write("登录失败")
settings = {
    ‘template_path‘: ‘views‘,
    ‘static_path‘:‘static‘,
}

# 下面第一个参数是HTML中的参数映射
application = tornado.web.Application([
    (r"/index", loginHandler),
], **settings)


if __name__ == "__main__":
    application.listen(8000)
    tornado.ioloop.IOLoop.instance().start()
标签:nav input ide submit 密码 open from fetch .com
原文地址:http://www.cnblogs.com/pyrene/p/6753016.html
