标签:ack 关闭 dff 自己 公钥 免密 env audio rsync
目录:
第一部分:操作系统准备工作:
1. 安装部署CentOS7.3 1611
2. CentOS7软件安装(net-tools, wget, vim等)
3. 更新CentOS7的Yum源,更新软件速度更快
4. CentOS 用户配置,Sudo授权
第二部分:Java环境准备
1. JDK1.8 安装与配置
第三部分:Hadoop配置,启动与验证
1. 解压Hadoop2.7.3更新全局变量
2. 更新Hadoop配置文件
3. 启动Hadoop
4. 验证Hadoop
=============================================================================================
第一部分:操作系统准备工作:
1. 安装部署CentOS7.3 1611
2. CentOS7软件安装(net-tools, wget, vim等)
3. 更新CentOS7的Yum源,更新软件速度更快
4. CentOS 用户配置,Sudo授权
1. 安装部署CentOS7.3 1611
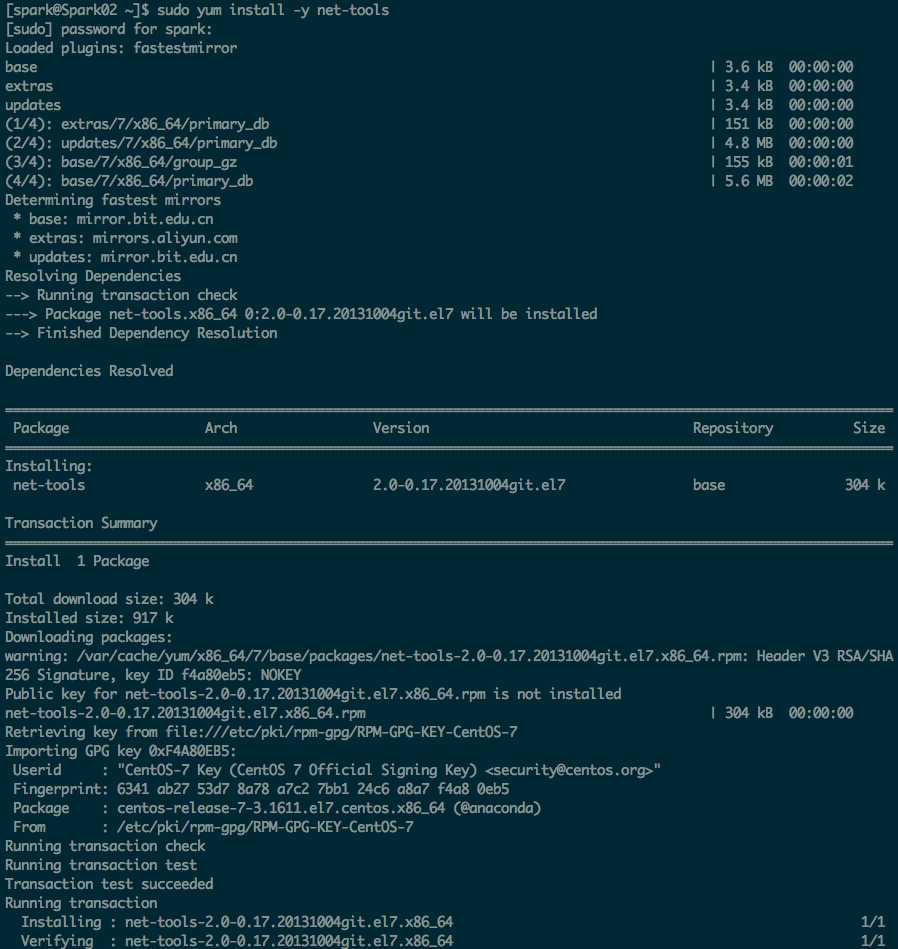
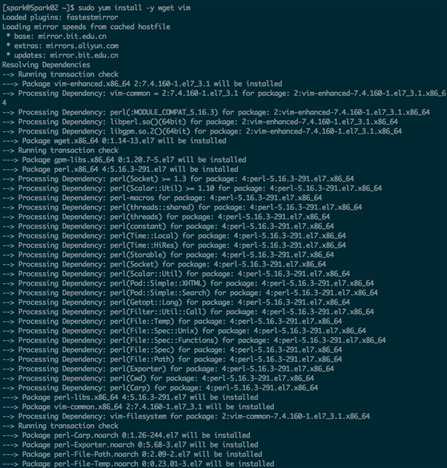
2. CentOS7软件安装(net-tools, wget, vim等)
sudo yum install -y net-tools
sudo yum install -y wget
sudo yum install -y vim
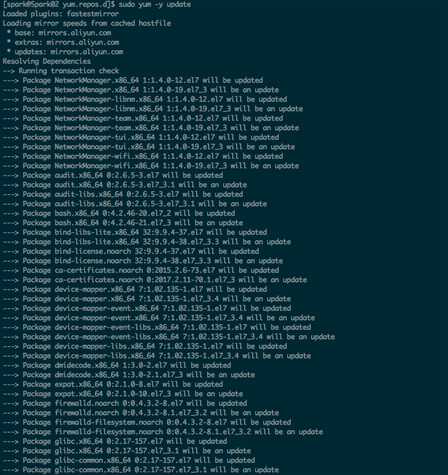
3. 更新CentOS7的Yum源(更新为阿里云的CentOS7的源),更新软件速度更快
http://mirrors.aliyun.com/help/centos
1、备份
mv /etc/yum.repos.d/CentOS-Base.repo /etc/yum.repos.d/CentOS-Base.repo.backup
2、下载新的CentOS-Base.repo 到/etc/yum.repos.d/
CentOS 5
wget -O /etc/yum.repos.d/CentOS-Base.repo http://mirrors.aliyun.com/repo/Centos-5.repo
CentOS 6
wget -O /etc/yum.repos.d/CentOS-Base.repo http://mirrors.aliyun.com/repo/Centos-6.repo
CentOS 7
wget -O /etc/yum.repos.d/CentOS-Base.repo http://mirrors.aliyun.com/repo/Centos-7.repo
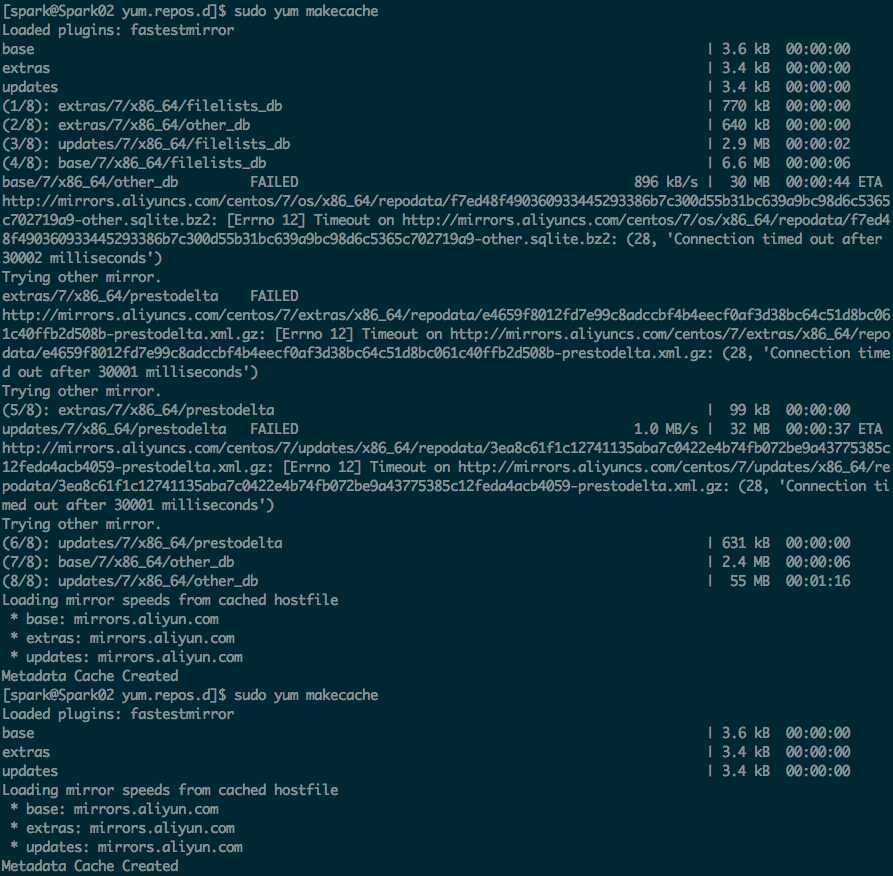
3、之后运行yum makecache生成缓存
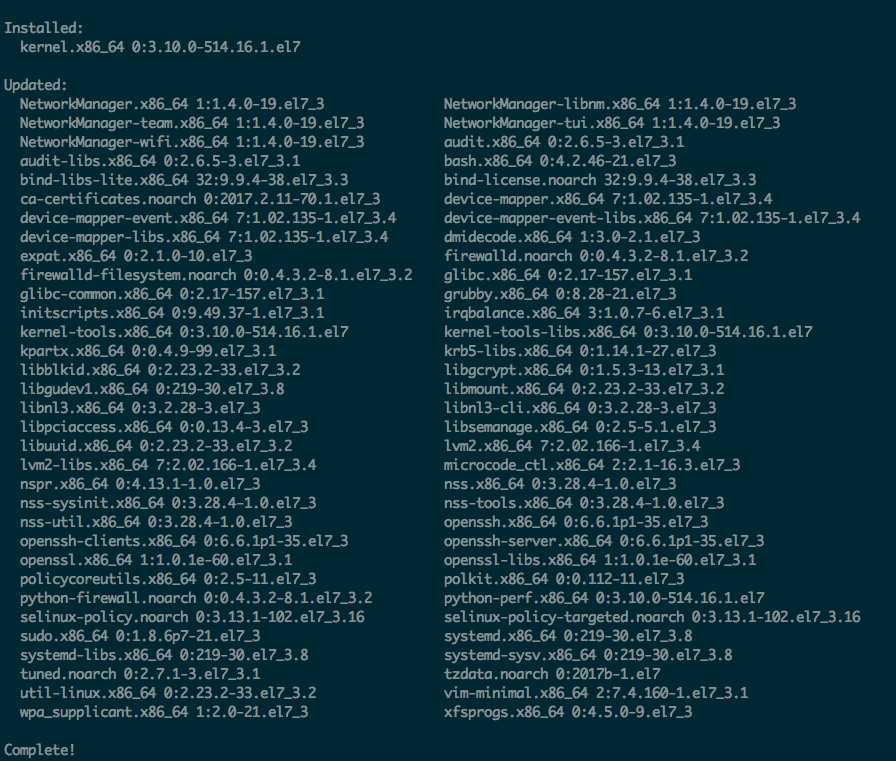
4、sudo yum -y update 对系统进行升级
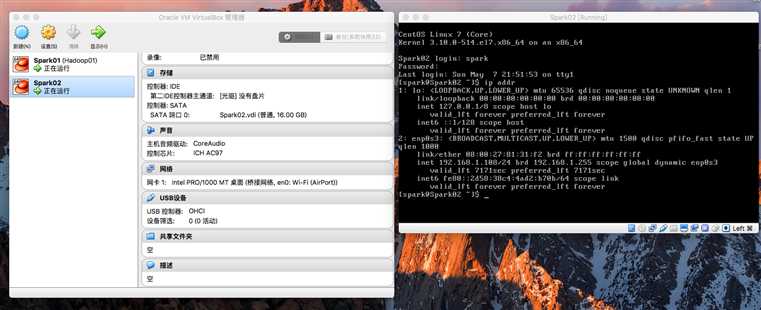
sudo vim /etc/hosts # 更新hosts文件,便于用spark02代表本机IP

第二部分:Java环境准备
1. JDK1.8 安装与配置
通过FileZilla 上传实验所需要用到的文件(JDK,Hadoop,Spark)
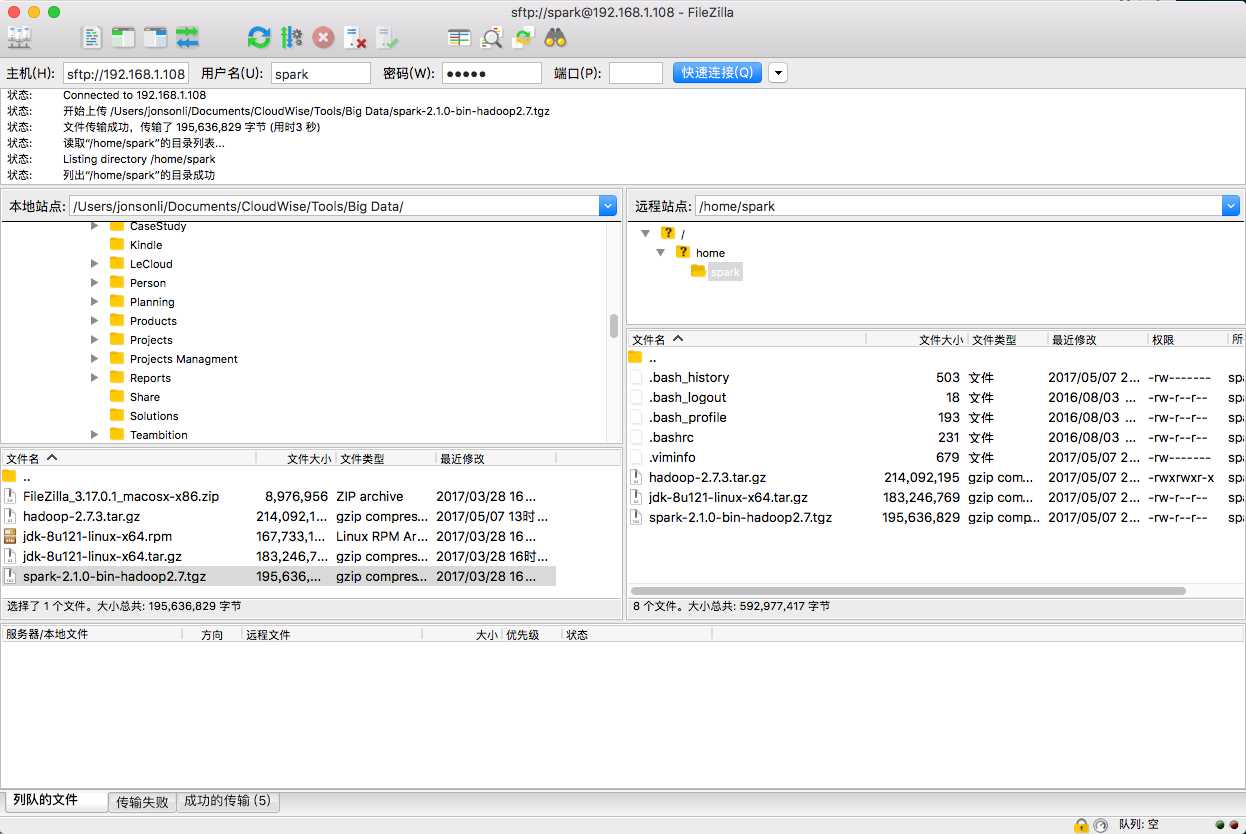
对JDK和Hadoop进行解压
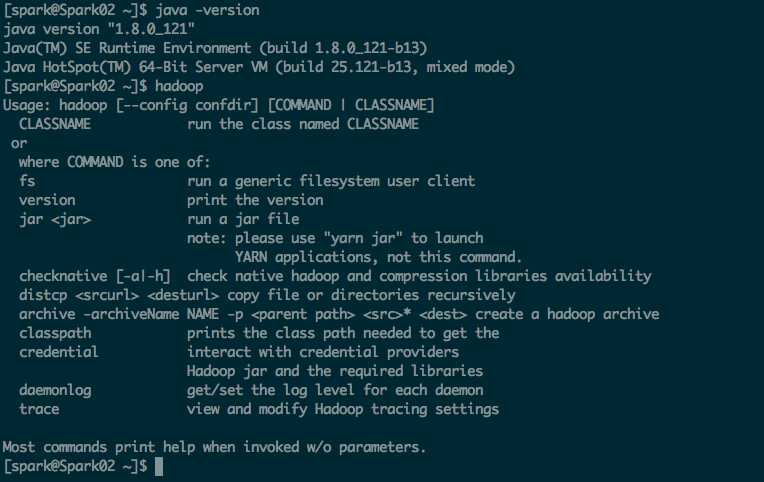
tar -zxvf jdk-8u121-linux-x64.tar.gz
tar -zxvf hadoop-2.7.3.tar.gz
在 .bash_profile文件内增加环境便利,便于Java和Hadoop更容易操作
#Add JAVA_HOME and HADOOP_HOME
export JAVA_HOME=/home/spark/jdk1.8.0_121
export PATH=$PATH:$JAVA_HOME/bin
export HADOOP_HOME=/home/spark/hadoop-2.7.3
export PATH=$PATH:$HADOOP_HOME/bin:$HADOOP_HOME/sbin
source .bash_profile #配置生效
第三部分:Hadoop配置,启动与验证
1. 解压Hadoop2.7.3更新全局变量
2. 更新Hadoop配置文件
3. 启动Hadoop
4. 验证Hadoop
参考:Hadoop2.7.3 官方文档进行伪分布式的配置
http://hadoop.apache.org/docs/r2.7.3/hadoop-project-dist/hadoop-common/SingleCluster.html
Pseudo-Distributed Operation
Hadoop can also be run on a single-node in a pseudo-distributed mode where each Hadoop daemon runs in a separate Java process.
Configuration
Use the following:
etc/hadoop/core-site.xml:
<configuration>
    <property>
        <name>fs.defaultFS</name>
        <value>hdfs://localhost:9000</value>
    </property>
</configuration>
etc/hadoop/hdfs-site.xml:
<configuration>
    <property>
        <name>dfs.replication</name>
        <value>1</value>
    </property>
</configuration>
Setup passphraseless ssh
Now check that you can ssh to the localhost without a passphrase:
If you cannot ssh to localhost without a passphrase, execute the following commands:
  $ ssh-keygen -t rsa -P ‘‘ -f ~/.ssh/id_rsa
  $ cat ~/.ssh/id_rsa.pub >> ~/.ssh/authorized_keys
  $ chmod 0600 ~/.ssh/authorized_keys
Execution
The following instructions are to run a MapReduce job locally. If you want to execute a job on YARN, see YARN on Single Node.
-
Format the filesystem:
$ bin/hdfs namenode -format
-
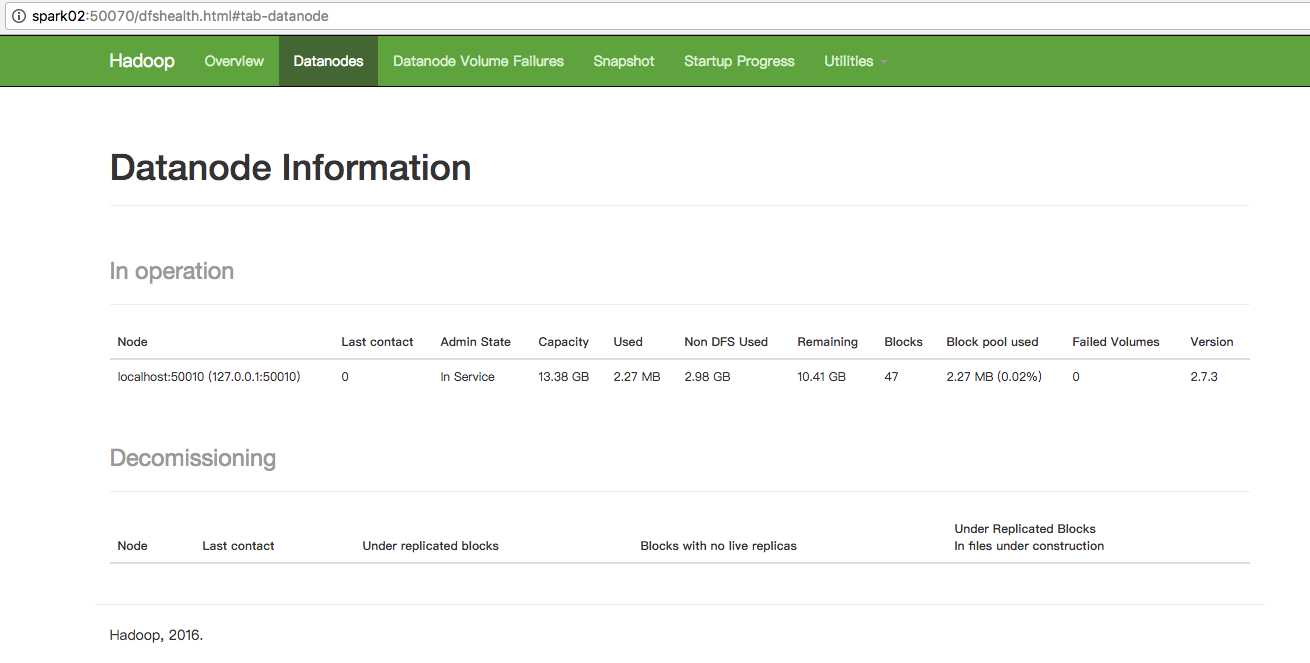
Start NameNode daemon and DataNode daemon:
The hadoop daemon log output is written to the $HADOOP_LOG_DIR directory (defaults to $HADOOP_HOME/logs).
-
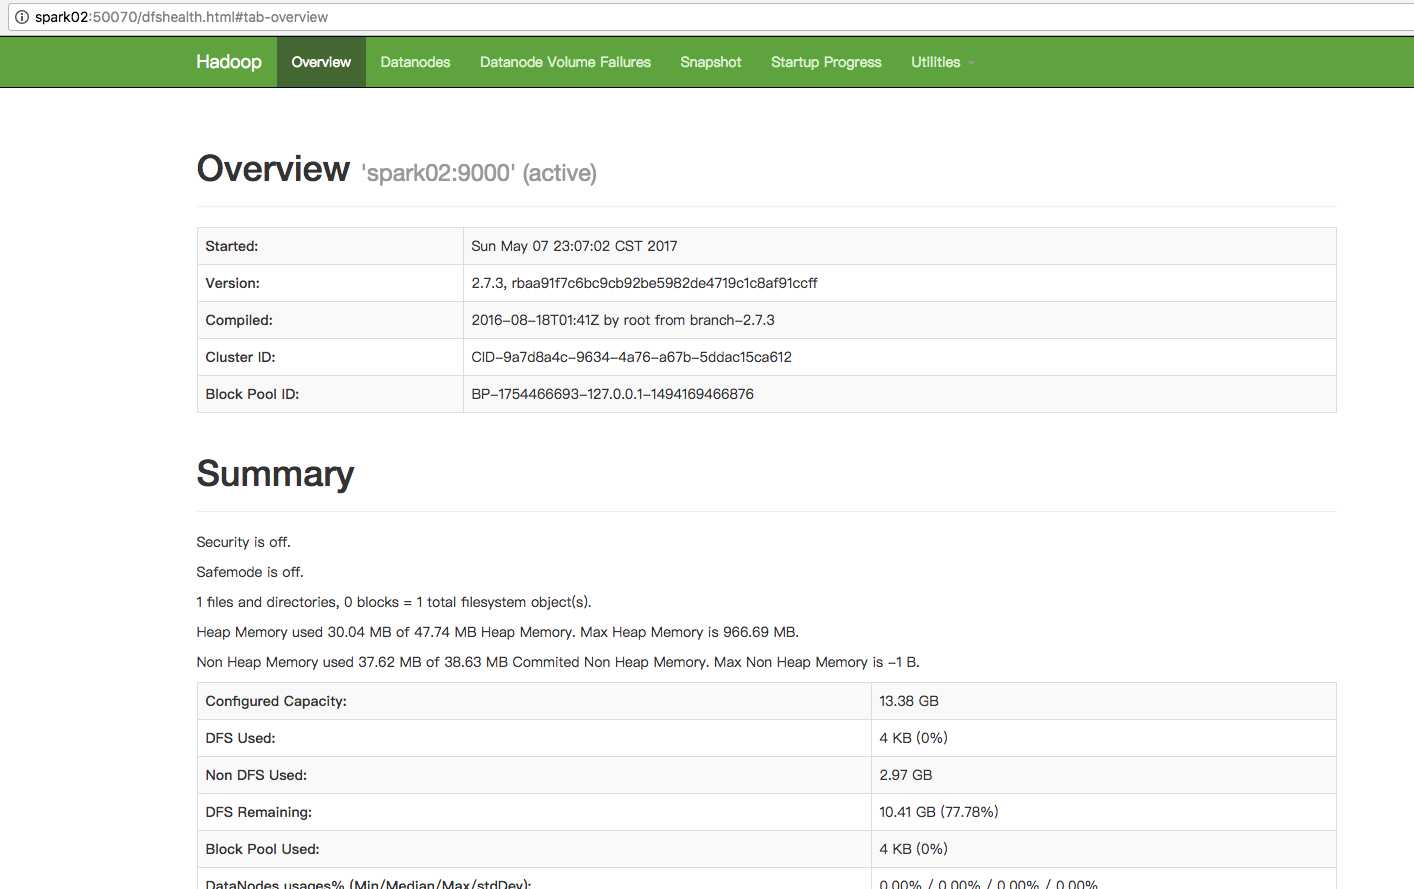
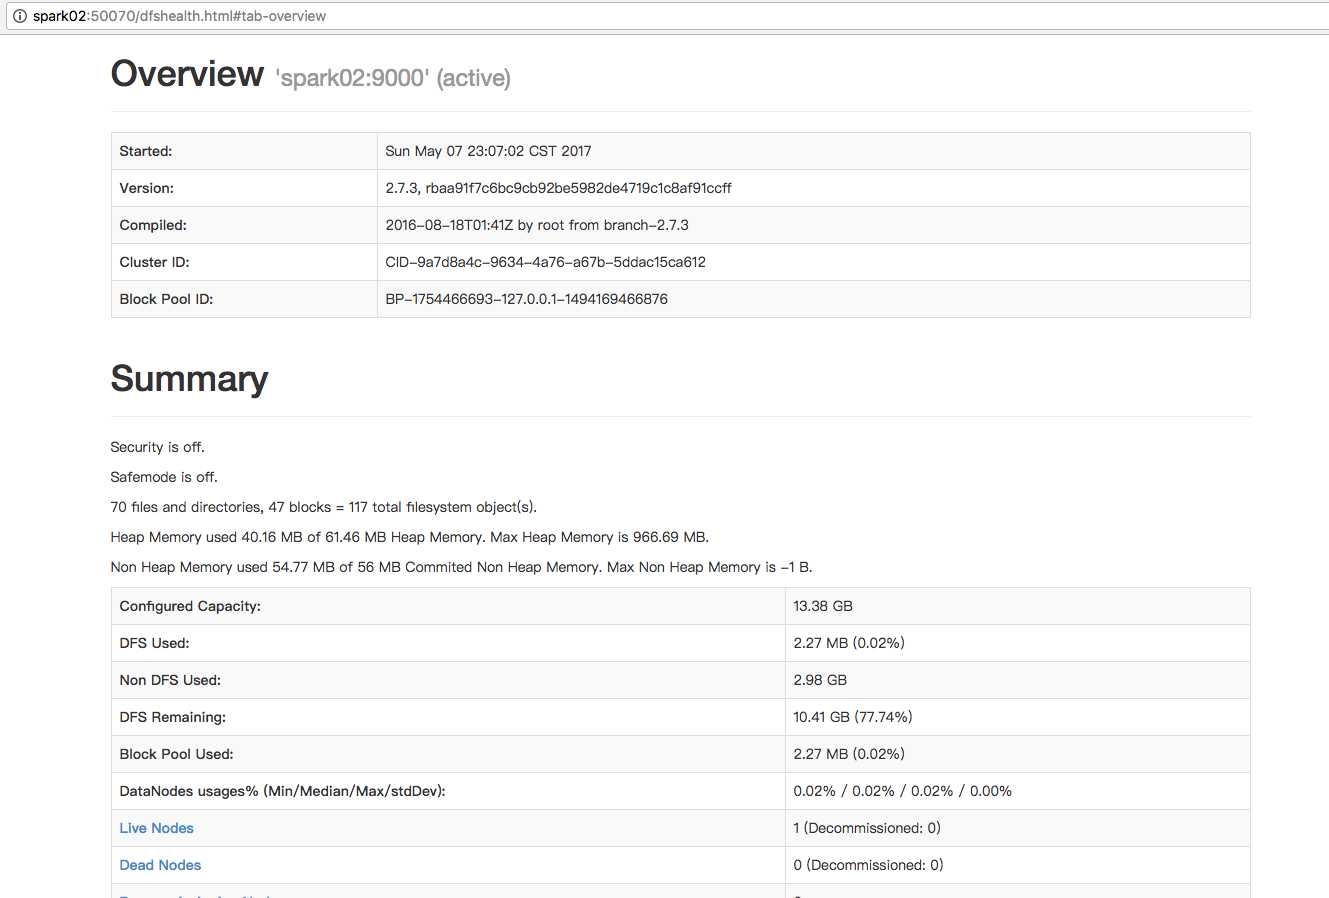
Browse the web interface for the NameNode; by default it is available at:
- NameNode - http://localhost:50070/
-
Make the HDFS directories required to execute MapReduce jobs:
  $ bin/hdfs dfs -mkdir /user
  $ bin/hdfs dfs -mkdir /user/<username>
-
Copy the input files into the distributed filesystem:
$ bin/hdfs dfs -put etc/hadoop input
-
Run some of the examples provided:
$ bin/hadoop jar share/hadoop/mapreduce/hadoop-mapreduce-examples-2.7.3.jar grep input output ‘dfs[a-z.]+‘
-
Examine the output files: Copy the output files from the distributed filesystem to the local filesystem and examine them:
  $ bin/hdfs dfs -get output output
  $ cat output/*
or
View the output files on the distributed filesystem:
$ bin/hdfs dfs -cat output/*
-
When you’re done, stop the daemons with:
YARN on a Single Node
You can run a MapReduce job on YARN in a pseudo-distributed mode by setting a few parameters and running ResourceManager daemon and NodeManager daemon in addition.
The following instructions assume that 1. ~ 4. steps of the above instructions are already executed.
-
Configure parameters as follows:etc/hadoop/mapred-site.xml:
<configuration>
    <property>
        <name>mapreduce.framework.name</name>
        <value>yarn</value>
    </property>
</configuration>
etc/hadoop/yarn-site.xml:
<configuration>
    <property>
        <name>yarn.nodemanager.aux-services</name>
        <value>mapreduce_shuffle</value>
    </property>
</configuration>
-
Start ResourceManager daemon and NodeManager daemon:
-
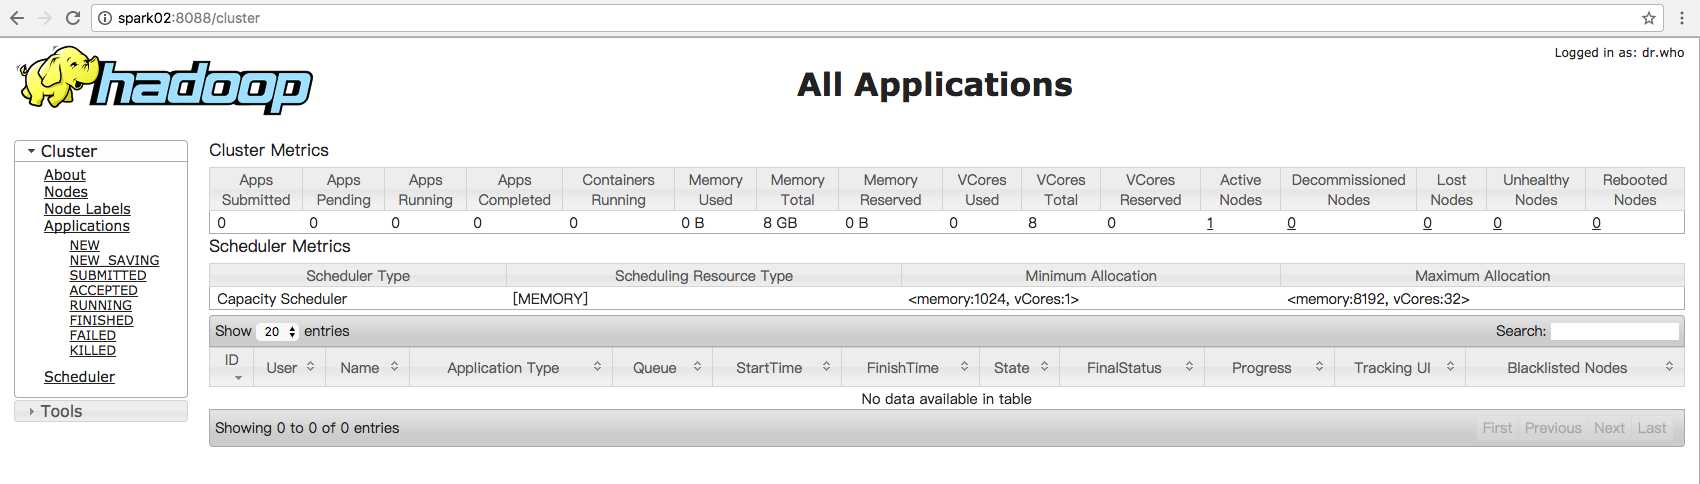
Browse the web interface for the ResourceManager; by default it is available at:
- ResourceManager - http://localhost:8088/
-
Run a MapReduce job.
-
When you’re done, stop the daemons with:
$ sbin/stop-yarn.sh
配置免密码,否则运行的时候会报错。
Setup passphraseless ssh
Now check that you can ssh to the localhost without a passphrase:
If you cannot ssh to localhost without a passphrase, execute the following commands:
  $ ssh-keygen -t rsa -P ‘‘ -f ~/.ssh/id_rsa
  $ cat ~/.ssh/id_rsa.pub >> ~/.ssh/authorized_keys
  $ chmod 0600 ~/.ssh/authorized_keys
Hadoop配置文件具体的配置信息如下:
1. vim etc/hadoop/hadoop-env.sh
#export JAVA_HOME=${JAVA_HOME}
export JAVA_HOME=/home/spark/jdk1.8.0_121
2. vim etc/hadoop/core-site.xml
<!-- Put site-specific property overrides in this file. -->
<configuration>
<property>
<name>fs.defaultFS</name>
<value>hdfs://spark01:9000</value>
</property>
<property>
<name>hadoop.tmp.dir</name>
<value>/home/spark/hadoopdata</value>
</property>
</configuration>
3. vim etc/hadoop/hdfs-site.xml
<configuration>
<property>
<name>dfs.replication</name>
<value>1</value>
</property>
</configuration>
4. vim etc/hadoop/mapred-site.xml
<configuration>
<property>
<name>mapreduce.framework.name</name>
<value>yarn</value>
</property>
</configuration>
5.vim etc/hadoop/yarn-site.xml
<configuration>
<!-- Site specific YARN configuration properties -->
<property>
<name>yarn.nodemanager.aux-services</name>
<value>mapreduce_shuffle</value>
</property>
<property>
<name>yarn.log-aggregation-enable</name>
<value>true</value>
</property>
</configuration>
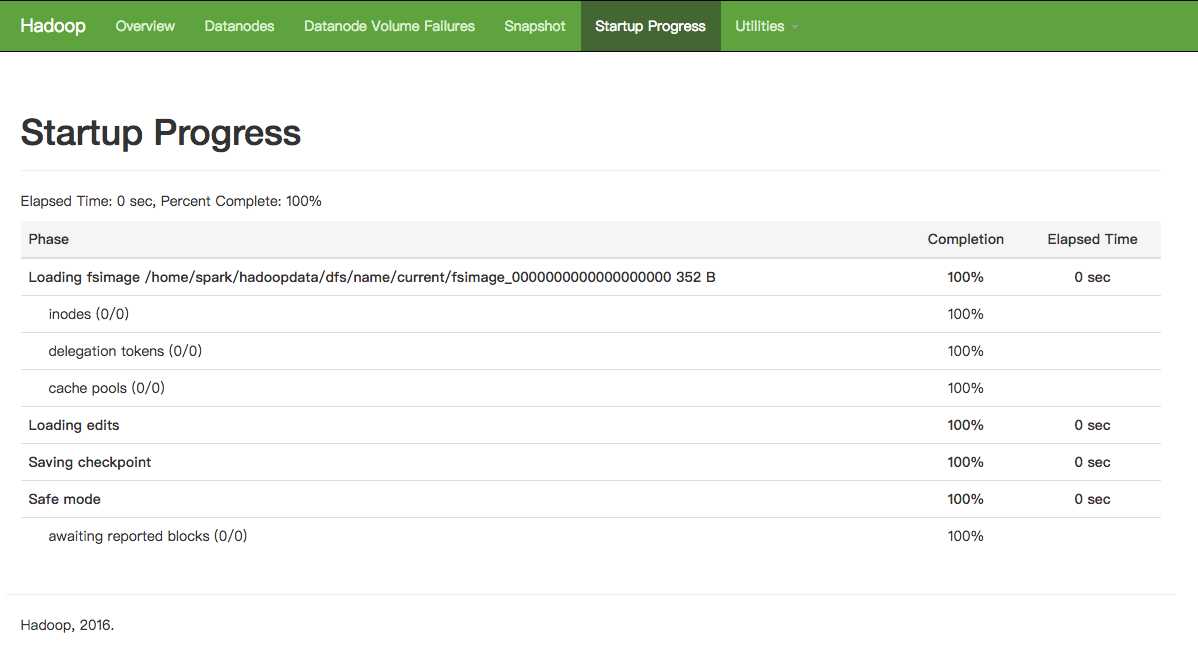
1. 对HDFS进行格式化
hdfs namenode -format

2.启动HDFS
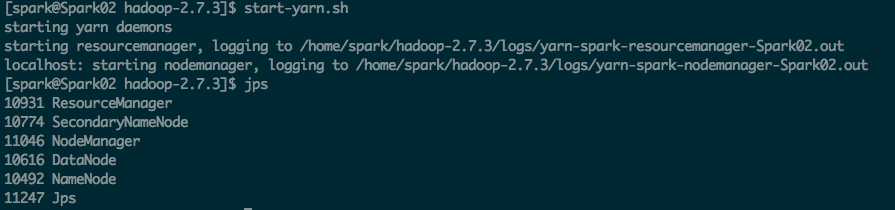
start-dfs.sh

3. 启动YARN
start-yarn.sh
关闭防火墙,其他服务器才能进行访问和验证
[spark@Spark02 hadoop-2.7.3]$ systemctl stop firewalld.service
==== AUTHENTICATING FOR org.freedesktop.systemd1.manage-units ===
Authentication is required to manage system services or units.
Authenticating as: spark
Password:
==== AUTHENTICATION COMPLETE ===
http://spark02:8088
http://spark02:50070
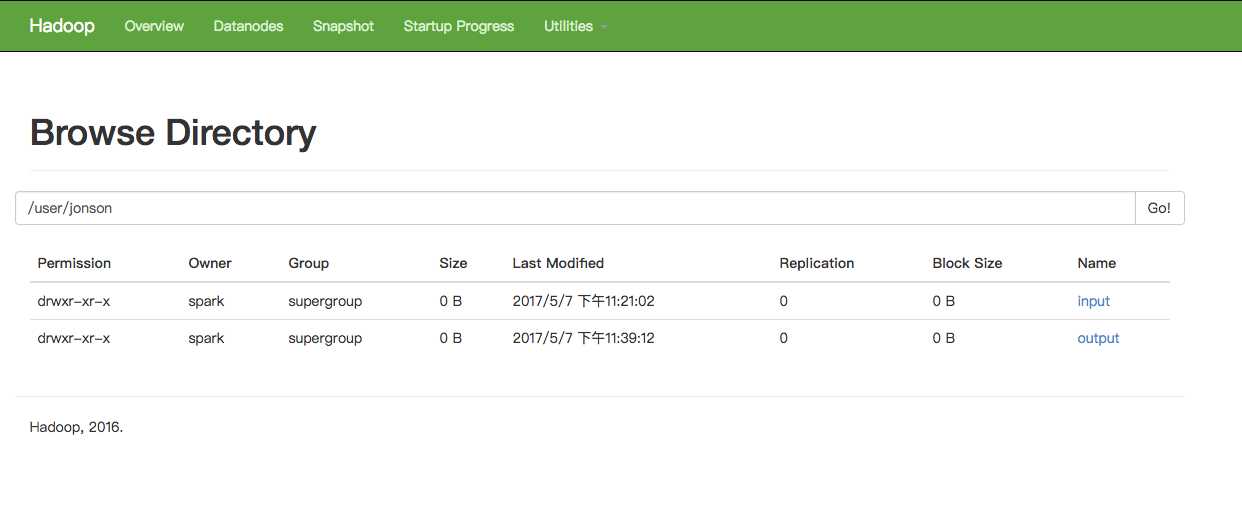
使用HDFS创建目录,拷贝文件和查看文件
hdfs dfs -mkdir hdfs://user/jonson/input
hdfs dfs -cp etc/hadoop hdfs://user/jonson/input
hdfs dfs -ls hdfs://user/jonson/input
hdfs dfs -mkdir hdfs://user/jonson/output
hdfs dfs -rmdir hdfs://user/jonson/output
hdfs dfs -ls hdfs://user/jonson
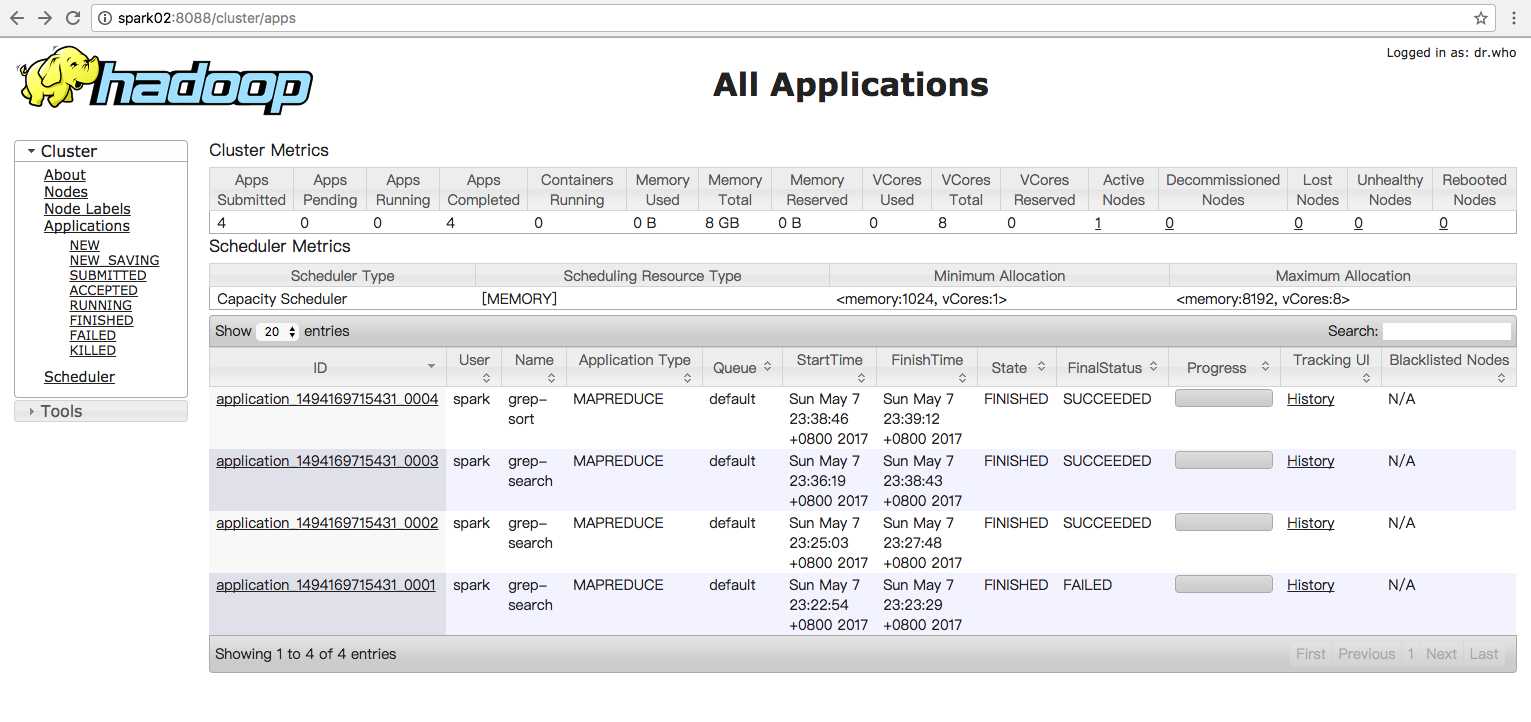
尝试使用MapReduce计算框架
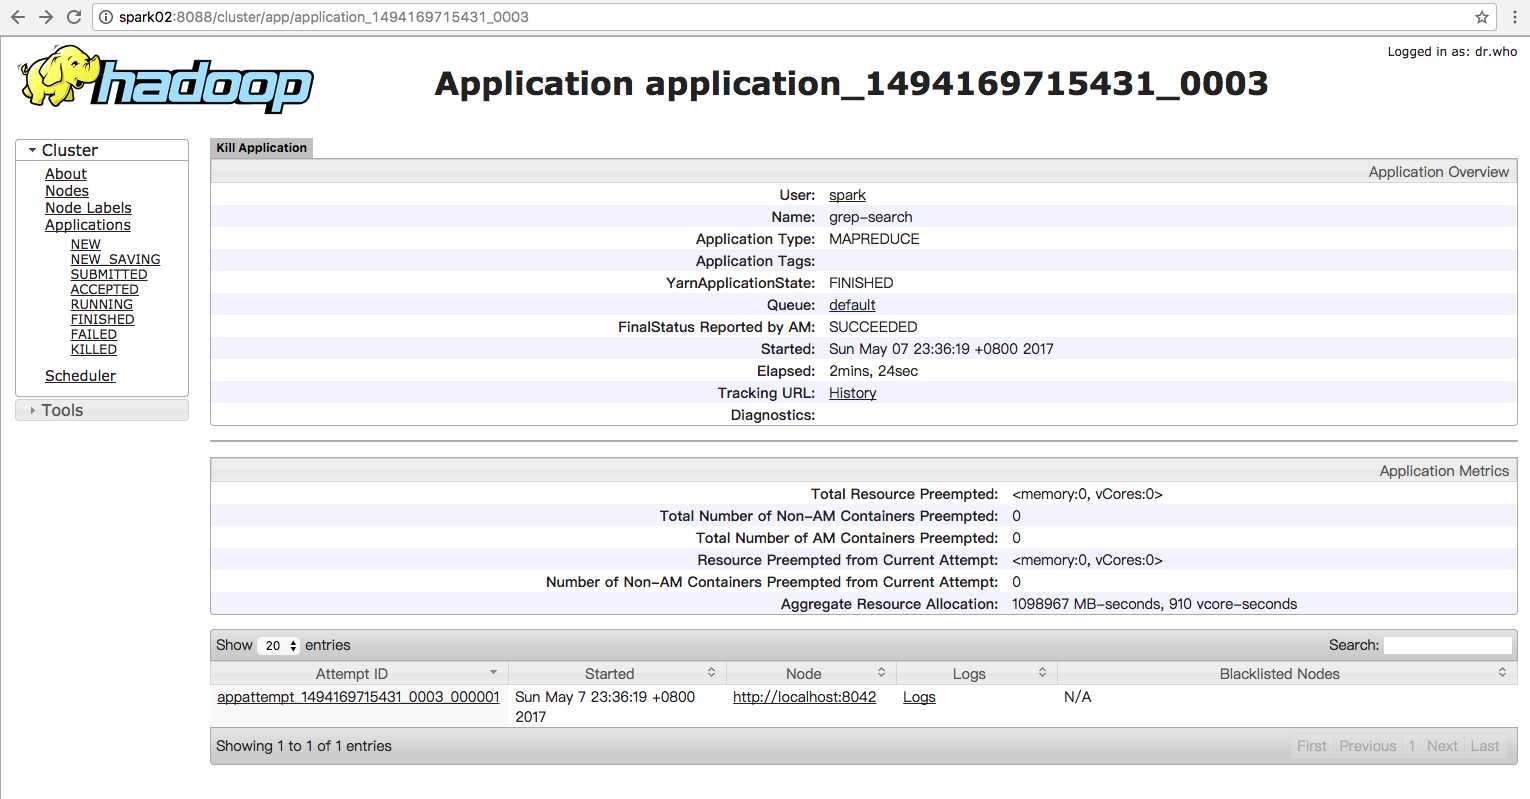
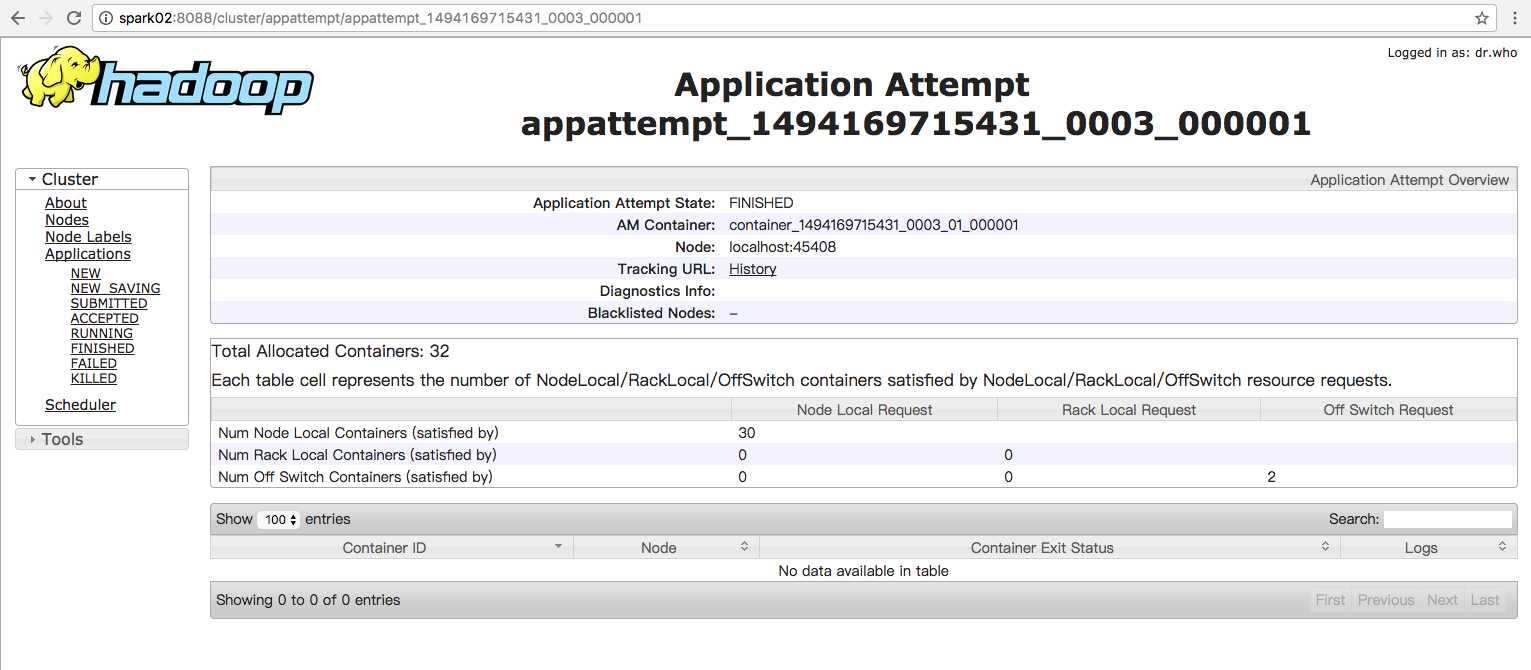
[spark@Spark02 hadoop-2.7.3]$ hadoop jar share/hadoop/mapreduce/hadoop-mapreduce-examples-2.7.3.jar grep hdfs:///user/jonson/input/hadoop hdfs:///user/jonson/output ‘dfs[a-z.]+‘
[spark@Spark02 hadoop-2.7.3]$ hadoop jar share/hadoop/mapreduce/hadoop-mapreduce-examples-2.7.3.jar grep hdfs:///user/jonson/input/hadoop hdfs:///user/jonson/output ‘dfs[a-z.]+‘
17/05/07 23:36:17 INFO client.RMProxy: Connecting to ResourceManager at /0.0.0.0:8032
17/05/07 23:36:18 INFO input.FileInputFormat: Total input paths to process : 30
17/05/07 23:36:18 INFO mapreduce.JobSubmitter: number of splits:30
17/05/07 23:36:19 INFO mapreduce.JobSubmitter: Submitting tokens for job: job_1494169715431_0003
17/05/07 23:36:19 INFO impl.YarnClientImpl: Submitted application application_1494169715431_0003
17/05/07 23:36:19 INFO mapreduce.Job: The url to track the job: http://localhost:8088/proxy/application_1494169715431_0003/
17/05/07 23:36:19 INFO mapreduce.Job: Running job: job_1494169715431_0003
17/05/07 23:36:28 INFO mapreduce.Job: Job job_1494169715431_0003 running in uber mode : false
17/05/07 23:36:28 INFO mapreduce.Job: map 0% reduce 0%
17/05/07 23:36:58 INFO mapreduce.Job: map 20% reduce 0%
17/05/07 23:37:25 INFO mapreduce.Job: map 37% reduce 0%
17/05/07 23:37:26 INFO mapreduce.Job: map 40% reduce 0%
17/05/07 23:37:50 INFO mapreduce.Job: map 47% reduce 0%
17/05/07 23:37:51 INFO mapreduce.Job: map 57% reduce 0%
17/05/07 23:37:54 INFO mapreduce.Job: map 57% reduce 19%
17/05/07 23:38:04 INFO mapreduce.Job: map 60% reduce 19%
17/05/07 23:38:06 INFO mapreduce.Job: map 60% reduce 20%
17/05/07 23:38:12 INFO mapreduce.Job: map 73% reduce 20%
17/05/07 23:38:15 INFO mapreduce.Job: map 73% reduce 24%
17/05/07 23:38:18 INFO mapreduce.Job: map 77% reduce 24%
17/05/07 23:38:21 INFO mapreduce.Job: map 77% reduce 26%
17/05/07 23:38:33 INFO mapreduce.Job: map 83% reduce 26%
17/05/07 23:38:34 INFO mapreduce.Job: map 90% reduce 26%
17/05/07 23:38:35 INFO mapreduce.Job: map 93% reduce 26%
17/05/07 23:38:36 INFO mapreduce.Job: map 93% reduce 31%
17/05/07 23:38:43 INFO mapreduce.Job: map 100% reduce 31%
17/05/07 23:38:44 INFO mapreduce.Job: map 100% reduce 100%
17/05/07 23:38:45 INFO mapreduce.Job: Job job_1494169715431_0003 completed successfully
17/05/07 23:38:45 INFO mapreduce.Job: Counters: 49
File System Counters
FILE: Number of bytes read=345
FILE: Number of bytes written=3690573
FILE: Number of read operations=0
FILE: Number of large read operations=0
FILE: Number of write operations=0
HDFS: Number of bytes read=81841
HDFS: Number of bytes written=437
HDFS: Number of read operations=93
HDFS: Number of large read operations=0
HDFS: Number of write operations=2
Job Counters
Launched map tasks=30
Launched reduce tasks=1
Data-local map tasks=30
Total time spent by all maps in occupied slots (ms)=653035
Total time spent by all reduces in occupied slots (ms)=77840
Total time spent by all map tasks (ms)=653035
Total time spent by all reduce tasks (ms)=77840
Total vcore-milliseconds taken by all map tasks=653035
Total vcore-milliseconds taken by all reduce tasks=77840
Total megabyte-milliseconds taken by all map tasks=668707840
Total megabyte-milliseconds taken by all reduce tasks=79708160
Map-Reduce Framework
Map input records=2103
Map output records=24
Map output bytes=590
Map output materialized bytes=519
Input split bytes=3804
Combine input records=24
Combine output records=13
Reduce input groups=11
Reduce shuffle bytes=519
Reduce input records=13
Reduce output records=11
Spilled Records=26
Shuffled Maps =30
Failed Shuffles=0
Merged Map outputs=30
GC time elapsed (ms)=8250
CPU time spent (ms)=13990
Physical memory (bytes) snapshot=6025490432
Virtual memory (bytes) snapshot=64352063488
Total committed heap usage (bytes)=4090552320
Shuffle Errors
BAD_ID=0
CONNECTION=0
IO_ERROR=0
WRONG_LENGTH=0
WRONG_MAP=0
WRONG_REDUCE=0
File Input Format Counters
Bytes Read=78037
File Output Format Counters
Bytes Written=437
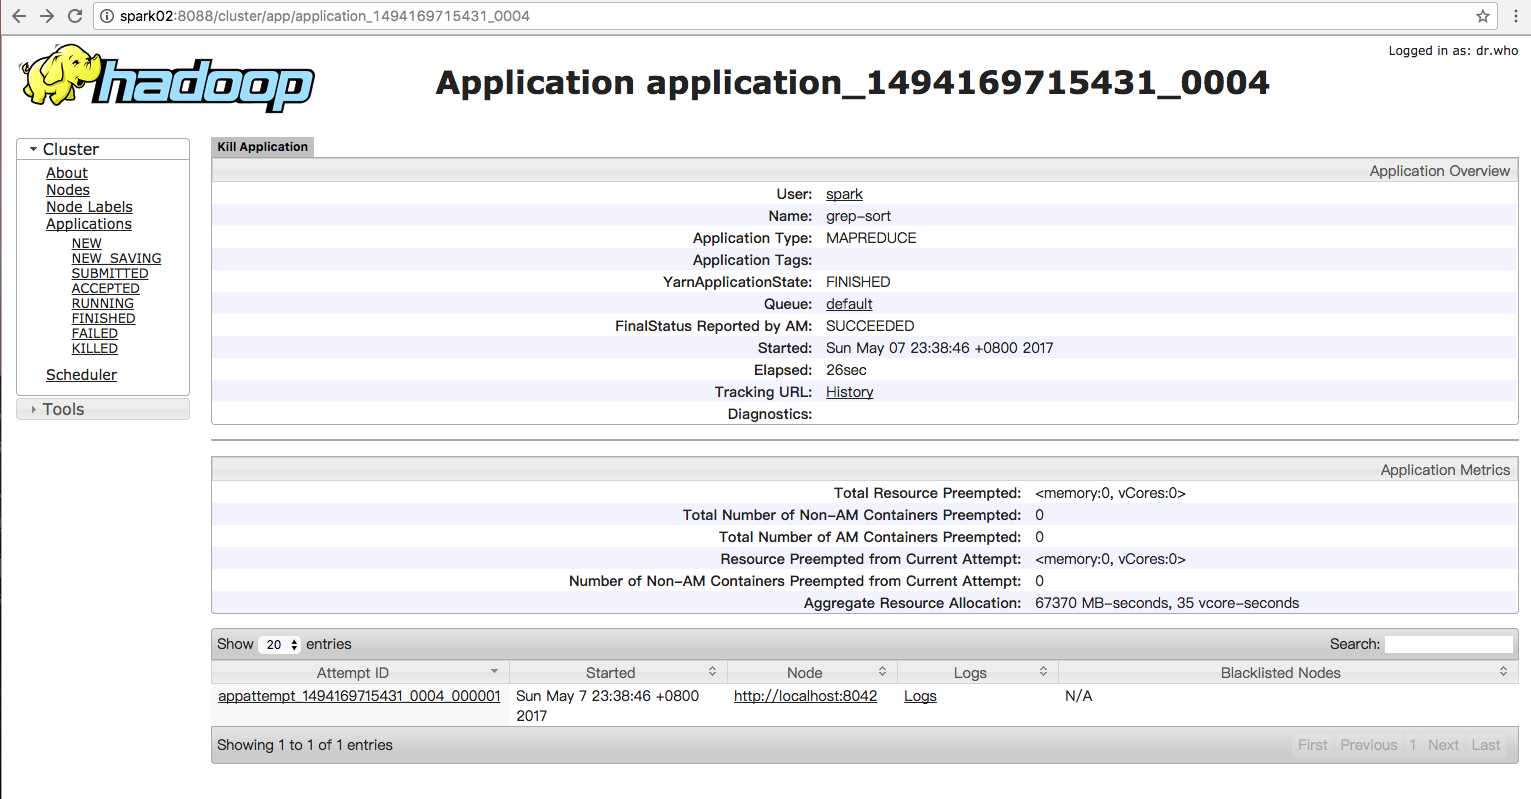
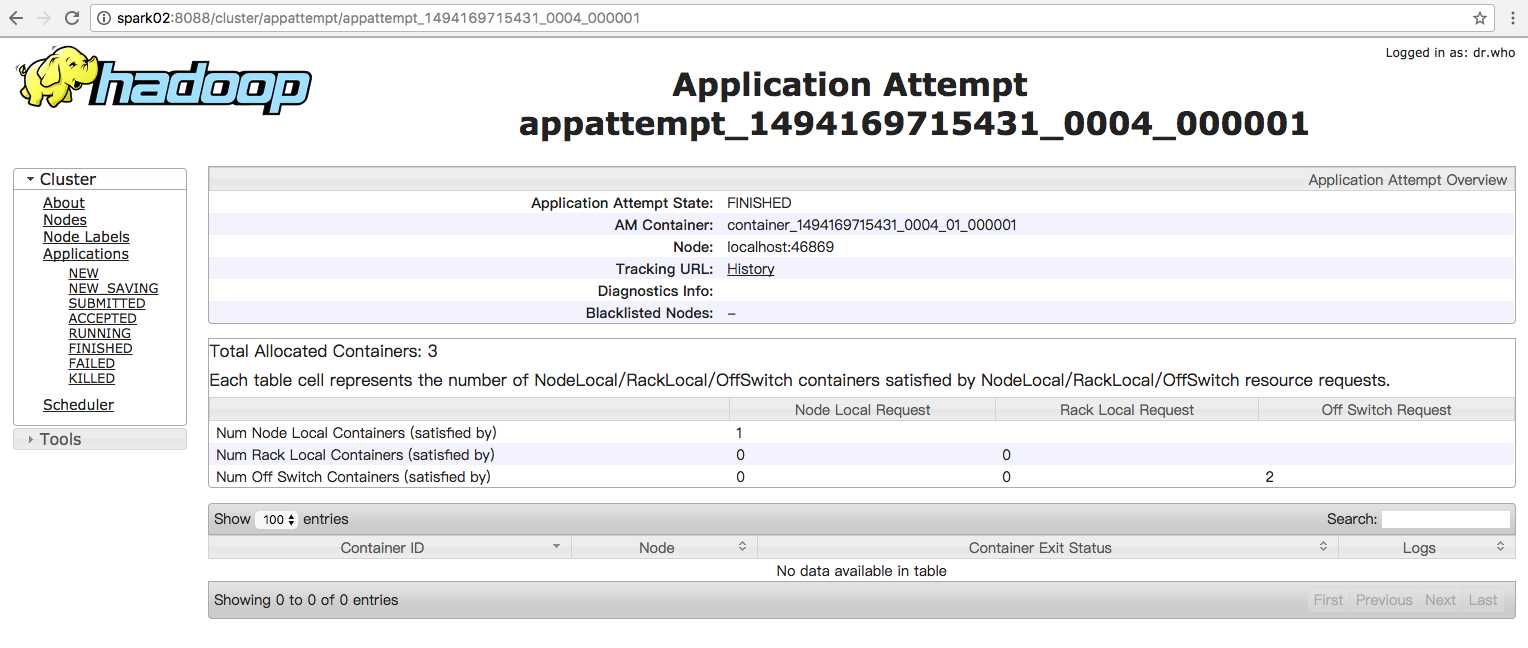
17/05/07 23:38:45 INFO client.RMProxy: Connecting to ResourceManager at /0.0.0.0:8032
17/05/07 23:38:46 INFO input.FileInputFormat: Total input paths to process : 1
17/05/07 23:38:46 INFO mapreduce.JobSubmitter: number of splits:1
17/05/07 23:38:46 INFO mapreduce.JobSubmitter: Submitting tokens for job: job_1494169715431_0004
17/05/07 23:38:46 INFO impl.YarnClientImpl: Submitted application application_1494169715431_0004
17/05/07 23:38:46 INFO mapreduce.Job: The url to track the job: http://localhost:8088/proxy/application_1494169715431_0004/
17/05/07 23:38:46 INFO mapreduce.Job: Running job: job_1494169715431_0004
17/05/07 23:39:00 INFO mapreduce.Job: Job job_1494169715431_0004 running in uber mode : false
17/05/07 23:39:00 INFO mapreduce.Job: map 0% reduce 0%
17/05/07 23:39:06 INFO mapreduce.Job: map 100% reduce 0%
17/05/07 23:39:13 INFO mapreduce.Job: map 100% reduce 100%
17/05/07 23:39:14 INFO mapreduce.Job: Job job_1494169715431_0004 completed successfully
17/05/07 23:39:14 INFO mapreduce.Job: Counters: 49
File System Counters
FILE: Number of bytes read=291
FILE: Number of bytes written=237535
FILE: Number of read operations=0
FILE: Number of large read operations=0
FILE: Number of write operations=0
HDFS: Number of bytes read=566
HDFS: Number of bytes written=197
HDFS: Number of read operations=7
HDFS: Number of large read operations=0
HDFS: Number of write operations=2
Job Counters
Launched map tasks=1
Launched reduce tasks=1
Data-local map tasks=1
Total time spent by all maps in occupied slots (ms)=3838
Total time spent by all reduces in occupied slots (ms)=3849
Total time spent by all map tasks (ms)=3838
Total time spent by all reduce tasks (ms)=3849
Total vcore-milliseconds taken by all map tasks=3838
Total vcore-milliseconds taken by all reduce tasks=3849
Total megabyte-milliseconds taken by all map tasks=3930112
Total megabyte-milliseconds taken by all reduce tasks=3941376
Map-Reduce Framework
Map input records=11
Map output records=11
Map output bytes=263
Map output materialized bytes=291
Input split bytes=129
Combine input records=0
Combine output records=0
Reduce input groups=5
Reduce shuffle bytes=291
Reduce input records=11
Reduce output records=11
Spilled Records=22
Shuffled Maps =1
Failed Shuffles=0
Merged Map outputs=1
GC time elapsed (ms)=143
CPU time spent (ms)=980
Physical memory (bytes) snapshot=306675712
Virtual memory (bytes) snapshot=4157272064
Total committed heap usage (bytes)=165810176
Shuffle Errors
BAD_ID=0
CONNECTION=0
IO_ERROR=0
WRONG_LENGTH=0
WRONG_MAP=0
WRONG_REDUCE=0
File Input Format Counters
Bytes Read=437
File Output Format Counters
Bytes Written=197
利用命令行来查看运行结果:
[spark@Spark02 hadoop-2.7.3]$ hadoop fs -cat hdfs:///user/jonson/output/*
6 dfs.audit.logger
4 dfs.class
3 dfs.server.namenode.
2 dfs.period
2 dfs.audit.log.maxfilesize
2 dfs.audit.log.maxbackupindex
1 dfsmetrics.log
1 dfsadmin
1 dfs.servers
1 dfs.replication
1 dfs.file
[spark@Spark02 hadoop-2.7.3]$ hadoop fs -cat hdfs:///user/jonson/output/part-r-00000
6 dfs.audit.logger
4 dfs.class
3 dfs.server.namenode.
2 dfs.period
2 dfs.audit.log.maxfilesize
2 dfs.audit.log.maxbackupindex
1 dfsmetrics.log
1 dfsadmin
1 dfs.servers
1 dfs.replication
1 dfs.file
====================================
免密码登录原理和方法
背景:搭建Hadoop环境需要设置无密码登陆,所谓无密码登陆其实是指通过证书认证的方式登陆,使用一种被称为"公私钥"认证的方式来进行ssh登录。
在linux系统中,ssh是远程登录的默认工具,因为该工具的协议使用了RSA/DSA的加密算法.该工具做linux系统的远程管理是非常安全的。telnet,因为其不安全性,在linux系统中被搁置使用了。
" 公私钥"认证方式简单的解释:首先在客户端上创建一对公私钥 (公钥文件:~/.ssh/id_rsa.pub; 私钥文件:~/.ssh/id_rsa)。然后把公钥放到服务器上(~/.ssh/authorized_keys), 自己保留好私钥.在使用ssh登录时,ssh程序会发送私钥去和服务器上的公钥做匹配.如果匹配成功就可以登录了。
方法/步骤
-
确认系统已经安装了SSH。
rpm –qa | grep openssh
rpm –qa | grep rsync
-->出现如下图的信息表示已安装
假设没有安装ssh和rsync,可以通过下面命令进行安装。
yum install ssh -->安装SSH协议
yum install rsync -->rsync是一个远程数据同步工具,可通过LAN/WAN快速同步多台主机间的文件
service sshd restart -->启动服务
-
生成秘钥对
ssh-keygen –t rsa –P ‘‘ -->直接回车生成的密钥对:id_rsa和id_rsa.pub,默认存储在"/home/hadoop/.ssh"目录下。
-
把id_rsa.pub追加到授权的key里面去。
cat ~/.ssh/id_rsa.pub >> ~/.ssh/authorized_keys
-
修改授权key的权限
chmod 600 ~/.ssh/authorized_keys
-
修改SSH配置文件
su - -->登陆root用户修改配置文件
vim /etc/ssh/sshd_config -->去掉下图中三行的注释
-
测试连接
service sshd restart -->重启ssh服务,
exit -->退出root用户,回到普通用户
ssh localhost -->连接普通用户测试
这只是配置好了单机环境上的SSH服务,要远程连接其它的服务器,接着看下面。
-
现在秘钥对已经生成好了,客户端SSH服务也已经配置好了,现在就把我们的钥匙(公钥)送给服务器。
scp ~/.ssh/id_rsa.pub 远程用户名@远程服务器IP:~/ -->将公钥复制到远程服务器的~/目录下
如: scp ~/.ssh/id_rsa.pub hadoop@192.168.1.134:~/
可以看到我们复制的时候需要我们输入服务器的密码,等我们把SSH配置好之后这些步骤就可以不用输入密码了。
-
8
上一步把公钥发送到192.168.1.134服务器上去了,我们去134机器上把公钥追加到授权key中去。(注意:如果是第一次运行SSH,那么.ssh目录需要手动创建,或者使用命令ssh-keygen -t rsa生成秘钥,它会自动在用户目录下生成.ssh目录。特别注意的是.ssh目录的权限问题,记得运行下chmod 700 .ssh命令)
在134机器上使用命令:
cat ~/id_rsa.pub >> ~/.ssh/authorized_keys -->追加公钥到授权key中
rm ~/id_rsa.pub -->保险起见,删除公钥
同样在134机器上重复第四步和第五步,
service sshd restart -->重启ssh服务
-
9
回到客户机来,输入:
ssh 192.168.1.134 -->应该就能直接连接服务器咯。
【原创 Spark动手实践 1】Hadoop2.7.3安装部署实际动手
标签:ack 关闭 dff 自己 公钥 免密 env audio rsync
原文地址:http://www.cnblogs.com/licheng/p/6822544.html


