标签:false perl rabbitmq ret method event 交换 登录 too
更新中.....
RabbitMQ是一个在AMQP基础上完整的,可复用的企业消息系统。他遵循Mozilla Public License开源协议。
MQ全称为Message Queue, 消息队列(MQ)是一种应用程序对应用程序的通信方法。应用程序通过读写出入队列的消息(针对应用程序的数据)来通信,而无需专用连接来链接它们。消息传递指的是程序之间通过在消息中发送数据进行通信,而不是通过直接调用彼此来通信,直接调用通常是用于诸如远程过程调用的技术。排队指的是应用程序通过队列来通信。队列的使用除去了接收和发送应用程序同时执行的要求。RabbitMQ可以,多个程序同时使用RabbitMQ ,但是必须队列名称不一样。采用erlang语言,属于爱立信公司开发的。
消息中间件 --->就是消息队列
异步方式:不需要立马得到结果,需要排队
同步方式:需要实时获得数据,坚决不能排队
subprocess 的Q也提供不同进程之间的沟通
应用场景:
电商秒杀活动
抢购小米手机
堡垒机批量发送文件
一、安装erlang
依赖包:
yum -y install gcc ncurses ncurses-base ncurses-devel ncurses-libs ncurses-static ncurses-term ocaml-curses ocaml-curses-devel openssl-devel zlib-devel openssl-devel perl xz xmlto kernel-devel m4  这是一行


1、下载otp_src_19.3.tar.gz
2、tar xvf otp_src_19.3.tar.gz
3、cd opt_src_19.3.tar.gz
4、./configure --prefix=/usr/local/erlang --with-ssl --enable-threads --enable-smp-support --enable-kernel-poll --enable-hipe --without-javac
5、make && make install

5、配置erlang环境:

vi /etc/profile

export PATH=$PATH:/usr/local/erlang/bin

source /etc/profile # 环境变量重启生效


二、安装rabbitmq
1、下载rabbitmq-server-generic-unix-3.6.5.tar.xz
2、tar xvf rabbitmq-server-generic-unix-3.6.5.tar.xz
3、mv rabbitmq_server-3.6.5/ /usr/local/rabbitmq
4、启动:
	#启动rabbitmq服务
	/usr/local/rabbitmq/sbin/rabbitmq-server
	#后台启动
	/usr/local/rabbitmq/sbin/rabbitmq-server -detached
	#关闭rabbitmq服务
	/usr/local/rabbitmq/sbin/rabbitmqctl stop
	或
	ps -ef | grep rabbit 和 kill -9 xxx  杀死服务

	#开启插件管理页面
	/usr/local/rabbitmq/sbin/rabbitmq-plugins enable rabbitmq_management

	#创建用户
	/usr/local/rabbitmq/sbin/rabbitmqctl add_user rabbitadmin 123456
	/usr/local/rabbitmq/sbin/rabbitmqctl set_user_tags rabbitadmin administrator
       ./rabbitmqctl set_permissions -p / rabbitadmin ".*" ".*" ".*" 为这个用户授权


5、登录
	#WEB登录
	http://10.10.3.63:15672  自己的IP地址
	用户名:rabbitadmin
	密码:123456
sender

import pika
# 认证
credentials = pika.PlainCredentials(‘rabbitadmin‘, ‘123456‘)  # 一定要认证
# 连接这台机器
connection = pika.BlockingConnection(pika.ConnectionParameters(
    ‘192.168.14.38‘,credentials=credentials))    #主机IP 和验证
channel = connection.channel() # 建立了rabbitmq的协议通道

# 声明queue队列
channel.queue_declare(queue=‘hello‘)

# n RabbitMQ a message can never be sent directly to the queue, it always needs to go through an exchange.
# 发送消息
channel.basic_publish(exchange=‘‘, exchange表示交换器,能精确指定消息应该发送到哪个队列,
                      routing_key=‘hello‘, #
                      body=‘Hello World!‘)#routing_key设置为队列的名称,body就是发送的内容
print(" [x] Sent ‘Hello World!‘")
connection.close()
import pika
import time

credentials = pika.PlainCredentials(‘rabbitadmin‘, ‘123456‘)
# 连接这台机器
connection = pika.BlockingConnection(pika.ConnectionParameters(
    ‘192.168.14.38‘,credentials=credentials))
channel = connection.channel() # 建立了rabbitmq的协议通道


channel.queue_declare(queue=‘hello‘)


def callback(ch, method, properties, body):

    print("received msg...start processing....",body)
    time.sleep(20)
    print(" [x] msg process done....",body)


channel.basic_consume(callback,
                      queue=‘hello‘,
                      no_ack=True)

print(‘ [*] Waiting for messages. To exit press CTRL+C‘)
channel.start_consuming()

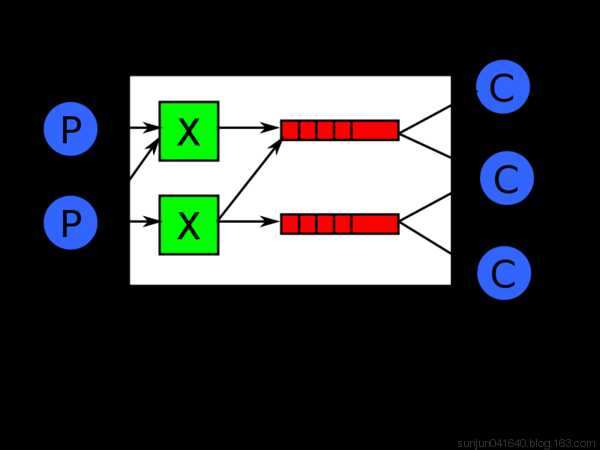
在这种模式下,RabbitMQ会默认把p发的消息依次分发给各个消费者(c),跟负载均衡差不多。
消息提供者代码
import pika
import time
connection = pika.BlockingConnection(pika.ConnectionParameters(
    ‘localhost‘))
channel = connection.channel()

# 声明queue
channel.queue_declare(queue=‘task_queue‘)

# n RabbitMQ a message can never be sent directly to the queue, it always needs to go through an exchange.
import sys

message = ‘ ‘.join(sys.argv[1:]) or "Hello World! %s" % time.time()
channel.basic_publish(exchange=‘‘,
                      routing_key=‘task_queue‘,
                      body=message,
                      properties=pika.BasicProperties(
                          delivery_mode=2,  # make message persistent
                      )
                      )
print(" [x] Sent %r" % message)
connection.close()
import pika, time

connection = pika.BlockingConnection(pika.ConnectionParameters(
    ‘localhost‘))
channel = connection.channel()


def callback(ch, method, properties, body):
    print(" [x] Received %r" % body)
    time.sleep(20)
    print(" [x] Done")
    print("method.delivery_tag",method.delivery_tag)
    ch.basic_ack(delivery_tag=method.delivery_tag)


channel.basic_consume(callback,
                      queue=‘task_queue‘,
                      no_ack=True
                      )

print(‘ [*] Waiting for messages. To exit press CTRL+C‘)
channel.start_consuming()
此时,先启动消息生产者,然后再分别启动3个消费者,通过生产者多发送几条消息,你会发现,这几条消息会被依次分配到各个消费者身上
虽然有了消息反馈机制,但是如果rabbitmq自身挂掉的话,那么任务还是会丢失。所以需要将任务持久化存储起来。声明持久化存储:
将队列(Queue)与消息(Message)都设置为可持久化的(durable),这样可以保证绝大部分情况下我们的RabbitMQ消息不会丢失。但依然解决不了小概率丢失事件的发生(比如RabbitMQ服务器已经接收到生产者的消息,但还没来得及持久化该消息时RabbitMQ服务器就断电了),如果需要对这种小概率事件也要管理起来,那么要用到事务。由于这里仅为RabbitMQ的简单介绍,所以不讲解RabbitMQ相关的事务。
import pika


connection = pika.BlockingConnection(pika.ConnectionParameters(‘localhost‘))
channel = connection.channel()  # 建立了rabbit 协议的通道

# durable=True 声明持久化存储
channel.queue_declare(queue=‘task_queue‘, durable=True)


channel.basic_publish(exchange=‘‘,
                      routing_key=‘task_queue‘,
                      body=‘Hello World!‘,
                      # 在发送任务的时候,用delivery_mode=2来标记消息为持久化存储
                      properties=pika.BasicProperties(
                          delivery_mode=2,
                      ))

print(" [x] Sent ‘Hello World!‘")
connection.close()

sender.py
import pika
import time


connection = pika.BlockingConnection(pika.ConnectionParameters(‘localhost‘))
channel = connection.channel()
channel.queue_declare(queue=‘task_queue‘, durable=True)


def callback(ch, method, properties, body):
    print("received msg...start processing....",body)
    time.sleep(20)
    print(" [x] msg process done....", body)
    ch.basic_ack(delivery_tag=method.delivery_tag)

channel.basic_consume(
    callback,
    queue=‘task_queue‘,
    no_ack=False  # 默认为False
)

print(‘ [*] Waiting for messages. To exit press CTRL+C‘)
channel.start_consuming()
如果Rabbit只管按顺序把消息发到各个消费者身上,不考虑消费者负载的话,很可能出现,一个机器配置不高的消费者那里堆积了很多消息处理不完,同时配置高的消费者却一直很轻松。为解决此问题,可以在各个消费者端,配置perfetch=1,意思就是告诉RabbitMQ在我这个消费者当前消息还没处理完的时候就不要再给我发新消息了。

channel.basic_qos(prefetch_count=1)
带消息持久化+公平分发的完整代码
生产者端
import pika
import sys

connection = pika.BlockingConnection(pika.ConnectionParameters(
        host=‘localhost‘))
channel = connection.channel()

channel.queue_declare(queue=‘task_queue‘, durable=True)

message = ‘ ‘.join(sys.argv[1:]) or "Hello World!"
channel.basic_publish(exchange=‘‘,
                      routing_key=‘task_queue‘,
                      body=message,
                      properties=pika.BasicProperties(
                         delivery_mode = 2, # make message persistent
                      ))
print(" [x] Sent %r" % message)
connection.close()
消费者端
import pika
import time

connection = pika.BlockingConnection(pika.ConnectionParameters(
        host=‘localhost‘))
channel = connection.channel()

channel.queue_declare(queue=‘task_queue‘, durable=True)
print(‘ [*] Waiting for messages. To exit press CTRL+C‘)

def callback(ch, method, properties, body):
    print(" [x] Received %r" % body)
    time.sleep(body.count(b‘.‘))
    print(" [x] Done")
    ch.basic_ack(delivery_tag = method.delivery_tag)

channel.basic_qos(prefetch_count=1)
channel.basic_consume(callback,
                      queue=‘task_queue‘)

channel.start_consuming()
之前的例子都基本都是1对1的消息发送和接收,即消息只能发送到指定的queue里,但有些时候你想让你的消息被所有的Queue收到,类似广播的效果,这时候就要用到exchange了,
交流是一个非常简单的事情。一方面它收到消息从生产者和另一边推他们队列。交换必须知道如何处理接收到的消息。应该是附加到一个特定的队列吗?应该是附加到多队列?或者应该丢弃。交换的规则定义的类型。
Exchange在定义的时候是有类型的,以决定到底是哪些Queue符合条件,可以接收消息
fanout: 所有bind到此exchange的queue都可以接收消息
direct: 通过routingKey和exchange决定的那个唯一的queue可以接收消息
topic:所有符合routingKey(此时可以是一个表达式)的routingKey所bind的queue可以接收消息
表达式符号说明:#代表一个或多个字符,*代表任何字符
例:#.a会匹配a.a,aa.a,aaa.a等
*.a会匹配a.a,b.a,c.a等
注:使用RoutingKey为#,Exchange Type为topic的时候相当于使用fanout
headers: 通过headers 来决定把消息发给哪些queue

消息publisher
import pika
import sys

connection = pika.BlockingConnection(pika.ConnectionParameters(
        host=‘localhost‘))
channel = connection.channel()

channel.exchange_declare(exchange=‘logs‘,
                         type=‘fanout‘)

message = ‘ ‘.join(sys.argv[1:]) or "info: Hello World!"
channel.basic_publish(exchange=‘logs‘,
                      routing_key=‘‘,
                      body=message)
print(" [x] Sent %r" % message)
connection.close()
消息subscriber
import pika

connection = pika.BlockingConnection(pika.ConnectionParameters(
        host=‘localhost‘))
channel = connection.channel()

channel.exchange_declare(exchange=‘logs‘,
                         type=‘fanout‘)

result = channel.queue_declare(exclusive=True) #不指定queue名字,rabbit会随机分配一个名字,exclusive=True会在使用此queue的消费者断开后,自动将queue删除
queue_name = result.method.queue

channel.queue_bind(exchange=‘logs‘,
                   queue=queue_name)

print(‘ [*] Waiting for logs. To exit press CTRL+C‘)

def callback(ch, method, properties, body):
    print(" [x] %r" % body)

channel.basic_consume(callback,
                      queue=queue_name,
                      no_ack=True)

channel.start_consuming()
RabbitMQ还支持根据关键字发送,即:队列绑定关键字,发送者将数据根据关键字发送到消息exchange,exchange根据 关键字 判定应该将数据发送至指定队列
import pika
import sys

connection = pika.BlockingConnection(pika.ConnectionParameters(
        host=‘localhost‘))
channel = connection.channel()

channel.exchange_declare(exchange=‘direct_logs‘,
                         type=‘direct‘)

severity = sys.argv[1] if len(sys.argv) > 1 else ‘info‘
message = ‘ ‘.join(sys.argv[2:]) or ‘Hello World!‘
channel.basic_publish(exchange=‘direct_logs‘,
                      routing_key=severity,
                      body=message)
print(" [x] Sent %r:%r" % (severity, message))
connection.close()
import pika
import sys

connection = pika.BlockingConnection(pika.ConnectionParameters(
        host=‘localhost‘))
channel = connection.channel()

channel.exchange_declare(exchange=‘direct_logs‘,
                         type=‘direct‘)

result = channel.queue_declare(exclusive=True)
queue_name = result.method.queue

severities = sys.argv[1:]
if not severities:
    sys.stderr.write("Usage: %s [info] [warning] [error]\n" % sys.argv[0])
    sys.exit(1)

for severity in severities:
    channel.queue_bind(exchange=‘direct_logs‘,
                       queue=queue_name,
                       routing_key=severity)

print(‘ [*] Waiting for logs. To exit press CTRL+C‘)

def callback(ch, method, properties, body):
    print(" [x] %r:%r" % (method.routing_key, body))

channel.basic_consume(callback,
                      queue=queue_name,
                      no_ack=True)

channel.start_consuming()
Although using the direct exchange improved our system, it still has limitations - it can‘t do routing based on multiple criteria.
In our logging system we might want to subscribe to not only logs based on severity, but also based on the source which emitted the log. You might know this concept from the syslog unix tool, which routes logs based on both severity (info/warn/crit...) and facility (auth/cron/kern...).
That would give us a lot of flexibility - we may want to listen to just critical errors coming from ‘cron‘ but also all logs from ‘kern‘.

topi: 意思是话题
To receive all the logs run:
python receive_logs_topic.py "#" #绑定#号,就是收所有消息,相当于广播
To receive all logs from the facility "kern":
python receive_logs_topic.py "kern.*" #以kern开头
Or if you want to hear only about "critical" logs:
python receive_logs_topic.py "*.critical" #以critical结尾
You can create multiple bindings:
python receive_logs_topic.py "kern.*" "*.critical" #收kern开头并且以critical结尾(相当于收两个)
And to emit a log with a routing key "kern.critical" type:
python emit_log_topic.py "kern.critical" "A critical kernel error" #发消息到kern.critical里,内容是:
A critical kernel error
示例:
rabbit_topic_send.py (生产者是发送端)
1 import pika
 2 import sys
 3
 4 credentials = pika.PlainCredentials(‘nulige‘, ‘123456‘)
 5 connection = pika.BlockingConnection(pika.ConnectionParameters(
 6     host=‘192.168.1.118‘,credentials=credentials))
 7
 8 channel = connection.channel()
 9
10 channel.exchange_declare(exchange=‘topic_logs‘,type=‘topic‘) #指定类型
11
12 routing_key = sys.argv[1] if len(sys.argv) > 1 else ‘anonymous.info‘
13
14 message = ‘ ‘.join(sys.argv[2:]) or ‘Hello World!‘  #消息
15
16 channel.basic_publish(exchange=‘topic_logs‘,
17                       routing_key=routing_key,
18                       body=message)
19 print(" [x] Sent %r:%r" % (routing_key, message))
20 connection.close()
rabbit_topic_recv.py (消费者是接收端)单向的
 1 import pika
 2 import sys
 3
 4 credentials = pika.PlainCredentials(‘nulige‘, ‘123456‘)
 5 connection = pika.BlockingConnection(pika.ConnectionParameters(
 6     host=‘192.168.1.118‘,credentials=credentials))
 7
 8 channel = connection.channel()
 9 channel.exchange_declare(exchange=‘topic_logs‘,type=‘topic‘)
10
11 result = channel.queue_declare(exclusive=True)
12 queue_name = result.method.queue
13
14 binding_keys = sys.argv[1:]
15 if not binding_keys:
16     sys.stderr.write("Usage: %s [binding_key]...\n" % sys.argv[0])
17     sys.exit(1)
18
19 for binding_key in binding_keys:
20     channel.queue_bind(exchange=‘topic_logs‘,
21                        queue=queue_name,
22                        routing_key=binding_key)
23
24 print(‘ [*] Waiting for logs. To exit press CTRL+C‘)
25
26 def callback(ch, method, properties, body):
27     print(" [x] %r:%r" % (method.routing_key, body))
28
29 channel.basic_consume(callback,queue=queue_name)
30
31 channel.start_consuming()
执行结果:
 1 #接收端
 2 D:\python\day42>python3 rabbit_topic_recv.py error
 3  [*] Waiting for logs. To exit press CTRL+C
 4  [x] ‘error‘:b‘mysql has error‘
 5
 6
 7 D:\python\day42>python3 rabbit_topic_recv.py *.warning mysql.*
 8  [*] Waiting for logs. To exit press CTRL+C
 9  [x] ‘mysql.error‘:b‘mysql has error‘
10
11
12 D:\python\day42>python3 rabbit_topic_send.py mysql.info "mysql has error"
13  [x] Sent ‘mysql.info‘:‘mysql has error‘
14
15
16 D:\python\day42>python3 rabbit_topic_recv.py *.error.*
17  [*] Waiting for logs. To exit press CTRL+C
18  [x] ‘mysql.error.‘:b‘mysql has error‘
19
20
21 #发送端                                指定类型:error      消息内容
22 D:\python\day42>python3 rabbit_topic_send.py error "mysql has error"
23  [x] Sent ‘error‘:‘mysql has error‘
24
25
26 D:\python\day42>python3 rabbit_topic_send.py mysql.error "mysql has error"
27  [x] Sent ‘mysql.error‘:‘mysql has error‘
28  [x] ‘mysql.info‘:b‘mysql has error‘
29
30
31 D:\python\day42>python3 rabbit_topic_send.py mysql.error. "mysql has error"
32  [x] Sent ‘mysql.error.‘:‘mysql has error‘
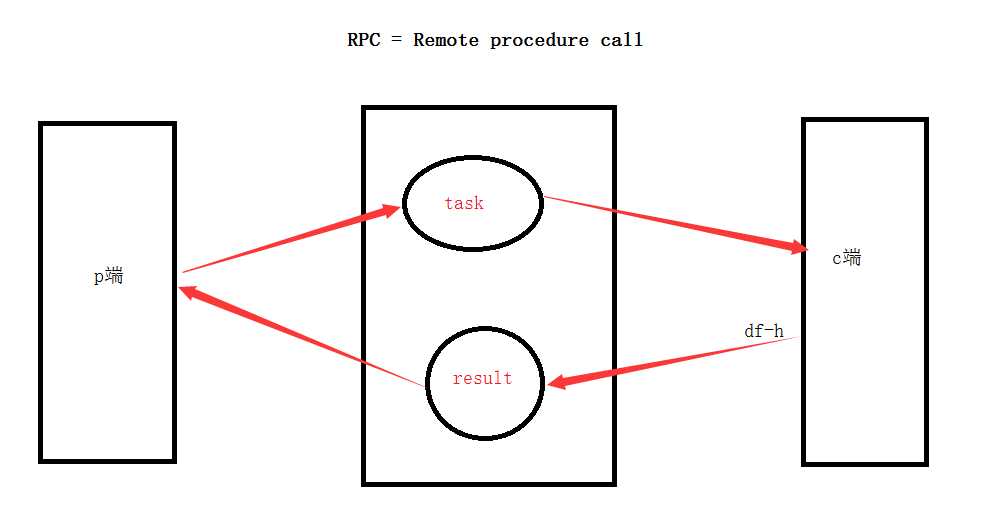
To illustrate how an RPC service could be used we‘re going to create a simple client class. It‘s going to expose a method named call which sends an RPC request and blocks until the answer is received:
fibonacci_rpc = FibonacciRpcClient()
result = fibonacci_rpc.call(4)
print("fib(4) is %r" % result)

应用场景:
示例:实现RPC服务功能
rabbit_rpc_send.py(生产者是发送端)

 1 import pika
 2 import uuid
 3
 4 class SSHRpcClient(object):
 5     def __init__(self):
 6         credentials = pika.PlainCredentials(‘nulige‘, ‘123456‘)
 7         self.connection = pika.BlockingConnection(pika.ConnectionParameters(
 8                             host=‘192.168.1.118‘,credentials=credentials))
 9
10         self.channel = self.connection.channel()
11
12         result = self.channel.queue_declare(exclusive=True) #客户端的结果必须要返回到这个queue
13         self.callback_queue = result.method.queue
14
15         self.channel.basic_consume(self.on_response,queue=self.callback_queue) #声明从这个queue里收结果
16
17     def on_response(self, ch, method, props, body):
18         if self.corr_id == props.correlation_id: #任务标识符
19             self.response = body
20             print(body)
21
22     # 返回的结果,放在callback_queue中
23     def call(self, n):
24         self.response = None
25         self.corr_id = str(uuid.uuid4()) #唯一标识符
26         self.channel.basic_publish(exchange=‘‘,
27                                    routing_key=‘rpc_queue3‘,  #声明一个Q
28                                    properties=pika.BasicProperties(
29                                        reply_to=self.callback_queue,
30                                        correlation_id=self.corr_id,
31                                    ),
32                                    body=str(n))
33
34         print("start waiting for cmd result ")
35         count = 0
36         while self.response is None: #如果命令没返回结果
37             print("loop ",count)
38             count +=1
39             self.connection.process_data_events() #以不阻塞的形式去检测有没有新事件
40             #如果没事件,那就什么也不做, 如果有事件,就触发on_response事件
41         return self.response
42
43 ssh_rpc = SSHRpcClient()
44
45 print(" [x] sending cmd")
46 response = ssh_rpc.call("ipconfig")
47
48 print(" [.] Got result ")
49 print(response.decode("gbk"))
rabbit_rpc_recv.py(消费端是接收端)

 1 import pika
 2 import time
 3 import subprocess
 4
 5 credentials = pika.PlainCredentials(‘nulige‘, ‘123456‘)
 6 connection = pika.BlockingConnection(pika.ConnectionParameters(
 7     host=‘192.168.1.118‘, credentials=credentials))
 8
 9 channel = connection.channel()
10 channel.queue_declare(queue=‘rpc_queue3‘)
11
12 def SSHRPCServer(cmd):
13
14     print("recv cmd:",cmd)
15     cmd_obj = subprocess.Popen(cmd.decode(),shell=True,stdout=subprocess.PIPE,stderr=subprocess.PIPE)
16
17     result = cmd_obj.stdout.read() or cmd_obj.stderr.read()
18     return result
19
20 def on_request(ch, method, props, body):
21
22     print(" [.] fib(%s)" % body)
23     response = SSHRPCServer(body)
24
25     ch.basic_publish(exchange=‘‘,
26                      routing_key=props.reply_to,
27                      properties=pika.BasicProperties(correlation_id= 28                                                          props.correlation_id),
29                      body=response)
30
31 channel.basic_consume(on_request, queue=‘rpc_queue3‘)
32 print(" [x] Awaiting RPC requests")
33 channel.start_consuming()
标签:false perl rabbitmq ret method event 交换 登录 too
原文地址:http://www.cnblogs.com/sunkai1993/p/6833309.html