标签:const set ima als group 性能 打印 jedis iba
一、spring整合redis
Redis作为一个时下非常流行的NOSQL语言,不学一下有点过意不去。
背景:学习Redis用到的框架是maven+spring+mybatis(框架如何搭建这边就不叙述了)
首先在pom里面添加当前所需要的jar包,有下面几个:
      ………………
    <dependency>
            <groupId>redis.clients</groupId>
            <artifactId>jedis</artifactId>
            <version>2.9.0</version>
        </dependency>

        <dependency>
            <groupId>org.apache.commons</groupId>
            <artifactId>commons-pool2</artifactId>
            <version>2.4.2</version>
        </dependency>

      <!--mybaitis 缓存-->
        <dependency>
            <groupId>org.mybatis.caches</groupId>
            <artifactId>mybatis-redis</artifactId>
            <version>1.0.0-beta2</version>
        </dependency>
    <!-- spring data redis -->
    <dependency>
        <groupId>org.springframework.data</groupId>
        <artifactId>spring-data-redis</artifactId>
        <version>1.8.1.RELEASE</version>
    </dependency>
    ……………………
第一个是支持Redis的语言——Jedis包
第二个是依赖包
第三个是mybaitis自己做的一个 mybatis与redis整合的一个jar包
第四个是spring与redis整合的需要的jar包
先看spring与redis整合的配置文件,如下:
 1 <?xml version="1.0" encoding="UTF-8"?>
 2 <beans xmlns="http://www.springframework.org/schema/beans"
 3        xmlns:xsi="http://www.w3.org/2001/XMLSchema-instance"
 4        xsi:schemaLocation="http://www.springframework.org/schema/beans http://www.springframework.org/schema/beans/spring-beans.xsd">
 5
 6
 7     <!--redis哨兵 -->
 8     <!--<bean id="redisSentinelConfiguration"
 9           class="org.springframework.data.redis.connection.RedisSentinelConfiguration">
10         <property name="master">
11             <bean class="org.springframework.data.redis.connection.RedisNode">
12                 <property name="name" value="mymaster"></property>
13             </bean>
14         </property>
15         <property name="sentinels">
16             <set>
17                 <bean class="org.springframework.data.redis.connection.RedisNode">
18                     <constructor-arg index="0" value="${redis.host.slave}"/>
19                     <constructor-arg index="1" value="${redis.port}"/>
20                 </bean>
21                 <bean class="org.springframework.data.redis.connection.RedisNode">
22                     <constructor-arg index="0" value="${redis.host.master}"/>
23                     <constructor-arg index="1" value="${redis.port}"/>
24                 </bean>
25             </set>
26         </property>
27     </bean>-->
28
29     <bean id="jedisConnFactory"
30           class="org.springframework.data.redis.connection.jedis.JedisConnectionFactory">
31         <property name="hostName" value="${redis.host}"/>
32         <property name="port" value="${redis.port}"/>
33         <property name="password" value="${redis.password}"/>
34         <property name="usePool" value="false"/>
35         <!--<property name="poolConfig" ref="poolConfig"/>-->
36         <!--<constructor-arg ref="redisSentinelConfiguration"/>-->
37         <property name="timeout" value="10000"/>
38     </bean>
39
40     <bean id="stringRedisTemplate" class="org.springframework.data.redis.core.StringRedisTemplate">
41         <property name="connectionFactory" ref="jedisConnFactory"/>
42     </bean>
43
44     <!-- 使用中间类解决RedisCache.jedisConnectionFactory的静态注入,从而使MyBatis实现第三方缓存 -->
45     <bean id="redisCacheTransfer" class="com.anhoo.util.RedisCacheTransfer">
46         <property name="jedisConnectionFactory" ref="jedisConnFactory"/>
47     </bean>
48
49 </beans>
其中所涉及到的config.properties文件内容为:
redis.host=127.0.0.1
redis.port=7777
redis.password=eoooxy


driver=com.mysql.jdbc.Driver
url=jdbc:mysql://localhost:3306/anhoo
username=root
password=root
8-27行是配置redis集群需要的哨兵,这边暂且不讲,下次再说。
29-38是通过JedisConnectionFactory来配置redis的初始化配置。这里可以配置poolConfig,即jedis的进一步性能的配置,以及sentinel哨兵的配置,这里用到,下次再说
40-42通过jedis的配置,注入到StringRedisTemplate中,得到stringRedisTemplate bean
45-47是redis做mybatis的缓存的时候,需要的用到的,下面讲到的时候具体再说。
这样一来测试下,(这里在获取string-redis.xml中的stringRedisTemplate bean的时候,需要把对应的配置文件引入的配置放到当前文件中,或者把hostName、post、password,直接替换成具体的值)
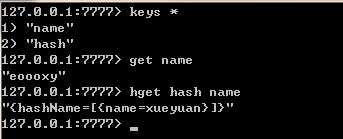
   @Test
    public void redis() {

        Map<String, List<Map<String, String>>> hashMap = new HashMap<String, List<Map<String, String>>>();
        Map<String, String> map = new HashMap<>();
        map.put("name", "xueyuan");
        List<Map<String, String>> list = new ArrayList<Map<String, String>>();
        list.add(map);
        hashMap.put("hashName", list);

        ClassPathXmlApplicationContext ctx = new ClassPathXmlApplicationContext("spring-redis.xml");
        StringRedisTemplate template = ctx.getBean(StringRedisTemplate.class);
        template.opsForValue().set("name", "eoooxy");
        template.opsForHash().put("hash", "name", hashMap.toString());
        System.out.println(template.opsForValue().get("name"));
        System.out.println(template.opsForHash().get("hash", "name"));

    }
打印结果为:

在查看一下redis中的key,以及结果:
如果这些都成功的话,那么你的redis基本配置完成,下面只要在你的spring-content.xml 引入spring-redis.xml。每个人的这个文件名不一样,这个文件就是在web.xml的一个配置,如下:
   <context-param>
        <param-name>contextConfigLocation</param-name>
        <param-value>classpath:spring-context.xml</param-value>
    </context-param>
这样一来,如果在springmvc框架的service层需要用到redis的话,只需要自动注入bean就可以了,如下:
    @Autowired
    StringRedisTemplate stringRedisTemplate;
二、redis做mybatis的第三方缓存
mybatis自己已经做了一个兼容redis的第三方缓存的jar包,具体项目git连接: https://github.com/mybatis/redis-cache
官方描述使用jar的方法是:首先要在pom.xml中引入redis-cache的jar包,前面我们已经引入了。之后只要在mybatis的Mapper中引入:
<mapper namespace="org.acme.FooMapper">
  <cache type="org.mybatis.caches.redis.RedisCache" />
  ...
</mapper>
做好上面的操作,还需要我们在classpath 的resource下面放一个redis的配置文件:/redis.properties
下面就简单介绍下 mybatis-redis 的工作顺序,其主要有以下几个jar包:
mybatis-redis
|----DummyReadWriteLock
|----RedisCache
|----RedisCallback
|----RedisConfig
|----RedisConfigurationBuilder
|----SerializeUtil
我们在使用的时候,先后步骤为:
但是在使用redis-cache的时候他有三个不足之处:
下面针对上面的三个不足之处进行了进一步的改进:
需要用到mybatis-redis 中SerializeUtil类(这个工具类用起来还是很好用的 :) )以及 RedisCacheTransfer类,这个类的目的是根据spring-redis.xml中的 jedisConnFactory bean注入到自定义RedisCache中的 jedisConnectionFactory(这个也就是上面spring-redis.xml 45-47行的作用)
public class RedisCacheTransfer {

    @Autowired
    public void setJedisConnectionFactory(JedisConnectionFactory jedisConnectionFactory) {
        RedisCache.setJedisConnectionFactory(jedisConnectionFactory);
    }
}
这样一来我们就解决了 上面第一跟第二不足之处,对于第三个不足之处,因为redis-cache用的是hash来缓存Mapper中的查询,这里我们采用string数据结构来缓存。下面就根绝redis-chahe我们自己自定义一个RedisCache
  1 import com.anhoo.common.BaseBean;
  2 import org.apache.ibatis.cache.Cache;
  3 import org.springframework.data.redis.connection.jedis.JedisConnection;
  4 import org.springframework.data.redis.connection.jedis.JedisConnectionFactory;
  5 import redis.clients.jedis.exceptions.JedisConnectionException;
  6
  7 import java.util.concurrent.locks.ReadWriteLock;
  8 import java.util.concurrent.locks.ReentrantReadWriteLock;
  9
 10 /**
 11  * Author XueYuan
 12  * Data  2017/05/16
 13  * Time  16:04
 14  */
 15
 16 public class RedisCache extends BaseBean implements Cache {
 17
 18     private final ReadWriteLock readWriteLock = new ReentrantReadWriteLock();
 19     private String id;
 20     private static JedisConnectionFactory jedisConnectionFactory;
 21
 22     public RedisCache(String id) {
 23         if (id == null) {
 24             throw new IllegalArgumentException("Cache instances require an ID");
 25         }
 26         logger.debug("---------------------Mybatis RedisCache:id=" + id + "---------------------");
 27         this.id = id;
 28     }
 29
 30     /**
 31      * 清除所有数据
 32      */
 33     @Override
 34     public void clear() {
 35         JedisConnection connection = null;
 36         try {
 37             connection = (JedisConnection) jedisConnectionFactory.getConnection();
 38             connection.flushAll();
 39         } catch (JedisConnectionException e) {
 40             e.printStackTrace();
 41         } finally {
 42             if (connection != null) {
 43                 connection.close();
 44             }
 45         }
 46     }
 47
 48     /**
 49      * @return
 50      */
 51     @Override
 52     public String getId() {
 53         return this.id;
 54     }
 55
 56     /**
 57      * 得到指定key的 value
 58      * @param key
 59      * @return object
 60      */
 61     @Override
 62     public Object getObject(Object key) {
 63         Object result = null;
 64         JedisConnection connection = null;
 65         try {
 66             connection = (JedisConnection) jedisConnectionFactory.getConnection();
 67             result = SerializeUtil.unserialize(connection.get(SerializeUtil.serialize(key)));
 68             //result = SerializeUtil.unserialize(connection.hGet(RedisCache.this.id.toString().getBytes(), key.toString().getBytes()));
 69         } catch (JedisConnectionException e) {
 70             e.printStackTrace();
 71         } finally {
 72             if (connection != null) {
 73                 connection.close();
 74             }
 75         }
 76         return result;
 77     }
 78
 79     /**
 80      * 得到当前db的key值
 81      * @return int
 82      */
 83     @Override
 84     public int getSize() {
 85         int result = 0;
 86         JedisConnection connection = null;
 87         try {
 88             connection = (JedisConnection) jedisConnectionFactory.getConnection();
 89             result = Integer.valueOf(connection.dbSize().toString());
 90 //            result = Integer.valueOf(connection.hGetAll(RedisCache.this.id.toString().getBytes()).size());
 91         } catch (JedisConnectionException e) {
 92             e.printStackTrace();
 93         } finally {
 94             if (connection != null) {
 95                 connection.close();
 96             }
 97         }
 98         return result;
 99     }
100
101     /**
102      * 写入 key-value
103      * @param key
104      * @param value
105      */
106     @Override
107     public void putObject(Object key, Object value) {
108         JedisConnection connection = null;
109         try {
110             logger.debug("------------------Redis Put Object:" + key.toString() + ":" + value.toString() + "-------------------");
111             connection = (JedisConnection) jedisConnectionFactory.getConnection();
112             connection.set(SerializeUtil.serialize(key), SerializeUtil.serialize(value));
113 //            connection.hSet(RedisCache.this.id.toString().getBytes(),key.toString().getBytes(),SerializeUtil.serialize(value));
114         } catch (JedisConnectionException e) {
115             e.printStackTrace();
116         } finally {
117             if (connection != null) {
118                 connection.close();
119             }
120         }
121     }
122
123     /**
124      * 删除指定key的值
125      * @param key
126      * @return
127      */
128     @Override
129     public Object removeObject(Object key) {
130         JedisConnection connection = null;
131         Object result = null;
132         try {
133             connection = (JedisConnection) jedisConnectionFactory.getConnection();
134             result = connection.expire(SerializeUtil.serialize(key), 0);
135             //或者  result = connection.del(SerializeUtil.serialize(key));
136 //            result = connection.hDel(RedisCache.this.id.toString().getBytes(),key.toString().getBytes());
137         } catch (JedisConnectionException e) {
138             e.printStackTrace();
139         } finally {
140             if (connection != null) {
141                 connection.close();
142             }
143         }
144         return result;
145     }
146
147     @Override
148     public ReadWriteLock getReadWriteLock() {
149         return this.readWriteLock;
150     }
151
152     /**
153      * 注入jedisConnectionFactory
154      * @param jedisConnectionFactory
155      */
156     public static void setJedisConnectionFactory(JedisConnectionFactory jedisConnectionFactory) {
157         RedisCache.jedisConnectionFactory = jedisConnectionFactory;
158     }
159 }
其中每个方法下面都有被注释的存储到hash结构的方法,我们这里才用的是string,所以存储到redis中的是key-value对应的,这样一来我们就可以解决key的生存时间了。
这里面主要通过set注入的方法注入 jedisConnectionFactory 之后通过其做一系列的 get、put等等操作。
当然使用string结构来存储也有不足之处:会生成大量的key
上面都配置完毕之后,使用方法跟mybatis-redis一致,需要开启mybatis的缓存:
<?xml version="1.0" encoding="UTF-8"?>
<!DOCTYPE configuration PUBLIC "-//mybatis.org//DTD Config 3.0//EN"
        "http://mybatis.org/dtd/mybatis-3-config.dtd">
<configuration>
    <settings>
        <!--<setting name="logImpl" value="LOG4J2" />-->

        <!-- 全局映射器启用缓存-->
        <setting name="cacheEnabled" value="true"/>
    </settings>
</configuration>
本文涉及到的配置以及框架内容下载连接:https://github.com/eoooxy/anhoo 如有错误,谢谢指出。
参考:
http://www.jianshu.com/p/648c10420df1
http://www.cnblogs.com/springlight/p/6374372.html
http://www.cnblogs.com/yjmyzz/p/4105731.html
标签:const set ima als group 性能 打印 jedis iba
原文地址:http://www.cnblogs.com/eoooxy/p/6866273.html