标签:detail blocks 删除 方法 strong ext ranch nexus 5 line
参考Android系统源代码情况分析第二章进行实践,为了提高效率,也为了增加实践机会,使用Nexus5进行内核编译。需要说明的是,Android源代码工程默认是不包含它所使用的Linux内核源码,如果需要运行定制的Linux内核,就要单独下载内核源码,并且对它进行编译。Nexus Android源码的编译参考
1、下载nexus5 对应的内核源码
Android系统使用的是Linux内核,但与主线分枝的Linux内核又有一些差异,各个不同的厂商又有自己的修改。内核源码位于谷歌境外服务器,不FQ无法访问,这给同步源码造成很大的不便。幸好清华大学的开源服务器上也同步了AOSP内核的源码,使得我们无须FQ就可以同步源码。
映射关系如下:
名称     Google GIT地址     清华服务器地址
common     https://android.googlesource.com/kernel/common.git     https://aosp.tuna.tsinghua.edu.cn/kernel/common.git
exynos     https://android.googlesource.com/kernel/exynos.git     https://aosp.tuna.tsinghua.edu.cn/kernel/exynos.git
goldfish     https://android.googlesource.com/kernel/goldfish.git     https://aosp.tuna.tsinghua.edu.cn/kernel/goldfish.git
hikey-linaro     https://android.googlesource.com/kernel/hikey-linaro     https://aosp.tuna.tsinghua.edu.cn/kernel/hikey-linaro.git
lk         https://aosp.tuna.tsinghua.edu.cn/kernel/lk.git
msm     https://android.googlesource.com/kernel/msm.git     https://aosp.tuna.tsinghua.edu.cn/kernel/msm.git
omap     https://android.googlesource.com/kernel/omap.git     https://aosp.tuna.tsinghua.edu.cn/kernel/omap.git
samsung     https://android.googlesource.com/kernel/samsung.git     https://aosp.tuna.tsinghua.edu.cn/kernel/samsung.git
tegra     https://android.googlesource.com/kernel/tegra.git     https://aosp.tuna.tsinghua.edu.cn/kernel/tegra.git
x86_64     https://android.googlesource.com/kernel/x86_64.git     https://aosp.tuna.tsinghua.edu.cn/kernel/x86_64.git
由于nexus5使用的是高通处理器,所以直接同步msm的链接
ninjame@ubuntu1604:~/aosp$ mkdir kernel
ninjame@ubuntu1604:~/aosp$ cd kernel
ninjame@ubuntu1604:~/aosp/kernel$ git clone https://aosp.tuna.tsinghua.edu.cn/kernel/msm.git
git branch 查看Android内核源码的代码版本分支
ninjame@ubuntu1604:~/aosp/kernel/msm$ git branch -a
* (头指针分离于 7717f76)
  master
  remotes/origin/HEAD -> origin/master
  remotes/origin/android-4.4
  remotes/origin/android-4.4.y
……
  remotes/origin/android-msm-hammerhead-3.4-kitkat-mr1
  remotes/origin/android-msm-hammerhead-3.4-kitkat-mr2
  remotes/origin/android-msm-hammerhead-3.4-kk-fr1
  remotes/origin/android-msm-hammerhead-3.4-kk-fr2
  remotes/origin/android-msm-hammerhead-3.4-kk-r1
  remotes/origin/android-msm-hammerhead-3.4-l-preview
  remotes/origin/android-msm-hammerhead-3.4-lollipop-mr1
  remotes/origin/android-msm-hammerhead-3.4-lollipop-mr1.1
  remotes/origin/android-msm-hammerhead-3.4-lollipop-release
  remotes/origin/android-msm-hammerhead-3.4-m-preview
  remotes/origin/android-msm-hammerhead-3.4-marshmallow
  remotes/origin/android-msm-hammerhead-3.4-marshmallow-mr1
  remotes/origin/android-msm-hammerhead-3.4-marshmallow-mr2
  remotes/origin/android-msm-hammerhead-3.4-marshmallow-mr3
……
和nexus5 相关的且是adnoid6.0 版本的内核分支共有4个,到底checkout哪个分支呢?对于Android的源码与Android内核源码版本的对应关系,很难说得清楚。经过摸索,找到一种比较讨巧的方法,直接进入手机设置,查看关于手机
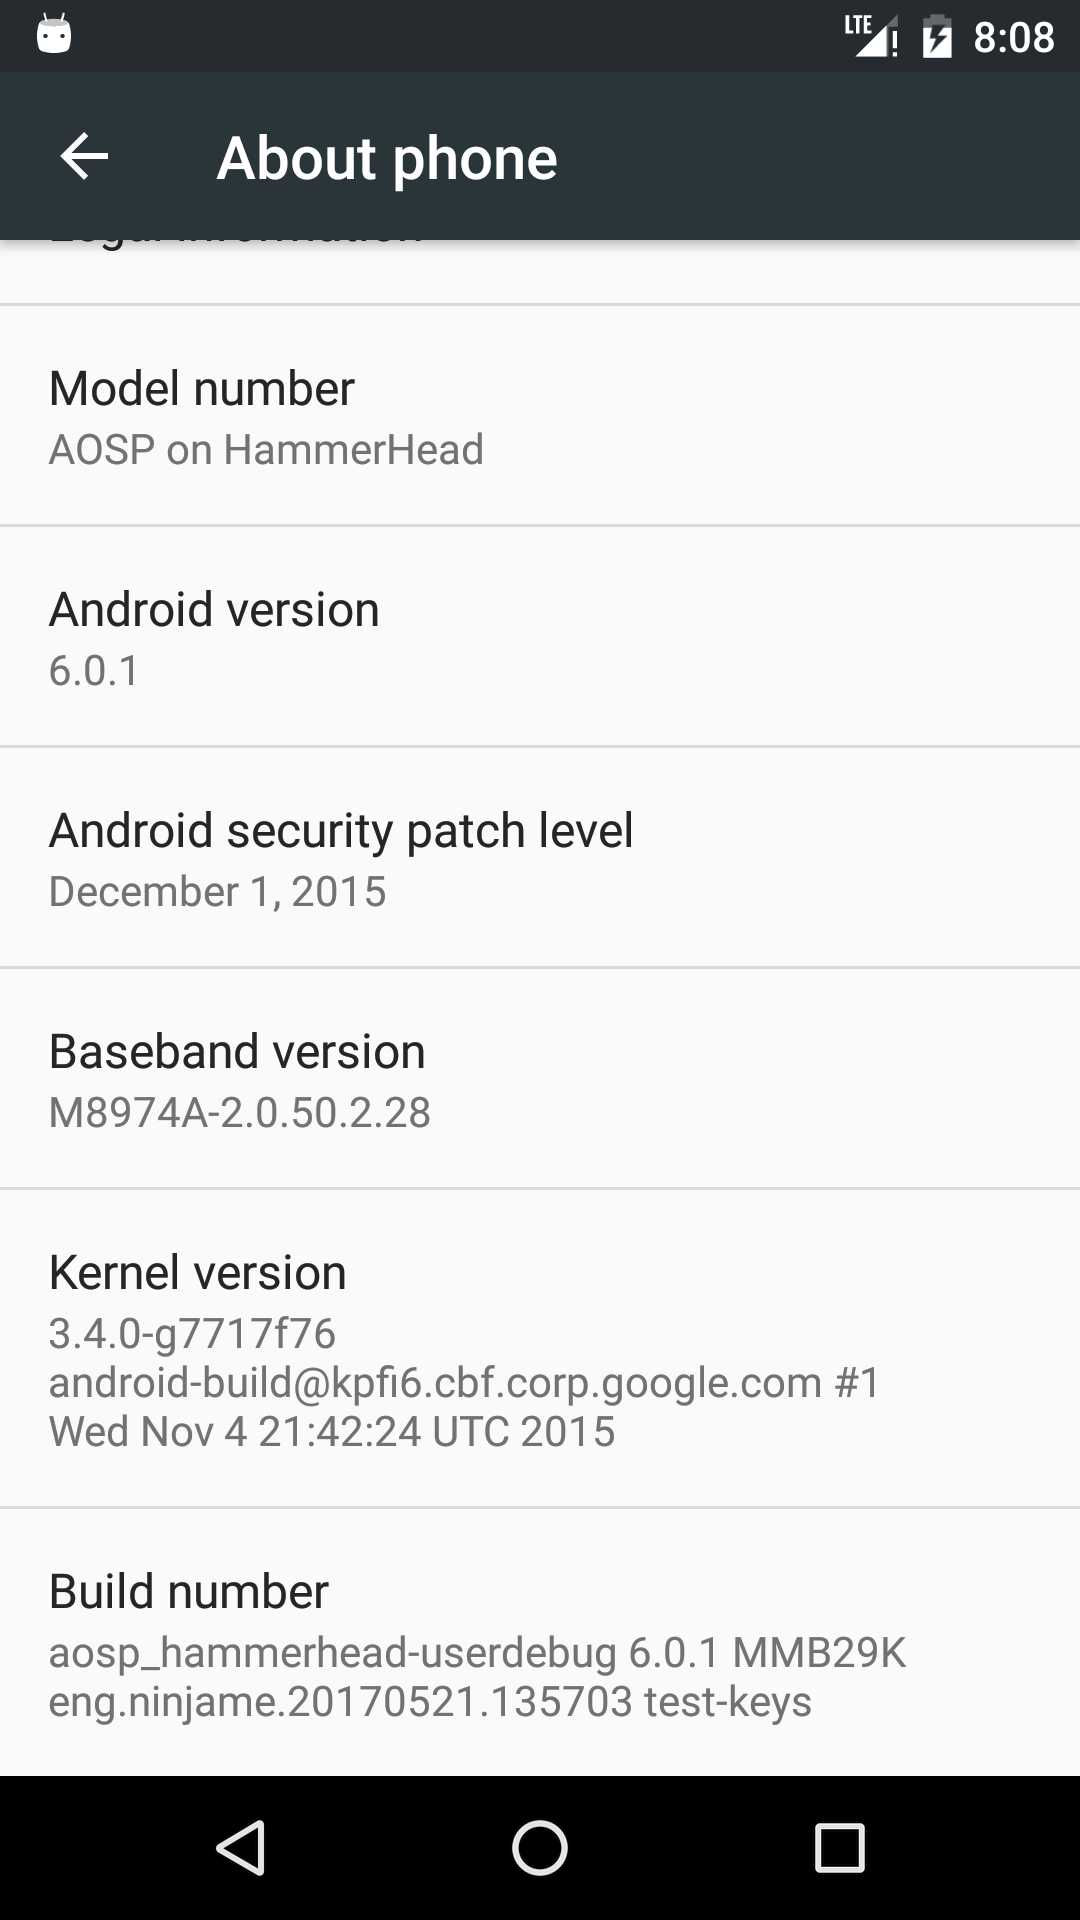
内核版本是3.4.0-g7717f76
ninjame@ubuntu1604:~/aosp/kernel/msm$ git checkout 3.4.0-g7717f76
当发现真的把相应分支源码的源码给同步过来,竟然有种意外的惊喜,这是怎么回事呢?
ninjame@ubuntu1604:~/aosp/kernel/msm$ git branch -r --contains 7717f769b2d0bf26db19598d8826a01b82ab6540
  origin/android-msm-hammerhead-3.4-marshmallow-mr1
  origin/android-msm-hammerhead-3.4-marshmallow-mr2
  origin/android-msm-hammerhead-3.4-marshmallow-mr3
7717f76对应着源码中的一个commit节点,可以看做是git库上最小的分支(分支都是从commit节点拉出来的,那么每一个节点都可以看做一个分支,当然某些分支中只包含它自己)
3.4.0-g7717f76 就可以解读为该内核版本大的分支为linux3.4.0,具体的源码对应于commit节点为7717f76 那一次提交代码对应的快照。
下载部分参考博客:
http://blog.csdn.net/sunao2002002/article/details/53057374
http://blog.csdn.net/qq1084283172/article/details/54880488
2、配置编译环境
由于是在 Linux / Mac OS X 上进行编译,所以交叉编译的环境变量是必须要设置的,一共涉及到三个。
首先设定 ARCH,–注意,由于 Nexus 5 是32位架构,所以取值为 arm,如果是64位,则要取值为 arm64
export ARCH=arm
然后设定 CROSS_COMPILE,同上,64位要取值 aach64-linux-android-
export CROSS_COMPILE=arm-eabi-
对应地,告诉编译系统到哪里寻找编译器
export PATH=$PATH:/home/ninjame/aosp/prebuilts/gcc/linux-x86/arm/arm-eabi-4.8/bin
3、编译
开始编译之前,不要着急开始,先使用 help 看有哪些预定义好的配置
make help
从上面可以找到 hammerhead_defconfig,这正是 Nexus 5 的默认配置
make hammerhead_defconfig
上述就是生成配置,如果需要调整,则可以继续执行
make menuconfig
最后执行编译吧
make
成功编译后,可以看到类似如下的输出:
OBJCOPY arch/arm/boot/zImage
Kernel: arch/arm/boot/zImage is ready
DTC arch/arm/boot/msm8974-hammerhead-rev-11.dtb
DTC arch/arm/boot/msm8974-hammerhead-rev-11j.dtb
DTC arch/arm/boot/msm8974-hammerhead-rev-10.dtb
DTC arch/arm/boot/msm8974-hammerhead-rev-c.dtb
DTC arch/arm/boot/msm8974-hammerhead-rev-b.dtb
DTC arch/arm/boot/msm8974-hammerhead-rev-bn.dtb
DTC arch/arm/boot/msm8974-hammerhead-rev-a.dtb
DTC arch/arm/boot/msm8974-hammerhead-rev-f.dtb
CAT arch/arm/boot/zImage-dtb
Kernel: arch/arm/boot/zImage-dtb is ready
make[1]: Nothing to be done for ‘arch/arm/boot/dtbs‘.
编译碰到的问题;
问题1:
File "/home/ninjame/aosp/kernel/msm/scripts/gcc-wrapper.py", line 55
    print "error, forbidden warning:", m.group(2)

解决:由于本人把机器上的python给改成3.5了,不支持这种print语法
sudo rm /usr/bin/python,删除
sudo ln -s /usr/bin/python2.7 /usr/bin/python,默认设置成python2.7

这样在终端中输入python默认就是 2.7版本了
指定ubuntu下的Python的运行版本
问题2:
CHK     include/linux/version.h
  CHK     include/generated/utsrelease.h
make[1]: ‘include/generated/mach-types.h‘ is up to date.
  CC      kernel/bounds.s
arm-eabi-gcc: No such file or directory
Is your PATH set correctly?
/home/ninjame/aosp/kernel/msm/./Kbuild:35: recipe for target ‘kernel/bounds.s‘ failed
make[1]: *** [kernel/bounds.s] Error 2
Makefile:993: recipe for target ‘prepare0‘ failed
make: *** [prepare0] Error 2

解决:环境变量没设置好,最开始设置成了
export PATH=$PATH:/home/ninjame/aosp/prebuilts/gcc/linux-x86/arm/arm-eabi-4.8/arm-eabi/bin
提示再明显不过了
ninjame@ubuntu1604:~/aosp/prebuilts$ find -name "arm-eabi-gcc"
./gcc/darwin-x86/arm/arm-eabi-4.8/bin/arm-eabi-gcc
./gcc/linux-x86/arm/arm-eabi-4.8/bin/arm-eabi-gcc

问题3:
Can‘t use ‘defined(@array)‘ (Maybe you should just omit the defined()?) at kernel/timeconst.pl line 373.
/home/ninjame/aosp/kernel/msm/kernel/Makefile:129: recipe for target ‘kernel/timeconst.h‘ failed
make[1]: *** [kernel/timeconst.h] Error 255
Makefile:953: recipe for target ‘kernel‘ failed
make: *** [kernel] Error 2
解决:其实,提示的错误信息已经明确告诉你了,你应该省略defined() 。打开 kernel/timeconst.pl
将if (defined(@val)) 改为if (@val),再次编译就可以通过
参考博客:
http://doc.okbase.net/JonnyLulu/archive/123308.html
4、刷新内核
进入到了 Android 源代码目录,设置环境变量,告知已编译好的新内核地址
ninjame@ubuntu1604:~/aosp/kernel/msm$ cd arch/arm/boot/
ninjame@ubuntu1604:~/aosp/kernel/msm/arch/arm/boot$ ls -l zImage-dtb
-rw-rw-r-- 1 ninjame ninjame 8441144 5月  23 00:27 zImage-dtb
ninjame@ubuntu1604:~/aosp/kernel/msm/arch/arm/boot$ pwd
/home/ninjame/aosp/kernel/msm/arch/arm/boot
export TARGET_PREBUILT_KERNEL=/home/ninjame/aosp/kernel/msm/arch/arm/boot/zImage-dtb
重新编译bootimage
make bootimage
成功后,若有类似如下的输出:
Copy: out/target/product/hammerhead/kernel
Target boot image: out/target/product/hammerhead/boot.img
out/target/product/hammerhead/boot.img maxsize=23519232 blocksize=135168 total=9369600 reserve=270336

#### make completed successfully (03:29 (mm:ss)) ####
重启手机进入bootloader模式
adb reboot bootloader
刷入内核
fastboot flash boot boot.img
重启手机
fastboot reboot
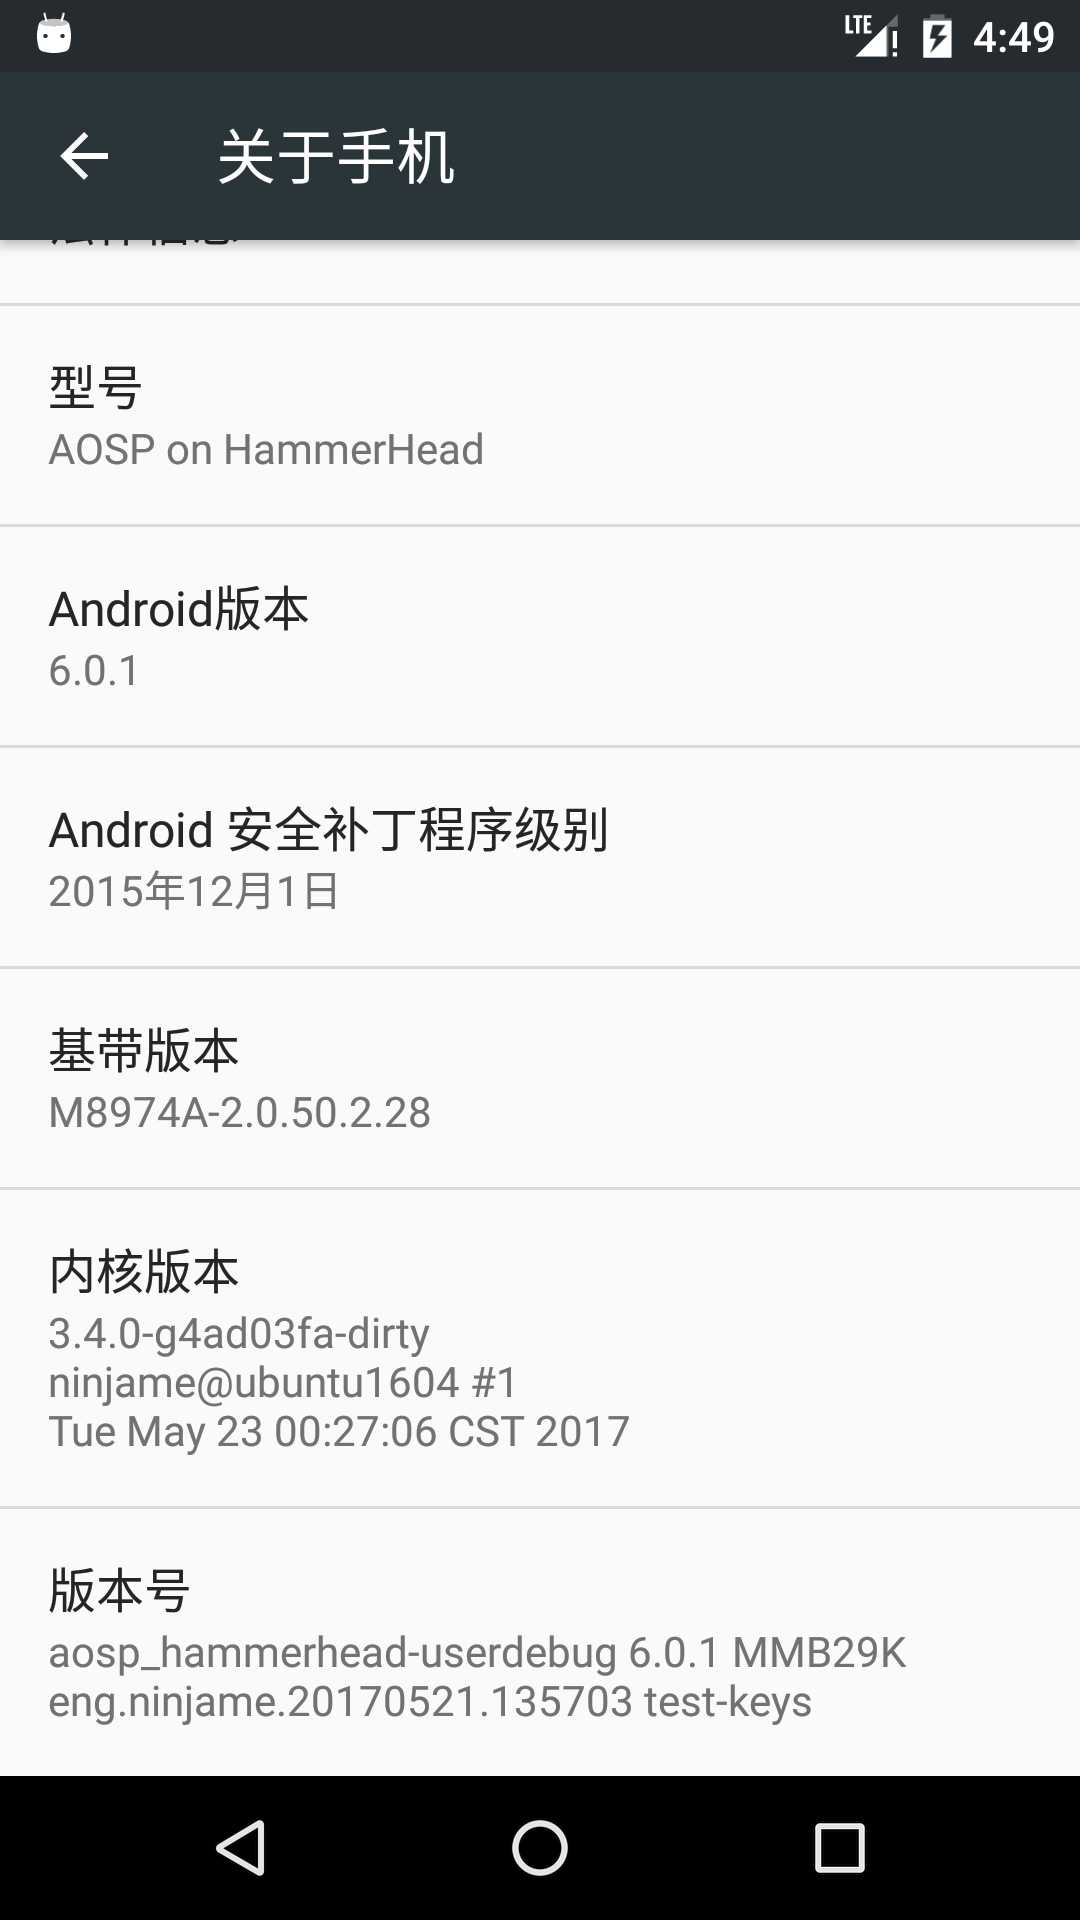
~晒图,换上自己的签名了,哈哈~ ,不过g4ad03fa 打脸了。。。
参考博客:
http://ju.outofmemory.cn/entry/253033
标签:detail blocks 删除 方法 strong ext ranch nexus 5 line
原文地址:http://www.cnblogs.com/hixin/p/6892206.html