标签:提交 key png network xms 端口 repos url sha
虚拟机两台:
192.168.1.42
192.168.1.46
系统环境保持一致:
cat /etc/redhat-release
uname -a


elk准备环境保持一致:
下载并安装GPG key
rpm --import https://packages.elastic.co/GPG-KEY-elasticsearch
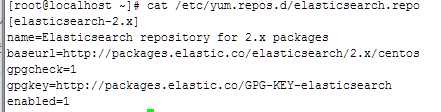
添加yum源:
安装elasticsearch
yum install -y elasticsearch
下载并安装GPG key
[root@linux-node2 ~]# rpm --import https://packages.elastic.co/GPG-KEY-elasticsearch添加yum仓库
[root@linux-node2 ~]# vim /etc/yum.repos.d/logstash.repo[logstash-2.1]name=Logstash repository for 2.1.x packagesbaseurl=http://packages.elastic.co/logstash/2.1/centosgpgcheck=1gpgkey=http://packages.elastic.co/GPG-KEY-elasticsearchenabled=1安装logstash
[root@linux-node2 ~]# yum install -y logstash安装kibana
[root@linux-node2 ~]#cd /usr/local/src[root@linux-node2 ~]#wget https://download.elastic.co/kibana/kibana/kibana-4.3.1-linux-x64.tar.gztar zxf kibana-4.3.1-linux-x64.tar.gz[root@linux-node1 src]# mv kibana-4.3.1-linux-x64 /usr/local/[root@linux-node2 src]# ln -s /usr/local/kibana-4.3.1-linux-x64/ /usr/local/kibana安装Redis,nginx和java
yum install -y redis nginx java
修改elasticsearch配置文件,并授权
[root@linux-node1 src]# grep -n ‘^[a-Z]‘ /etc/elasticsearch/elasticsearch.yml 17:cluster.name: chuck-cluster 判别节点是否是统一集群23:node.name: linux-node1 节点的hostname33:path.data: /data/es-data 数据存放路径37:path.logs: /var/log/elasticsearch/ 日志路径43:bootstrap.mlockall: true 锁住内存,使内存不会再swap中使用54:network.host: 0.0.0.0 允许访问的ip58:http.port: 9200 端口[root@linux-node1 ~]# mkdir -p /data/es-data[root@linux-node1 src]# chown elasticsearch.elasticsearch /data/es-data/启动elasticsearch
[root@linux-node1 src]# systemctl start elasticsearch[root@linux-node1 src]# systemctl enable elasticsearchln -s ‘/usr/lib/systemd/system/elasticsearch.service‘ ‘/etc/systemd/system/multi-user.target.wants/elasticsearch.service‘[root@linux-node1 src]# systemctl status elasticsearchelasticsearch.service - Elasticsearch Loaded: loaded (/usr/lib/systemd/system/elasticsearch.service; enabled) Active: active (running) since Thu 2016-01-14 09:30:25 CST; 14s ago Docs: http://www.elastic.co Main PID: 37954 (java) CGroup: /system.slice/elasticsearch.service └─37954 /bin/java -Xms256m -Xmx1g -Djava.awt.headless=true -XX:+UseParNewGC -XX:+UseConc...Jan 14 09:30:25 linux-node1 systemd[1]: Starting Elasticsearch...Jan 14 09:30:25 linux-node1 systemd[1]: Started Elasticsearch.[root@linux-node1 src]# netstat -lntup|grep 9200tcp6 0 0 :::9200 :::* LISTEN 37954/java
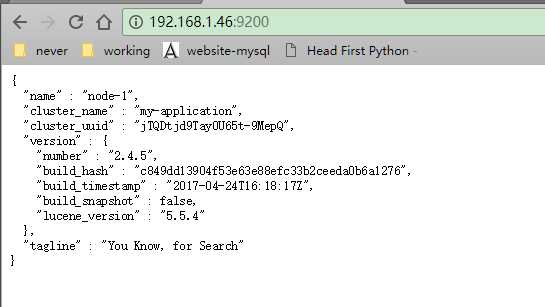
访问9200端口,会把信息显示出来
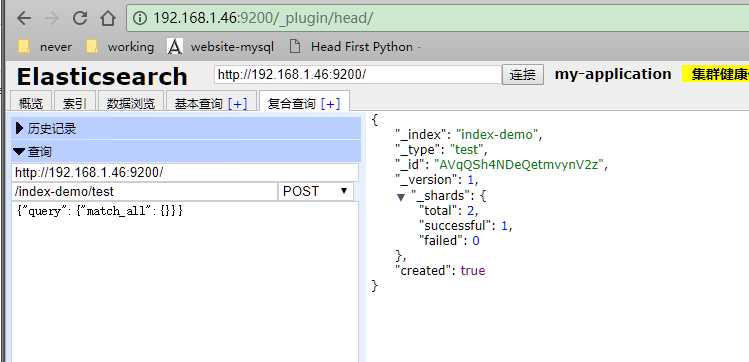
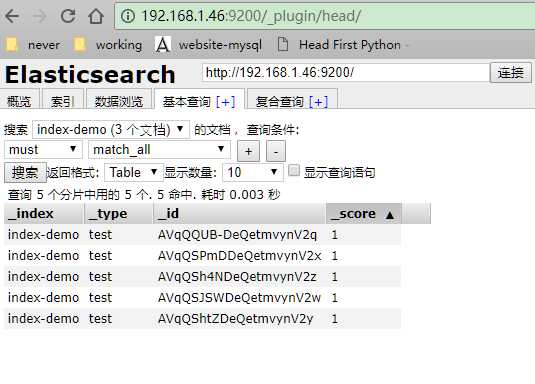
使用head插件显示索引和分片情况
/usr/share/elasticsearch/bin/plugin install mobz/elasticsearch-head
在插件中添加一个index-demo/test的索引,提交请求
待更....
标签:提交 key png network xms 端口 repos url sha
原文地址:http://www.cnblogs.com/alex-note/p/6952178.html