标签:ted cisco 5.0 cisc active man 名称 vim 说明
双网卡接入,既能添加网络带宽,同时又能做相应的冗余。通过这篇文章了解linux双网卡(多网卡)的绑定方法
//测试的机器是centos6
===================================
操作部分:
0,先停止NetworkManager
service NetworkManager stop
chkconfig NetworkManager off   //开机自启动 关闭
1,配置文件
cp ifcfg-eth0{,.old} //备份网卡配置文件
cp ifcfg-eth1{,.old} //备份网卡配置文件
a, ifcfg-bond0文件配置
vim ifcfg-bond0 //创建bond0 配置文件 也可以用原有网卡配置文件修改
DEVICE=bond0
BONDING_OPTS="miimon=80 mode=0 primary=eth0 "   //这一步也可以在下面 /etc/modprobe.d/bonidng.conf 里面填写
IPADDR=10.0.0.7
NETMASK=255.255.255.0
GATEWAY=10.0.0.2
TYPE=Ethernet
USERCTL=no
BOOTPROTO=none
ONBOOT=yes
b, ifcfg-eth0文件配置
DEVICE=eth0
TYPE=Ethernet
USERCTL=no
BOOTPROTO=dhcp
ONBOOT=yes
MASTER=bond0
SLAVE=yes
c, ifcfg-eth1文件配置
DEVICE=eth1
TYPE=Ethernet
USERCTL=no
BOOTPROTO=dhcp
ONBOOT=yes
MASTER=bond0
SLAVE=yes
d, 绑定模块 配置文件 /etc/modprobe.d/bond.conf
有些文档中用的配置文件为:/etc/modprobe.conf
会报错WARNING: Deprecated config file /etc/modprobe.conf, all config files belong into /etc/modprobe.d/.
alias bond0 bonding
options bond0 miimon=100 mode=0   primary=eth0 //bond0文件或这里 配置一处就可以
2,开启绑定
  modprobe bonding    //打开绑定模块
  lsmod | grep bonding  //检查模块是否开启
  service network restart //重启网络
3,开机绑定,增加默认网关
  echo “ifenslave bond0 eth0 eth1” >> /etc/rc.d/rc.local
  echo “route add default gw 10.0.0.1  ” >> /etc/rc.d/rc.local  能上网可不设置
4,检查绑定
a
ifconfig -a //查看网卡信息 观察mac地址
b
cat /proc/net/bonding/bond0 //查看绑定情况
5,取消绑定
  rm ifcfg-bond0 //删除 ifcfg-bond0文件

  rm /etc/modprobe.d/bond.conf // 删除bond.conf文件

  mv ifcfg-eth0{.old,} //回复网卡默认配置文件

  mv ifcfg-eth0{.old,} //回复网卡默认配置文件

  rmmod bonding //对应之前的 modprobe bingding  不要忘记

  service network restart  //重启网络服务
6,测试
ping 断网观察
7,多网口绑定
for example : eth0+eth1=bond0 eth3+eth4=bond1
设置文件:/etc/modprobe.d/band.conf
band口同模式
alias bond0 bonding
alias bond1 bonding
alias bond3 bonding
options bonding miimon=200 mode=1  max_bonds=3  //max_bonds 配置的bond口个数
band口多模式
当2个或者多个bond网卡的参数(即bonding模块的参数,如mode、miimon等)不同时,需要在加载bonding模块时修改模块的名称(文档中的说法是linux的模块加载系统要求系统加载的模块甚至相同模块的不同实例都需要有一个唯一的命名)
install bond0 /sbin/modprobe --ignor-install bonding -o bond0 miimon=200 mode=1
install bond1 /sbin/modprobe --ignor-install bonding -o bond1 miimon=200 mode=0
install bond2 /sbin/modprobe --ignor-install bonding -o bond2 miimon=200 mode=1
install bond3 /sbin/modprobe --ignor-install bonding -o bond3 miimon=200 mode=6
===================================
拓展阅读:
1,miimon
miimon是用来进行链路监测的。 比如:miimon=100,那么系统每100ms监测一次链路连接状态,如果有一条线路不通就转入另一条线路;
2,mode
mode的值表示工作模式,他共有0,1,2,3,4,5,6六种模式,常用为0,6,1三种。
0,1可参考raid的模式
mode=0
表示load balancing (round-robin)为负载均衡方式,两块网卡都工作,但是与网卡相连的交换必须做特殊配置(这两个端口应该采取聚合方式),因为做bonding的这两块网卡是使用同一个MAC地址
mode=1
表示fault-tolerance (active-backup)提供冗余功能,工作方式是主备的工作方式,也就是说默认情况下只有一块网卡工作,另一块做备份
mode=6
表示load balancing (round-robin)为负载均衡方式,两块网卡都工作,但是该模式下无需配置交换机,因为做bonding的这两块网卡是使用不同的MAC地址
mode=2
表示balance-x,提供负载均衡和冗余功能。
mode=3
表示broadcast,这个模式提供容错性。
mode=4
表示802.3ad,提供了ethtool的迅速,以及使用了802.3ad模式
mode=5
表示balance-tlb,自动适应负载均衡,自动切换故障。在此基础上Ethtool支持驱动。
注意:bonding只能提供链路监测,即从主机到交换机的链路是否接通。
如果只是交换机对外的链路down掉了,而交换机本身并没有故障,那么bonding会认为链路没有问题而继续使用
3,NetworkManager
NM_CONTROLLED=yes这意味着网卡eth0得有NetworkManager托管。
当NM_CONTROLLED=yes 时,你想使你的网卡配置生效,要重启下NetworkManager服务后,再重启network服务。
当NM_CONTROLLED=no时,你想使你的网卡配置生效,不用重启NetworkManager服务,直接重启network服务就行了
4,交换机聚合
mode 0下bond所绑定的网卡的IP都被修改成相同的mac地址,正常情况下mac地址是全球唯一的,一个mac地址对应多个端口肯定使交换机迷惑了。所以 mode0下的bond如果连接到交换机,交换机这几个端口应该采取聚合方式(cisco称为 ethernetchannel,foundry称为portgroup),因为交换机做了聚合后,聚合下的几个端口也被捆绑成一个mac地址.我们的解 决办法是,两个网卡接入不同的交换机即可。
mode6模式下无需配置交换机,因为做bonding的这两块网卡是使用不同的MAC地址。
5,ethtool查看设置带宽
cat /proc/net/bonding/bond0 #查看双网卡信息
ethtool eth0 //查看eth0的的网卡信息
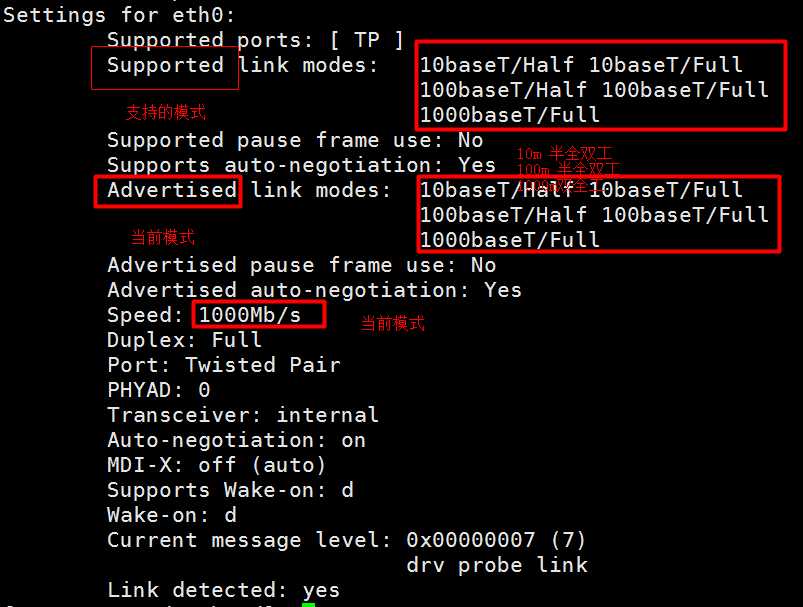
ethtoll -s eth0 speed 1000 //修改eth0 速度为1000M
ethtoo eth0 //查看eth0修改情况
/etc/init.d/network restart  //重启网络服务
cat /proc/net/binding/bond0 //查看修改后的状态
5,ifenslave 修改主网卡
ifenslave -c bond0 eth0 //修改主网卡
cat /proc/net/bonding/bond0  //查看修改结果
标签:ted cisco 5.0 cisc active man 名称 vim 说明
原文地址:http://www.cnblogs.com/hswangnux/p/6977934.html