标签:版本 des mon sources 相关 justify little boa sub
最近使用ReactNative做项目,有信心今天目标把ReactNative框架掌握,所以自己从每个知识点学习提高自己吧......
步骤如下:
一.创建依赖包文件(package.json):
React Native的植入过程同时需要React和React Native两个node依赖包。我们把具体的依赖包记录在package.json文件中。
如果自己创建package.json文件,终端操作:
cd 需要放置的目录下(项目的根目录/项目中自己创建的文件夹)
touch package.json
package.json添加以下内容:我这里使用的是0.44
{
  "name": "iOSNestReactNative",
  "version": "0.0.1",
  "private": true,
  "scripts": {
    "start": "node node_modules/react-native/local-cli/cli.js start"
  },
  "dependencies": {
    "react": "16.0.0-alpha.6",
    "react-native": "0.44.0"
  }
}
使用npm(即node包管理器,Node package manager)来安装React和React Native模块。这些模块会被安装到项目根目录下的node_modules/目录中。
cd 项目的根目录/项目中自己创建的文件夹
npm install
等待执行完毕。项目中会多出一个node_modules文件夹。
在React和React Native模块成功安装到node_modules目录之后,你就可以开始创建Podfile以便选择所需的组件安装到应用中。
这里需要使用CocoaPods哟...我相信做iOS的应该都有这个吧...哈哈??
## 在iOS原生代码所在的目录中(也就是`.xcodeproj`文件所在的目录)执行:
$ cd 项目的根目录
$ pod init
修改Profile文件:
# 最低适配的版本
platform :ios, "9.0"
use_frameworks!
# target的名字一般与你的项目名字相同
target ‘iOSNestReactNative‘ do

  # ‘node_modules‘目录一般位于根目录中
  # 但是如果你的结构不同,那你就要根据实际路径修改下面的`:path`
#记得此处的路径,如果你有创建一个新的文件夹存放这些文件,前面要加上你文件夹的名字:‘../RNComponent/node_modules/react-native‘,如果没有,直接如下创建即可。
  pod ‘React‘, :path => ‘./node_modules/react-native‘, :subspecs => [
    ‘Core‘,
    ‘RCTText‘,
    ‘RCTNetwork‘,
    ‘RCTWebSocket‘, # 这个模块是用于调试功能的
    # 在这里继续添加你所需要的模块
  ]
 # 如果你的RN版本 >= 0.42.0,请加入下面这行
# 该版本号是package.json中的“dependencies”字典下面的“react-native”后面对应的内容
  pod "Yoga", :path => "./node_modules/react-native/ReactCommon/yoga"
end
创建好了Podfile后,就可以开始安装React Native的pod包了。
执行: pod install即可.
现在我们已经准备好了所有依赖,可以开始着手修改原生代码来把React Native真正植入到应用中了。
首先创建一个空的index.ios.js文件。一般来说我们把它放置在同上面的package.json的同级目录下.
$ cd 项目的根目录/项目中自己创建的文件夹
$ touch index.ios.js
在index.ios.js文件里写页面代码就可以了哟!!!
‘use strict‘;

import React,{Component} from ‘react‘;
import {
  AppRegistry,
  StyleSheet,
  Text,
  View
} from ‘react-native‘;

class RNHighScores extends React.Component {

  render() {
    // 这里是使用Xcode那边传过来的数据进行构建组件
     var content = this.props[‘NameDict‘].map(
       name=><Text key = {name.name}>{name.name}:{name.value}{‘\n‘}</Text>
     );
    return (
      <View style={styles.container}>
        <Text style={styles.highScoresTitle}>
          跳转过来啦...嘻嘻!
        </Text>
        <Text style={styles.scores}>
          iOS嵌套ReactNative是不是成功了呢??
        </Text>
        <Text style={styles.scores}>
          {content}
        </Text>
      </View>
    );
  }
}

const styles = StyleSheet.create({
  container: {
    flex: 1,
    justifyContent: ‘center‘,
    alignItems: ‘center‘,
    backgroundColor: ‘#FFFFFF‘,
  },
  highScoresTitle: {
    fontSize: 20,
    textAlign: ‘center‘,
    margin: 10,
  },
  scores: {
    textAlign: ‘center‘,
    color: ‘#333333‘,
    marginBottom: 5,
  },
});

// 整体js模块的名称
AppRegistry.registerComponent(‘RNHighScores‘, () => RNHighScores);
先看一下我的Xcode的目录结构:
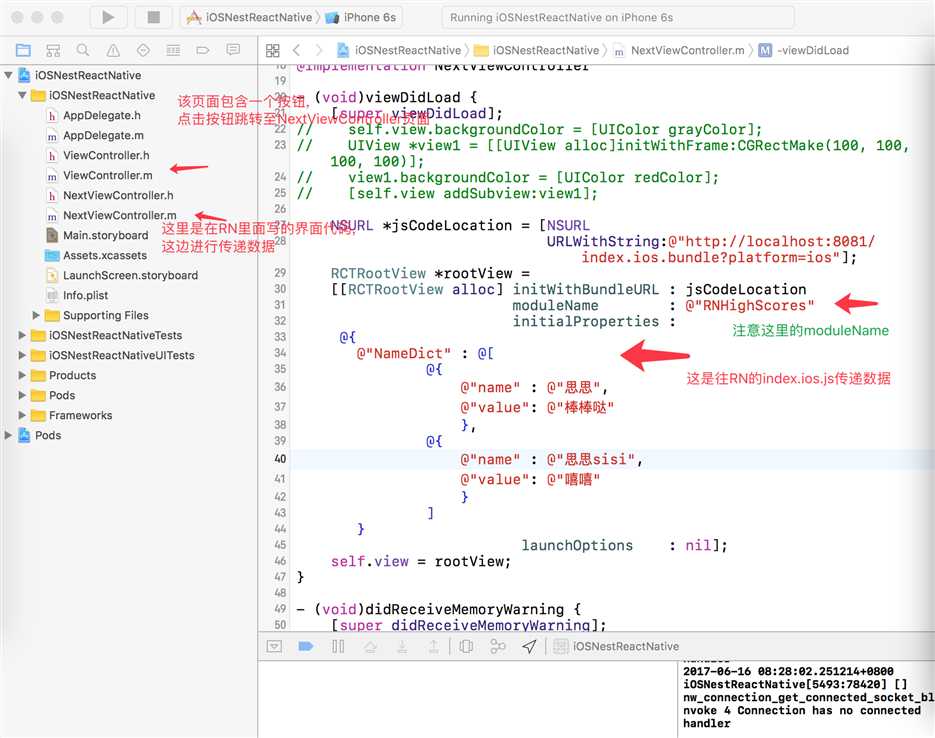
1>首先导入RCTRootView.h头文件;
// #import "RCTRootView.h",更新之后,需要导入下面的头文件。
// 官网的评论下方也有说明,否则会提示RCTRootView.h文件不存在。
#import <React/RCTRootView.h>
2>viewDidload中加入代码:
//
//  NextViewController.m
//  iOSNestReactNative
//
//  Created by 思 彭 on 2017/6/16.
//  Copyright ? 2017年 思 彭. All rights reserved.
//

#import "NextViewController.h"
// #import "RCTRootView.h",更新之后,需要导入下面的头文件。
// 官网的评论下方也有说明,否则会提示RCTRootView.h文件不存在。
#import <React/RCTRootView.h>

@interface NextViewController ()

@end

@implementation NextViewController

- (void)viewDidLoad {
    [super viewDidLoad];
//    self.view.backgroundColor = [UIColor grayColor];
//    UIView *view1 = [[UIView alloc]initWithFrame:CGRectMake(100, 100, 100, 100)];
//    view1.backgroundColor = [UIColor redColor];
//    [self.view addSubview:view1];

    NSURL *jsCodeLocation = [NSURL
                             URLWithString:@"http://localhost:8081/index.ios.bundle?platform=ios"];
    RCTRootView *rootView =
    [[RCTRootView alloc] initWithBundleURL : jsCodeLocation
                         moduleName        : @"RNHighScores"
                         initialProperties :
     @{
       @"NameDict" : @[
               @{
                   @"name" : @"思思",
                   @"value": @"棒棒哒"
                   },
               @{
                   @"name" : @"思思sisi",
                   @"value": @"嘻嘻"
                   }
               ]
       }
                          launchOptions    : nil];
    self.view = rootView;
}

- (void)didReceiveMemoryWarning {
    [super didReceiveMemoryWarning];
    // Dispose of any resources that can be recreated.
}

/*
#pragma mark - Navigation

// In a storyboard-based application, you will often want to do a little preparation before navigation
- (void)prepareForSegue:(UIStoryboardSegue *)segue sender:(id)sender {
    // Get the new view controller using [segue destinationViewController].
    // Pass the selected object to the new view controller.
}
*/

@end
# 进入到node_modules文件夹所在的路径
$ cd 项目的根目录/项目中自己创建的文件夹
$ npm start
注意:直接运行项目会报Could not connect to development server错误,需要在项目中配置App Transport Security。(相信这个大家都会的啦~(≧▽≦)/~)
在info.plist中添加http
<key>NSAppTransportSecurity</key>
    <dict>
        <key>NSAllowsArbitraryLoads</key>
        <true/>
    </dict>
运行结果如下:

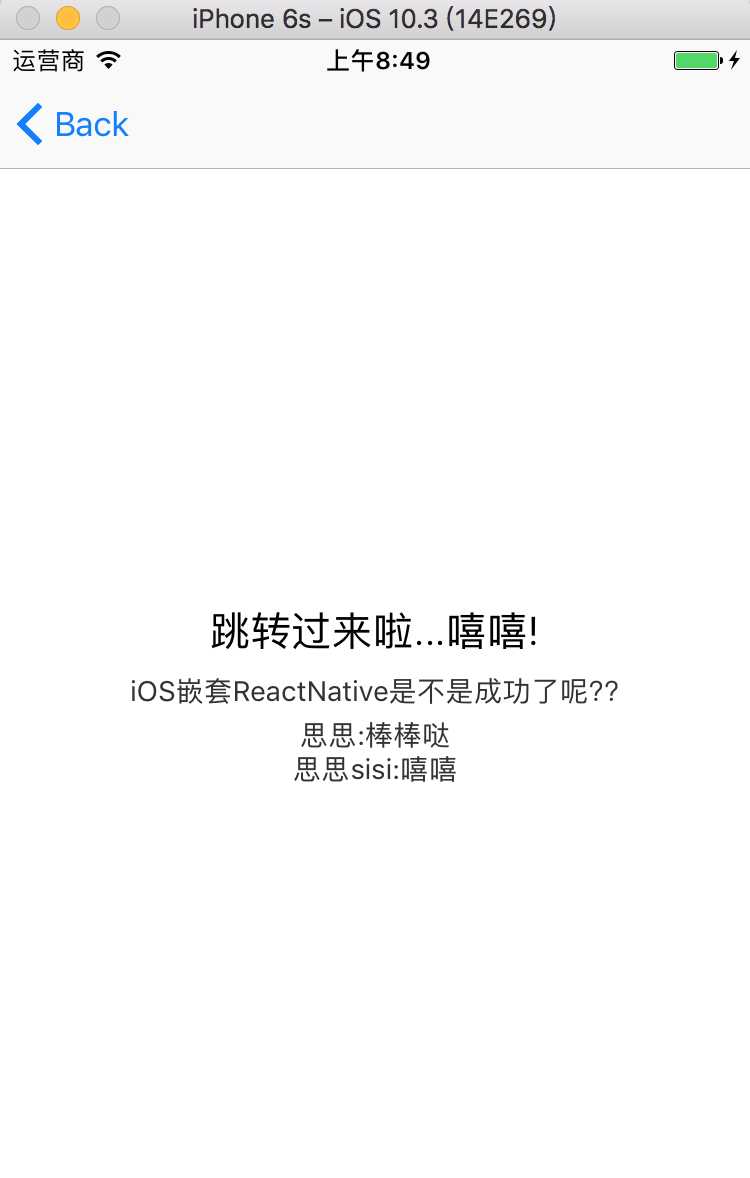
大功告成...耶耶耶!
Demo地址:https://github.com/PengSiSi/iOSNestReactNativeDemo
标签:版本 des mon sources 相关 justify little boa sub
原文地址:http://www.cnblogs.com/pengsi/p/7025769.html