标签:std his lan http isa connect UI 过滤 doc
第一步,使用struts2。
导入struts所需的包:
strust-core-xxx.jar xwork-core-xxx.jar commons-io-xxx.jar
commons-fileupload-xxx.jar commons-lang-xxx.jar commons-logging-xxx.jar
freemarker-xxx.jar javassist-xxx.GA.jar ognl-xxx.jar
导入包的方式有很多,可以在Build Path里面 Add Extenal JARs添加,可以新建一个自定义的Librariy添加这些包然后再导入这个Library。我就用最简单的方式,把这些包复制到项目的WebRoot->WEB-INF->lib下面,这样项目就会自动把包导入到Referenced Libraries下面了。
导入包后编译一下,顺利运行Tomcat,我们就可以测试一下Struts了。在src目录下新建一个struts.xml,内容如下:

<?xml version="1.0" encoding="UTF-8" ?>
<!DOCTYPE struts PUBLIC "-//Apache Software Foundation//DTD Struts Configuration 2.1//EN" "http://struts.apache.org/dtds/struts-2.1.dtd">
<struts>
    <!-- 需要Spring时添加 -->
    <!-- <constant name="struts.objectFactory" value="spring" />  -->

    <package name="default" extends="struts-default">
        <action name="login" class="com.struts2test.action.LoginAction" method="execute">
            <result name=‘success‘>/index.jsp</result>
            <result name=‘login‘>/login.jsp</result>
        </action>
    </package>

</struts>
如上面所示"default"包是Web请求到Struts会首先进入这里来寻找我们的action路径。
项目为了支持Struts,我们还需在WebRoot -> WEB-INF下面修改web.xml,内容如下:
<?xml version="1.0" encoding="UTF-8"?>
<web-app version="2.5"
 xmlns="http://java.sun.com/xml/ns/javaee"
 xmlns:xsi="http://www.w3.org/2001/XMLSchema-instance"
 xsi:schemaLocation="http://java.sun.com/xml/ns/javaee
 http://java.sun.com/xml/ns/javaee/web-app_2_5.xsd">

   <filter>
        <filter-name>struts2</filter-name>
        <filter-class>org.apache.struts2.dispatcher.ng.filter.StrutsPrepareAndExecuteFilter</filter-class>
   </filter>

   <filter-mapping>
        <filter-name>struts2</filter-name>
        <url-pattern>/*</url-pattern>
   </filter-mapping>

   <welcome-file-list>
        <welcome-file>index.jsp</welcome-file>
   </welcome-file-list>
</web-app>
添加的filter和filter-mapping顾名思义是过滤器,所有客户端Web请求都会首先进入这个web.xml,是WEB项目最基础的一个配置文件,其他文件都是这个xml导航过去的。传统的方式是直接使用Servlet直接导航到方法,这样项目层次很少,大家都应该知道,层次少开发容易维护就比较麻烦,层次多一些开发会麻烦但是维护则显得容易很多。Struts其实也是封装了Servlet方法罢了。
然后就新建一个com.struts2test.action包放所有的action方法,在这个包下新建一个Class类,如struts.xml里面命名为LoginAction即可,内容如下:
package com.struts2test.action;

import com.opensymphony.xwork2.ActionSupport;

public class LoginAction extends ActionSupport {// 该类继承了ActionSupport类。这样就可以直接使用SUCCESS,
                                                // LOGIN等变量和重写execute等方法

    private String username;
    private String password;

    public String getUsername() {
        return username;
    }
    public void setUsername(String username) {
        this.username = username;
    }
    public String getPassword() {
        return password;
    }
    public void setPassword(String password) {
        this.password = password;
    }

    @Override
    public String execute() throws Exception {
        if (username.equals("admin") && password.equals("123"))//返回SUCCESS;否则,返回LOGIN
            return SUCCESS;
        return LOGIN;
    }
}
上面所示,我们需要为username和password一个setter和getter,这样页面传值这里将可以接收并给他们赋值,可以推测,页面传值也是注入进来的。
有了这个方法,我们就可以根据login.jsp提交的username和password来判断进入index主页了!
index主页内容就随便,login.jsp也很简单,内容如下:
<%@ page language="java" import="java.util.*" pageEncoding="UTF-8"%>
<%
String path = request.getContextPath();
String basePath = request.getScheme()+"://"+request.getServerName()+":"+request.getServerPort()+path+"/";
%>

<!DOCTYPE HTML PUBLIC "-//W3C//DTD HTML 4.01 Transitional//EN">
<html>
  <head>
    <base href="<%=basePath%>">

    <title>My JSP ‘login.jsp‘ starting page</title>

    <meta http-equiv="pragma" content="no-cache">
    <meta http-equiv="cache-control" content="no-cache">
    <meta http-equiv="expires" content="0">
    <meta http-equiv="keywords" content="keyword1,keyword2,keyword3">
    <meta http-equiv="description" content="This is my page">
    <!--
    <link rel="stylesheet" type="text/css" href="styles.css">
    -->

  </head>

  <body>
      <form method="post" action="login">
        登录名:<input name=‘username‘ type="text" /><br/>
        密码:<input name =‘password‘ type="password" /><br/>
        <button type="submit" style="width: 70px; height: 20px;">确定</button>
    </form>
  </body>
</html>
做过基本的HTML传值的应该都知道input的name属性是用来传值的,所以应该和我们上面LoginAction方法的username和password名字一样,不然传值会失败的。
万事俱备,发布到Tomcat上编译运行。通过 http://localhost:8080/项目名/login.jsp 就能访问我们的网站了。输入admin/123进入index.jsp,就是成功了!
第二步,在struts基础上使用spring。
导入spring所需要的包:
strus2t-spring-plugin-xxx.jar spring-core-xxx.jar spring-context-xxx.jar
spring-bean-xxx.jar spring-web-xxx.jar spring-asm-xxx.jar spring-expression-xxx.jar
使用spring主要是依赖注入和切面编程,这里就利用spring注入username和password给LoginAction试试,这样无论界面输入什么都无所谓,程序都使用我注入的username和password了。
为了使Struts支持Spring(当Struts寻找到action的时候同时用Spring注入bean),要在Struts.xml添加如下语句:
<constant name="struts.objectFactory" value="spring" />
前面已经写了,取消注释即可。
然后在src目录下新建applicationContext.xml,内容如下:
<?xml version="1.0" encoding="UTF-8"?>
<beans xmlns="http://www.springframework.org/schema/beans"
    xmlns:xsi="http://www.w3.org/2001/XMLSchema-instance" xmlns:context="http://www.springframework.org/schema/context"
    xmlns:aop="http://www.springframework.org/schema/aop" xmlns:tx="http://www.springframework.org/schema/tx"
    xsi:schemaLocation="http://www.springframework.org/schema/beans
           http://www.springframework.org/schema/beans/spring-beans-2.5.xsd
           http://www.springframework.org/schema/context http://www.springframework.org/schema/context/spring-context-2.5.xsd
           http://www.springframework.org/schema/aop http://www.springframework.org/schema/aop/spring-aop-2.5.xsd
           http://www.springframework.org/schema/tx http://www.springframework.org/schema/tx/spring-tx-2.5.xsd">

    <bean id="LoginAction" class="com.struts2test.action.LoginAction">
        <property name="username" value="admin">
        </property>
        <property name="password" value="123">
        </property>
    </bean>

</beans>
这样之后,重新部署Tomcat启动,我们在login.jsp上面无论输入什么,我们都可以跳转到index.jsp。因为spring已经帮我们注入了一个固定的值。
这里可以看到,我们使用多少个bean就需要在这里配置多少个,这样其实就显得麻烦,和传统的配置Servlet差不多的样子。其实我们可以使用一个Spring自动扫描bean的功能,我们上面导入的spring-context-xxx.jar就带有这个功能,在applicationContext.xml里面加入:
    <context:annotation-config />
    <!-- 让spring自动扫描指定包下面注解@Controller,@Service,@Resposity,@Comopnent -->
    <context:component-scan base-package="com.struts2test" />
即可,这样我们只需在类上标识@Respository,项目就会扫描到将其识别为bean,与我们显式手写一样。要调用这个bean的地方我们使用@Resource标识这个变量即可,而且这样的方式可以不写setter和getter,方便,代码也简洁。具体的用法大家可以网上搜一下,很多其他的功能我还没用过,就不多讲了。
第三步,使用hibernate。
如果大家接触过Microsoft MVC,就应该知道和Linq其实是差不多的一个东西,毕竟微软很多都是仿照别人的东西,只是封装的好,用起来方便而已。使用hibernate官方有一个很好的文档,有中文版的,我也是参考文档来写hibernate配置的,建议大家看文档:http://docs.jboss.org/hibernate/core/3.5/reference/zh-CN/html_single/
使用hibernate之前,我们还需要使用数据库连接jar包,随各位想用什么数据库便下载什么jar包。我使用的是mysql,在网上下载了一个mysql-connetor-java-5.1.12.jar。
然后也把hibernate的jar包导入:
hibernate3.jar commons-collections-xxx.jar cglib-xxx.jar jta-xxx.jar
antlr-xxx.jar dom4j-xxx.jar slf4j-api-xxx.jar slf4j-log4j12-xxx.jar
新建com.struts2test.vo包放数据库对应类和映射文件,新建一个Users类作为登陆用户类即可,其中包括username和password两个属性即可,记得给他们setter和getter。
OK之后,还要建立这个类的数据库映射,我们必须告诉数据库那个类对应哪个表,哪个属性对应哪个字段。同样在com.struts2test.vo包下新建一个Users.hbm.xml,内容如下:
<?xml version="1.0"?>
<!DOCTYPE hibernate-mapping PUBLIC
    "-//Hibernate/Hibernate Mapping DTD 3.0//EN"
    "http://hibernate.sourceforge.net/hibernate-mapping-3.0.dtd">

<hibernate-mapping package="com.struts2test.vo">

    <class name="Users" table="Users">
        <id name="username" column="username" type="string">
            <generator class="native" />
        </id>
        <property name="password" column="password" type="string" />
    </class>

</hibernate-mapping>
以上显示username是<id>,说明username是主键。我们数据库建立表的时候也必须给Users表username字段设置为主键。貌似没有主键是不行的 - - 当然给每张表建立主键是一个好习惯,即使不会使用到也应该建立。
最后在src目录下新建一个hibernate数据库连接配置文件hibernate.cfg.xml,内容如下:
<?xml version=‘1.0‘ encoding=‘utf-8‘?>
<!DOCTYPE hibernate-configuration PUBLIC
        "-//Hibernate/Hibernate Configuration DTD 3.0//EN"
        "http://hibernate.sourceforge.net/hibernate-configuration-3.0.dtd">


<hibernate-configuration>

    <session-factory>

        <!-- Database connection settings -->
        <property name="connection.driver_class">com.mysql.jdbc.Driver</property>
        <property name="connection.url">jdbc:mysql://localhost:3306/MySQL</property>
        <property name="connection.username">数据库用户名</property>
        <property name="connection.password">数据库密码</property>

        <!-- JDBC connection pool (use the built-in) -->
        <!-- <property name="connection.pool_size">1</property> -->

        <!-- SQL dialect SQL方言,选择你的数据库方言 -->
        <property name="dialect">org.hibernate.dialect.MySQLDialect</property>

        <!-- Enable Hibernate‘s automatic session context management -->
        <property name="current_session_context_class">thread</property>

        <!-- Disable the second-level cache -->
        <property name="cache.provider_class">org.hibernate.cache.NoCacheProvider</property>

        <!-- Echo all executed SQL to stdout -->
        <property name="show_sql">true</property>

        <!-- Drop and re-create the database schema on startup -->
        <!-- <property name="hbm2ddl.auto">update</property> -->

        <mapping resource="com/struts2test/vo/Users.hbm.xml" />

    </session-factory>

</hibernate-configuration>
最主要的是<mapping resource>这行,hibernate的映射文件应该都写在这里,也就是使用的表都要在这里mapping一下。
这样便完成了数据库映射。
针对我们的登录,仍然需要将数据库映射数据Select出来,看页面传值与数据库映射数据是否对应。于是新建一个com.struts2test.dao包,包下新建一个UserDao类。内容如下:
package com.struts2test.dao;

import org.hibernate.Query;
import org.hibernate.Session;
import org.hibernate.SessionFactory;
import org.hibernate.cfg.Configuration;

import com.struts2test.vo.Users;

public class UserDao {

    public boolean Login(Users login){
        Configuration cfg = new Configuration();
        SessionFactory factory = cfg.configure().buildSessionFactory();
        Session session = factory.openSession();
        Query q = session.createQuery("from Users where 1 = 1 and username = ‘" + login.getUsername() + "‘ and password = ‘" + login.getPassword() + "‘");
        User user = (User)q.uniqueResult();
        if(user != null)
            return true;
        return false;
    }
}
hibernate查询的方式大致如上面所示:Configuration -> SessionFactory -> Session -> Query。算是一个固定的方式。参考hibernate文档就可以了。
上面类似SQL的查询语句中from Users这个Users不是指数据库的表了,而是Users类,以前犯过错误我定义类名时定义成User,而数据库里是Users,映射也对了,但是怎么也查询不出来,主要就是由于这个原因,hibernate完成映射后查询就面对对象了。
我们使用这样的方式,所以我们要修改LoginAction判断方式,LoginAction方法需要调用UserDao的Login方法来判断即可。这个UserDao可以new出来,也可以Spring注入进去,因为刚学习了Spring,我就试着用Spring来注入。成功!
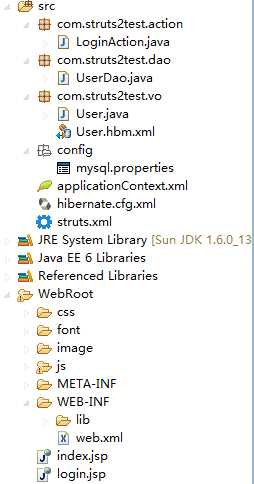
附带一下整个项目的目录树:
本文引用了Jeff砹的ssh入门搭建。
标签:std his lan http isa connect UI 过滤 doc
原文地址:http://www.cnblogs.com/life-8/p/7079006.html