在我们常用的Jstack, Jmap 用于分析java虚拟机的状态的工具,通过起另一个虚拟机通过运行sun.tools包下的java文件,去跟踪另一个虚拟机的状态。
如果让你设计一个跟踪另一个进程的方法,你也通常会考虑这几种常用的方式。
第一种,就是通知被跟踪的进程,让进程执行相应的消息,同时对该消息做出反应。
第二种,就是通过内核的调用,直接能够访问进程的内存,堆栈情况,通过分析被跟踪的进程的内存结构,从而知道当前被跟踪的进程的状态。
第一种方式
优势:
对调用者和被调用者只要达成简单的通讯协议,调用者无需知道被调用者的逻辑,结构,只需要简单的发送命令的方式,被调用者能够接受到命令,并且对该命令进行回应就可以。
缺点:
如果被调用者当时的状态本来就不正常,或者繁忙,没办法对该命令做出响应,那这个跟踪进程往往是在规定的等待时间里,无法返回正确的需要的信息。其次被调用者在分析的过程中,有可能需要暂停进程中的其他的线程,而对被跟踪的进程有一定的影响。
第二种方式
优势:
通过内核的支持,访问被跟踪的内存,并作出快照,后台分析,很少影响被跟踪的进程。
缺点:
这种方式需要对被跟踪程的内存分配和使用非常的了解,无法解耦,而本身系统内核调用也会出问题。
Java工具类中也是大致实现了这2中方式,工具中会先选择第一种方式,如果发现第一种方式不能成功,将会建议使用-F参数,也就是第二种方式。
我们先讲第一种方式。
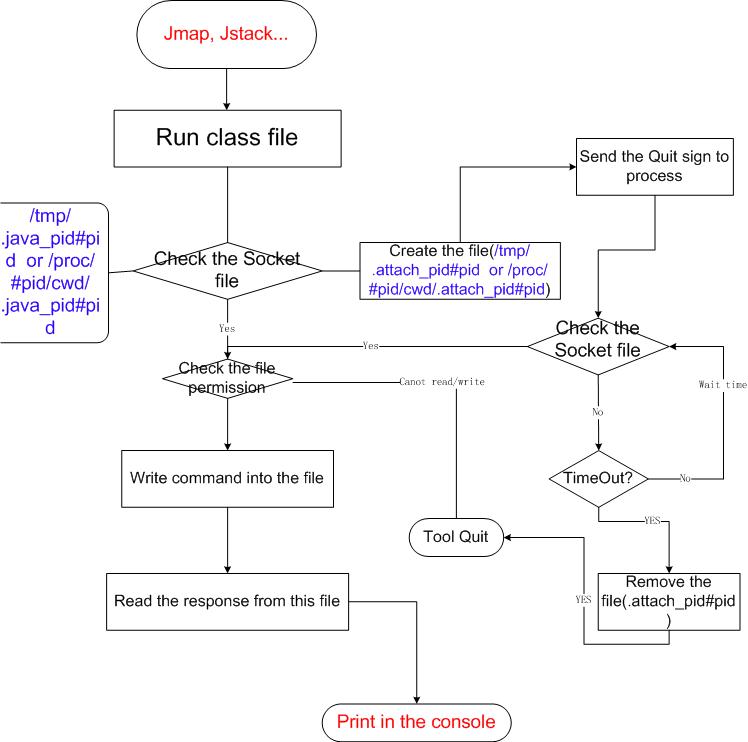
既然是需要向被跟踪进程发出命令,在linux中可以选择多种方式进行进程中通讯 共享内存,文件之类,其中创建socket的文件实现通讯是比较简单的方法。
下面是整个的流程图:
当java虚拟机启动的时候,会启动很多内部的线程,这些线程主要在thread.cpp里的create_vm方法体里实现
而在thread.cpp里主要起了2个线程来处理信号相关的
- JvmtiExport::enter_live_phase();
-
- // Signal Dispatcher needs to be started before VMInit event is posted
- os::signal_init();
-
- // Start Attach Listener if +StartAttachListener or it can‘t be started lazily
- if (!DisableAttachMechanism) {
- if (StartAttachListener || AttachListener::init_at_startup()) {
- AttachListener::init();
- }
- }
1. Signal Dispatcher 线程
在os.cpp中的signal_init()函数中,启动了signal dispatcher 线程,对signal dispather 线程主要是用于处理信号,等待信号并且分发处理,可以详细看signal_thread_entry的方法
- static void signal_thread_entry(JavaThread* thread, TRAPS) {
- os::set_priority(thread, NearMaxPriority);
- while (true) {
- int sig;
- {
- // FIXME : Currently we have not decieded what should be the status
- // for this java thread blocked here. Once we decide about
- // that we should fix this.
- sig = os::signal_wait();
- }
- if (sig == os::sigexitnum_pd()) {
- // Terminate the signal thread
- return;
- }
-
- switch (sig) {
- case SIGBREAK: {
- // Check if the signal is a trigger to start the Attach Listener - in that
- // case don‘t print stack traces.
- if (!DisableAttachMechanism && AttachListener::is_init_trigger()) {
- continue;
- }
- // Print stack traces
- // Any SIGBREAK operations added here should make sure to flush
- // the output stream (e.g. tty->flush()) after output. See 4803766.
- // Each module also prints an extra carriage return after its output.
- VM_PrintThreads op;
- VMThread::execute(&op);
- VM_PrintJNI jni_op;
- VMThread::execute(&jni_op);
- VM_FindDeadlocks op1(tty);
- VMThread::execute(&op1);
- Universe::print_heap_at_SIGBREAK();
- if (PrintClassHistogram) {
- VM_GC_HeapInspection op1(gclog_or_tty, true /* force full GC before heap inspection */,
- true /* need_prologue */);
- VMThread::execute(&op1);
- }
- if (JvmtiExport::should_post_data_dump()) {
- JvmtiExport::post_data_dump();
- }
- break;
- }
- default: {
- // Dispatch the signal to java
- HandleMark hm(THREAD);
- klassOop k = SystemDictionary::resolve_or_null(vmSymbolHandles::sun_misc_Signal(), THREAD);
- KlassHandle klass (THREAD, k);
- if (klass.not_null()) {
- JavaValue result(T_VOID);
- JavaCallArguments args;
- args.push_int(sig);
- JavaCalls::call_static(
- &result,
- klass,
- vmSymbolHandles::dispatch_name(),
- vmSymbolHandles::int_void_signature(),
- &args,
- THREAD
- );
- }
- if (HAS_PENDING_EXCEPTION) {
- // tty is initialized early so we don‘t expect it to be null, but
- // if it is we can‘t risk doing an initialization that might
- // trigger additional out-of-memory conditions
- if (tty != NULL) {
- char klass_name[256];
- char tmp_sig_name[16];
- const char* sig_name = "UNKNOWN";
- instanceKlass::cast(PENDING_EXCEPTION->klass())->
- name()->as_klass_external_name(klass_name, 256);
- if (os::exception_name(sig, tmp_sig_name, 16) != NULL)
- sig_name = tmp_sig_name;
- warning("Exception %s occurred dispatching signal %s to handler"
- "- the VM may need to be forcibly terminated",
- klass_name, sig_name );
- }
- CLEAR_PENDING_EXCEPTION;
- }
- }
- }
- }
- }
可以看到通过os::signal_wait();等待信号,而在linux里是通过sem_wait()来实现,接受到SIGBREAK(linux 中的QUIT)信号的时候(关于信号处理请参考笔者的另一篇博客:java 中关于信号的处理在linux下的实现),第一次通过调用 AttachListener::is_init_trigger()初始化attach listener线程,详细见2.Attach Listener 线程。
- 第一次收到信号,会开始初始化,当初始化成功,将会直接返回,而且不返回任何线程stack的信息(通过socket file的操作返回),并且第二次将不在需要初始化。如果初始化不成功,将直接在控制台的outputstream中打印线程栈信息。
- 第二次收到信号,如果已经初始化过,将直接在控制台中打印线程的栈信息。如果没有初始化,继续初始化,走和第一次相同的流程。
2. Attach Listener 线程
Attach Listener 线程是负责接收到外部的命令,而对该命令进行执行的并且吧结果返回给发送者。在jvm启动的时候,如果没有指定+StartAttachListener,该线程是不会启动的,刚才我们讨论到了在接受到quit信号之后,会调用 AttachListener::is_init_trigger()通过调用用AttachListener::init()启动了Attach Listener 线程,同时在不同的操作系统下初始化,在linux中 是在attachListener_Linux.cpp文件中实现的。
在linux中如果发现文件.attach_pid#pid存在,才会启动attach listener线程,同时初始化了socket 文件,也就是通常jmap,jstack tool干的事情,先创立attach_pid#pid文件,然后发quit信号,通过这种方式暗式的启动了Attach Listener线程(见博客:http://blog.csdn.net/raintungli/article/details/7023092)。
线程的实现在 attach_listener_thread_entry 方法体中实现
- static void attach_listener_thread_entry(JavaThread* thread, TRAPS) {
- os::set_priority(thread, NearMaxPriority);
-
- if (AttachListener::pd_init() != 0) {
- return;
- }
- AttachListener::set_initialized();
-
- for (;;) {
- AttachOperation* op = AttachListener::dequeue();
- if (op == NULL) {
- return; // dequeue failed or shutdown
- }
-
- ResourceMark rm;
- bufferedStream st;
- jint res = JNI_OK;
-
- // handle special detachall operation
- if (strcmp(op->name(), AttachOperation::detachall_operation_name()) == 0) {
- AttachListener::detachall();
- } else {
- // find the function to dispatch too
- AttachOperationFunctionInfo* info = NULL;
- for (int i=0; funcs[i].name != NULL; i++) {
- const char* name = funcs[i].name;
- assert(strlen(name) <= AttachOperation::name_length_max, "operation <= name_length_max");
- if (strcmp(op->name(), name) == 0) {
- info = &(funcs[i]);
- break;
- }
- }
-
- // check for platform dependent attach operation
- if (info == NULL) {
- info = AttachListener::pd_find_operation(op->name());
- }
-
- if (info != NULL) {
- // dispatch to the function that implements this operation
- res = (info->func)(op, &st);
- } else {
- st.print("Operation %s not recognized!", op->name());
- res = JNI_ERR;
- }
- }
-
- // operation complete - send result and output to client
- op->complete(res, &st);
- }
- }
在AttachListener::dequeue(); 在liunx里的实现就是监听刚才创建的socket的文件,如果有请求进来,找到请求对应的操作,调用操作得到结果并把结果写到这个socket的文件,如果你把socket的文件删除,jstack/jmap会出现错误信息 unable to open socket file:........
我们经常使用 kill -3 pid的操作打印出线程栈信息,我们可以看到具体的实现是在Signal Dispatcher 线程中完成的,因为kill -3 pid 并不会创建.attach_pid#pid文件,所以一直初始化不成功,从而线程的栈信息被打印到控制台中。
信号转发线程,Attach Listener 线程都只是操作socket文件,并没有去执行比如stack 分析,或者heap的分析,真正的工作线程其实是vm thread.
(一)启动vm thread
- jint Threads::create_vm(JavaVMInitArgs* args, bool* canTryAgain) {
- ...
- // Create the VMThread
- { TraceTime timer("Start VMThread", TraceStartupTime);
- VMThread::create();
- Thread* vmthread = VMThread::vm_thread();
-
- if (!os::create_thread(vmthread, os::vm_thread))
- vm_exit_during_initialization("Cannot create VM thread. Out of system resources.");
-
- // Wait for the VM thread to become ready, and VMThread::run to initialize
- // Monitors can have spurious returns, must always check another state flag
- {
- MutexLocker ml(Notify_lock);
- os::start_thread(vmthread);
- while (vmthread->active_handles() == NULL) {
- Notify_lock->wait();
- }
- }
- }
- ...
-
-
- }
我们可以看到,在thread.cpp里启动了线程vm thread,在这里我们同时也稍微的略带的讲一下jvm在linux里如何启动线程的。
通常在linux中启动线程,是调用
- int pthread_create((pthread_t *__thread, __const pthread_attr_t *__attr,void *(*__start_routine) (void *), void *__arg));
而在java里却增加了os:create_thread --初始化线程 和os:start_thread--启动线程
我们去看一下jvm里面是如何在linux里做到的
在os_linux.cpp中来看create_thread的方法
- bool os::create_thread(Thread* thread, ThreadType thr_type, size_t stack_size) {
- ....
- int ret = pthread_create(&tid, &attr, (void* (*)(void*)) java_start, thread);
- ....
- }
继续看java_start方法
- static void *java_start(Thread *thread) {
- ....
- // handshaking with parent thread
- {
- MutexLockerEx ml(sync, Mutex::_no_safepoint_check_flag);
-
- // notify parent thread
- osthread->set_state(INITIALIZED);
- sync->notify_all();
-
- // wait until os::start_thread()
- while (osthread->get_state() == INITIALIZED) {
- sync->wait(Mutex::_no_safepoint_check_flag);
- }
- }
-
- // call one more level start routine
- thread->run();
-
- return 0;
- }
首先jvm先设置了当前线程的状态是Initialized, 然后notify所有的线程,
while (osthread->get_state() == INITIALIZED) {
sync->wait(Mutex::_no_safepoint_check_flag);
}
不停的查看线程的当前状态是不是Initialized, 如果是的话,调用了sync->wait()的方法等待。
来看os:start_thread的方法 os.cpp
- void os::start_thread(Thread* thread) {
- // guard suspend/resume
- MutexLockerEx ml(thread->SR_lock(), Mutex::_no_safepoint_check_flag);
- OSThread* osthread = thread->osthread();
- osthread->set_state(RUNNABLE);
- pd_start_thread(thread);
- }
这时候设置了线程的状态为runnable,但没有notify线程
在 pd_start_thread(thread)中, os_linux.cpp中
- void os::pd_start_thread(Thread* thread) {
- OSThread * osthread = thread->osthread();
- assert(osthread->get_state() != INITIALIZED, "just checking");
- Monitor* sync_with_child = osthread->startThread_lock();
- MutexLockerEx ml(sync_with_child, Mutex::_no_safepoint_check_flag);
- sync_with_child->notify();
- }
这时候我们看到了notify 线程的操作
也就是这时候notify了线程,因为这时候的线程的状态是RUNNABLE, 方法java_start继续往下执行,于是调用了thread->run()的方法
对于线程vm Thread 也就是调用了vmthread::run方法
vmThread.cpp
- void VMThread::run() {
- ...
- this->loop();
- ...
- }
调用了loop函数,处理了VM_Operation 的queue 关于queue的级别和优先级处理算法:可以参考 另一篇博客:http://blog.csdn.net/raintungli/article/details/6553337
(二)Jstack 运行在vm thread里的VM_Operation
jstack 处理也就是在前面博客所提到的attach Listener 线程所做的 operation
- static jint thread_dump(AttachOperation* op, outputStream* out) {
- bool print_concurrent_locks = false;
- if (op->arg(0) != NULL && strcmp(op->arg(0), "-l") == 0) {
- print_concurrent_locks = true;
- }
-
- // thread stacks
- VM_PrintThreads op1(out, print_concurrent_locks);
- VMThread::execute(&op1);
-
- // JNI global handles
- VM_PrintJNI op2(out);
- VMThread::execute(&op2);
-
- // Deadlock detection
- VM_FindDeadlocks op3(out);
- VMThread::execute(&op3);
-
- return JNI_OK;
- }
简单看一下类VM_PrintThreads 它 继承了VM_Operation
- class VM_PrintThreads: public VM_Operation {
- private:
- outputStream* _out;
- bool _print_concurrent_locks;
- public:
- VM_PrintThreads() { _out = tty; _print_concurrent_locks = PrintConcurrentLocks; }
- VM_PrintThreads(outputStream* out, bool print_concurrent_locks) { _out = out; _print_concurrent_locks = print_concurrent_locks; }
- VMOp_Type type() const { return VMOp_PrintThreads; }
- void doit();
- bool doit_prologue();
- void doit_epilogue();
- };
当调用VMThread::execute()也就是将VM_PrintThreads 放入了_vm_queue中,交给vm thread 处理,对vm thread来说取出queue里的VM_Operation,并且调用doit方法。
在jstack里,attach listener 的线程产生了VM_PrintThreads,VM_PrintJNI,VM_FindDeadlocks 3个operations,交给了vm thread 的线程处理。