标签:accept php -- 流程 语法 yum 很多 pcr bbs
一、nginx优点
0、配置简单,更灵活。
1、高并发(静态小文件)。
2、占用资源少。2w并发 开10个线程服务,内存消耗几百兆。
3、功能种类多(web,cache,proxy),每一个功能都不是特别强。
4、支持epoll模型(apache支持select模型)。使得nginx可以支持高并发!
5、nginx配合动态服务和apache有区别。
6、利用Nginx可以对Ip限速,可以限制连接数。
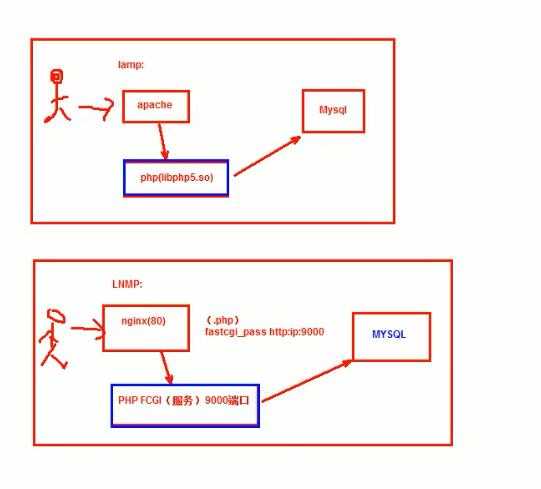
二、LNMP与LAMP实现原理
三、NGINX应用场合
1、静态服务器(图片,视频服务)html,js,css,.flv等。===另一个是lighttpd,但是社区不活跃。并发1-3W
2、动态服务,nginx+fastcgi的方式运行php,jsp。动态并发:500-1500
3、反向代理,负载均衡。日pv2000w以下,都可以直接用NGINX做代理。
4、缓存服务。
四、nginx虚拟主机
一个server标签就是一个虚拟主机。
1、基于域名的虚拟主机。通过域名来区分虚拟主机 ==》应用:外部网站
2、基于端口的虚拟主机。通过端口来区分虚拟主机 ==》应用:公司内部网站,网站的后台
3、基于ip的虚拟主机。几乎不用。不支持ifconfig别名,配置文件可以。
五、nginx安装
5.1)源码下载
http://nginx.org/
5.2)安装准备,安装pcre是为了使nginx支持http rewrite模块
yum install -y pcre pcre-devel
5.3)openssl
yum install -y openssl*
5.4)开始安装,由于nginx默认会装很多核心的东西,所以编译参数很少
5.4.1)创建nginx用户
[root@server ~]# useradd nginx -M -s /sbin/nologin
tar -zxf nginx-1.6.2.tar.gz
cd nginx-1.6.2
./configure --user=nginx --group=nginx --prefix=/application/nginx1.6.2 --with-http_stub_status_module --with-http_ssl_module
make && make install
echo $?
[root@server application]# ln -s nginx1.6.2/ nginx
5.4.2)检测语法并开启
[root@server sbin]# ./nginx -t
nginx: the configuration file /application/nginx1.6.2/conf/nginx.conf syntax is ok
nginx: configuration file /application/nginx1.6.2/conf/nginx.conf test is successful
[root@server sbin]# ./nginx
六、软件目录结构
[root@server nginx]# tree
.
├── client_body_temp
├── conf
│?? ├── fastcgi.conf					动态的配置文件,,配合php时用到
│?? ├── fastcgi.conf.default
│?? ├── fastcgi_params
│?? ├── fastcgi_params.default
│?? ├── koi-utf
│?? ├── koi-win
│?? ├── mime.types
│?? ├── mime.types.default
│?? ├── nginx.conf					静态配置文件
│?? ├── nginx.conf.default
│?? ├── scgi_params
│?? ├── scgi_params.default
│?? ├── uwsgi_params
│?? ├── uwsgi_params.default
│?? └── win-utf
├── fastcgi_temp
├── html						默认站点目录
│?? ├── 50x.html
│?? └── index.html
├── logs
│?? ├── access.log
│?? ├── error.log
│?? └── nginx.pid
├── proxy_temp
├── sbin
│?? └── nginx						启动文件
├── scgi_temp
└── uwsgi_temp
七、默认的配置文件
[root@server conf]# cat -n nginx.conf
	 1
     2	#user  nobody;
     3	worker_processes  1;	//cpu是几核就可以用几个进程
     4
     5	#error_log  logs/error.log;			//错误日志,一般日志级别error,,,,可以参考官方文档
     6	#error_log  logs/error.log  notice;
     7	#error_log  logs/error.log  info;
     8
     9	#pid        logs/nginx.pid;
    10
    11
    12	events {					//整个nginx连接请求的数量
    13	    worker_connections  1024;
    14	}
    15
    16
    17	http {
    18	    include       mime.types;
    19	    default_type  application/octet-stream;
    20
    21	    #log_format  main  ‘$remote_addr - $remote_user [$time_local] "$request" ‘
    22	    #                  ‘$status $body_bytes_sent "$http_referer" ‘
    23	    #                  ‘"$http_user_agent" "$http_x_forwarded_for"‘;
    24		上面是访问日志的格式
    25	    #access_log  logs/access.log  main;		//是否记录访问日志
    26
    27	    sendfile        on;
    28	    #tcp_nopush     on;
    29
    30	    #keepalive_timeout  0;
    31	    keepalive_timeout  65;
    32
    33	    #gzip  on;
    34
    35	    server {
    36	        listen       80;
    37	        server_name  localhost;
    38
    39	        #charset koi8-r;
    40
    41	        #access_log  logs/host.access.log  main;
    42
    43	        location / {
    44	            root   html;
    45	            index  index.html index.htm;
    46	        }
    47
    48	        #error_page  404              /404.html;
    49
    50	        # redirect server error pages to the static page /50x.html
    51	        #
    52	        error_page   500 502 503 504  /50x.html;				//指定一个错误的访问页面
    53	        location = /50x.html {							//如果location是50x.html页面,就去这个目录下面找
    54	            root   html;
    55	        }
    56
    57	        # proxy the PHP scripts to Apache listening on 127.0.0.1:80
    58	        #
    59	        #location ~ \.php$ {
    60	        #    proxy_pass   http://127.0.0.1;
    61	        #}
    62
    63	        # pass the PHP scripts to FastCGI server listening on 127.0.0.1:9000
    64	        #
    65	        #location ~ \.php$ {
    66	        #    root           html;
    67	        #    fastcgi_pass   127.0.0.1:9000;
    68	        #    fastcgi_index  index.php;
    69	        #    fastcgi_param  SCRIPT_FILENAME  /scripts$fastcgi_script_name;
    70	        #    include        fastcgi_params;
    71	        #}
    72
    73	        # deny access to .htaccess files, if Apache‘s document root
    74	        # concurs with nginx‘s one
    75	        #
    76	        #location ~ /\.ht {
    77	        #    deny  all;
    78	        #}
    79	    }
    80
    81
    82	    # another virtual host using mix of IP-, name-, and port-based configuration
    83	    #
    84	    #server {
    85	    #    listen       8000;
    86	    #    listen       somename:8080;
    87	    #    server_name  somename  alias  another.alias;
    88
    89	    #    location / {
    90	    #        root   html;
    91	    #        index  index.html index.htm;
    92	    #    }
    93	    #}
    94
    95
    96	    # HTTPS server
    97	    #
    98	    #server {
    99	    #    listen       443 ssl;
   100	    #    server_name  localhost;
   101
   102	    #    ssl_certificate      cert.pem;
   103	    #    ssl_certificate_key  cert.key;
   104
   105	    #    ssl_session_cache    shared:SSL:1m;
   106	    #    ssl_session_timeout  5m;
   107
   108	    #    ssl_ciphers  HIGH:!aNULL:!MD5;
   109	    #    ssl_prefer_server_ciphers  on;
   110
   111	    #    location / {
   112	    #        root   html;
   113	    #        index  index.html index.htm;
   114	    #    }
   115	    #}
   116
   117	}
八、为了简单的完成虚拟主机改的配置文件
[root@server conf]# cat -n nginx.conf

     1	worker_processes  1;
     2	events {
     3	    worker_connections  1024;
     4	}
     5	http {
     6	    include       mime.types;
     7	    default_type  application/octet-stream;
     8	    sendfile        on;
     9	    keepalive_timeout  65;
    10	    server {
    11	        listen       80;
    12	        server_name  www.etiantian.org;
    13	            root   html/www;
    14	            index  index.html index.htm;
    15	    }
    16	 server {
    17	        listen       80;
    18	        server_name  bbs.etiantian.org;
    19	            root   html/bbs;
    20	            index  index.html index.htm;
    21	    }
    22	 server {
    23	        listen       80;
    24	        server_name  blog.etiantian.org;
    25	            root   html/blog;
    26	            index  index.html index.htm;
    27	    }
    28
    29
    30	}
给目标站点创建目录,并添加响应的数据
[root@server conf]# mkdir ../html/{www,blog,bbs}
[root@server conf]# for n in www blog bbs;do echo "$n.etiantian.org" >../html/$n/index.html;done
[root@server conf]# ../sbin/nginx -t
nginx: the configuration file /application/nginx1.6.2/conf/nginx.conf syntax is ok
nginx: configuration file /application/nginx1.6.2/conf/nginx.conf test is successful
[root@server conf]# ../sbin/nginx -s reload
========分割点
配置虚拟主机流程:
1)复制一个完整的server标签段,到结尾,注意:要放在http的结束大括号前,也就是server标签段放入http标签。
2)更改server_name及对应网页的root根目录。
3)检查配置文件语法,平滑重启服务。
4)创建server_name对应网页的根目录,并且建立测试文件,如果没有index首页会出现403错误。
5)在客户端对server_name的主机名做host解析或dns配置,并检查(ping域名看返回的ip对不对)
6)win32浏览器访问,或者在linux客户端做host解析,用wget或curl访问。
九、配置文件的小点
9.1)配置nginx状态信息虚拟主机
[root@server conf]# vim nginx.conf
##status
server{
	listen 80;
	server_name status.etiantian.org;
	   stub_status on;
	   access_log  off;
}
显示结果:
Active connections: 4 	//nginx正处理的活动连接数4个
server accepts handled requests
 13 13 84
Reading: 0 Writing: 1 Waiting: 3

第一个server表示nginx启动到现在共处理了13个连接
第二个accepts表示nginx启动到现在共成功创建了13次握手
请求丢失数=(握手数-连接数),可以看出,本次状态显示没有丢失请求。
第三个handled requests,表示总共处理了84次请求
Reading:nginx读取到客户端的header信息数。
Writing:nginx返回给客户端的header信息数。
Waiting:nginx已经处理完正在等候下一次请求指令的驻留连接,开启keep-alive的情况下,
这个值等于active-(reading+writing)
9.2)配置别名
server_name bbb.etiantian.org etiantian.org;
9.3)配置301重定向跳转
 server {
        listen       80;
        server_name  www.etiantian.org;
            root   html/www;
            index  index.html index.htm;
            rewrite ^/(.*)$ http://www.etiantian.org/$1 permanent;   //(.*)是域名后面的内容,$1就是(.*)所指代的内容,permanent永久重定向,,,,可以防止别人用ip来解析,
    }
9.4)ip访问会访问第一个标签的内容
9.5)解决恶意域名的绑定,将第一个标签的内容改为拒绝所有
server{
        listen 80;
        location /{
           deny all;
        }
}
9.6)访问日志 http://nginx.org/en/docs/http/ngx_http_log_module.html,,可以看看后面的配置文件
9.7)日志轮询
用脚本来进行日志轮询
cd /application/nginx/logs && mv www_access.log www_access_$(date +%F -d -1day).log
/application/nginx/sbin/nginx -s reload
最终放到crontab中
9.8)如果是基于端口的,就只要单纯的改变listen端口,对于域名就没有什么要求,访问的时候需要加上端口号
十、给访问日志的参考
worker_processes  1;
events {
    worker_connections  1024;
}
http {
    include       mime.types;
    default_type  application/octet-stream;
    sendfile        on;
    keepalive_timeout  65;
    error_log logs/error.log error;

    log_format  main  ‘$remote_addr - $remote_user [$time_local] "$request" ‘
                      ‘$status $body_bytes_sent "$http_referer" ‘
                      ‘"$http_user_agent" "$http_x_forwarded_for"‘;


server{
	listen 80;
	location /{
	   deny all;
	}
      }

 server {
        listen       80;
        server_name  www.etiantian.org;
            root   html/www;
            index  index.html index.htm;
        access_log logs/www_access.log;
 }
server {
        listen       80;
        server_name  etiantian.org;
        rewrite ^/(.*)$ http://www.etiantian.org/$1 permanent;
    }

 server {
        listen       80;
        server_name  bbs.etiantian.org;
            root   html/bbs;
            index  index.html index.htm;
    }
 server {
        listen       80;
        server_name  blog.etiantian.org;
            root   html/blog;
            index  index.html index.htm;
    }

##status
server{
	listen 80;
	server_name status.etiantian.org;
	   stub_status on;
	   access_log  off;


}

}
十一、nginx也可以利用类似于apache的vhost的配置
主配置文件
worker_processes  1;
events {
    worker_connections  1024;
}
http {
    include       mime.types;
    default_type  application/octet-stream;
    sendfile        on;
    keepalive_timeout  65;
    error_log logs/error.log error;

    log_format  main  ‘$remote_addr - $remote_user [$time_local] "$request" ‘
                      ‘$status $body_bytes_sent "$http_referer" ‘
                      ‘"$http_user_agent" "$http_x_forwarded_for"‘;

    include extra/www.conf;
    include extra/bbs.conf;
    include extra/blog.conf;
}
在extrax下,该目录要自己创建
[root@server extra]# cat bbs.conf
server {
        listen       80;
        server_name  bbs.etiantian.org;
            root   html/bbs;
            index  index.html index.htm;
    }
标签:accept php -- 流程 语法 yum 很多 pcr bbs
原文地址:http://www.cnblogs.com/bill2014/p/7470069.html