标签:serve miss 基本 使用 you 注释 option tac cat
安装openstack前的准备环境:
两个centos7系统的环境:192.168.101.10 node1,192.168.101.11 node2
控制节点node1,计算节点node2
1、统一hosts文件:
[root@node1 ~]# cat /etc/hosts
127.0.0.1   localhost localhost.localdomain localhost4 localhost4.localdomain4
::1         localhost localhost.localdomain localhost6 localhost6.localdomain6
192.168.101.10    node1
192.168.101.11    node2
[root@node2 ~]# cat /etc/hosts
127.0.0.1   localhost localhost.localdomain localhost4 localhost4.localdomain4
::1         localhost localhost.localdomain localhost6 localhost6.localdomain6
192.168.101.10   node1
192.168.101.11   node2
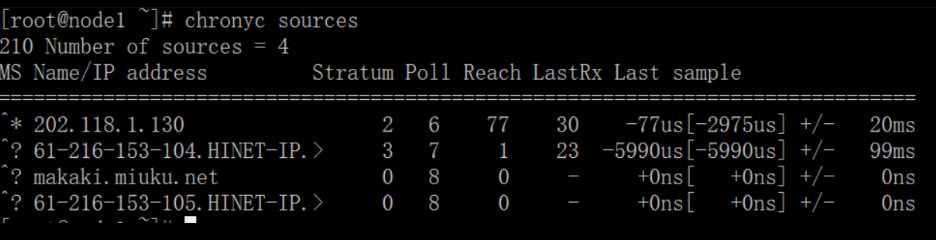
2、时间同步(控制节点操作)
yum install chrony
修改vim /etc/chrony.conf
allow 192.168.101.0/16 开启
最后开启服务:
systemctl enable chronyd.service
systemctl start chronyd.service
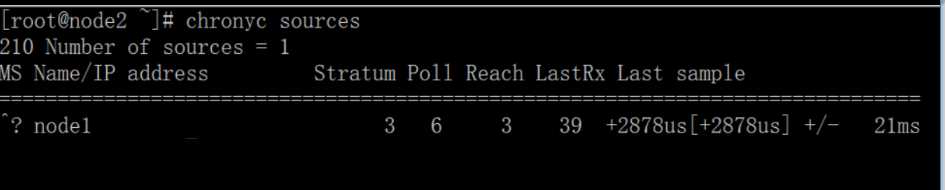
以下是计算节点或者其他节点操作:
yum install chrony
修改vim /etc/chrony.conf
allow 192.168.101.0/16 开启
注释掉:
#server 0.centos.pool.ntp.org iburst
#server 1.centos.pool.ntp.org iburst
#server 2.centos.pool.ntp.org iburst
#server 3.centos.pool.ntp.org iburst
server 192.168.101.10 iburst           (新增控制节点)
最后开启服务:
systemctl enable chronyd.service
systemctl start chronyd.service
有必要的化请设置时区:timedatectl set-timezone Asia/Shanghai
官网设置:
3、在所有节点(这里只有控制节点和计算节点,如果有其他节点也需要操作)操作如下:
yum install centos-release-openstack-pike
yum upgrade
If the upgrade process includes a new kernel, reboot your host to activate it.
由于更新了kernel,于是需要进行重启,以新内核启动,开启后,继续执行:
# yum install mariadb mariadb-server python2-PyMySQL
# vim /etc/my.cnf.d/openstack.cnf
[mysqld]
bind-address = 192.168.101.10

default-storage-engine = innodb
innodb_file_per_table = on
max_connections = 4096
collation-server = utf8_general_ci
character-set-server = utf8
# systemctl enable mariadb.service
       # systemctl start mariadb.service
# mysql_secure_installation
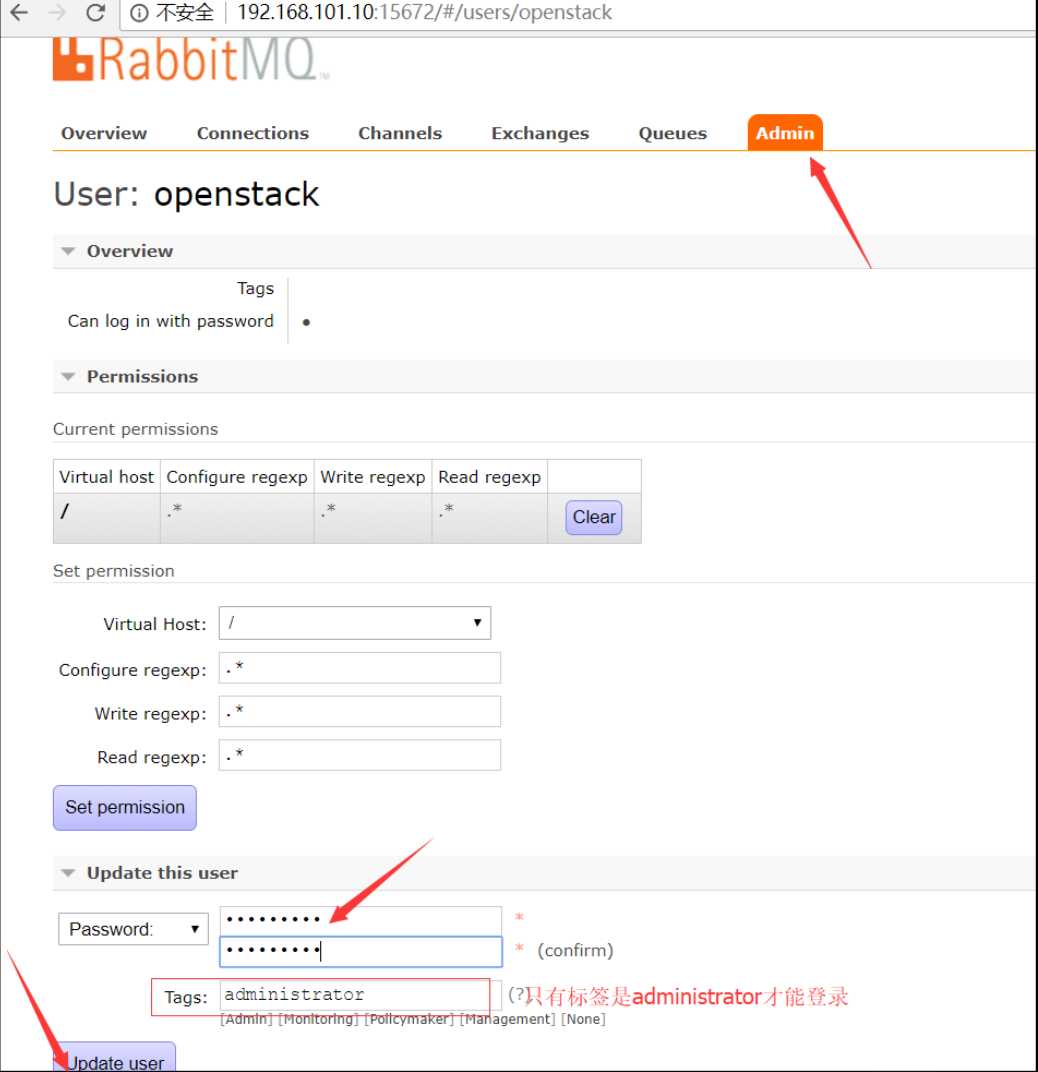
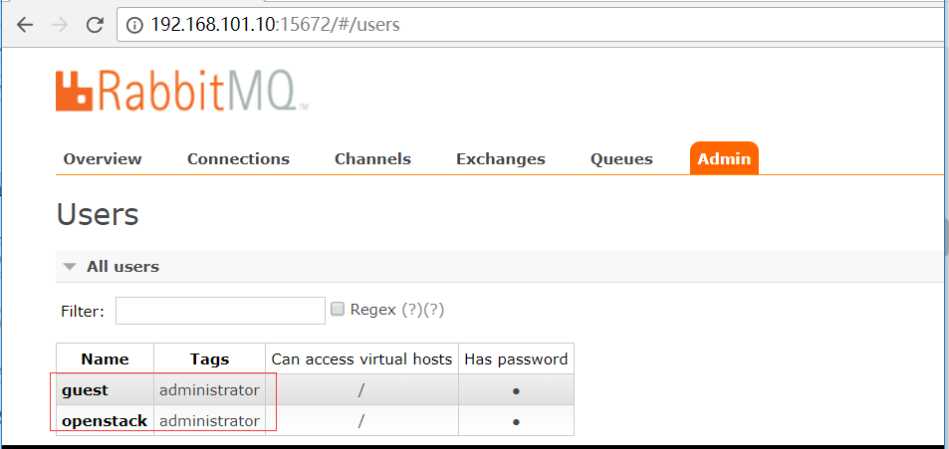
5、安装消息队列服务rabbitmq(控制节点上操作)
# yum install rabbitmq-server
# systemctl enable rabbitmq-server.service
# systemctl start rabbitmq-server.service
Add the openstack user:
# rabbitmqctl add_user openstack openstack(账号和密码)
Permit configuration, write, and read access for the openstack user:
# rabbitmqctl set_permissions openstack ".*" ".*" ".*"

rabbitmq服务监听在5672、25672端口
# rabbitmq-plugins list
启动某一个插件:
# rabbitmq-plugins enable rabbitmq_management
重启rabbitmq服务:
systemctl restart rabbitmq-server.service
上面这个开启的插件是一个web管理平台,监听在15672端口:
tcp 0 0 0.0.0.0:15672 0.0.0.0:* LISTEN 12581/beam.smp
访问这个web管理平台:
# yum install memcached python-memcached
修改配置文件:/etc/sysconfig/memcached
OPTIONS="-l 127.0.0.1,::1,192.168.101.10"
开启memcached服务:
# systemctl enable memcached.service
# systemctl start memcached.service
tcp        0      0 192.168.101.10:11211    0.0.0.0:*               LISTEN      12982/memcached
tcp        0      0 127.0.0.1:11211         0.0.0.0:*               LISTEN      12982/memcached
至此openstack基本前提环境安装完成
照着官网来安装openstack pike之environment设置
标签:serve miss 基本 使用 you 注释 option tac cat
原文地址:http://www.cnblogs.com/jsonhc/p/7692227.html