标签:工作 scope inject coding singleton spring框架 cte ips c++
Spring可以帮助我们管理软件开发过程中的对象,以及如何创建和维护对象之间的关系。 Spring是一个轻量级的控制反转(IoC)和面向切面(AOP)的容器框架,可以将组建的耦合度降至最低,即实现解耦,便于系统以后的维护和升级。
1.spring 开发
eclipse开发工具
maven搭建项目-添加spring-context依赖包
引入applicationContext.xml配置文件
2.IOC (Inversion of Control) :控制反转,通过容器来控制对象的创建及维护,对象中成员变量的创建及维护。反转就是将对象的控制权转移给容器处理,目的是获得更好的扩展性和可维护性。
3.Spring Core Container(即Spring核心容器)——Spring框架的核心
4.Spring管理Bean的原理
Spring的核心容器可以管理任何java类,容器可以初始化该类,并返回该类的实例。
xml配置方式:
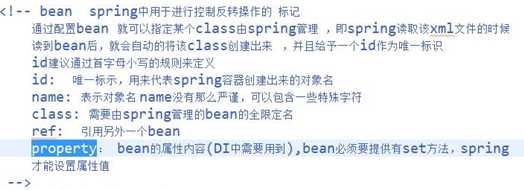
    <!-- spring中进行控制反转的标记
        通过配置bean  可以指定某个class由spring来管理
        spring在读取主配置文件的时候会将当前标记读取,并且根据当前标记的class
        的值,通过反射来创建该bean的对象  id是用来给某个创建的对象设置一个唯一
        标识
        lazy-init:懒加载设置    默认为立即加载,即值为false
        设置成true,会在用到该bean的时候才创建该bean的对象
     -->
测试:
添加Junit依赖包
新建Javabean类(完整的),添加init、destroy方法(略。。。)
配置xml文件:
<bean id="animal" class="com.rong.entity.Animal" lazy-init="false" init-method="init" destroy-method="destroy"></bean>
方法测试:
 1 public class MyTest {
 2     //ApplicationContext context=null;
 3     ClassPathXmlApplicationContext context=null;
 4     @Before
 5     public void before(){
 6         context=new ClassPathXmlApplicationContext("application.xml");
 7     }
 8     //测试destroy需要关闭容器,关闭容器的时候会自动销毁容器中的对象
 9     @Test
10     public void test1(){
11         Animal animal = context.getBean("animal", Animal.class);
12         System.out.println(animal);
13         context.close();//容器关闭,对象销毁  destroy调用只在单例模式下有效 (默认单例)
14     }
15 }
单例与多例
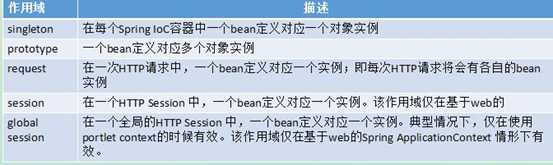
    <!--
        bean的作用域
        scope:默认是单例singleton
               pototype 表示多实例  每次getBean都会创建一个新的对象
     -->
     <bean name="animal1" class="com.rong.entity.Animal" scope="prototype"></bean>
1     @Test
2     public void test2(){
3         //修改了作用域后,每次getBean都会创建一个对象
4         Animal animal1 = context.getBean("animal1", Animal.class);
5         Animal animal2 = context.getBean("animal1", Animal.class);
6     }
5.Bean对象的实例化
A.用构造器来实例化
如果不指定调用哪个构造器,spring默认会调用无参构造方法。
例:<bean name="animal1" class="com.rong.entity.Animal" scope="prototype"></bean>
1     <!--
2         constructor-arg:设置构造方法注入,通过该标签来设置构造方法中 的  index的位置上的参数,
3         赋于value属性的值
4         index:构造方法中的参数的索引位置,从0开始计算
5         value:设置属性值,只有String和基本数据类型可以直接用value指定值
6         ref:如果需要引用其他的bean作为属性值,用ref(用其他bean的id或name)
7         type:设置当前参数的类型,可以省略
8       -->
    <bean id="animal" class="com.rong.entity.Animal" lazy-init="false" init-method="init" destroy-method="destroy">
        <constructor-arg index="0" type="java.lang.String" value="小花"></constructor-arg>
        <constructor-arg index="1" value="18"></constructor-arg>
    </bean>
B.使用静态工厂实例化
类中声明静态工厂方法
    public Animal() {
        super();
        System.out.println("无参Animal");
    }
    public static Animal getInstance(){
        System.out.println("静态工厂创建实例");
        return new Animal();
    }
<!--
        factory-method:使用对象静态工厂的方式创建对象
     -->
    <bean id="animal2" class="com.rong.entity.Animal" factory-method="getInstance"></bean>
C.使用实例工厂实例化
    <!-- 通过对象工厂创建对象
        1.创建工厂对象
        2.设置bean使用工厂对象的方法来创建
     -->
1 public class AnimalFactory {
2     public Animal getInstance(){
3         System.out.println("工厂方法调用");
4         return new Animal();
5     }
6 }
    <bean id="animalFactory" class="com.rong.entity.AnimalFactory"></bean>
    <bean id="animal3" class="com.rong.entity.Animal" factory-bean="animalFactory" factory-method="getInstance"></bean>
1     @Test
2     public void test4(){
3         Animal animal = context.getBean("animal3", Animal.class);
4         System.out.println(animal);
5     }
D.延时实例化——lazy-init
6.依赖注入(DI全称是Dependency Injection)
<!-- DI 依赖注入配置 即通过spring去做 构造方法或set方法给属性赋值工作 -->
A.构造方法注入(示例如上)
B.set方法注入
1)类中提供set方法
2)在spring主配置文件中通过property属性来设置(value和ref属性不能同时使用)
<!-- setter注入
        property  :调用setter方法设置属性值
        name:设置哪个属性赋值
        value:给该属性赋予什么值
        ref : 给引用类型属性赋值
    -->
1     <bean id="animal3" class="com.rong.entity.Animal" factory-bean="animalFactory" factory-method="getInstance">
2         <property name="age" value="60"></property>
3         <property name="type" value="www"></property>
4     </bean>
C.自动装配的方式
<!-- 自动装配 ,一般结合依赖注入使用 -->
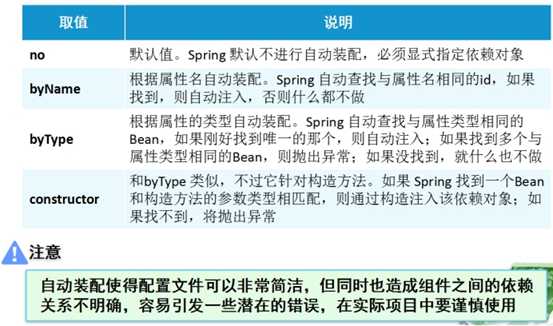
 1     <!--
 2         autowire:使用自动装配的方式,给当前bean的属性赋值
 3         byType:spring自动检索容器中有哪些bean,并且找到符合当前bean的属性的类型的bean出来,如果找到了
 4         则自动给该属性赋值
 5         byName:spring自动根据当前bean的属性的名称,从容器中查找与该属性名一致的bean,注入到该属性上
 6      -->
 7
 8     <!-- <bean id="favourite" class="com.web.entity.Favourite">
 9         <property name="sport" value="游泳"></property>
10     </bean> -->
11     <bean id="favourite2" class="com.web.entity.Favourite">
12         <property name="sport" value="打篮球"></property>
13     </bean>
14     <!-- <bean id="myAnimal" class="com.web.entity.Animal" autowire="byName"></bean> -->
15     <bean id="myAnimal2" class="com.web.entity.Animal" autowire="byType"></bean>
list、set、map、property的注入方式
 1 package com.web.entity;
 2
 3 import java.util.Iterator;
 4 import java.util.List;
 5 import java.util.Map;
 6 import java.util.Map.Entry;
 7 import java.util.Properties;
 8 import java.util.Set;
 9
10 public class MyBean {
11     private List<String> cities;
12     private Set<String> names;
13     private Map<String,Integer> map;
14     private Properties props;
15     public List<String> getCities() {
16         return cities;
17     }
18     public void setCities(List<String> cities) {
19         this.cities = cities;
20     }
21     public Set<String> getNames() {
22         return names;
23     }
24     public void setNames(Set<String> names) {
25         this.names = names;
26     }
27     public Map<String, Integer> getMap() {
28         return map;
29     }
30     public void setMap(Map<String, Integer> map) {
31         this.map = map;
32     }
33     public Properties getProps() {
34         return props;
35     }
36     public void setProps(Properties props) {
37         this.props = props;
38     }
39
40     public void show(){
41         System.out.println("list==========");
42         for (String string : cities) {
43             System.out.println(string);
44         }
45         System.out.println("set==========");
46         for (String name : names) {
47             System.out.println(name);
48         }
49         System.out.println("map==========");
50         Set<Entry<String, Integer>> entrySet = map.entrySet();
51         Iterator<Entry<String, Integer>> iterator = entrySet.iterator();
52         while(iterator.hasNext()){
53             Entry<String, Integer> entry = iterator.next();
54             String key = entry.getKey();
55             Integer value = entry.getValue();
56             System.out.println(key+":"+value);
57         }
58         System.out.println("property==========");
59         Set<Object> Set = props.keySet();
60         for (Object object : Set) {
61             String key=(String)object;
62             String value = props.getProperty(key);
63             System.out.println(key+":"+value);
64         }
65
66
67     }
68
69 }
    <bean id="myBean" class="com.web.entity.MyBean">
        <property name="cities">
            <list>
                <value>北京</value>
                <value>上海</value>
                <value>广州</value>
                <value>深圳</value>
            </list>
        </property>
        <property name="names">
            <set>
                <value>胡歌</value>
                <value>杨幂</value>
                <value>霍建华</value>
                <value>叶剑英</value>
            </set>
        </property>
        <property name="map">
            <map>
                <entry>
                    <key>
                        <value>Java</value>
                    </key>
                    <value>100</value>
                </entry>
                <entry>
                    <key>
                        <value>C++</value>
                    </key>
                    <value>98</value>
                </entry>
                <entry>
                    <key>
                        <value>Android</value>
                    </key>
                    <value>96</value>
                </entry>
            </map>
        </property>
        <!-- ref引用方式 -->
<!--         <property name="props" ref="dbProps">

        </property> -->
        <!-- 直接赋值方式 -->
        <property name="props">
            <props>
                <prop key="username">#{dbProps.username}</prop>
                <prop key="password">#{dbProps.password}</prop>
                <prop key="driver">com.mysql.jdbc.Driver</prop>
            </props>
        </property>
    </bean>
    <!-- 读取配置文件转成Properties对象
    id:唯一标识
    location:从哪里读取文件
    classpath:    通过类路径开始读取
    -->
    <util:properties id="dbProps" location="classpath:db.properties"></util:properties>
1 url=jdbc:mysql://localhost:3306/utf8?useUnicode=true&characterEncoding=utf-8
2 username=root
3 password=123123
4 driver=com.mysql.jdbc.Driver
标签:工作 scope inject coding singleton spring框架 cte ips c++
原文地址:http://www.cnblogs.com/57rongjielong/p/7827769.html