码迷,mamicode.com
首页 > 编程语言 > 详细

SpringBoot整合Mybatis实现增删改查的功能

时间:2018-05-16 10:47:27      阅读:192      评论:0      收藏:0      [点我收藏+]

标签:分享   利用   apache   false   navicat   开发   细节   uda   integer   

SpringBoot框架作为现在主流框架之一,好多框架都渐渐的移植到SpringBoot中来。前面我给大家介绍过redis,jpa等等的的整合,今天在这里给大家介绍一下Mybatis的整合过程。


SpringBoot+Mybatis一般有两种形式。一种是采用原生的xml模式,还有一种就是采用注解模式。今天我给大家介绍的就是后者,也就是注解模式。
1.首选需要在SpringBoot的启动类里面增加用来扫描Mapper接口的注解,用来扫描Mapper包下面的接口。
[java] view plain copy
 
  1. package com.joy;  
  2. import org.mybatis.spring.annotation.MapperScan;  
  3. import org.springframework.boot.SpringApplication;  
  4. import org.springframework.boot.autoconfigure.SpringBootApplication;  
  5. @SpringBootApplication  
  6. @MapperScan("com.joy.*")  
  7. public class App {  
  8.     public static void main(String[] args) {  
  9.         SpringApplication.run(App.class, args);  
  10.     }  
  11. }  
在这里我扫描的是项目的根目录,只要能扫描到的包含Mapper接口的范围就可以。如果大家知道Mapper接口的具体位置,建议大家可以精确一点。
2.在application.properties配置文件中添加数据库的支持
[html] view plain copy
 
  1. #DB Configuration:  
  2. spring.datasource.driverClassName = com.mysql.jdbc.Driver  
  3. spring.datasource.url = jdbc:mysql://localhost:3306/mybatis_db?useUnicode=true&characterEncoding=utf-8&useSSL=false  
  4. spring.datasource.username = root  
  5. spring.datasource.password = 220316  
这个关于数据库配置的代码其实很简单
第一个是数据库所用的驱动
第二个是数据库url地址,这里我连接的名字为mybatis_db数据库
第三第四是数据库连接的用户名和密码
3.pom.xml文件中添加相应的jar包
这里我就不一一介绍了,大家看一下demo就知道需要添加哪些内容了。
主要是SpringBoot相关的jar包,mybatis相关的jar包就ok了
[html] view plain copy
 
  1. <project xmlns="http://maven.apache.org/POM/4.0.0" xmlns:xsi="http://www.w3.org/2001/XMLSchema-instance"  
  2.     xsi:schemaLocation="http://maven.apache.org/POM/4.0.0 http://maven.apache.org/maven-v4_0_0.xsd">  
  3.     <modelVersion>4.0.0</modelVersion>  
  4.     <groupId>springboot-mybatis</groupId>  
  5.     <artifactId>com.joy</artifactId>  
  6.     <packaging>war</packaging>  
  7.     <version>0.0.1-SNAPSHOT</version>  
  8.     <name>com.joy Maven Webapp</name>  
  9.     <url>http://maven.apache.org</url>  
  10.     <parent>  
  11.         <groupId>org.springframework.boot</groupId>  
  12.         <artifactId>spring-boot-starter-parent</artifactId>  
  13.         <version>1.5.7.RELEASE</version>  
  14.     </parent>  
  15.     <properties>  
  16.         <java.version>1.8</java.version>  
  17.     </properties>  
  18.     <dependencies>  
  19.         <dependency>  
  20.             <groupId>org.springframework.boot</groupId>  
  21.             <artifactId>spring-boot-starter-web</artifactId>  
  22.         </dependency>  
  23.         <dependency>  
  24.             <groupId>javax.servlet</groupId>  
  25.             <artifactId>javax.servlet-api</artifactId>  
  26.         </dependency>  
  27.         <!-- https://mvnrepository.com/artifact/mysql/mysql-connector-java -->  
  28.         <dependency>  
  29.             <groupId>mysql</groupId>  
  30.             <artifactId>mysql-connector-java</artifactId>  
  31.         </dependency>  
  32.         <!-- https://mvnrepository.com/artifact/com.github.pagehelper/pagehelper-spring-boot-starter -->  
  33.         <dependency>  
  34.             <groupId>com.github.pagehelper</groupId>  
  35.             <artifactId>pagehelper</artifactId>  
  36.             <version>4.1.0</version>  
  37.         </dependency>  
  38.         <!-- https://mvnrepository.com/artifact/org.mybatis.spring.boot/mybatis-spring-boot-starter -->  
  39.         <dependency>  
  40.             <groupId>org.mybatis.spring.boot</groupId>  
  41.             <artifactId>mybatis-spring-boot-starter</artifactId>  
  42.             <version>1.2.2</version>  
  43.         </dependency>  
  44.   
  45.         <dependency>  
  46.             <groupId>junit</groupId>  
  47.             <artifactId>junit</artifactId>  
  48.             <scope>test</scope>  
  49.         </dependency>  
  50.     </dependencies>  
  51.     <build>  
  52.         <finalName>springboot-mybatis</finalName>  
  53.     </build>  
  54. </project>  
4.上面准备都完成了,我们就可以开始正式mybatis项目的开发了。这里需要先新建一个数据库映射的实体类,名字叫做UserEntity。
[java] view plain copy
 
  1. package com.joy.entity;  
  2. import java.util.Date;  
  3. public class UserEntity {  
  4.     private long userId;  
  5.     private String userCode;  
  6.     private String userName;  
  7.     private String nickName;  
  8.     private String userPwd;  
  9.     private Date createDate;  
  10.     private Date updateDate;  
  11.     public long getUserId() {  
  12.         return userId;  
  13.     }  
  14.     public void setUserId(long userId) {  
  15.         this.userId = userId;  
  16.     }  
  17.     public String getUserCode() {  
  18.         return userCode;  
  19.     }  
  20.     public void setUserCode(String userCode) {  
  21.         this.userCode = userCode;  
  22.     }  
  23.     public String getUserName() {  
  24.         return userName;  
  25.     }  
  26.     public void setUserName(String userName) {  
  27.         this.userName = userName;  
  28.     }  
  29.     public String getNickName() {  
  30.         return nickName;  
  31.     }  
  32.     public void setNickName(String nickName) {  
  33.         this.nickName = nickName;  
  34.     }  
  35.     public String getUserPwd() {  
  36.         return userPwd;  
  37.     }  
  38.     public void setUserPwd(String userPwd) {  
  39.         this.userPwd = userPwd;  
  40.     }  
  41.     public Date getCreateDate() {  
  42.         return createDate;  
  43.     }  
  44.     public void setCreateDate(Date createDate) {  
  45.         this.createDate = createDate;  
  46.     }  
  47.     public Date getUpdateDate() {  
  48.         return updateDate;  
  49.     }  
  50.     public void setUpdateDate(Date updateDate) {  
  51.         this.updateDate = updateDate;  
  52.     }  
  53. }  
5.因为mybatis和jpa不一样,不会通过映射实体类反向生成数据库的表和字段。所以就得我们自己来新建一个表和字段。这里我新建一个user表。
技术分享图片技术分享图片
我们可以利用navicat来手动的新建这张表并加相应的数据,也可以通过sql命令来实现,sql命令如下所示:
[sql] view plain copy
 
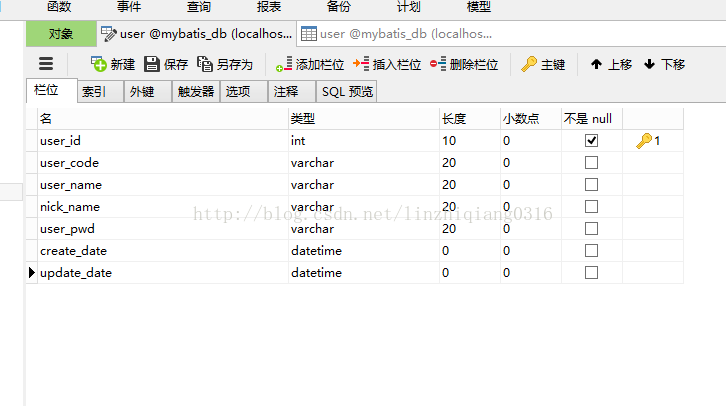
  1. SET FOREIGN_KEY_CHECKS=0;  
  2. -- ----------------------------  
  3. -- Table structure for user  
  4. -- ----------------------------  
  5. DROP TABLE IF EXISTS `user`;  
  6. CREATE TABLE `user` (  
  7.   `user_id` int(10) NOT NULL AUTO_INCREMENT,  
  8.   `user_code` varchar(20) DEFAULT NULL,  
  9.   `user_name` varchar(20) DEFAULT NULL,  
  10.   `nick_name` varchar(20) DEFAULT NULL,  
  11.   `user_pwd` varchar(20) DEFAULT NULL,  
  12.   `create_date` datetime DEFAULT NULL,  
  13.   `update_date` datetime DEFAULT NULL,  
  14.   PRIMARY KEY (`user_id`)  
  15. ) ENGINE=InnoDB AUTO_INCREMENT=3 DEFAULT CHARSET=utf8;  
  16. -- ----------------------------  
  17. -- Records of user  
  18. -- ----------------------------  
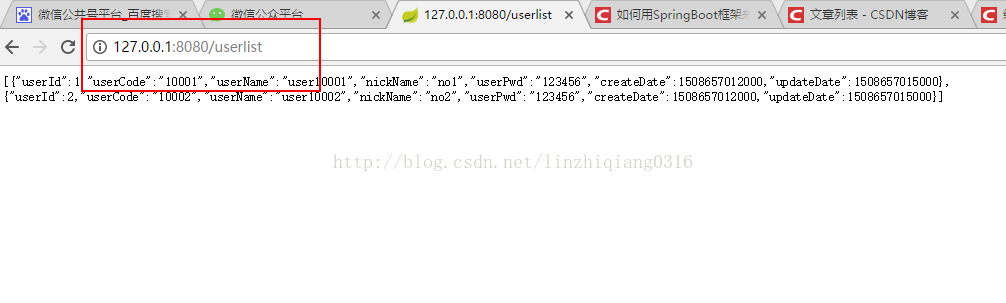
  19. INSERT INTO `user` VALUES (‘1‘, ‘10001‘, ‘user10001‘, ‘no1‘, ‘123456‘, ‘2017-10-22 15:23:32‘, ‘2017-10-22 15:23:35‘);  
  20. INSERT INTO `user` VALUES (‘2‘, ‘10002‘, ‘user10002‘, ‘no2‘, ‘123456‘, ‘2017-10-22 15:23:32‘, ‘2017-10-22 15:23:35‘);  
6.接下来就是最重要的编写Mapper接口,我们这里采用通过注解来实现数据库的增删改查功能。
增删改查分别对应的注解为@Insert,@Delete,@Update,@Select
关于注解的使用细节,我这里举select的例子来给大家解释一下。
[java] view plain copy
 
  1. @Select("select * from user")  
  2.     @Results({  
  3.             @Result(property = "userId", column = "user_id"),  
  4.             @Result(property = "nickName", column = "nick_name"),  
  5.             @Result(property = "userCode", column = "user_code"),   
  6.             @Result(property = "userName", column = "user_name"),  
  7.             @Result(property = "userPwd", column = "user_pwd"),  
  8.             @Result(property = "createDate", column = "create_date"),  
  9.             @Result(property = "updateDate", column = "update_date") })  
  10.     public List<UserEntity> queryList();  
上面是查询数据库user表的所有数据,然后会自动的转为list集合。其中column里面的字段名称必须和数据库里面表的字段一模一样,property里面的字段属性必须和UserEntity这个实体类对应的字段一模一样。
[java] view plain copy
 
  1. @Select("SELECT * FROM USER WHERE user_id = #{userId}")  
  2.     @Results({  
  3.             @Result(property = "userId", column = "user_id"),  
  4.             @Result(property = "nickName", column = "nick_name"),  
  5.             @Result(property = "userCode", column = "user_code"),  
  6.             @Result(property = "userName", column = "user_name"),  
  7.             @Result(property = "userPwd", column = "user_pwd"),  
  8.             @Result(property = "createDate", column = "create_date"),  
  9.             @Result(property = "updateDate", column = "update_date") })  
  10.     UserEntity findById(long userId);  
上面这种形式是通过传入一个字段来查询数据。这里需要注意的是#{}里面的字段内容必须和findById里面传入的字段一模一样。除了#{}以外的字段都必须满足sql的查询格式。这里大家不要误解了,findById可以随便定义和jpa中是不一样的。
下面将给出增删改查的所有代码,如下所示:
[java] view plain copy
 
  1. package com.joy.dao;  
  2. import java.util.List;  
  3. import java.util.Map;  
  4. import org.apache.ibatis.annotations.*;  
  5. import com.joy.entity.UserEntity;  
  6. public interface UserMapper {  
  7.     @Select("select * from user")  
  8.     @Results({  
  9.             @Result(property = "userId", column = "user_id"),  
  10.             @Result(property = "nickName", column = "nick_name"),  
  11.             @Result(property = "userCode", column = "user_code"),   
  12.             @Result(property = "userName", column = "user_name"),  
  13.             @Result(property = "userPwd", column = "user_pwd"),  
  14.             @Result(property = "createDate", column = "create_date"),  
  15.             @Result(property = "updateDate", column = "update_date") })  
  16.     public List<UserEntity> queryList();  
  17.     @Select("SELECT * FROM USER WHERE user_id = #{userId}")  
  18.     @Results({  
  19.             @Result(property = "userId", column = "user_id"),  
  20.             @Result(property = "nickName", column = "nick_name"),  
  21.             @Result(property = "userCode", column = "user_code"),  
  22.             @Result(property = "userName", column = "user_name"),  
  23.             @Result(property = "userPwd", column = "user_pwd"),  
  24.             @Result(property = "createDate", column = "create_date"),  
  25.             @Result(property = "updateDate", column = "update_date") })  
  26.     UserEntity findById(long userId);  
  27.   
  28.     @Insert("INSERT INTO USER(nick_name, user_code) VALUES(#{nickName}, #{userCode})")  
  29.     int insertParam(@Param("nickName") String nickName, @Param("userCode") String userCode);  
  30.   
  31.     @Insert("INSERT INTO USER(nick_name, user_code) VALUES(#{nickName,jdbcType=VARCHAR}, #{userCode,jdbcType=INTEGER})")  
  32.     int insertByMap(Map<String, Object> map);  
  33.   
  34.     @Insert("insert into user(nick_name,user_code,user_name,user_pwd,create_date,update_date) values(#{nickName},#{userCode},#{userName},#{userPwd},#{createDate},#{updateDate})")  
  35.     public int insertEntity(UserEntity entity);  
  36.   
  37.     @Update("UPDATE user SET nick_name=#{nickName} WHERE user_id=#{userId}")  
  38.     int updateEntity(UserEntity user);  
  39.   
  40.     @Delete("DELETE FROM user WHERE user_id =#{userId}")  
  41.     int delete(Long userId);  
  42.   
  43.     @Delete("DELETE FROM user WHERE user_id =#{userId}")  
  44.     int deleteEntity(UserEntity entity);  
  45. }  
7.最后就是编写相应的service和controller类来调用这些增删改查的接口。
service类信息:
[java] view plain copy
 
  1. package com.joy.service;  
  2. import java.util.Date;  
  3. import java.util.HashMap;  
  4. import java.util.List;  
  5. import java.util.Map;  
  6. import org.springframework.beans.factory.annotation.Autowired;  
  7. import org.springframework.stereotype.Service;  
  8. import com.joy.dao.UserMapper;  
  9. import com.joy.entity.UserEntity;  
  10. @Service  
  11. public class UserService {  
  12.     @Autowired(required = false)  
  13.     private UserMapper mapper;  
  14.       
  15.     public List<UserEntity> queryList(){  
  16.         List<UserEntity> userList=mapper.queryList();  
  17.         return userList;  
  18.     }  
  19.   
  20.     public UserEntity findById(long userId){  
  21.         System.out.println("userId:"+userId);  
  22.         return mapper.findById(userId);  
  23.     }  
  24.   
  25.     public int insertEntity() {  
  26.         UserEntity entity=new UserEntity();  
  27.         entity.setUserName("lisi");  
  28.         entity.setUserCode("lisi"+new Date());  
  29.         entity.setNickName("郭靖");  
  30.         entity.setUserPwd("123");  
  31.         entity.setCreateDate(new Date());  
  32.         entity.setUpdateDate(new Date());  
  33.         return mapper.insertEntity(entity);  
  34.     }  
  35.   
  36.     public int insertParam() {  
  37.         return mapper.insertParam("linzhiqiang","lzq");  
  38.     }  
  39.   
  40.     public int insertByMap() {  
  41.         Map<String, Object> map=new HashMap<String, Object>();  
  42.         map.put("nickName","zhaotong");  
  43.         map.put("userCode","zt");  
  44.         return mapper.insertByMap(map);  
  45.     }  
  46.   
  47.     public int updateEntity() {  
  48.         UserEntity entity=new UserEntity();  
  49.         entity.setUserId(1);  
  50.         entity.setNickName("郭靖");  
  51.         return mapper.updateEntity(entity);  
  52.     }  
  53.   
  54.     public int deleteEntity() {  
  55.         UserEntity entity=new UserEntity();  
  56.         entity.setUserId(11);  
  57.         return mapper.deleteEntity(entity);  
  58.     }  
  59. }  
controller类信息:
[java] view plain copy
 
  1. package com.joy.controller;  
  2. import java.util.List;  
  3. import org.springframework.beans.factory.annotation.Autowired;  
  4. import org.springframework.web.bind.annotation.RequestMapping;  
  5. import org.springframework.web.bind.annotation.RestController;  
  6. import com.github.pagehelper.PageHelper;  
  7. import com.joy.entity.UserEntity;  
  8. import com.joy.service.UserService;  
  9. @RestController  
  10. public class UserController {  
  11.     @Autowired  
  12.     private UserService userService;  
  13.     @RequestMapping("/userlist")  
  14.     public List<UserEntity> queryList(){  
  15.         PageHelper.startPage(1, 2);  
  16.         return userService.queryList();  
  17.     }  
  18.   
  19.     @RequestMapping("/queryUser")  
  20.     public UserEntity queryUserEntity(long userId){  
  21.         UserEntity userEntity=userService.findById(userId);  
  22.         return userEntity;  
  23.     }  
  24.   
  25.     @RequestMapping("/insert")  
  26.     public int insertEntity() {  
  27.         return userService.insertEntity();  
  28.     }  
  29.   
  30.     @RequestMapping("/insertParam")  
  31.     public int insertParam() {  
  32.         return userService.insertParam();  
  33.     }  
  34.   
  35.     @RequestMapping("/insertByMap")  
  36.     public int insertByMap() {  
  37.         return userService.insertByMap();  
  38.     }  
  39.   
  40.     @RequestMapping("/updateEntity")  
  41.     public int updateEntity() {  
  42.         return userService.updateEntity();  
  43.     }  
  44.   
  45.     @RequestMapping("/deleteEntity")  
  46.     public int deleteEntity() {  
  47.         return userService.deleteEntity();  
  48.     }  
  49. }  
8.执行结果如下所示:
技术分享图片技术分享图片
8.如果想要将执行的sql打印在控制台上面,可以在application.properties添加如下的配置信息。
logging.level.com.joy=DEBUG
这里需要特别注意的是:level后面是你项目包的地址不要写的和我一样。
到这里关于SpringBoot整合Mybatis项目就介绍完毕,如果大家想要源代码的话可以去我的GitHub地址下载。
如果按照博客上面写的步骤操作还有问题,可以观看我为大家录制的视频讲解。因为本人不是专业的讲师,所以可能讲的不是特别细致。有什么建议都可以提出来,谢谢大家。视频地址:https://pan.baidu.com/s/1qYcFDow点击打开链接
如果大家对文章有什么问题或者疑意之类的,可以加我订阅号在上面留言,订阅号上面我会定期更新最新博客。如果嫌麻烦可以直接加我wechat:lzqcode
技术分享图片

SpringBoot整合Mybatis实现增删改查的功能

标签:分享   利用   apache   false   navicat   开发   细节   uda   integer   

原文地址:https://www.cnblogs.com/nierzhao/p/9044429.html

(0)
(0)
   
举报
评论 一句话评论(0
登录后才能评论!
© 2014 mamicode.com 版权所有  联系我们:gaon5@hotmail.com
迷上了代码!