标签:自己 yellow count otto tco har prot textview 自己的
app下的res目录,点击layout中的activity_main.xml,修改其中的android:text="Hello World!"<?xml version="1.0" encoding="utf-8"?>
<android.support.constraint.ConstraintLayout xmlns:android="http://schemas.android.com/apk/res/android"
xmlns:app="http://schemas.android.com/apk/res-auto"
xmlns:tools="http://schemas.android.com/tools"
android:layout_width="match_parent"
android:layout_height="match_parent"
tools:context=".MainActivity">
<TextView
android:layout_width="wrap_content"
android:layout_height="wrap_content"
android:text="Hello World!20155329 20165330 20165331"
app:layout_constraintBottom_toBottomOf="parent"
app:layout_constraintLeft_toLeftOf="parent"
app:layout_constraintRight_toRightOf="parent"
app:layout_constraintTop_toTopOf="parent" />
</android.support.constraint.ConstraintLayout>
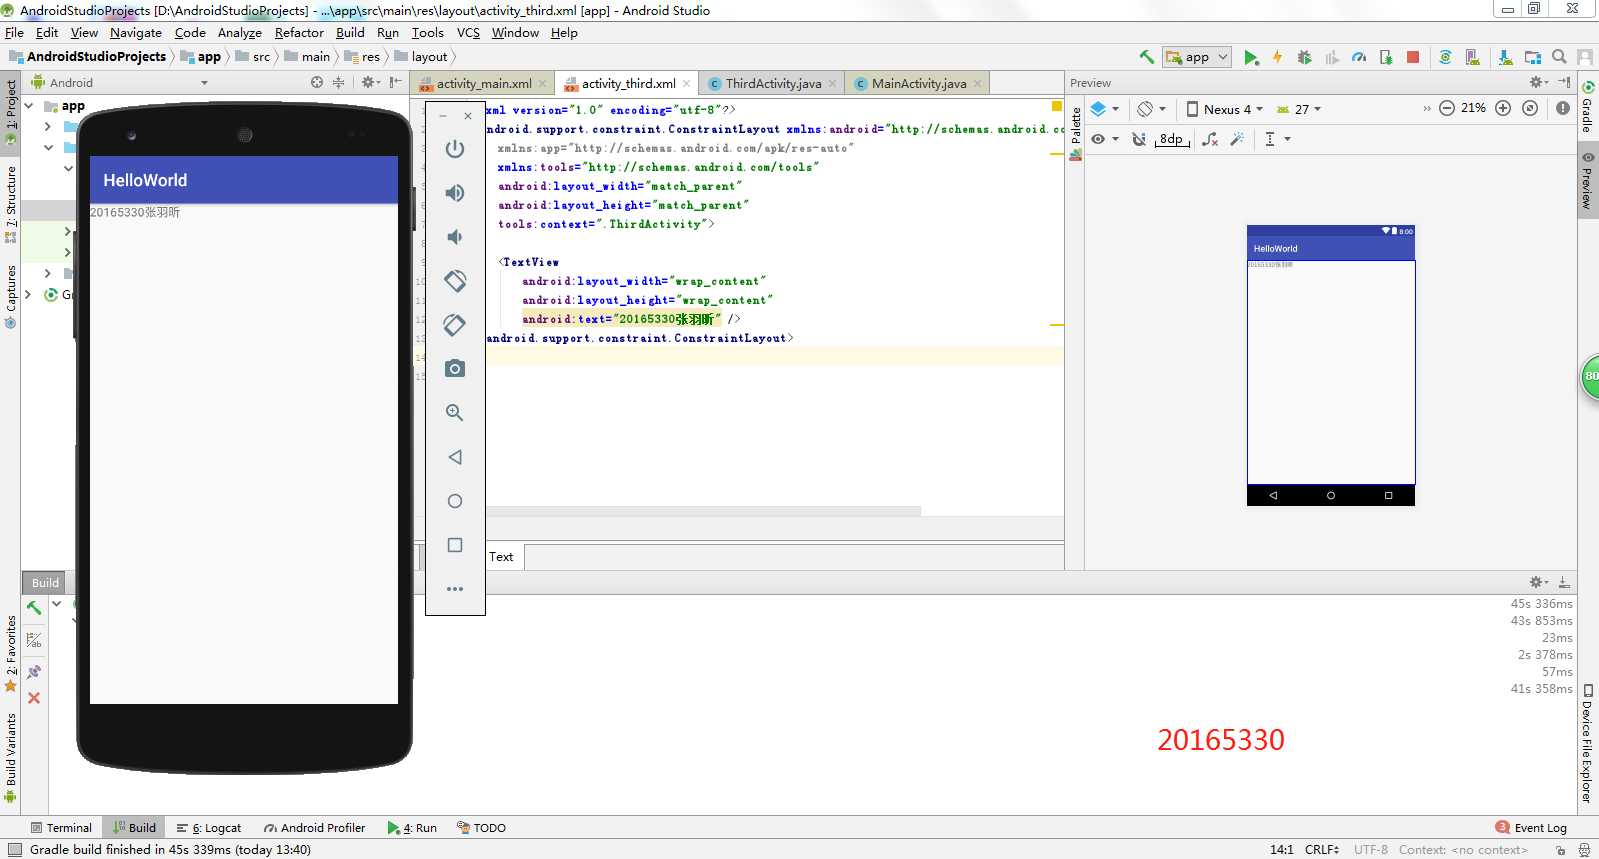
ThirdActivityMainActivity中的代码main中新建thirdactivity_main.xml并修改android:text="Hello World!"内容package zyx.is.besti.edu.cn.helloworld;
import android.support.v7.app.AppCompatActivity;
import android.os.Bundle;
import android.content.Intent;
public class MainActivity extends AppCompatActivity {
@Override
protected void onCreate(Bundle savedInstanceState) {
super.onCreate(savedInstanceState);
setContentView(R.layout.activity_main);
Intent intent = new Intent(this,ThirdActivity.class);
startActivity(intent);
}
}<?xml version="1.0" encoding="utf-8"?>
<android.support.constraint.ConstraintLayout xmlns:android="http://schemas.android.com/apk/res/android"
xmlns:app="http://schemas.android.com/apk/res-auto"
xmlns:tools="http://schemas.android.com/tools"
android:layout_width="match_parent"
android:layout_height="match_parent"
tools:context=".ThirdActivity">
<TextView
android:layout_width="wrap_content"
android:layout_height="wrap_content"
android:text="20165330张羽昕" />
</android.support.constraint.ConstraintLayout>
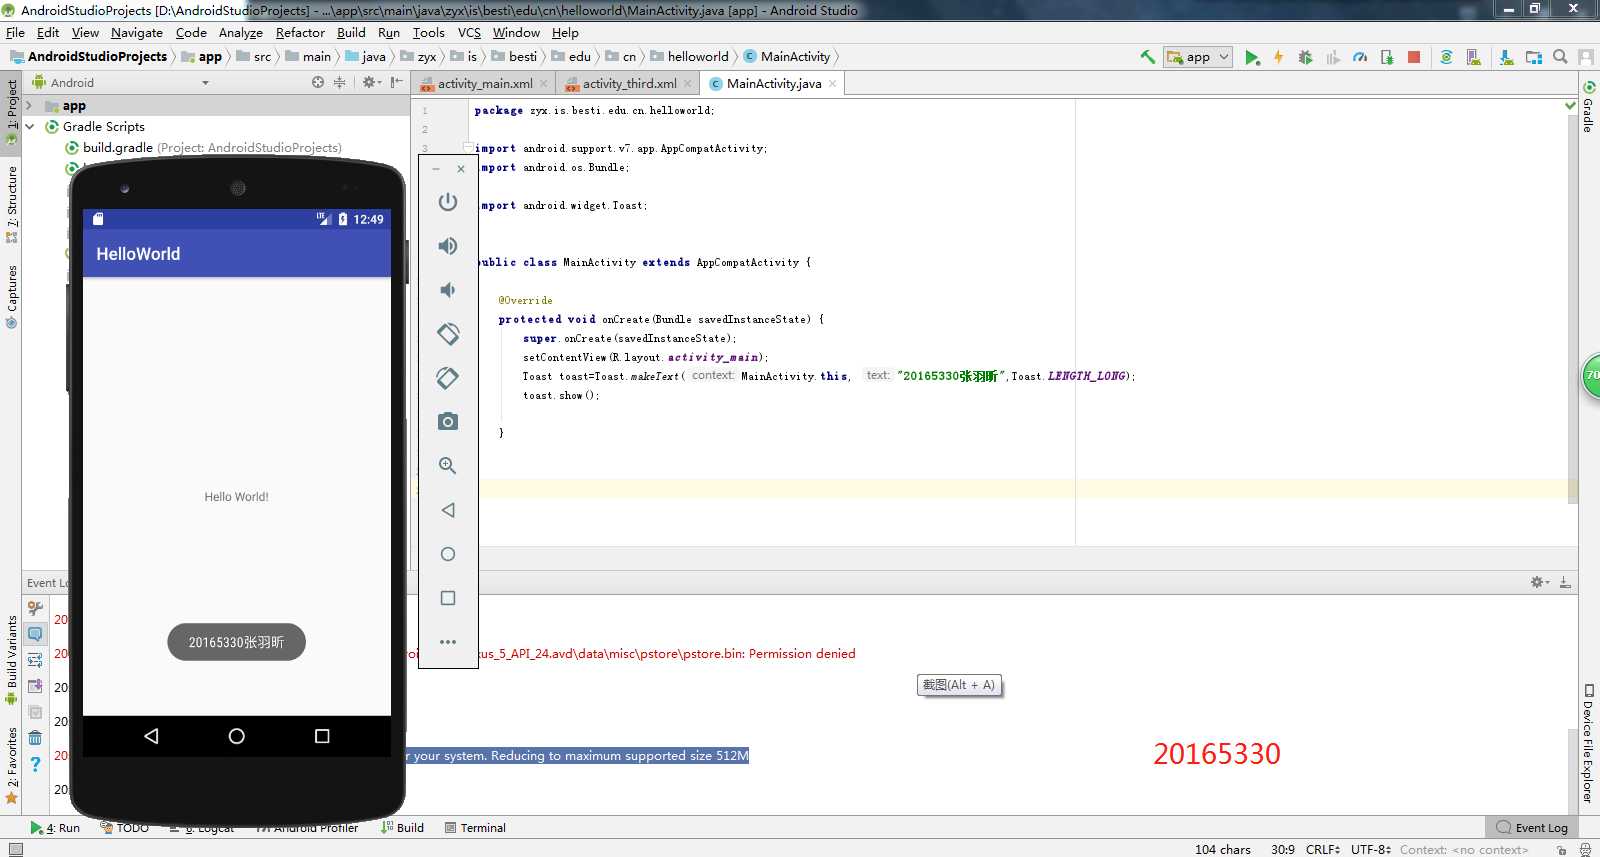
package zyx.is.besti.edu.cn.helloworld;

import android.support.v7.app.AppCompatActivity;
import android.os.Bundle;

import android.widget.Toast;


public class MainActivity extends AppCompatActivity {

    @Override
    protected void onCreate(Bundle savedInstanceState) {
        super.onCreate(savedInstanceState);
        setContentView(R.layout.activity_main);
        Toast toast=Toast.makeText(MainActivity.this, "20165330张羽昕",Toast.LENGTH_LONG);
        toast.show();

    }

}
<RelativeLayout
    xmlns:android="http://schemas.android.com/apk/res/android"
    xmlns:app="http://schemas.android.com/apk/res-auto"
    xmlns:tools="http://schemas.android.com/tools"
    android:layout_width="match_parent"
    android:layout_height="match_parent"
    android:paddingLeft="2dp"
    android:paddingRight="2dp">
<Button
    android:id="@+id/cancelButton"
    android:layout_width="wrap_content"
    android:layout_height="wrap_content"
    android:text="20165330"
    android:layout_marginTop="70dp"
    android:layout_alignParentTop="true"
    android:layout_centerHorizontal="true" />
<Button
android:id="@+id/saveButton"
android:layout_width="wrap_content"
android:layout_height="wrap_content"
android:text="张羽昕"
android:layout_below="@+id/cancelButton"
android:layout_alignLeft="@+id/cancelButton"
android:layout_alignStart="@+id/cancelButton"
android:layout_marginTop="23dp" />
<ImageView
android:layout_width="150dp"
android:layout_height="150dp"
android:layout_marginTop="45dp"
android:padding="4dp"
android:src="@android:drawable/ic_dialog_email"
android:id="@+id/imageView"
android:layout_below="@+id/saveButton"
android:layout_centerHorizontal="true" />
<LinearLayout
android:id="@+id/filter_button_container"
android:layout_width="match_parent"
android:layout_height="wrap_content"
android:layout_alignParentBottom="true"
android:gravity="center|bottom"
android:background="@android:color/white"
android:orientation="horizontal" >
<Button
    android:id="@+id/filterButton"
    android:layout_width="wrap_content"
    android:layout_height="fill_parent"
    android:text="Filter" />
<Button
    android:id="@+id/shareButton"
    android:layout_width="wrap_content"
    android:layout_height="fill_parent"
    android:text="Share" />
<Button
    android:id="@+id/deleteButton"
    android:layout_width="wrap_content"
    android:layout_height="fill_parent"
    android:text="Delete" />
</LinearLayout>

     <ImageButton
        android:id="@+id/imageButton"
        android:layout_width="wrap_content"
        android:layout_height="wrap_content"
        android:layout_alignParentBottom="true"
        android:layout_centerHorizontal="true"
        android:layout_marginBottom="160dp"
        app:srcCompat="@mipmap/ic_launcher" />
</RelativeLayout>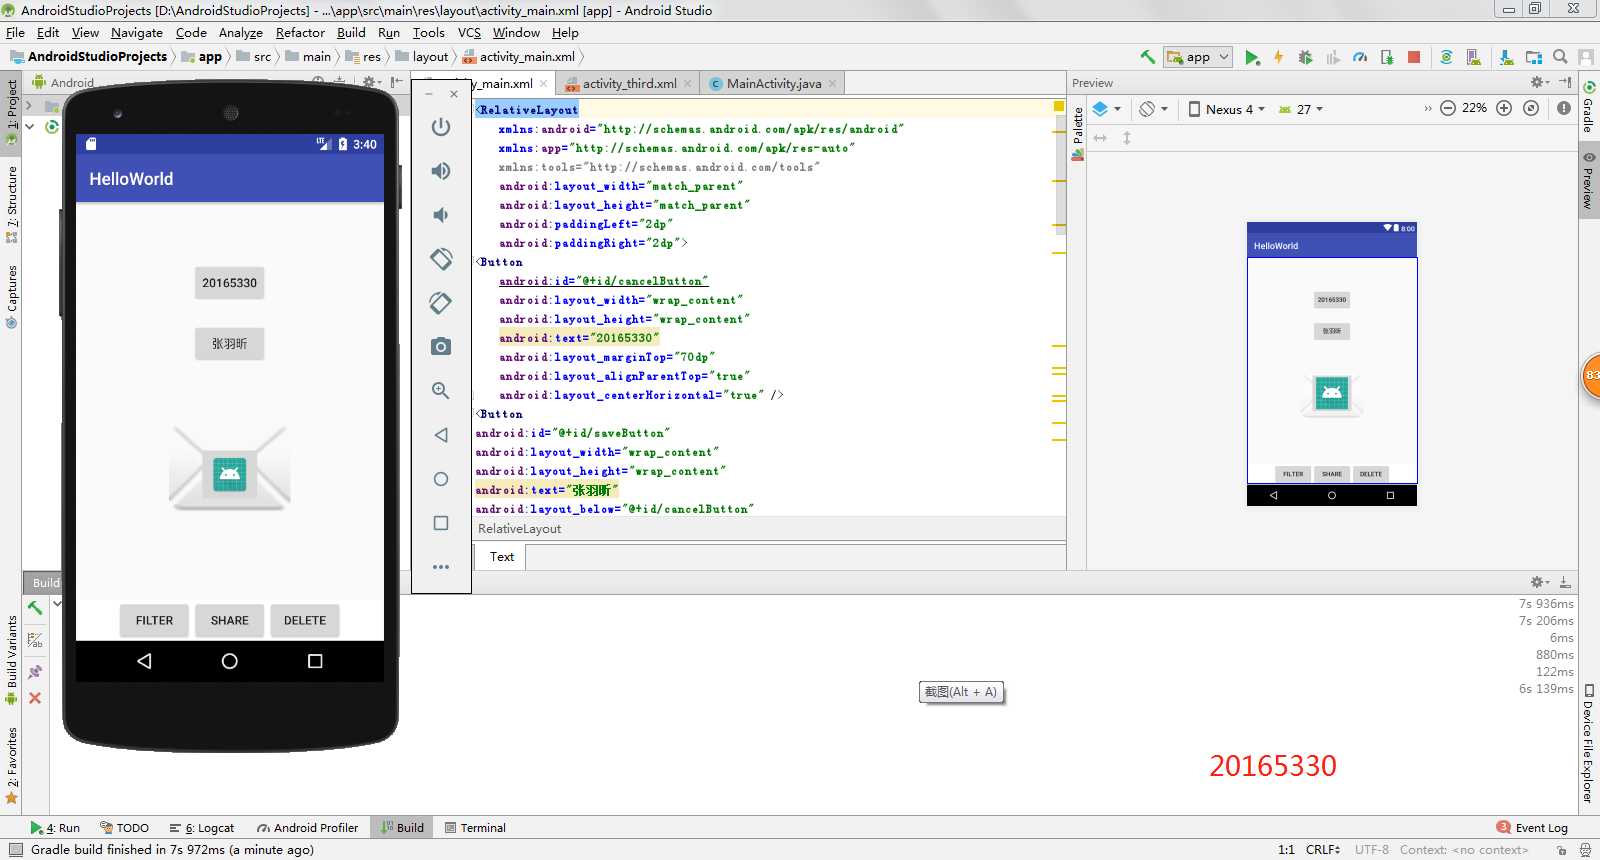
package zyx.is.besti.edu.cn.helloworld;

import android.app.Activity;

import android.graphics.Color;

import android.os.Bundle;

import android.view.Menu;

import android.view.View;


public class MainActivity extends Activity {


    int counter = 0;

    int[] colors = { Color.BLACK, Color.BLUE, Color.CYAN,

            Color.DKGRAY, Color.GRAY, Color.GREEN, Color.LTGRAY,

            Color.MAGENTA, Color.RED, Color.WHITE, Color.YELLOW };

    @Override

    protected void onCreate(Bundle savedInstanceState) {

        super.onCreate(savedInstanceState);

        setContentView(R.layout.activity_main);

    }

    @Override

    public boolean onCreateOptionsMenu(Menu menu) {

// Inflate the menu; this adds items to the action bar if it

// is present.

        getMenuInflater().inflate(R.menu.menu_main, menu);

        return true;

    }

    public void changeColor(View view) {

        if (counter == colors.length) {

            counter = 0;

        }

        view.setBackgroundColor(colors[counter++]);

    }

}<RelativeLayout xmlns:android="http://schemas.android.com/apk/res/android"
xmlns:tools="http://schemas.android.com/tools"
android:layout_width="match_parent"
android:layout_height="match_parent"
android:paddingBottom="20dp"
android:paddingLeft="20dp"
android:paddingRight="20dp"
tools:context=".MainActivity">
<AnalogClock
android:id="@+id/analogClock1"
android:layout_width="wrap_content"
android:layout_height="wrap_content"
android:layout_alignParentTop="true"
android:layout_centerHorizontal="true"
android:layout_marginTop="90dp"
android:onClick="changeColor" />
</RelativeLayout>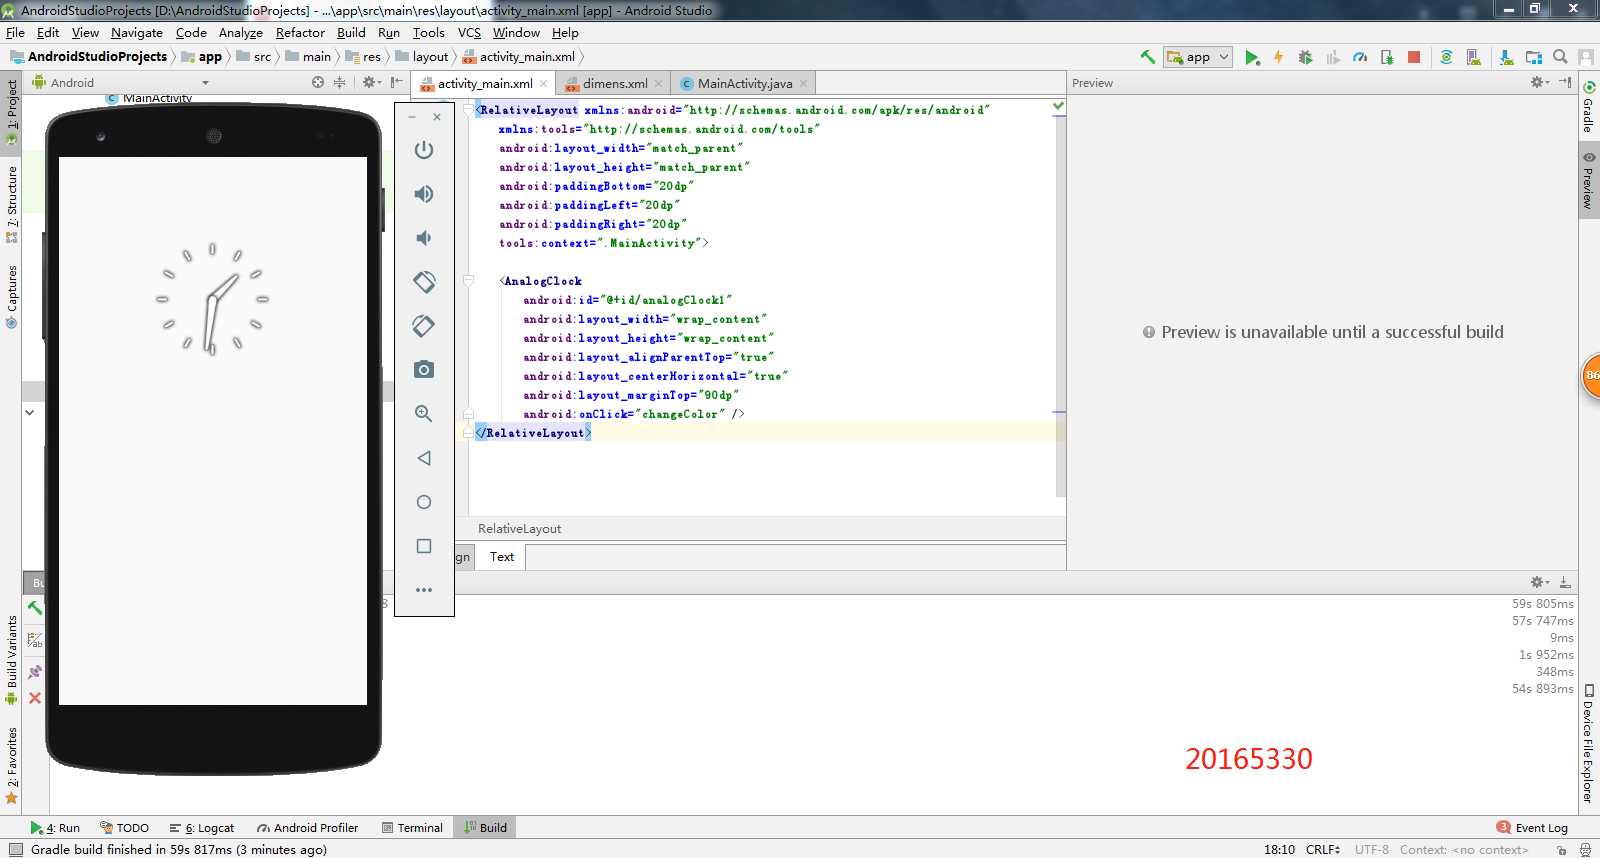
在运行Android Studio时,发现创建的java程序有红J标识,非C标识
解决办法:在网上找了很多办法,参考Android Studio解决未识别Java文件(出现红J)问题,在修改后并重启电脑再打开,发现成功解决
Toast的makeText()方法报错
解决办法:参考android Toast大全(五种情形)建立属于你自己的Toast,最终解决方法是在主函数里利用事件处理器,设置了一个按钮来调用这个提示。
2017-2018-2 20165330 实验四《Android程序设计》实验报告
标签:自己 yellow count otto tco har prot textview 自己的
原文地址:https://www.cnblogs.com/besty-zyx/p/9060556.html