标签:ip地址 network clu 分享 sga 版本 erp tin ati
测试环境:
svc: nginx
deployment: nginx-web-de1 nginx-web-de2
gateway: nginx-gateway
Virtualservice: nginx-virtual
DestinationRule: nginx
一、先可以访问,正常工作(访问gateway的时候能够跳转到nginx的POD)
1.创建svc和deployment,一个svc引用两个deployment,规则在virtualservice配置,比如v1百分之20,v2百分之80,或者根据cookie、user、ip等访问v1或者v2
apiVersion: v1
kind: Service
metadata:
name: nginx
labels:
app: nginx
spec:
ports:
- port: 80
name: http
selector:
app: nginx-web-de
---
apiVersion: extensions/v1beta1
kind: Deployment
metadata:
name: nginx-web-de1
spec:
replicas: 1
template:
metadata:
labels:
app: nginx-web-de
version: v1
spec:
containers:
- name: nginx
image: nginx:v1
imagePullPolicy: IfNotPresent
ports:
- containerPort: 80
---
apiVersion: extensions/v1beta1
kind: Deployment
metadata:
name: nginx-web-de2
spec:
replicas: 1
template:
metadata:
labels:
app: nginx-web-de
version: v2
spec:
containers:
- name: nginx
image: nginx:v2
imagePullPolicy: IfNotPresent
ports:
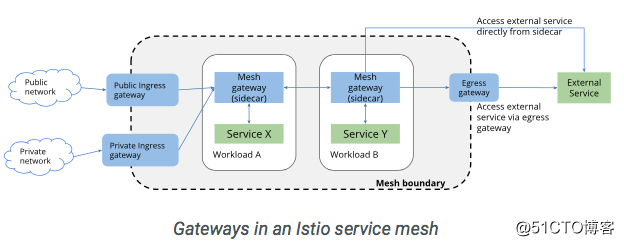
- containerPort: 802.创建的gateway是通过api到etcd中,然后istio-ingressgateway的实例获取,这个就相当于treafic或者nginx-ingress,然后直接访问istio-ingressgateway
apiVersion: networking.istio.io/v1alpha3
kind: Gateway
metadata:
name: nginx-gateway
spec:
selector:
istio: ingressgateway # use istio default controller
servers:
- port:
number: 80
name: http
protocol: HTTP
hosts:
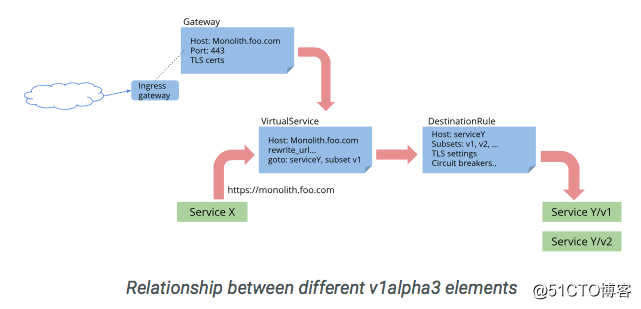
- "*"2.创建virtualservice,绑定到gateway,可以想像成nginx的虚拟主机,访问的ip地址想象成istio-gateway
apiVersion: networking.istio.io/v1alpha3
kind: VirtualService
metadata:
  name: nginx-virtual
spec:
  hosts:
  - "*"
  gateways:
  - nginx-gateway
  http:
  - match:
    - uri:
        exact: /nginx/
    route:
    - destination:
        host: nginx.default.svc.cluster.local
        port:
          number: 80
3.修改ingressgateway的访问吧方式
kubectl edit svc/istio-ingressgateway -n istio-system 改成NodePort
curl 192.168.99.100:31380/nginx/ 这样的话就是nginx-web-de1和nginx-web-de2 负载均衡,一次111一次222
docker镜像就是简单的 创建 nginx/index.html目录,然后v1是"111",v2是"222",
----------------------------------------------------PS:功能实现只是能够访问-------------------------------------------------------------------------
我学习istio的主要要求就是 A/B test或者金丝雀发布
(1)金丝雀:利用分流 ,比如新上v2之后,我只把百分之5的流量给v2,其余还是访问v1,根据数据分析,用户反馈在加大流量访问
(2)AB 根据cookie、ip、user等引流,访问定义的版本
二、利用istio把v1百分之20 v2百分之80
1.添加DestinationRule
iapiVersion: networking.istio.io/v1alpha3
kind: DestinationRule
metadata:
name: nginx
spec:
host: nginx.default.svc.cluster.local
subsets:
apiVersion: networking.istio.io/v1alpha3
kind: Gateway
metadata:
name: nginx-gateway
spec:
selector:
istio: ingressgateway # use istio default controller
servers:apiVersion: networking.istio.io/v1alpha3
kind: VirtualService
metadata:
name: nginx-virtual
spec:
hosts:
apiVersion: networking.istio.io/v1alpha3
kind: VirtualService
metadata:
name: nginx-virtual
spec:
hosts:
3.更改replace的配置
istioctl replace -f nginxgateway.yaml
4.再次访问的时候就是十次只有两次到v1,virtualserver的规则可以自己随便修改,证明配置是否生效
标签:ip地址 network clu 分享 sga 版本 erp tin ati
原文地址:http://blog.51cto.com/11578535/2147143