标签:技术 payment ring 支持 bean 对比 red etc 去掉
引用增强,是一个比较特殊的增强,不同于其他方法级别的增强。
引用增强可以实现:一个Java类,没有实现A接口,在不修改Java类的的情况下,使其具备A接口的功能。
先看看背景,我们有个Love接口:
package com.stuPayment.aopTest;

public interface Love {
    public void sayLove();
}
还有一个Greeting接口和我们的GreetingImpl实现类,这两个是我们的目标接口和目标类,GreetingImpl是我们要加强的目标类。:
package com.stuPayment.aopTest;

public interface Greeting {
    public void sayHello(String name);
    public int saySth();
}
package com.stuPayment.aopTest;

import org.springframework.stereotype.Component;

@Component
public class GreetingImpl implements Greeting {
    @Override
    public void sayHello(String name) {
        // TODO Auto-generated method stub
        System.out.println("hello, " + name);
    }

    @Override
    public int saySth() {
        // TODO Auto-generated method stub
        System.out.println("this is say sth");
        return 213;
    }

}
先看看不用@DeclareParents注解的实现方法:之前的博客中有介绍过这个(之前的随笔“梳理一下我理解的AOP“中有介绍,这里简单说一下”)
比如说我要实现接口Love,类Greeting是没有实现这个接口的,我想利用引用加强让Greeeting实现它,并可以调用Love接口的方法。
首先我需要一个引用加强类:
@Component
public class LoveAdvice extends DelegatingIntroductionInterceptor implements Love () {
  .......    要重写的代码还有实现Love接口的代码
}
继承了这个很长的类之后,这个类就变成了引入加强的advice类。
然后配置文件:
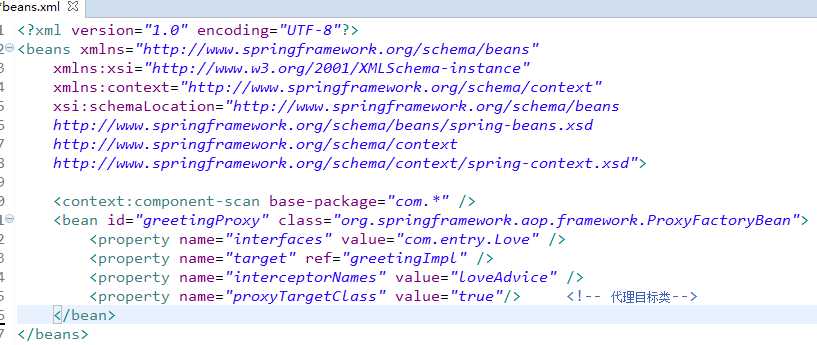
然后在测试方法中就可以:
ApplicationContext context = new ClassPathXmlApplicationContext(beans.xml);
GreetingImpl greetingImpl = (GreetingImpl)context.getBean("greetingProxy");

Love love = (Love)greetingImpl;
love.sayLove();
GreetingImpl没有实现Love,但这里我们却可以把它强行转换成Love接口并调用相关的方法。也就是引入增强成功。
然后看我们的@DeclareParents注解的实现方法,这里我是在SpringBoot的环境下。
首先,我们要写个Love接口的实现类:
package com.stuPayment.aopTest;

public class LoveImpl implements Love {
    @Override
    public void sayLove() {
        // TODO Auto-generated method stub
        System.out.println("##################### I LOVE ###################");
        System.out.println("#############            U         #############");
        System.out.println("################################################");
    }
}
然后是引入增强的Aspect类:
package com.stuPayment.aopTest.advice;

import org.aspectj.lang.annotation.Aspect;
import org.aspectj.lang.annotation.DeclareParents;
import org.springframework.stereotype.Component;

import com.stuPayment.aopTest.Love;
import com.stuPayment.aopTest.LoveImpl;

@Component
@Aspect
public class IntroductionAdviceAspect {

    @DeclareParents(value = "* com.stuPayment.aopTest.Greeting.*(..)", defaultImpl = LoveImpl.class)
    public Love love;

}
跟其他Aspect一样,这个类也要@Componemt注解和@Aspect注解。
然后看看@DeclareParents,这里的value和其他的@Before注解的pointcut一样(好像在@DeclareParents只能用value……),然后后面的表达式就类似我们的Pointcut表达式,我这里写的是之前在execution(....)的那些,只是把execution去掉了。这里我这个表达式的意思,就是匹配所有实现了所有Greeting接口的类。
然后这个defaultImpl写默认的Love接口实现类,就你要找个实现了Love的接口的类写在这。
注解下面写你要加强的那个接口,也就是你要目标类本来没有实现现在又要他实现的那个接口。
然后看我们的测试类:
package com.stuPayment.aopTest;

import org.junit.Test;
import org.junit.runner.RunWith;
import org.springframework.beans.factory.annotation.Autowired;
import org.springframework.boot.test.context.SpringBootTest;
import org.springframework.test.context.ContextConfiguration;
import org.springframework.test.context.junit4.SpringRunner;

@RunWith(SpringRunner.class)    // SpringJUnit支持,由此引入Spring-Test框架支持!

@SpringBootTest             //提供spring环境
public class Test2 {

    @Autowired
    private Greeting greeting;

    @Test
    public void demoIntroductionAdvice() {
        Love love = (Love)greeting;
        love.sayLove();
        greeting.sayHello("Ben");
    }

}
这个Greeting接口的greeting我们教给Spring容器去管理,之前在GreetingImpl已经有过@Component注释了,这里直接注入就行。
然后运行,结果嗯……报错了:

嗯想到是不是没有设按个spring.aop.proxyTargetClass=true
然后去设了,还是不行……
然后对比了看了下网上的例子,有个例子比我多了这些东西:
一个配置类
package com.stuPayment.aopTest;

import org.springframework.context.annotation.ComponentScan;
import org.springframework.context.annotation.Configuration;
import org.springframework.context.annotation.EnableAspectJAutoProxy;

@ComponentScan
@Configuration
@EnableAspectJAutoProxy
public class SpringConfig {

}
还有在测试类中加入了这行代码,引入了上面那个配置类:
@RunWith(SpringRunner.class)    // SpringJUnit支持,由此引入Spring-Test框架支持!
@ContextConfiguration(classes = SpringConfig.class)
@SpringBootTest             //提供spring环境
public class Test2 {
然后运行,就可以了:

额这里就有点不明白了,这个@ComponemtScan按道理是SpringBoot肯定是默认开了的啊,不然之前的那些@Controller怎么配置,然后这个@EnableAspectJAutoProxy也是默认开的才对啊在SpringBoot,之前都是直接用注解,而且加了这个配置类之后,把那个Spring.aop.proxyTargetClass=true去掉了也可以。。。。
我想可能是测试环境和SpringBoot的环境的差异吧,先不理了,主要是学习如何通过注解来实现引入增强。
参考博客:
https://blog.csdn.net/elim168/article/details/78166296
https://www.cnblogs.com/xxdsan/p/6496332.html
标签:技术 payment ring 支持 bean 对比 red etc 去掉
原文地址:https://www.cnblogs.com/wangshen31/p/9383828.html