标签:daemonize 解决 解决方法 html ima isa connect error_log end
大致想法以及背景:刚开始创建Django项目,可以通过runserver命令更方便地调试程序,但是如果当一个项目完成了之后,需要部署到真正的环境,就需要考虑其稳定性。
之前在写毕设的时候,写过一个自动化运维监控的项目,部署在自己的阿里云服务器上。那时候没啥经验,直接一个(pyhon runserver 0.0.0.0:8888 &)让项目在后台自己跑。所以对一些项目挂掉,数据库连接失败等问题不能够及时定位解决。
所以现在花点时间结合Nginx+Uwsgi部署自己的项目,利用Nginx处理静态资源请求以及Uwsgi处理后台的动态请求。
pip安装:pip install uwsgi
源码包安装:wget https://files.pythonhosted.org/packages/a2/c9/a2d5737f63cd9df4317a4acc15d1ddf4952e28398601d8d7d706c16381e0/uwsgi-2.0.17.1.tar.gz
(解压文件,安装编译)
cd /data/wwwroot/DevOps/ (进入Django项目,以下是项目的目录树)
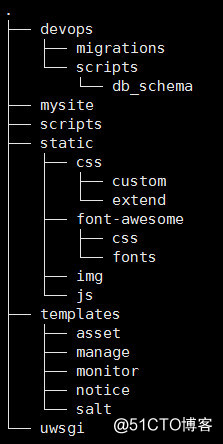
uwsgi --http 0.0.0.0:8888 --file mysite/wsgi.py --static-map=/static=static
参数详解:--http:启动项目的IP地址和端口 --file:指定Django项目中wsgi文件,一般创建Django项目自动生成,--static-map:指定静态资源存放的目录
启动成功!!!
创建uwsgi.ini配置文件
[uwsgi]
chdir=/data/wwwroot/DevOps/
module=mysite.wsgi:application
socket=/data/wwwroot/DevOps/uwsgi/uwsgi.sock
workers=5
pidfile=/data/wwwroot/DevOps/uwsgi/uwsgi.pid
http=192.168.1.1:8888
static-map=/static=/data/wwwroot/DevOps/static
uid=root
gid=root
master=true
vacuum=true
thunder-lock=true
enable-threads=true
harakiri=30
post-buffering=4096
daemonize=/data/wwwroot/DevOps/uwsgi/uwsgi.log
uwsgi.ini配置文件参数重点详解:
vacuum:自动移除unix Socket和pid文件当服务停止的时候;
thunder-lock:序列化接受的内容
enable-threads:启用线程
harakiri:设置自中断时间
post-buffering:设置缓冲
对于安装Nginx,本节忽略不讲,主要是针对安装玩Nginx,修改配置文件,添加虚拟主机。同时在前文也提到了,nginx对于处理静态资源能力强,而对于动态请求,nginx将其转发到uwsgi处理。
添加配置文件到/etc/nginx/conf.d/目录下
server{
                listen 80;
                server_name 192.168.1.1;
                access_log /data/wwwroot/DevOps/uwsgi/nginx/access.log main;
                error_log /data/wwwroot/DevOps/uwsgi/nginx/error.log;
                charset utf-8;
                gzip_types  text/plain application/x-javascript text/css text/javascript application/x-httpd-php application/json text/json image/jpeg image/gif image/png  application/octet-stream;
location / {
                include uwsgi_params;
                uwsgi_connect_timeout 30;
                uwsgi_pass unix:/data/wwwroot/DevOps/uwsgi/uwsgi.sock;
}
location /static/{
        alias  /data/wwwroot/DevOps/static/;
        index index.html index.htm;
}
}
重要参数详解:
gzip_types:支持的压缩类型
uwsgi_connect_timeout:设置Uwsgi超时时间
uwsgi_pass:指定uwsgi的sock文件处理动态请求
使用(nginx -t)命令检测nginx配置是否出错,然后重启nginx(systemctl restart nginx)
问题解决的方法:
通过查阅资料和整理文档:
“But uWSGI logs these things for misbehaving clients. A write error would happen if the upstream got disconnected, but the backend process was still attempting to write to the closed socket.”
在配置文件最后添加:
ignore-sigpipe = true
ignore-write-errors = true
disable-write-exception = true问题解决方法:
由于接受uwsgi的应答的事件超时,所以发生504错误,通过修改nginx的uwsgi超时连接时间就可以解决此类问题。
uwsgi_send_timeout 600; # 指定向uWSGI传送请求的超时时间,完成握手后向uWSGI传送请求的超时时间。
uwsgi_connect_timeout 600; # 指定连接到后端uWSGI的超时时间。
uwsgi_read_timeout 600; # 指定接收uWSGI应答的超时时间,完成握手后接收uWSGI应答的超时时间。 标签:daemonize 解决 解决方法 html ima isa connect error_log end
原文地址:http://blog.51cto.com/mbb97/2151933