标签:style blog http color io os 使用 ar java
开发的应用采用F5负载均衡交换机,F5将请求转发给5台hp unix服务器,每台服务器有多个webserver实例,对外提供web服务和socket等接口服务。之初,曾有个小小的疑问为何不采用开源的apache、Nginx软件负载,F5设备动辄几十万,价格昂贵?自己一个比较幼稚的问题,后续明白:F5是操作于IOS网络模型的传输层,Nginx、apache是基于http反向代理方式,位于ISO模型的第七层应用层。直白些就是TCP UDP 和http协议的区别,Nginx不能为基于TCP协议的应用提供负载均衡。
了解了二者之间的区别于应用场景,对Nginx产生浓厚的兴趣,阅读张宴的<实战Nginx>(这个85年的小伙子年轻有为羡慕+妒忌),搞明白了大致原理和配置,centos 下对Nginx+tomcat负载均衡做了配置尝试,将全部请求转发到tomcat,并未做静态,动态分开,图片防盗链等配置。
Nginx 介绍
Nginx (发音同 engine x)是一款轻量级的Web 服务器/反向代理服务器及电子邮件(IMAP/POP3)代理服务器,并在一个BSD-like 协议下发行。 其特点是占有内存少,并发能力强,事实上nginx的并发能力确实在同类型的网页伺服器中表现较好.目前中国大陆使用nginx网站用户有:新浪、网易、 腾讯,另外知名的微网志Plurk也使用nginx。
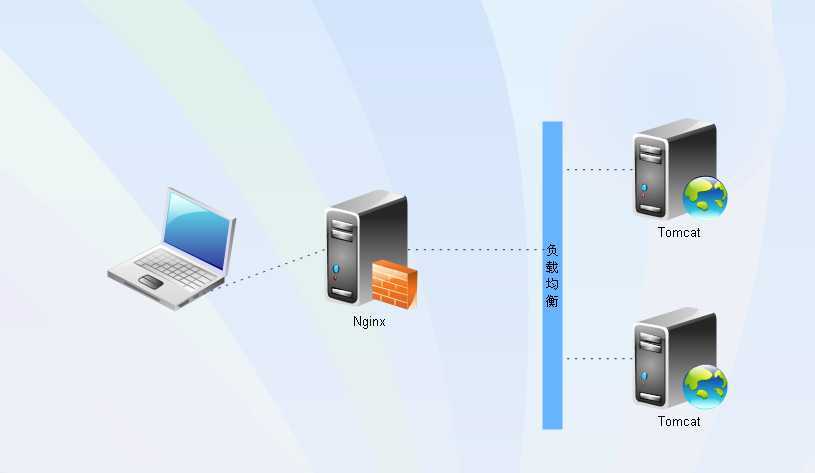
上面的全是Nginx介绍基本上是废话,下面转入正题,图文结合展示基本配置,首先是window环境、其次是Ubuntu环境(Vbox虚拟)。本文主要基于Nginx下配置两台tomcat,结构如下图:
http://nginx.org/en/download.html ,这里我们推荐下载稳定版(stable versions),本文采用nginx-1.44。
Nginx-
|_ conf 配置目录
|_ contrib
|_ docs 文档目录
|_ logs 日志目录
|_ temp 临时文件目录
|_ html 静态页面目录
|_ nginx.exe 主程序
centos 下安装Nginx极其简单,解压缩到一个无空格的英文目录即可(个人习惯,担心中文出问题), 使用/alidata/server/nginx/sbin/nginx -s reload启动,这里我安装到:/alidata/server/目录,下面涉及到的tomcat也安装在此目录
# /alidata/server/nginx/sbin/nginx -s reload
如果想要停止
# /alidata/server/nginx/sbin/nginx -s stop
nginx配置文件默认在conf目录,主要配置文件为nginx.conf,我们安装在/alidata/server/、默认主配置文件为/alidata/server/nginx/conf/。下面是nginx作为前端反向代理服务器的配置。
#Nginx所用用户和组
user  www www;

#工作的子进程数量(通常等于CPU数量或者2倍于CPU)
worker_processes  2;

#错误日志存放路径
#error_log  /alidata/log/nginx/error.log crit;
#error_log  /alidata/log/nginx/error.log  notice;
error_log  /alidata/log/nginx/error.log  info;

#指定pid存放文件
pid         /alidata/server/nginx/logs/nginx.pid;

events {
    #使用网络IO模型linux建议epoll,FreeBSD建议采用kqueue
    use epoll;

    #允许最大连接数
    worker_connections  2048;
}

http {
    include       mime.types;
    default_type  application/octet-stream;

    #定义日志格式
    #log_format  main  ‘$remote_addr - $remote_user [$time_local] $request ‘
    #                  ‘"$status" $body_bytes_sent "$http_referer" ‘
    #                  ‘"$http_user_agent" "$http_x_forwarded_for"‘;

    #access_log  off;
    access_log  logs/access.log;

    client_header_timeout  3m;
    client_body_timeout    3m;
    send_timeout           3m;

    client_header_buffer_size    1k;
    large_client_header_buffers  4 4k;

    sendfile        on;
    tcp_nopush      on;
    tcp_nodelay     on;

    #keepalive_timeout  75 20;

    include    gzip.conf;


    upstream localhost {
     #ip_hash
      #ip_hash;
      server localhost:9091;
      server localhost:9092;
     }

    server {
            listen       80;
            server_name  localhost;

            location  ~ \.(htm|html|gif|jpg|jpeg|png|bmp|ico|css|js|txt)$ {
                 root /alidata/www/static;
                 expires 24h;
            }
            location / {
              proxy_connect_timeout   3;
              proxy_send_timeout      30;
              proxy_read_timeout      30;
              proxy_pass http://localhost;
            }

   }
}
代理设置如下:
proxy.conf代码
proxy_redirect          off;
proxy_set_header        Host $host;
proxy_set_header        X-Real-IP $remote_addr;
proxy_set_header        X-Forwarded-For $proxy_add_x_forwarded_for;
client_max_body_size    10m;
client_body_buffer_size 128k;
proxy_connect_timeout   300;
proxy_send_timeout      300;
proxy_read_timeout      300;
proxy_buffer_size       4k;
proxy_buffers           4 32k;
proxy_busy_buffers_size 64k;
proxy_temp_file_write_size 64k;
gzip压缩相关配置如下:
gzip.conf代码
gzip              on;
gzip_min_length      1000;
gzip_types         text/plain text/css application/x-javascript;
对于tomcat大家都很熟悉,只需要修改server.xml配置文件即可,这里我们以apache-tomcat-7.0.47为例,分别在server目录,解压缩并命名为:apache-tomcat-7.0.47-cluster-1、apache-tomcat-7.0.47-cluster-2。
第一处端口修改:
<!--  修改port端口:18006 俩个tomcat不能重复,端口随意,别太小-->
<Server port="18006" shutdown="SHUTDOWN">
第二处端口修改:
<!-- port="18081" tomcat监听端口,随意设置,别太小 -->
<Connector port="9091" protocol="HTTP/1.1"
               connectionTimeout="20000"
               redirectPort="8443" />
第三处端口修改:
<Connector port="8009" protocol="AJP/1.3" redirectPort="8443" />
Engine元素增加jvmRoute属性:
<Engine name="Catalina" defaultHost="localhost" jvmRoute="tomcat1">
--两个tomcat的端口别重复,保证能启动起来,另一个tomcat配置省略,监听端口为9091,
改进后的nginx 配置文件
#user  nobody;
worker_processes  1;

#error_log  logs/error.log;
#error_log  logs/error.log  notice;
#error_log  logs/error.log  info;
error_log  /alidata/www/static/log/nginx/log.log  info;
#pid        logs/nginx.pid;


events {
    #使用网络IO模型linux建议epoll,FreeBSD建议采用kqueue
    use epoll;

    #允许最大连接数
    worker_connections  2048;
}


http {
    include       mime.types;
    default_type  application/octet-stream;

    #log_format  main  ‘$remote_addr - $remote_user [$time_local] "$request" ‘
    #                  ‘$status $body_bytes_sent "$http_referer" ‘
    #                  ‘"$http_user_agent" "$http_x_forwarded_for"‘;

    #access_log  logs/access.log  main;


    client_header_timeout  3m;
    client_body_timeout    3m;
    send_timeout           3m;
    client_header_buffer_size    1k;
    large_client_header_buffers  4 4k;

    sendfile        on;
    tcp_nopush      on;
    tcp_nodelay     on;


    #tcp_nopush     on;

    #keepalive_timeout  0;
    keepalive_timeout  65;


    #gzip  on;

    include    gzip.conf;

    upstream localhost {

      #ip_hash;
      server localhost:9091;
      server localhost:9092;
     }

    server {
        listen       80;
        server_name  localhost;

        #charset koi8-r;

        #access_log  logs/host.access.log  main;

    location ~ \.(jsp|do|cy|)$ {
              proxy_connect_timeout   3;
              proxy_send_timeout      30;
              proxy_read_timeout      30;
              proxy_pass http://localhost;
            proxy_redirect  off;
            proxy_set_header        Host    $http_host;
            proxy_set_header        X-Real-IP       $remote_addr;
            proxy_set_header        X-Forwarded-For $proxy_add_x_forwarded_for;
            proxy_set_header   Cookie $http_cookie;
            chunked_transfer_encoding       off;
        }

        location /  {
            root   /alidata/www/static/;
            index  index.html index.htm;
            expires 24h;
        }


        #error_page  404              /404.html;

        # redirect server error pages to the static page /50x.html
        #
        error_page   500 502 503 504  /50x.html;
        location = /50x.html {
            root   html;
        }

        # proxy the PHP scripts to Apache listening on 127.0.0.1:80
        #
        #location ~ \.php$ {
        #    proxy_pass   http://127.0.0.1;
        #}

        # pass the PHP scripts to FastCGI server listening on 127.0.0.1:9000
        #
        #location ~ \.php$ {
        #    root           html;
        #    fastcgi_pass   127.0.0.1:9000;
        #    fastcgi_index  index.php;
        #    fastcgi_param  SCRIPT_FILENAME  /scripts$fastcgi_script_name;
        #    include        fastcgi_params;
        #}

        # deny access to .htaccess files, if Apache‘s document root
        # concurs with nginx‘s one
        #
        #location ~ /\.ht {
        #    deny  all;
        #}
    }


    # another virtual host using mix of IP-, name-, and port-based configuration
    #
    #server {
    #    listen       8000;
    #    listen       somename:8080;
    #    server_name  somename  alias  another.alias;

    #    location / {
    #        root   html;
    #        index  index.html index.htm;
    #    }
    #}


    # HTTPS server
    #
    #server {
    #    listen       443 ssl;
    #    server_name  localhost;

    #    ssl_certificate      cert.pem;
    #    ssl_certificate_key  cert.key;

    #    ssl_session_cache    shared:SSL:1m;
    #    ssl_session_timeout  5m;

    #    ssl_ciphers  HIGH:!aNULL:!MD5;
    #    ssl_prefer_server_ciphers  on;

    #    location / {
    #        root   html;
    #        index  index.html index.htm;
    #    }
    #}

}
---------------------------------------------------------------------- over ------------------------------------------------------------------
标签:style blog http color io os 使用 ar java
原文地址:http://www.cnblogs.com/mjorcen/p/4007512.html