标签:plist inter 3.3 mina you pre killall disco sys
UMTSkeeper: keep your UMTS/GPRS/GSM connection alive automatically
by Elias from Mintaka
This page is about UMTSkeeper version 2 (Python version). If you need information about version 1.xx (BASH version), find it here.
What UMTSkeeper does, and scenarios:
- Connect the modem automatically and re-connect whenever possible.
You want to share a single internet connection with several people in your home. For this you set up a small gateway machine running Linux. You live in a somewhat remote location where cable is not available and the only affordable connection is via UMTS or GPRS cell phone modem. The quality of the connection is sometimes poor so that you suffer from frequent drop-outs. There‘s no other way than manually re-connecting every so often.
- Optionally, break the connection when a pre-set transfer limit is reached.
Your 3G mobile internet contract perhaps has a monthly transfer limit. In case you get above you are charged phantastic amounts. There‘s no easy way to monitor your transfers in real-time and disconnect before the limit is reached.
- Basic IPtables setup for NAT (forwarding a single internet connection to the internal network).
You would like to make this internet connection available to all machines within your home network. This is also known as "internet connection sharing" in other operating environments.
- Dynamic DNS (DDNS) update client to update with standard DDNS services. This is not limited to cellphone-type connections.
Commonly, your modem is assigned a different IP address every time you connect. You have a domain name that you would like to keep dynamically updated with the IP of your home or mobile internet connection, to be able to easily access your home servers from the internet. You can also choose to get notified about IP changes by e-mail.
- Transfer statistics in HTML which can be served by its own tiny webserver or your external webserver of choice, or read directly from disk. This is not limited to cellphone-type connections.
Monitoring the internet connection with some daily/monthly transfer statistics would be nice so that you can investigate the download behavior of net applications and your general usage.
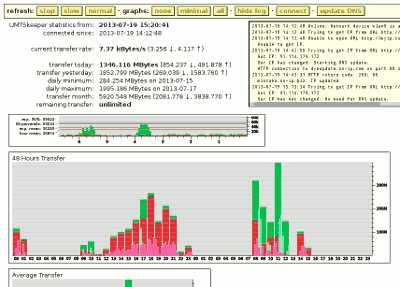
Screenshot of the UMTSkeeper statistics page (version 2.03).
Click image to enlarge.
Installation
Requirements
The program should run on any Linux OS with BASH (for Sakis3G), usb_modeswitch (installed with most desktop distros and pre-configured for many devices) and the Python2interpreter (it‘s made with 2.7).
← show more →
UMTSkeeper uses the Sakis3G script by Sakis Dimopoulos to set up the modem and connect to the net. Since the original author abandoned the project (and the original website, sakis3g.org, is offline), from version 2.05, I decided to include the Sakis3G script with the UMTSkeeper download (I am not afiliated with Sakis Dimopoulos). I include the "binary free" version, yet the "binary inclusive" (including usb_modeswitch) will do as well, should you need that. For further information on Sakis3G, get the website from the Internet Archive Wayback Machine: http://web.archive.org/web/*/http://www.sakis3g.org/. Read the manual!
An up-to-date Sakis3G is maintained by Brenton Edgar Scott on GitHub: https://github.com/trixarian/sakis3g-source.
Upgrading from version 1.xx
Version 2 is designed to be a drop-in replacement for version 1.xx. Anyway, make a backup of your files first, then extract the new program files into the version 1.xx program directory. Version 2.xx will first convert your umtskeeper.stat file to a new format and add a few items. The px*.png files are not needed anymore.
Prepare
Before you proceed, make sure you have read and understood the license agreement. For your convenience, I made an excerpt. It‘s not an endless read of tyring legal stuff.
← more for beginners →
In a terminal, this will download the archive, check if you indeed obtained the file from this site (the correct md5sum output should be: a456e1467057f78d53f4749adcd26d12 umtskeeper.tar.gz), extract the scripts, and make them executable (just in case...) - input line-by-line:cd ~
pwd
mkdir umtskeeper
cd umtskeeper
wget "http://mintakaconciencia.net/squares/umtskeeper/src/umtskeeper.tar.gz"
md5sum umtskeeper.tar.gz
tar -xzvf umtskeeper.tar.gz
chmod +x sakis3g umtskeeper resetusb
(with older versions only)
Also make sure that your system properly detects the modem (i.e. that usb_modeswitch works).
← more on usb_modeswitch and Network Manager →
← Raspberry Pi special instructions →
First Run
Please be aware that you should
never run a downloaded script with
root privileges unless you are sure what you do and that you indeed got the original file from the original source (not some trojan from a spy-in-the-middle).
Checking the MD5 can help but doesn‘t make you secure.
The clever way is to first connect manually with Sakis3G in interactive mode. Sakis3G will give you hints for the options to use. Do it asroot:
sudo ./sakis3g --interactive
Hint: if you are asked for APN user or APN password but you have none, enter "0".
If your connection works in interactive mode, unplug and re-plug your modem and try with UMTSkeeper with all the switches and options, also as root.
For example (this is a single line, mind the quotes!):
sudo ./umtskeeper --sakisoperators "USBINTERFACE=‘0‘ OTHER=‘USBMODEM‘ USBMODEM=‘12d1:140c‘ SIM_PIN=‘1234‘ APN=‘CUSTOM_APN‘ CUSTOM_APN=‘provider.com‘ APN_USER=‘0‘ APN_PASS=‘0‘" --sakisswitches "--sudo --console" --devicename ‘Huawei‘ --log --nat ‘no‘
UMTSkeeper will stay running after this. To end it, press the key combination CTRL+C.
Sidenote: You can watch the log flow by typing tail -f /var/log/umtskeeper.log if you like. End the watch with the key combination CTRL+C.
When run for the first time some log files will be created, among them /var/log/umtskeeper.log (option --log, the main log file),umtskeeper.stat.html (HTML statistics file to view in your web browser), and umtskeeper.stat (the file which keeps the numbers for the next run). Without the option --silent, the log is also printed on screen. It should contain something like this:
| 1 | cat /var/log/umtskeeper.log
| |
| 2 | 2013-07-23 12:16:05 Start: PID = 21338
| |
| 3 | Main stats file not found.
| This is normal for the first run when the main statistics file umtskeeper.stat is not yet present. Such an output should only make you worry if they happen with subsequent starts. Sometimes, UMTSkeeper might be interrupted just when it is in the middle of writing the stats file, which would be fatal. For such (rare) cases, a backup of that file is kept. |
| 4 | Main stats file is incomplete. This happens in rare cases when UMTSkeeper is killed in the wrong moment. Trying to load backup file. This can cause slight inacurracies in the statistics.
| |
| 5 | Main stats file backup not found. Possibly this program is being run for the very first time.
| |
| 6 | 2013-07-23 12:16:05 stats period = 8s, connection check period = 32s
|
| 7 | Monthly stats file not found, setting up a new one.
| New statistics files have been created. These are comma-separated-values files which you can import into your favorite spreadsheet software to plot lenghty graphs etc. - these statistics are kept until you manually delete them. The files are: umtskeeper.hourly.csv,umtskeeper.daily.csv,umtskeeper.monthly.csv. |
| 8 | Daily stats file not found, setting up a new one.
| |
| 9 | Hourly stats file not found, setting up a new one.
| |
| 10 | Internet status:
| |
| 11 | Cell network: No modem plugged.
| This is OK if you have the usual type of modem that first registers as a storage device to the system. The script will wait until the device is switched to modem mode. |
| 12 | 2013-07-23 12:16:41 Internet connection is DOWN. Calling Sakis3G connect...
| |
| 13 | Sakis3G cmdLine: nice ./sakis3g connect --sudo --console USBINTERFACE=‘0‘ OTHER=‘USBMODEM‘ USBMODEM=‘12d1:140c‘ SIM_PIN=‘1234‘ APN=‘CUSTOM_APN‘ CUSTOM_APN=‘provider.com‘ APN_USER=‘0‘ APN_PASS=‘0‘
| Commands that are being sent to Sakis3G. Use this for trying manually if something doesn‘t work. Sakis3G is called by the command nicewhich means that the program will run with lower priority. S3G is CPU hungry so you want it to play nicely and not interrupt other running processes. |
| 14 | Sakis3G says...
| |
| 15 | E1550 connected to PROVIDER (13579).
| The connection has been established. |
| 16 | 2013-07-23 12:17:14 Testing connection...
| |
| 17 | 2013-07-23 12:17:24 Success... we are online!
| |
If you unplug your modem now and re-plug it again then the connection should be established automatically. Give usb_modeswitch and Sakis3G a little patience.
Automatic Start
Last, you want to start UMTSkeeper automatically after boot. Put a line into /etc/rc.local like this (it‘s a single line which will make it run in the background and redirect screen output to an error.log file): /etc/rc.local has to be edited by the root user. Replace the path /home/mintaka/ in this example by the path you found out previously.
/home/mintaka/umtskeeper/umtskeeper --sakisoperators "USBINTERFACE=‘0‘ OTHER=‘USBMODEM‘ USBMODEM=‘12d1:140c‘ SIM_PIN=‘1234‘ APN=‘CUSTOM_APN‘ CUSTOM_APN=‘provider.com‘ APN_USER=‘0‘ APN_PASS=‘0‘" --sakisswitches "--sudo --console" --devicename ‘Huawei‘ --log --silent --monthstart 8 --nat ‘no‘ --httpserver &>> /home/mintaka/umtskeeper/error.log &
A line for only logging transfer statistics on wlan0 would for example look like this:
/home/mintaka/umtskeeper/umtskeeper --logonly --log --silent --monthstart 14 --iface ‘wlan0‘ --httpserver &>> /home/mintaka/umtskeeper/error.log &
Dynamic DNS updater and e-mail notification
There are two ways of using DDNS with UMTSkeeper: either let it call an external command line tool (if your DNS provider has a proprietary protocol), or use the internal update methods. Two methods are currently implemented: one is for the "freedns" style method which uses only an URL with an update code, and the other is the so-called "Members NIC Update API", invented by dyn.com and widely adopted by other services. The updater has been tested with freedns.afraid.org, dyn.com (dyndns.com) and no-ip.com.
The DNS updater must be configured by configuration file, as the configuration potentially contains sensitive data. See the sample config file for more information.
Notice, that if you use the DNS updater together with the webserver then your transfer statistics will be more easily accessible from the internet. If you don‘t want this, you can obfuscate the server by using a port other than standard HTTP port 80 (default is 8000), or you can secure it by using the IP whitelist feature. By all means, if those transfer statistics contain sensitive data (all human-generated traffic does!), don‘t get them over public nets without encryption. Security is your responsibility, don‘t take this lightly. Read my advice.
UMTSkeeper can also notify you about IP changes by e-mail. This must be configured by configuration file, as the configuration will contain sensitive data.
Uninstallation
Currently, UMTSkeeper does not have an uninstaller (just as there is no installer). To remove it without a trace, delete /var/log/umtskeeper.log and the whole program directory, and any special HTML dirs and temp dirs you may have made. That should be all.
Parameters and Customization
Configuration file:
All command line parameters can also be specified in a configuration file. UMTSkeeper will look for <progPath>/umtskeeper.conf (1). The configuration goes this way: (1) overrides the program defaults, and values in a config file given by the --conf <conffile> command line directive overrides (1). Further, any parameters given on the command line will override the values from the config files. An example config file (umtskeeper.conf.sample) is included in the package, along with a lot of explanation.
Commands:
connect
Retry connecting for example if connecting was suspended by --sakismaxfails.
resetmonth
Manually reset the monthly transfer counter.
resettransferstats
Reset the transfer amount counters. This will not reset the rate counters. Data will be deleted without asking again.
resetratestats
Reset the rate counters. This will not reset the transfer amount counters. Data will be deleted without asking again.
stop, quit, end
Any of these will terminate a running UMTSkeeper.
Options:
--log
Log to file (default: don‘t log). See also: --logfile, --iface.
--logonly
Do not connect to internet. Use this for only logging statistics on a connection. Recommended only for (W)LAN devices. (default: do connect)
--noroot
Force running without requiring root privileges. The default behaviour is that if writing to system dirs returns "permission denied", it switches to no-root mode. This means, that all temp files and logs will be stored in the program directory. This switch is the equivalent of setting the config variables conf[‘logFile‘]=progPath+‘umtskeeper.log‘, conf[‘tempPath‘]=progPath, and conf[‘statFilePath‘]=progPath.
--nostats
Don‘t write statistics files. (default: write them)
--htmlstats
Generate a HTML page without the internal webserver running. The HTML file is by default written to the temp dirctory: /run/umtskeeper/umtskeeper.stat.html or /var/run/umtskeeper/umtskeeper.stat.html. If --htmlPath is given then the HTML file is copied there. (default: none)
--silent
Suppress screen output. (default: verbose)
--httpserver
Run the internal webserver (default: off). See also --httpport.
Parameters:
--conf </path/to/configfile>
Specify a configuration file to use. For the order of configuration, look above. (default: none)
--iface <iface>
Network interface to monitor. This parameter is required for transfer logging. (default: ppp0)
--nat <iface>
Enable internet connection forwarding (NAT). <iface> is the name of the network adapter that connects to the internet. Often, this is ppp0 (look it up with ifconfig when the connection is up). Set to ‘no‘ if no forwarding is required. (default: no)
--testcycle <s> (formerly --interval)
Test connection in intervals of s statistics cycles (1 cycle is about 4 seconds). (default: 8).
--sakismaxfails <n>
Maximum of failed connection retries by Sakis3G in sequence until the program gives up (actually it tries twice in a cycle). This parameter should help to save on power, especially with battery driven machines. Sakis3G is CPU intensive. So, if for any reason (modem unplugged or other failure) the connection doesn‘t work then we‘d better give up constantly trying. See also --sakisfaillockduration. (default: 4)
--sakisfaillockduration <s>
Duration (in seconds) after which we retry to connect after the maximum of failed connection retries was reached. See also --sakismaxfails. (default: 300)
--logfile "<file>"
To specify an alternative log file. This implies the option ‘log‘. (default: /var/log/umtskeeper.log)
--devicename "<string>"
Set device name (eventually needed for device reset, this should be a unique identifier containing only letters and numbers. Get it with lsusb (don‘t listen to what Sakis3G says).
Example: lsusb may return the device name string: ZTE WCDMA Technologies MSM MF110/MF627/MF636. Any unique part of this name is ok to take as the device name. So, --devicename "MF636" would be appropriate here.
--statfilepath "<path>" (formerly --statpath")
Write statistics files to this location. (default: script path)
--temppath "<path>"
Specify alternative path for temporary files. The default is to make a subdirectory in /run/ or /var/run/ (whichever is found), which is a tmpFS (ramdisk) filesystem on most platforms, and therefore the contents are lost on shutdown.
--htmlpath "<path>"
Document path of external webserver to copy the stats HTML file to. (default: empty - do not copy)
--httpport <port>
Port on which the internal webserver is listening. Setting the port implies --httpserver. (default: 8000)
--limitday <limit>
Set daily transfer limit (in bytes). See also --limitmonth. (default: 0 = no limit)
--limitmonth <limit>
Set monthly transfer limit (in bytes). See also --monthstart, --limitday. (default: 0 = no limit)
--monthstart <day>
Day of month when monthly transfer count begins. This is typically the day on which your monthly contract starts. See also --limitmonth, --limitday. (default: 0 = no limit)
--sakisswitches "<switches>"
Set switches to pass to Sakis3g.
--sakisoperators "<operators>"
Set operators to pass to Sakis3g.
Downloads
Please read the license agreement before you use this program. It won‘t hurt - for your convenience, I made an excerpt.
Download UMTSkeeper (latest) 233.762 kB, MD5: a456e1467057f78d53f4749adcd26d12
Download older version:
2.06 224.823 kB, MD5: 72eb2c71bab4ef8c8a484163a9323f57
2.05 226.218 kB, MD5: e749c13d5b546983ff64750e4a7b03e5
2.04 70.955 kB, MD5: 134a9aa8357a866a0722272aa60116ec
MD5 hash can be checked with:
md5sum umtskeeper.tar.gz
Changelog
Sakis3G source
Old Sakis3G resources/help (archive.org Wayback Machine).Links
Further Reading and Acknowledgements
BigCowPi (Andy Thomson) has a great tutorial on turning the Raspberry Pi into a cell network internet gateway and wireless router, using UMTSkeeper/Sakis3G. This should also work with other computers. Also, there is a tutorial about setting up a NAS (network storage) using the RasPi which can be combined with the gateway/router function, and a good collection of other RasPi related stuff. Check out his site.
Many thanks to afraid.org for Free DNS hosting.References
Sakis3G source project on GitHub.
Sakis3G (down) (alternatively from the Wayback Machine)
usb_modeswitch
An older Sakis3G on SourgeForge (thanks BigCowPi for the link).
Questions and Answers
Q: Do I really *have* to run the thing as root?
A: No. For some functions of Sakis3G, and (rarely) to reset the modem, root access is necessary. Try if Sakis works without sudo, and if it does there‘s nothing wrong with running UMTSkeeper as an ordinary user. In this case, all logfiles will be created in the program directory.
Deamonising it with rc.local will run it as root, though.Q: Does the webserver function put my system at a risk?
A: It shouldn‘t. The HTTP server that UMTSkeeper uses is a very rudimentary implementation that uses the BaseHTTPServer module of Python. It‘s specially tailored so that it serves only those files that are on its whitelist, and everything else will receive a 403 (forbidden) reply. It does not run any scripts beside those in UMTSkeeper. The current implementation will ignore all URI arguments it doesn‘t know. Access can be restricted by an IP whitelist.Q: Why does the internal webserver not offer an authentication mechanism?
A: In short: because it would bring more trouble than it would help.
More specific, I thought about implementing user authentication to the server but I settled on providing none because it would require some knowledge on the user side that can not be ascertained. There are some facts about HTTP authentication that have to be kept in mind or else it may work contrary to the intention. First, there are basically two standard authentication mechanisms: ‘Basic‘ and ‘Digest‘ (there‘s also other proprietary ones). Basic authentication is rather easy to implement but it will send passwords in unencrypted form (base64-encoded plaintext). Digest should be more secure in that it is a challenge-response method where the server sends a random string to the client, who encodes this random string together with the username/password (MD5-hash) before sending it back.
But the most important thing to know is, that neither of the HTTP authentication methods will cause an encrypted connection to be set up, nor can they guarantee that data is actually coming from the addressed server. It is solely a way of letting the server ascertain that the user on the other end knows the right password. So, if users are not aware of this, they will likely live in a false sense of security, hence exposing their usage statistics to the internet or exposing (maybe even recycled) passwords. Also, the HTTP server is only a small side-function of this program for convenience, and I‘m by no means a data security expert. And not least, the license makes strong encryption mandatory which would forbid the use of MD5 for hashing passwords. In other words, there‘s simply too many pitfalls there.
Also read: How can I secure my usage statistics against eavesdropping criminals?Q: How can I secure my usage statistics against eavesdropping criminals?
A: Good question. For those who don‘t know yet, the internet is not free anymore. It is currently being turned into an instrument of repression by governments and other criminals, in a rapid and agressive pace. The internet will change a lot during the years to come. Of the few defences we have at the moment, one is the use of strong end-to-end encryption. From the user (and engineering) viewpoint it will take the awareness (but not anxiety!), that every byte sent over the public networks is likely to be recorded and analyzed. Permanent care shall be taken for the protection of our data, in the best of our ability. Sad but that‘s how it is. This said, I shall make the following clear in bold letters:UMTSkeeper contains a data logger which obtains and displays real-time information about your internet usage and hence can be used to spy on you and profile your habits.
Notice, that the license forbids such use. Yet, criminals will likely shit on any rules and rights. Therefore, the foremost rule for you as the user, and possibly, trusted network admin in charge of the functioning of your fellows‘ internet connection, is to never expose the UMTSkeeper statistics to public networks in unencrypted form. For UMTSkeeper to contain such encryption or even only user authentication, there are just too many pitfalls. Instead, there are plenty of ways to rely on that are more proven:- Disable the statistics feature altogether. Do this by setting conf[‘writeStats‘]=False or by using the command line switch --nostats.
- If you only use the stats from a private network, disable access from non-internal IPs. This can be done in the config file, for example: conf[‘httpIPList‘] = [‘127.0.0.1‘, ‘192.168.1.*‘], which will constrain access to localhost and a private IP range 192.168.1.0 to 192.168.1.255. More examples can be found in umtskeeper.conf.sample.
- Use TOR and make yourself a TOR hidden service (not just TOR at the client side but also on the server!). Clients available as a proxy daemon, as a specialized mozilla browser build, as USB live OS, and for smartphones (btw., consider to free yourself from smartphones that are unfree, software- and hardware-wise).
- Disable the internal HTTP daemon and use a ‘real‘ webserver like Apache instead, with TLS encryption (SHA3 recommended). Not trivial to set up but if you already have a server then it‘s just a matter of some configuring and setting up the keys and certificates to have it serve on a HTTPS connection.
Drawback: you will not be able to use the interactive features this way.
- Disable the internal HTTP daemon and use SSH for mounting the remote filesystem. If you do remote monitoring you will likely already use SSH for logging into your remote machine. There is a wrapper for SSH that actually lets you mount remote directories into your local directory tree. It‘s called SSHFS.
sudo apt-get install sshfs
sudo mkdir /media/umtskeeper-server/
sudo chown <myusername> /media/umtskeeper-server/
sshfs <username>@<serveraddress>:/run/umtskeeper/; /media/umtskeeper-server/
With the above, you install SSHFS, make a mountpoint /media/umtskeeper-server/ on your local tree, and change the ownership to your local non-root user (so that you actually have full access), and mount the remote temporary path thereafter. In your umtskeeper configuration, make sure you have conf[‘httpServer‘]=False and conf[‘writeHTMLStats‘]=True. After the remote directory is mounted, you can simply klick on the umtskeeper.stat.html file to open it. Read my note on SSH key authentication below.
Drawback: you will not be able to use the interactive features this way.
- The simple way: use SSH tunneling. With tunneling, one (non-secured) protocol (HTTP in our case) rides on top of another (encrypted) protocol (SSH). You open an SSH connection to your remote server and tell SSH to forward a specific request port from your machine to the server port on the remote machine. SSH will do all the rest:
ssh -N -L [localhost:]<localport>:<serveraddress>:<serverport> <username>@<proxyaddress>
"local"                          "remote"                             "remote"
 ____________________     SSH     ______________________     HTTP      ___________________
|Your home computer  | --------> |Proxy machine         | ----------> |Server machine     |
|IP: localhost       |           |IP: <proxyaddress>,   |             |IP: <serveraddress>|
|SSH client          | <=======> |    public            | <=========> |HTTP server:       |
|HTTP client         | encrypted |SSH server: port 22   | unencrypted |  <serverport>     |
|virtual HTTP server:| data      |encrypts HTTP conn. to| data        |                   |
|  <localport>       |           |SSH client            |             |                   |
 --------------------             ----------------------               -------------------
You do have a good, long, randomized password, don‘t you? Your data security depends on the strength of that password. Remember that your activity is intercepted, and that encrypted things are especially interesting! Better even, use
public key authentication that can only be matched with
extremely long passwords.
SSH with key authentication is more secure than HTTPS. First, the client is authenticated to the server, and the server is authenticated to the client. Second, there is no certificate to trust. For a man-in-the-middle attack, the attacker would need to have the public SSH key which is stored at the server.
Don‘t be confused when asked to generate an "RSA" key. That means the
RSA algorithm as opposed to the corrupt and abandoned-to-be company
RSA Security who primarily only share the name.
There are (up to) four network addresses acting here. First, your local SSH client logs in to the SSH server on proxyaddress asusername, forwarding local requests on localport to the SSH server. The SSH server will in turn forward the request toserveraddress:serverport. Therefore, it will appear as if the HTTP server was running on localhost:localport. If you leave away the localhost at the beginning, your tunnel will be open for any machine that sends a request to your local machine on localport.
The switch -N tells SSH to not execute any command on the remote machine. Many tutorials also use the switch -f to send the SSH process to the background once the connection is set up, and to free the command prompt for further use.
This can also be used to set up a simple proxy server, to let you tunnel through a firewall, for example. The proxy and the actual server can be the same machine, as can be localport and serverport.
So let‘s say, you have UMTSkeeper on your serveraddress, running the internal HTTP daemon with the default configuration, listening on port 8000, which you would like to reach by the address http://localhost/ from your local machine. On your local machine, you type:
ssh -N -L localhost:80:<serveraddress>:8000; <username>@<serveraddress>
Privileged ports can only be forwarded by root.
Gotcha! ‘Privileged‘ ports are those below 1024, which are commonly reserved for standardized protocols. So if you want UMTSkeeper to appear on localhost:80, you have to be root:sudo ssh -N -L localhost:80:<serveraddress>:8000; <username>@<serveraddress>
user@serveraddress‘s password:
Hint: with key authentication, SSH uses the key files from your <home>/.ssh/ directory. When acting as the local user root (with sudo or directly), it will look in /root/.ssh/. As the key identifies your machine rather than a user, the key files can be shared by users of the same machine. This also means that you should protect your keys from getting into the hands of (unprivileged) users on that machine. There is the possibility of protecting the keys by an extra password.
In your browser, the remote UMTSkeeper will now be available with the address http://localhost/. What happens is that SSH on your local machine now listens to port 80 (the standard HTTP port) and gets an HTTP request from the browser. The request is transmitted to the server through the encrypted tunnel and a request on port 8000 is made on the server machine. To UMTSkeeper, it will appear as a request coming from its own localhost. Therefore, it should be configured to only respond to requests from localhost. SSH will tunnel all data it receives upon the request back through the encrypted connection to your local machine.
To end the SSH tunnel, you terminate the SSH client. This can be done by pressing CTRL+C, or if you backgrounded it, the quick-and-dirty way is to just (sudo) killall ssh (terminates all running SSH instances), or find out the process ID (PID) to kill a specific instance:
ps aux | grep ssh
root 846 0.0 0.0 6684 4 ? Ss Jan13 0:00 /usr/sbin/sshd -D
user 20414 0.0 0.0 4080 32 ? Ss Jan13 0:02 /usr/bin/ssh-agent...
root 27282 0.0 0.0 6452 500 ? Ss 22:49 0:00 ssh -Nf -L 80:serveraddress:80 user@serveraddress
user 27284 0.0 0.0 4388 836 pts/2 S+ 22:49 0:00 grep --color=auto ssh
sudo kill 27282
License and Disclaimer
This program is released under a double license
Primarily, the Hacktivismo Enhanced-Source Software License Agreement (HESSLA), which can be found in full and with an additional statement about its objectives, at http://www.hacktivismo.com/about/hessla.php;
and for compatibility reasons, the GNU General Public License (GPL), see http://www.gnu.org/licenses/.
While the GPL contains the terms and conditions under which the software and derivative works thereof can be freely distributed, and thus is aimed primarily at software developers, the HESSLA, while granting the same rights and obligations to modify and distribute the software, contains additional terms that govern the use of the software. This makes the HESSLA function as a contract between the author and the user, rather than just being a copyleft agreement.
In particular, the HESSLA contains objectives on security standards (section 9), the adherence of the use of the software to respecting human rights, political freedom and privacy standards (section 10), as well as special terms on the use of the software by governmental entities and governmental persons (section 14).
For the purpose of including UMTSkeeper or portions thereof in GNU GPL licensed projects, UMTSkeeper is also licensed under the GPL. You may distribute UMTSkeeper or derivatives under the GNU GPL, provided that your distribution is also subject to the HESSLA.
The HESSLA
UMTSkeeper is free software: you can redistribute it and/or modify it under the terms of the Hacktivismo Enhanced-Source Software License Agreement (HESSLA) as published by Hacktivismo, either version 1, or prior, of the License, or (at your option) any later version.
By using UMTSkeeper, you express that you read and understood this license agreement, and that you are a Qualified Licensee as laid out in section 0.8, at the time you use UMTSkeeper, meaning that you will not use this software for infringement of human rights or the right to privacy. You will not use this software for surveillance purposes or to otherwise spy on people, neither for doing any harm to a human being.
See the Hacktivismo Enhanced-Source Software License Agreement (HESSLA) at http://www.hacktivismo.com/ for more details.
GNU GPL
UMTSkeeper is free software; you can redistribute it and/or modify it under the terms of the GNU General Public License as published by the Free Software Foundation; either version 2 of the License, or (at your option) any later version.
See the GNU General Public License for more details: http://www.gnu.org/licenses/gpl.txt
Disclaimer
This program is distributed in the hope that it will be useful, but WITHOUT ANY WARRANTY; without even the implied warranty of MERCHANTABILITY or FITNESS FOR A PARTICULAR PURPOSE.
And this should be common sense:
Above statement includes additional charges you may receive from your operator by using this program, defects to your SIM card including but not limited to being PIN blocked, defects on your hardware, 3G service abuse ban etc. USE WITH CARE. The author of this program or authors of any of its dependencies have no responsibility for what may happen to you.
The author is not related in any way with any of the companies, being operators or modem manufacturers, other than being a customer to some of them. Logos and trademarks mentioned by this package belong to their respective owners.
Installing 3G Modem Huawei 220
UMTSkeeper: keep your UMTS/GPRS/GSM connection alive automatically
标签:plist inter 3.3 mina you pre killall disco sys
原文地址:https://www.cnblogs.com/jins-note/p/9517662.html
