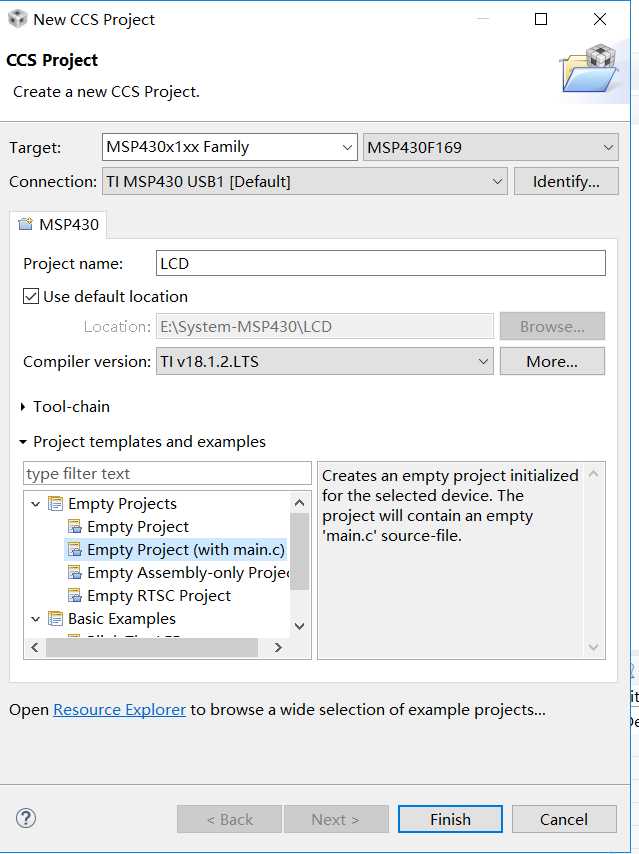
1,在CCS上正确创建工程文件。
新建工程:File-New-CCS Project
2,在main.c文件中编写程序并保存。

 1 #include <msp430f169.h>
 2 /*
 3  * 软件延时
 4  */
 5 #define CPU_F1 ((double)1000000)
 6 #define delay_us1M(x) __delay_cycles((long)(CPU_F1*(double)x/1000000.0))
 7 #define delay_ms1M(x) __delay_cycles((long)(CPU_F1*(double)x/1000.0))
 8
 9 /**
10  * main.c
11  */
12 int main(void)
13 {
14     unsigned char j,k;
15     WDTCTL = WDTPW + WDTHOLD;//关看门狗
16     P6DIR = 0xff;//设置P4端口为输出端口
17     while(1)
18     {
19         k = 1;
20         for(j=0;j<8;j++)//循环8次,即D1~D8轮流点亮
21         {
22             P6OUT = ~k;//反相输出,低电平点亮LED
23             delay_ms1M(300);//延时
24             k=k<<1;//左移一位
25         }
26     }
27
28 }
3编译程序:Project-Build All
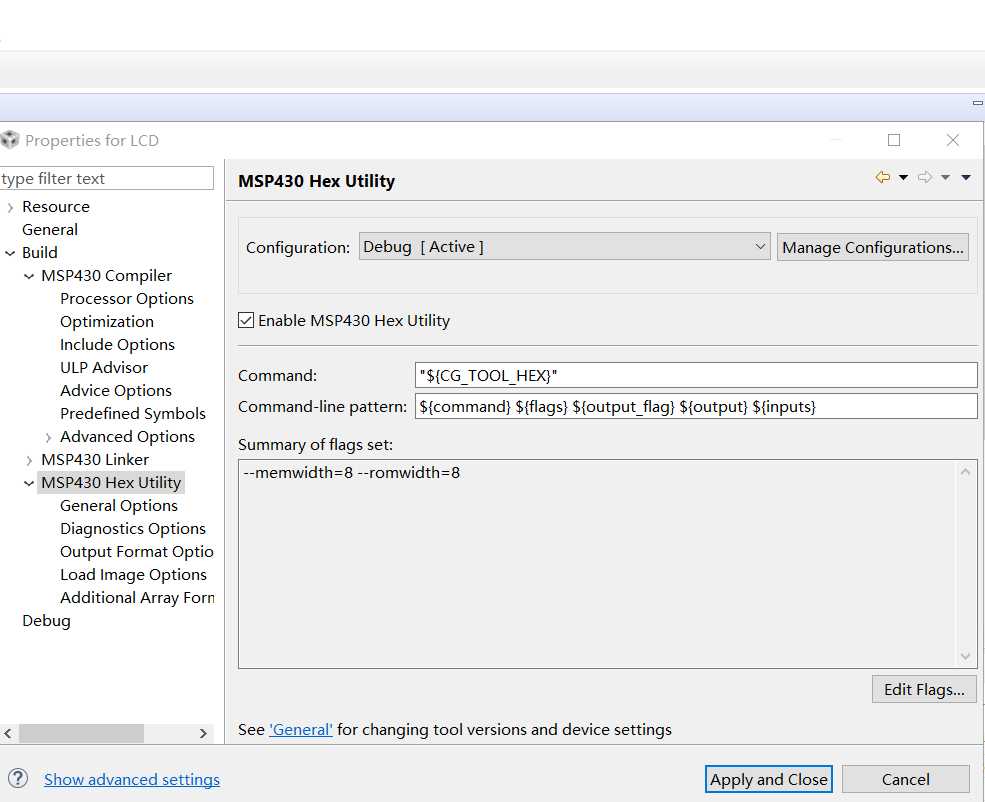
4,配置CCS使其产生.hex可执行文件(用Protues仿真时下载芯片的是.hex文件)
Project-Properties-MSP430 Hex Utility
勾选 Enable MSP430 Hex Utility 再 Apply and Close 运用并关闭
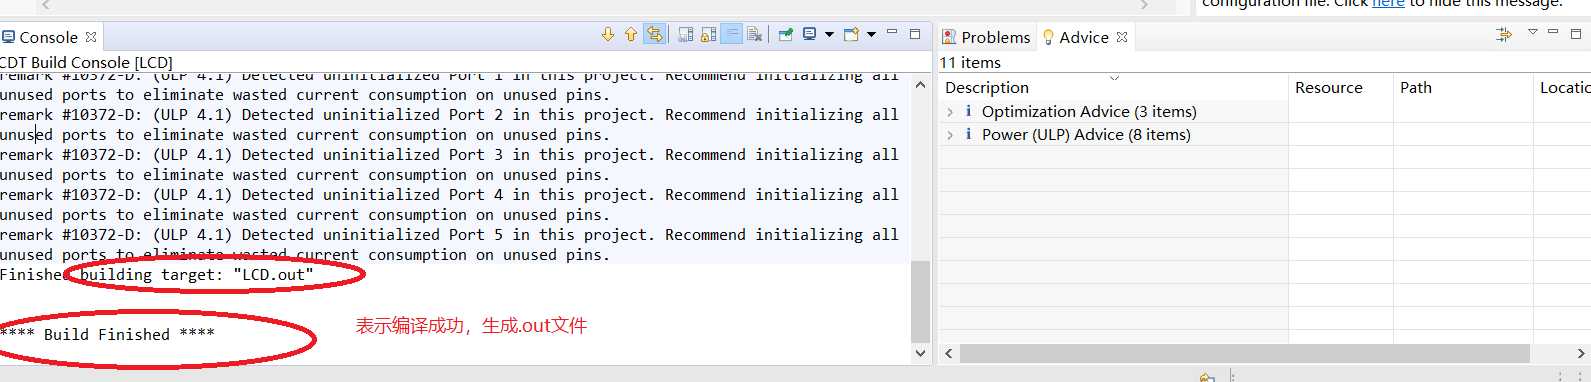
5,此时再次去编译程序,会产生.hex文件
结果:
**** Build of configuration Debug for project LCD ****
"D:\\TI\\ccsv8\\utils\\bin\\gmake" -k -j 4 all -O
gmake[1]: ‘LCD.out‘ is up to date.
Building files: "LCD.out"
Invoking: MSP430 Hex Utility
"D:/TI/ccsv8/tools/compiler/ti-cgt-msp430_18.1.2.LTS/bin/hex430" --memwidth=8 --romwidth=8 -o "LCD.hex""LCD.out"
Translating to Extended Tektronix format...
"LCD.out" .text ==> .text
"LCD.out" DACDMA ==> DACDMA
"LCD.out" PORT2 ==> PORT2
"LCD.out" USART1TX ==> USART1TX
"LCD.out" USART1RX ==> USART1RX
"LCD.out" PORT1 ==> PORT1
"LCD.out" TIMERA1 ==> TIMERA1
"LCD.out" TIMERA0 ==> TIMERA0
"LCD.out" ADC12 ==> ADC12
"LCD.out" USART0TX ==> USART0TX
"LCD.out" USART0RX ==> USART0RX
"LCD.out" WDT ==> WDT
"LCD.out" COMPARATORA ==> COMPARATORA
"LCD.out" TIMERB1 ==> TIMERB1
"LCD.out" TIMERB0 ==> TIMERB0
"LCD.out" NMI ==> NMI
"LCD.out" .reset ==> .reset
Finished building: "LCD.out"
**** Build Finished ****
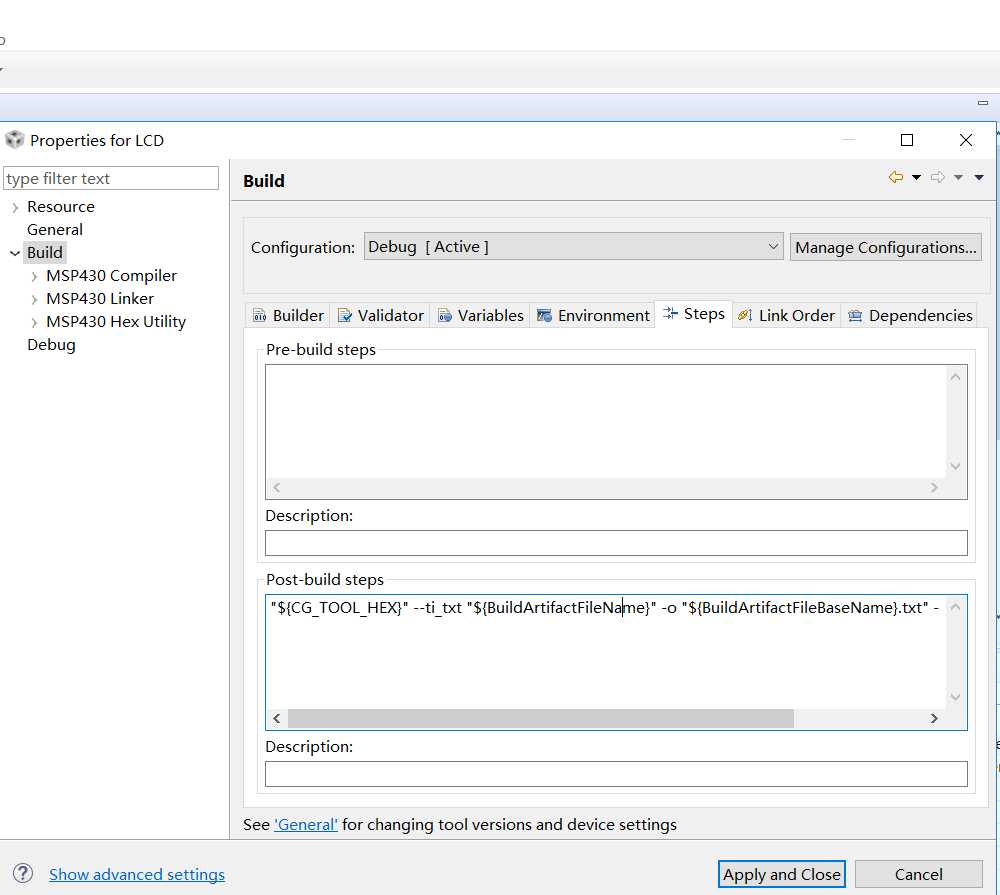
6,再次对CCS进行配置,将.hex文件转换成.txt文件,具体步骤如下:
a、 点击Project ,选择Properties;
b、选择 Build - Steps
c、在Post-build steps中加入下列语句,运用并关闭即可:
"${CG_TOOL_HEX}" --ti_txt "${BuildArtifactFileName}" -o "${BuildArtifactFileBaseName}.txt" -order MS -romwidth 16
7,再次编译程序,将产生.txt文件(可能会有编译无效,再进去看看配置的情况,然后在编译。也可以去工程文件夹中看看是否生成.txt文件)
结果:
**** Build of configuration Debug for project LCD ****
"D:\\TI\\ccsv8\\utils\\bin\\gmake" -k -j 4 all -O
gmake[1]: ‘LCD.out‘ is up to date.
Building files: "LCD.out"
Invoking: MSP430 Hex Utility
"D:/TI/ccsv8/tools/compiler/ti-cgt-msp430_18.1.2.LTS/bin/hex430" --memwidth=8 --romwidth=8 -o "LCD.hex" "LCD.out"
Translating to Extended Tektronix format...
"LCD.out" .text ==> .text
"LCD.out" DACDMA ==> DACDMA
"LCD.out" PORT2 ==> PORT2
"LCD.out" USART1TX ==> USART1TX
"LCD.out" USART1RX ==> USART1RX
"LCD.out" PORT1 ==> PORT1
"LCD.out" TIMERA1 ==> TIMERA1
"LCD.out" TIMERA0 ==> TIMERA0
"LCD.out" ADC12 ==> ADC12
"LCD.out" USART0TX ==> USART0TX
"LCD.out" USART0RX ==> USART0RX
"LCD.out" WDT ==> WDT
"LCD.out" COMPARATORA ==> COMPARATORA
"LCD.out" TIMERB1 ==> TIMERB1
"LCD.out" TIMERB0 ==> TIMERB0
"LCD.out" NMI ==> NMI
"LCD.out" .reset ==> .reset
Finished building: "LCD.out"
"D:/TI/ccsv8/tools/compiler/ti-cgt-msp430_18.1.2.LTS/bin/hex430" --ti_txt "LCD.out" -o "LCD.txt" -order MS -romwidth 16
Translating to TI-TXT format...
"LCD.out" .text ==> .text
"LCD.out" DACDMA ==> DACDMA
"LCD.out" PORT2 ==> PORT2
"LCD.out" USART1TX ==> USART1TX
"LCD.out" USART1RX ==> USART1RX
"LCD.out" PORT1 ==> PORT1
"LCD.out" TIMERA1 ==> TIMERA1
"LCD.out" TIMERA0 ==> TIMERA0
"LCD.out" ADC12 ==> ADC12
"LCD.out" USART0TX ==> USART0TX
"LCD.out" USART0RX ==> USART0RX
"LCD.out" WDT ==> WDT
"LCD.out" COMPARATORA ==> COMPARATORA
"LCD.out" TIMERB1 ==> TIMERB1
"LCD.out" TIMERB0 ==> TIMERB0
"LCD.out" NMI ==> NMI
"LCD.out" .reset ==> .reset
**** Build Finished ****
8,我们用BSL430来进行程序的烧录,就是将我们得到的.txt文件传录到芯片,控制CPU工作
SF_BSL430下载软件链接:https://pan.baidu.com/s/1tumqUGFZhx_83ynXRS3Ugw
下载好后我们以管理员身份运行应用程序。
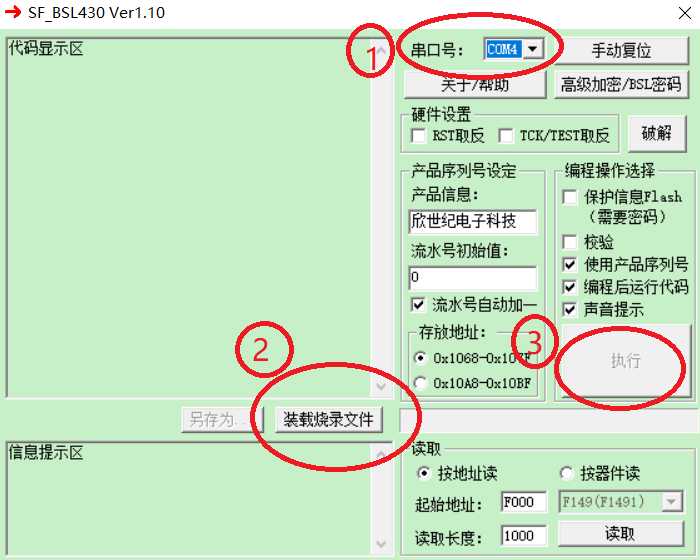
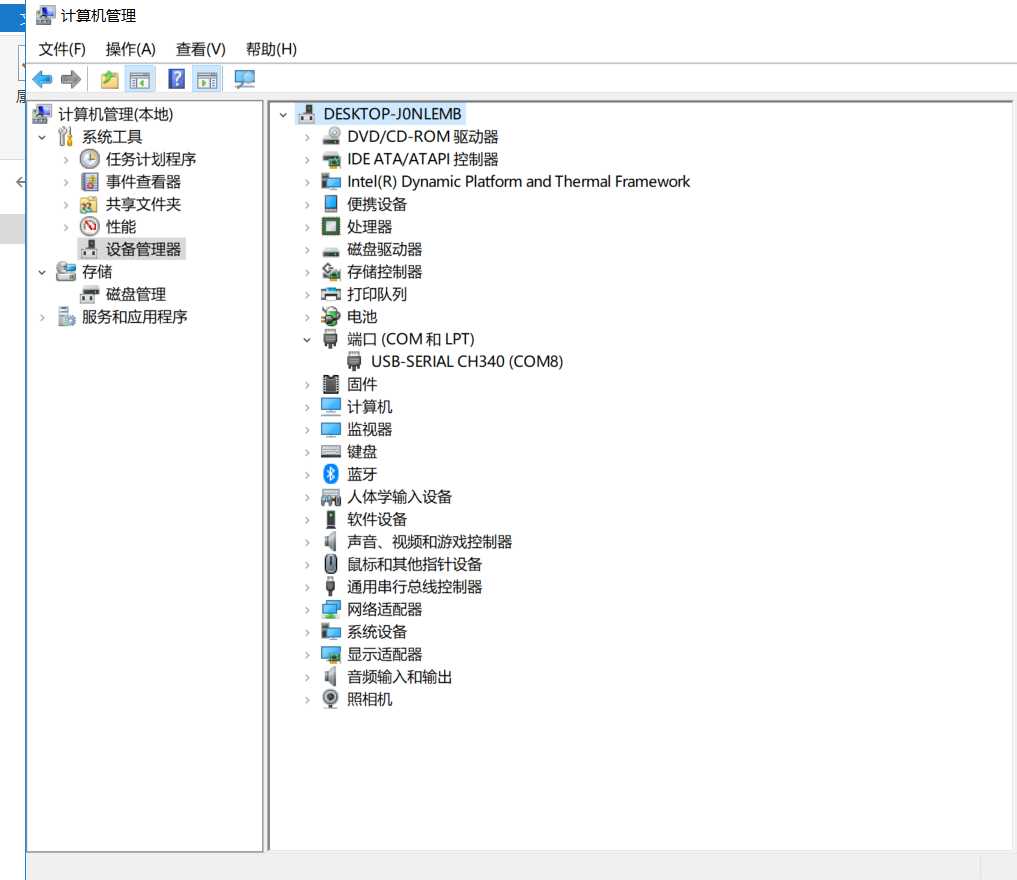
(1),选择串口号(此前还需安装USB转串口驱动 CH340或CH341 链接:https://pan.baidu.com/s/1DvtcWuatTF9EtwSaBLhbog)
进计算机管理系统-设备管理器 -端口查找串口号(必须链接开发板并上电开启)
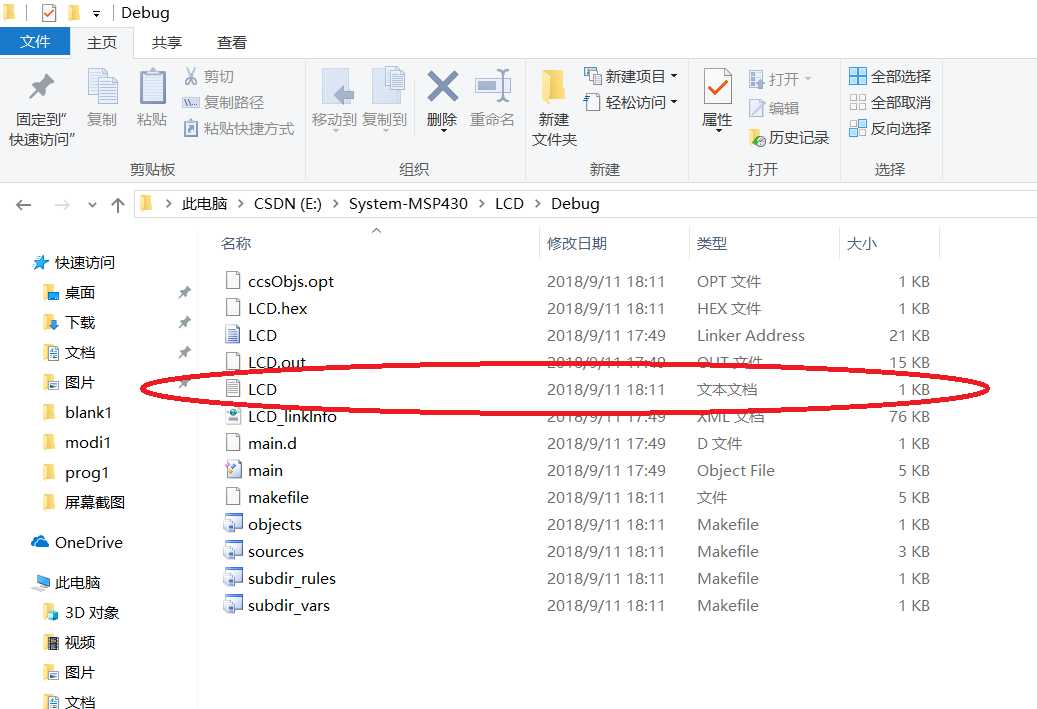
(2),装载烧录文件。
到工程文件夹中-Debug文件夹找到.txt文件

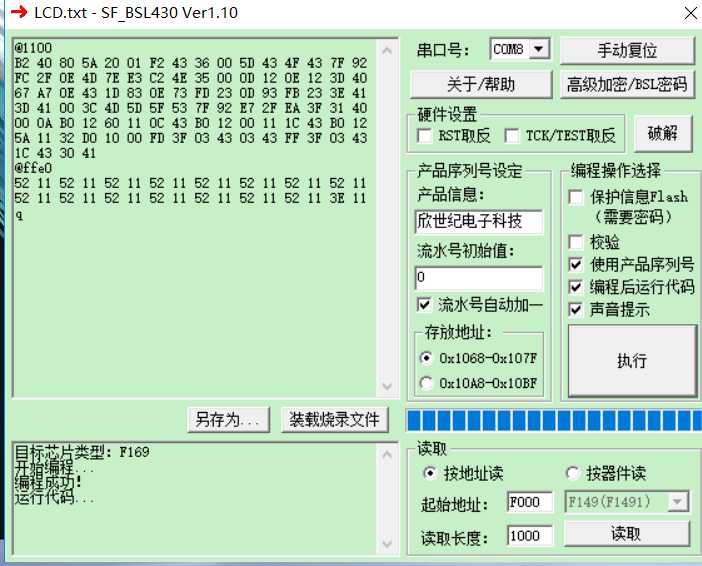
(3),执行(可能会编程失败,重新装载文件试试)
注:第5至8 可用一条语句直接输出 .bin .hex .txt文件
.进入工程配置选项,CCS Build --> Steps ,如图1所示
图1 CCS工程编译配置界面
在图1中的Command选项框中(红色圈出部分),输入如下命令(没有换行符):
"${CCE_INSTALL_ROOT}/utils/tiobj2bin/tiobj2bin" "${BuildArtifactFileName}" "${BuildArtifactFileBaseName}.bin" "${CG_TOOL_ROOT}/bin/armofd" "${CG_TOOL_ROOT}/bin/armhex" "${CCE_INSTALL_ROOT}/utils/tiobj2bin/mkhex4bin" & "${CG_TOOL_HEX}" -i "${BuildArtifactFileName}" -o "${BuildArtifactFileBaseName}.hex" -order MS -romwidth 32 & "${CG_TOOL_HEX}" --ti_txt "${BuildArtifactFileName}" -o "${BuildArtifactFileBaseName}.txt" -order MS -romwidth 32
保存配置,重新clear工程,再次编译即可同时生成.bin和.hex和.txt文件。
**** Build Finished ****
摘自 https://www.cnblogs.com/binglmm/p/9629618.html 做了小小补充。