标签:ges current Stub 命令 文件路径 show char exit ali
/usr/local/nginx/conf 配置文件目录
/usr/local/nginx/html 默认网页目录
/usr/local/nginx/logs 日志目录
/usr/local/nginx/sbin 二进制程序
为方便使用 nginx 命令,创建软链接
1 [root@localhost conf]# ln -s /usr/local/nginx/sbin/nginx /usr/local/sbin/
启动 nginx
1 [root@localhost ~]# nginx
2 [root@localhost ~]# ps -ef | grep nginx
3 root       1424      1  0 16:38 ?        00:00:00 nginx: master process /usr/local/nginx/sbin/nginx
4 nobody     1425   1424  0 16:38 ?        00:00:00 nginx: worker process
5 root       1432   1322  0 16:41 pts/1    00:00:00 grep --color=auto nginx
将 nginx 设为开机自启动
[root@localhost ~]# chmod a+x /etc/rc.d/rc.local
[root@localhost ~]# cat /etc/rc.d/rc.local
#!/bin/bash
# THIS FILE IS ADDED FOR COMPATIBILITY PURPOSES
#
# It is highly advisable to create own systemd services or udev rules
# to run scripts during boot instead of using this file.
#
# In contrast to previous versions due to parallel execution during boot
# this script will NOT be run after all other services.
#
# Please note that you must run ‘chmod +x /etc/rc.d/rc.local‘ to ensure
# that this script will be executed during boot.

touch /var/lock/subsys/local
# 将 nginx 设置为开机自启动
/usr/local/nginx/sbin/nginx
nginx 帮助信息
 1 [root@localhost ~]# nginx -h
 2 nginx version: nginx/1.13.7
 3 Usage: nginx [-?hvVtTq] [-s signal] [-c filename] [-p prefix] [-g directives]
 4
 5 Options:
 6   -?,-h         : this help
 7   -v            : show version and exit
 8   -V            : show version and configure options then exit
 9   -t            : test configuration and exit
10   -T            : test configuration, dump it and exit
11   -q            : suppress non-error messages during configuration testing
12   -s signal     : send signal to a master process: stop, quit, reopen, reload
13   -p prefix     : set prefix path (default: /usr/local/nginx/)
14   -c filename   : set configuration file (default: conf/nginx.conf)
15   -g directives : set global directives out of configuration file
常用命令
nginx                  # 启动 nginx
nginx -t               # 测试配置文件语法是否正确
nginx -s reload        # 重新加载配置文件
nginx -s stop          # 停止 nginx
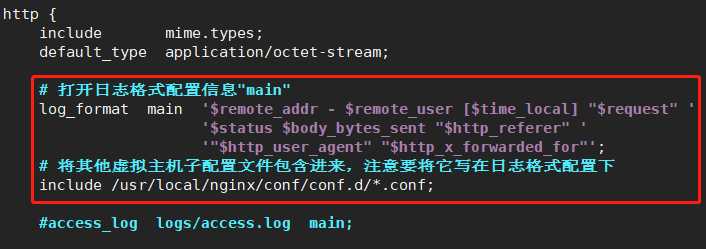
配置文件路径:/usr/local/nginx/conf
默认配置文件:
  1 #user  nobody;
  2 worker_processes  1;  # 启动的子进程数,若为计算密集型,worker数量等与cpu核数,若为IO密集型一般为cpu核数的2倍
  3
  4 #error_log  logs/error.log;  # 4-6行:全局错误日志位置级别,一般不在这里设置,应设置在每台虚拟主机处
  5 #error_log  logs/error.log  notice;
  6 #error_log  logs/error.log  info;
  7
  8 #pid        logs/nginx.pid;  # 指定pid文件
  9
 10
 11 events {    # 默认 use epoll;
 12     worker_connections  1024;  # 每个工作进程能接受的最大连接数
 13 }
 14
 15
 16 http {
 17     include       mime.types;  # 可传输的数据类型,可在/usr/local/nginx/conf/mime.types文件中查看
 18     default_type  application/octet-stream;
 19
 20     #log_format  main  ‘$remote_addr - $remote_user [$time_local] "$request" ‘
 21     #                  ‘$status $body_bytes_sent "$http_referer" ‘
 22     #                  ‘"$http_user_agent" "$http_x_forwarded_for"‘;  # 默认的日志格式,名字叫"main"
 23
 24     #access_log  logs/access.log  main;  # 访问日志的目录,格式为 "main"
 25
 26     sendfile        on;
 27     #tcp_nopush     on;  # 建议开启,26,27行开启可加快速度
 28
 29     #keepalive_timeout  0;
 30     keepalive_timeout  65;  # 长连接的超时时间
 31
 32     #gzip  on;  # 启动压缩特性,可节省带宽
 33
 34     server {            # 一对 server{} 就是一个虚拟主机
 35         listen       80;  # 设置虚拟主机监听端口 80
 36         server_name  localhost;  # 设置虚拟主机名称,可以取多个名字,用空格隔开即可
 37
 38         #charset koi8-r;
 39
 40         #access_log  logs/host.access.log  main;  # 本虚拟主机的访问日志
 41
 42         location / {   # 每个 server 可以有多个 location{},定义uri不同获取不同的响应
 43             root   html;    # 定义网页目录 /usr/local/nginx/html
 44             index  index.html index.htm;
 45         }
 46
 47         #error_page  404              /404.html;
 48
 49         # redirect server error pages to the static page /50x.html
 50         #
 51         error_page   500 502 503 504  /50x.html;  # 5xx 错误页面
 52         location = /50x.html {
 53             root   html;
 54         }
 55
 56         # proxy the PHP scripts to Apache listening on 127.0.0.1:80
 57         #
 58         #location ~ \.php$ {
 59         #    proxy_pass   http://127.0.0.1;
 60         #}
 61
 62         # pass the PHP scripts to FastCGI server listening on 127.0.0.1:9000
 63         #
 64         #location ~ \.php$ {
 65         #    root           html;
 66         #    fastcgi_pass   127.0.0.1:9000;
 67         #    fastcgi_index  index.php;
 68         #    fastcgi_param  SCRIPT_FILENAME  /scripts$fastcgi_script_name;
 69         #    include        fastcgi_params;
 70         #}
 71
 72         # deny access to .htaccess files, if Apache‘s document root
 73         # concurs with nginx‘s one
 74         #
 75         #location ~ /\.ht {
 76         #    deny  all;
 77         #}
 78     }
 79
 80
 81     # another virtual host using mix of IP-, name-, and port-based configuration
 82     #
 83     #server {
 84     #    listen       8000;
 85     #    listen       somename:8080;
 86     #    server_name  somename  alias  another.alias;
 87
 88     #    location / {
 89     #        root   html;
 90     #        index  index.html index.htm;
 91     #    }
 92     #}
 93
 94
 95     # HTTPS server
 96     #
 97     #server {
 98     #    listen       443 ssl;
 99     #    server_name  localhost;
100
101     #    ssl_certificate      cert.pem;
102     #    ssl_certificate_key  cert.key;
103
104     #    ssl_session_cache    shared:SSL:1m;
105     #    ssl_session_timeout  5m;
106
107     #    ssl_ciphers  HIGH:!aNULL:!MD5;
108     #    ssl_prefer_server_ciphers  on;
109
110     #    location / {
111     #        root   html;
112     #        index  index.html index.htm;
113     #    }
114     #}
115
116 }

示例:
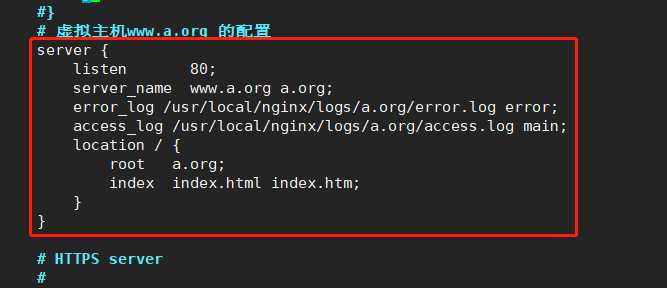
www.a.org,a.org 网页:/a.org 日志:/usr/local/nginx/logs/a.org
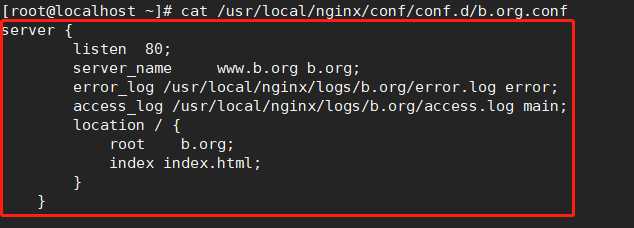
www.b.org,b.org 网页:/b.org 日志:/usr/local/nginx/logs/b.org
web 服务器端(192.168.233.134)
修改 /usr/local/nginx/conf/nginx.conf 配置文件
/usr/local/nginx/conf/conf.d/b.org.conf (虚拟主机 www.b.org 配置文件)
网页文件

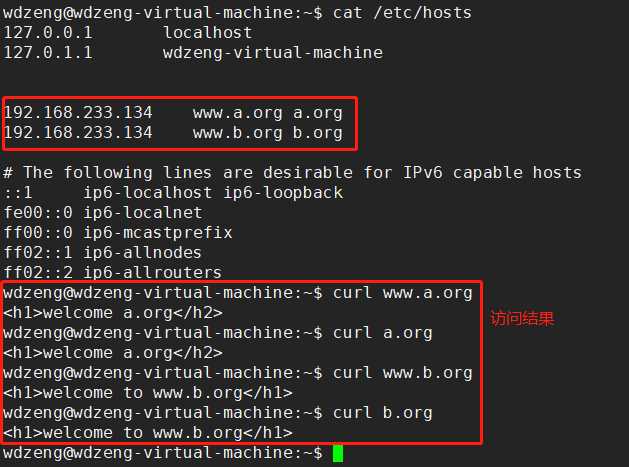
客户端 (192.168.233.130)
服务端的访问日志

HttpAccess 模块:此模块提供了一个简易的基于主机的访问控制。
放行
syntax: allow [ address | CIDR | all ] # CIDR 网段
default: no
context: http, server, location, limit_except # 可填入的配置文件位置
禁止
syntax: deny [ address | CIDR | all ]
default: no
context: http, server, location, limit_except
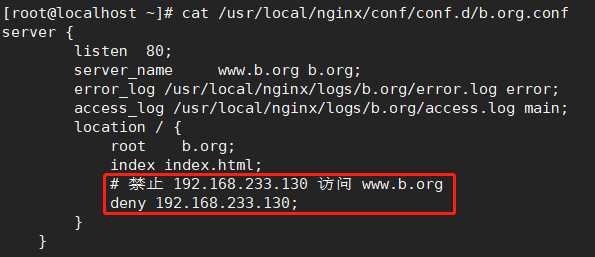
示例:禁止 192.168.233.130 访问 www.b.org
在服务器端配置虚拟主机 www.b.org
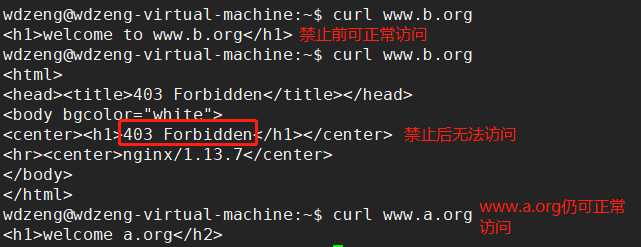
客户端访问情况
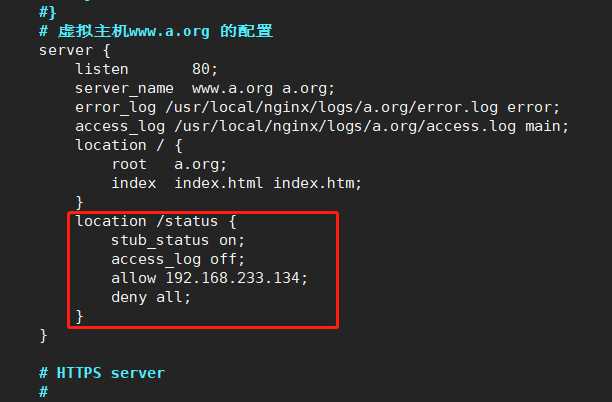
这个模块能够获取Nginx自上次启动以来的工作状态
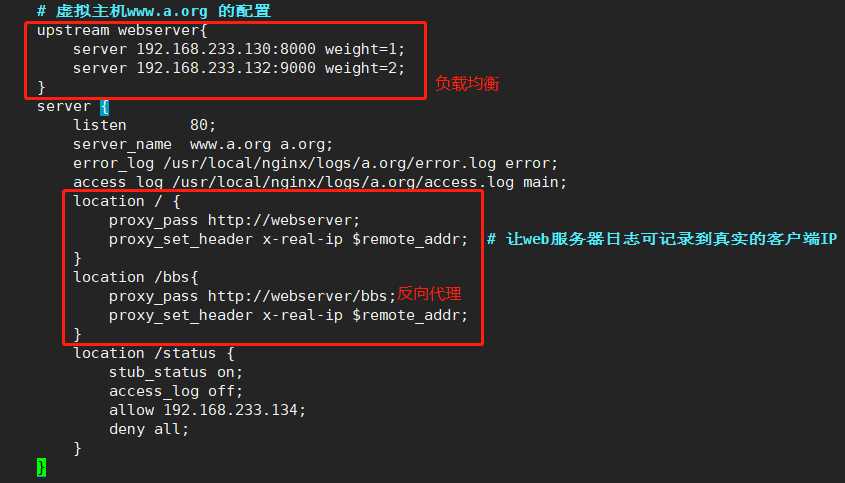
在服务器端配置虚拟主机 www.a.org
vim /usr/local/nginx/conf/nginx.conf

1 [root@localhost ~]# curl www.a.org/status
2 Active connections: 1   # 打开的所用连接数
3 server accepts handled requests
4  14 14 14   # 已接受的连接数  已处理的连接数  已处理的请求数(一个连接可以有多个请求)
5 Reading: 0 Writing: 1 Waiting: 0
# Reading: nginx 正在读取其报文首部的连接数
# Writing: nginx 正在读取其报文主体的连接数或正在处理请求的请求个数以及正在响应客户端的连接个数
# Waiting: 长连接中保持活动连接的连接个数

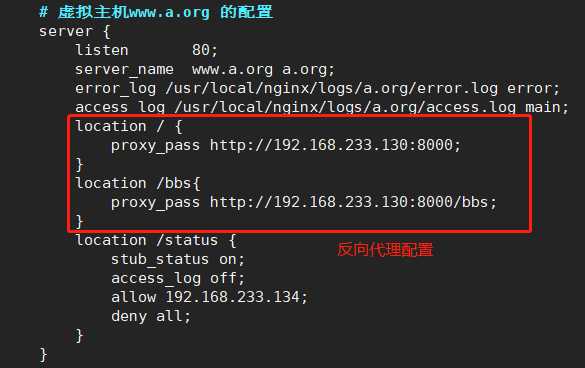
反向代理服务器(192.168.233.134)的配置
vim /usr/local/nginx/conf/nginx.conf
web 服务器(192.168.233.130:8000)开启一个 python 程序
 1 # coding:utf-8
 2
 3 import tornado.web
 4 import tornado.ioloop
 5 import tornado.httpserver
 6
 7 class IndexHandler(tornado.web.RequestHandler):
 8     def get(self):
 9         self.write("<h1>Hello Tornado!!!!!</h1>")
10
11 class BBSHandler(tornado.web.RequestHandler):
12     def get(self):
13         self.write("<h1>Welcome to BBS!!!!!</h1>")
14
15 if __name__ == "__main__":
16     app = tornado.web.Application([
17         (r"/", IndexHandler),
18         (r"/bbs", BBSHandler),
19     ])
20     http_server=tornado.httpserver.HTTPServer(app)
21     http_server.bind(8000)
22     http_server.start(3)
23     tornado.ioloop.IOLoop.current().start()
修改windows下的 C:\Windows\System32\drivers\etc\hosts文件
192.168.233.134 www.a.com


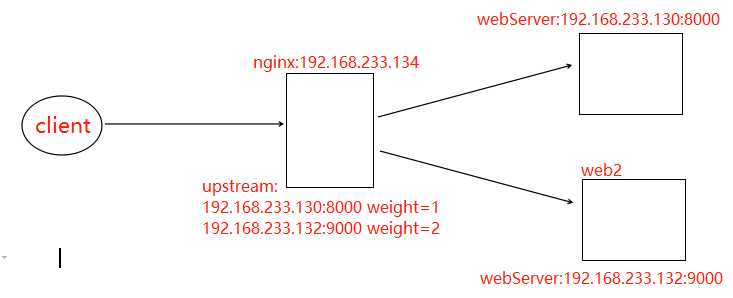
配置负载均衡服务器(192.168.233.134)/usr/local/nginx/conf/nginx.conf 文件
在web服务器端(192.168.233.132:9000)再启动一个python程序
 1 # coding:utf-8
 2
 3 import tornado.web
 4 import tornado.ioloop
 5 import tornado.httpserver
 6
 7 class IndexHandler(tornado.web.RequestHandler):
 8     def get(self):
 9         self.write("<h1>web2:Hello Tornado!!!!!</h1>")
10
11 class BBSHandler(tornado.web.RequestHandler):
12     def get(self):
13         self.write("<h1>web2:BBS!!!!!</h1>")
14
15 if __name__ == "__main__":
16     app = tornado.web.Application([
17         (r"/", IndexHandler),
18         (r"/bbs", BBSHandler),
19     ])
20     http_server=tornado.httpserver.HTTPServer(app)
21     http_server.bind(8000)
22     http_server.start(3)
23     tornado.ioloop.IOLoop.current().start()
在客户端访问 www.a.org


缓存组成的两部分
共享内存:存储键和缓存对象元数据
磁盘空间:存储数据
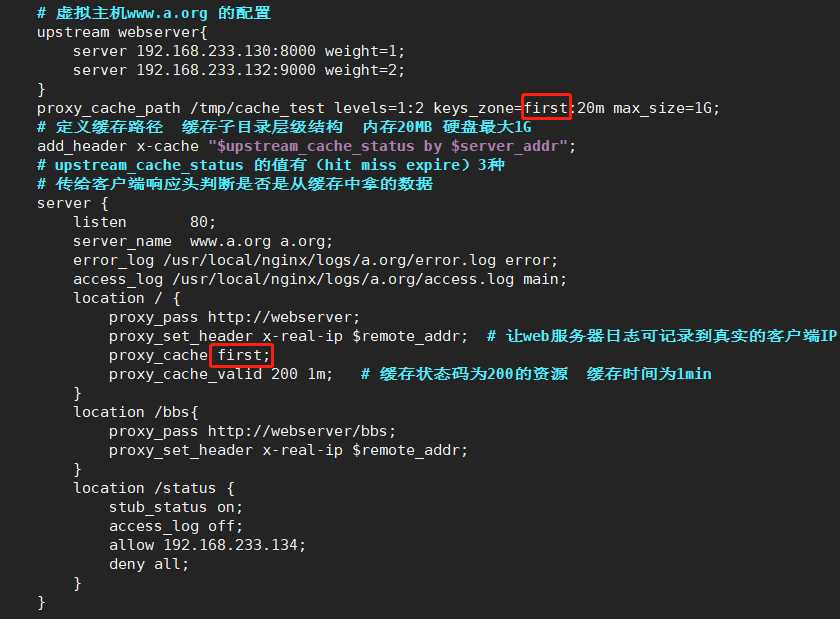
定义缓存空间
proxy_cache_path 不能定义在 server{} 中
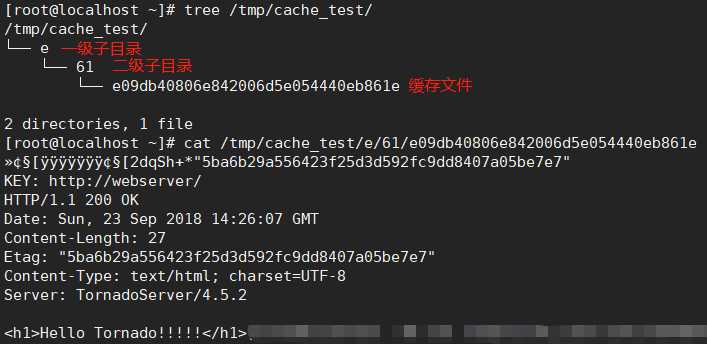
proxy_cache_path /nginx/cache/first levels=2:1:2 keys_zone=first:20m max_size=1G
levels=2:1:2 3级子目录,第一级为2个字符,第二个为1个,第三个为2个,字符个数最多为2个
keys_zone=name:size 定义存储键的区域(定义共享内存的名称)
max_size=1G 指定/nginx/cache/first中的1G空间用于存储缓存数据
代理缓存服务器(192.168.233.134)的配置
vim /usr/local/nginx/conf/nginx.conf
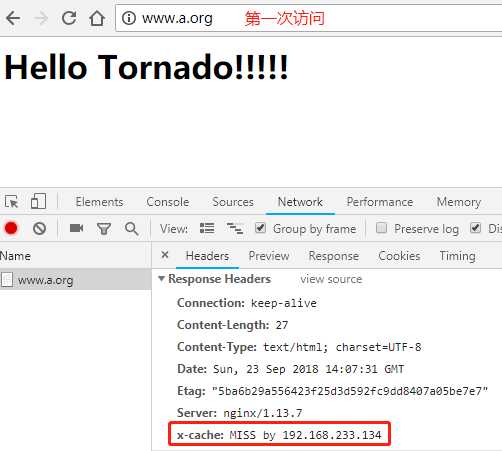
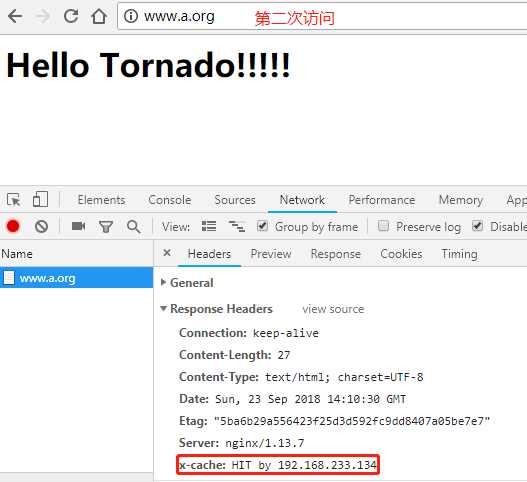
首次访问时 (x-cache:MISS by 192.168.233.134)在一分钟内继续访问(x-cache:HIT by 192.168.233.134)
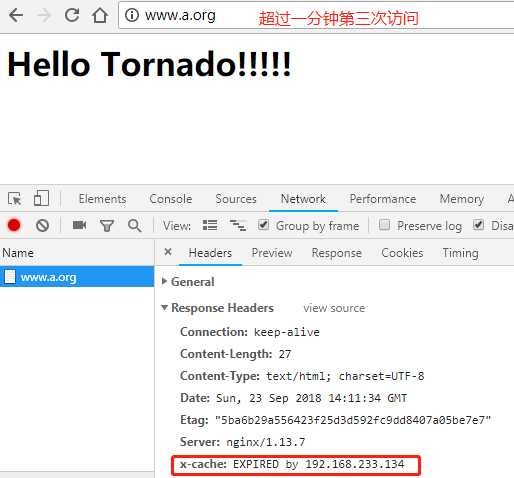
超过一分钟访问(x-cache:EXPIRED by 192.168.233.134)继续在一分钟内访问(x-cache:HIT by 192.168.233.134)
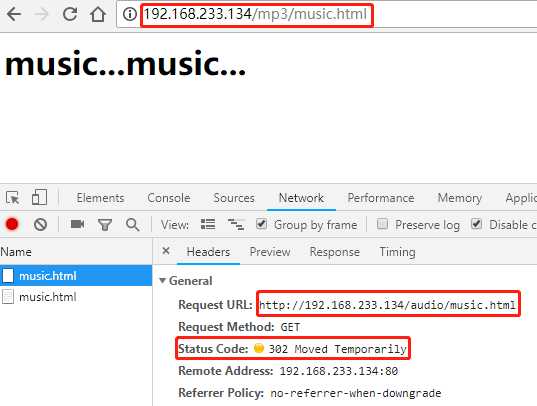
语法: rewrite regex replacement flag
默认: none
作用域: server, location, if
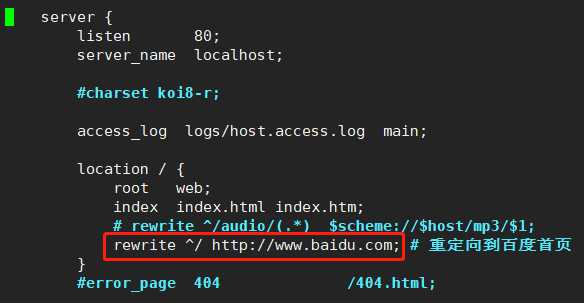
示例:http://192.168.233.134/audio/music.html 重定向到 http://192.168.233.134/mp3/music.html
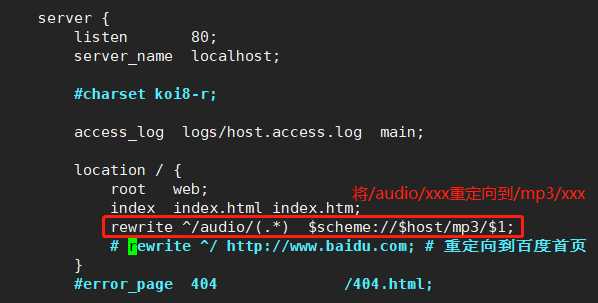
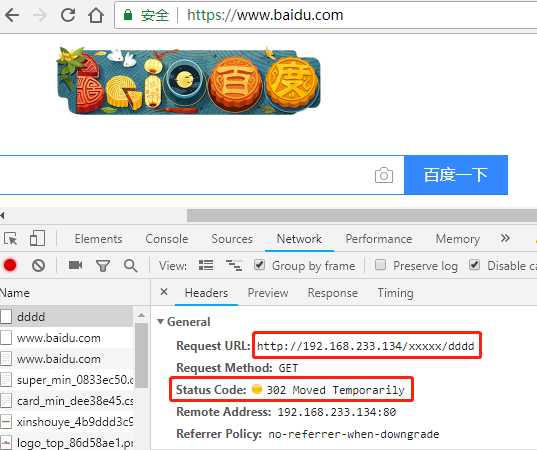
重定向到百度首页
标签:ges current Stub 命令 文件路径 show char exit ali
原文地址:https://www.cnblogs.com/brotherdong888/p/9691395.html