标签:poll uid enable tar zxvf water xca 窗口 sse 依赖关系
一、 Nginx 的优化
1、 编译安装前优化
编译前的优化主要是用来修改程序名等等, 目的更改源码隐藏软件名称和版本号
安装 zlib-devel、 pcre-devel 等依赖包
[root@www ~]# yum -y install gcc gcc-c++ make libtool zlib zlib-devel pcre pcre-devel openssl
openssl-devel
下载 nginx 的源码包: http://nginx.org/download
解压源码包:
[root@www ~]# tar zxf nginx-1.10.2.tar.gz
[root@www ~]# cd nginx-1.10.2/
隐藏软件名称和版本号
[root@www nginx-1.10.2]# vim src/core/nginx.h
//此行修改的是你想要的版本
#define NGINXVERSION "1.10.2" //第 13 行
//此行修改的是你想修改的软件名称
#define NGINXVER "nginx/" NGINXVERSION //第 14 行
修改上面的信息, 即可更改 nginx 显示版本。 例如: (curl –I 可看到, 请求头和响应头显示)
#define NGINXVERSION "7.0"
#define NGINXVER "IIS/" NGINXVERSION
修改 HTTP 头信息中的 connection 字段,防止回显具体版本号
拓展:通用 http 头 , 通用头包含请求和响应消息都支持的头,通用头包含 Cache-Control、
Connection、 Date、 Pragma、 Transfer-Encoding、 Upgrade、 Via。对通用头的扩展要求通讯双
方都支持此扩展,如果存在不支持的通用头,一般将会作为实体头处理。那么也就是说有部
分设备,或者是软件,能获取到 connection,部分不能,要隐藏就要彻底!
[root@www nginx-1.10.2]# vi src/http/ngxhttpheaderfiltermodule.c
修改前:
static char ngxhttpserverstring[] = "Server: nginx" CRLF; //第 49 行
修改后:
static char ngxhttpserverstring[] = "Server: IIS" CRLF;
定义了 http 错误码的返回:
有时候我们页面程序出现错误, Nginx 会代我们返回相应的错误代码,回显的时候,会带上
nginx 和版本号,我们把他隐藏起来
[root@www nginx-1.10.2]# vi src/http/ngxhttpspecialresponse.c
修改前
static uchar ngxhttperrortail[] = //第 29 行
"<hr><center>nginx</center>" CRLF
"</body>" CRLF
"</html>" CRLF
;
修改后
static uchar ngxhttperrortail[] =
"<hr><center>IIS</center>" CRLF
"</body>" CRLF
"</html>" CRLF
;
2、安装 ngnix
[root@www ~]# groupadd www #添加 www 组
[root@www ~]# useradd -g www www -s /sbin/nologin #创建 nginx运行账户 www并加入到
www 组,不允许 www 用户直接登录系统
[root@www nginx-1.10.2]# ./configure --prefix=/usr/local/nginx1.10
--with-httpdavmodule --with-httpstubstatusmodule
--with-httpadditionmodule --with-httpsubmodule
--with-httpflvmodule --with-httpmp4module --with-pcre
--with-httpsslmodule --with-httpgzipstaticmodule
--user=www --group=www
[root@www nginx-1.10.2]# make && make install
相关选项说明
--with-httpdavmodule #增加 PUT,DELETE,MKCOL:创建集合, COPY 和 MOVE 方法
--with-httpstubstatusmodule #获取 Nginx 的状态统计信息
--with-httpadditionmodule #作为一个输出过滤器,支持不完全缓冲,分部分相应请求
--with-httpsubmodule #允许一些其他文本替换 Nginx 相应中的一些文本
--with-httpflvmodule #提供支持 flv 视频文件支持
--with-httpmp4module #提供支持 mp4 视频文件支持,提供伪流媒体服务端支持
--with-httpsslmodule #启用 ngxhttpsslmodule
如果 pcre 是通过编译安装的话,例如
#tar zxvf /usr/local/src/pcre-8.36.tar.gz -C /usr/local/src/
#cd /usr/local/src/pcre-8.36
#./configure && make && make install
则--with-pcre=/usr/local/src/pcre-8.36 #需要注意,这里指的是源码,用#./configure --help
|grep pcre 查看帮助
[root@www nginx-1.10.2]# ln -s /usr/local/nginx1.10/sbin/nginx /usr/local/sbin/
[root@www nginx-1.10.2]# nginx -t
启动 nginx
[root@www nginx-1.10.2]# nginx
[root@www nginx-1.10.2]# netstat -anpt | grep nginx
tcp 0 0 0.0.0.0:80 0.0.0.0: LISTEN 9834/nginx: master
测试是否隐藏了版本和软件名
[root@www ~]# curl -I http://127.0.0.1
HTTP/1.1 200 OK
Server: IIS/7.0
Date: Sat, 05 Nov 2016 14:38:21 GMT
Content-Type: text/html
Content-Length: 612
Last-Modified: Sat, 05 Nov 2016 14:19:47 GMT
Connection: keep-alive
ETag: "581dea83-264"
Accept-Ranges: bytes
[root@www ~]# nginx -h
nginx version: IIS/7.0
Usage: nginx [-?hvVtTq] [-s signal] [-c filename] [-p prefix] [-g directives]
Options:
-v : show version and exit
-V : show version and configure options then exit
-t : test configuration and exit
-T : test configuration, dump it and exit
-q : suppress non-error messages during configuration testing
-s signal : send signal to a master process: stop, quit, reopen, reload
-p prefix : set prefix path (default: /usr/local/nginx1.10/)
-c filename : set configuration file (default: conf/nginx.conf)
-g directives : set global directives out of configuration file
3、 nginx 配置项优化
[root@www ~]# ps -ef | grep nginx
root 9834 1 0 22:36 ? 00:00:00 nginx: master process nginx
www 9953 9834 0 22:43 ? 00:00:00 nginx: worker process
在这里我们还可以看到在查看的时候, work 进程是 nginx 程序用户,但是 master 进程还是
root, 其中, master 是监控进程,也叫主进程, work 是工作进程,部分还有 cache 相关进程,
关系如图:
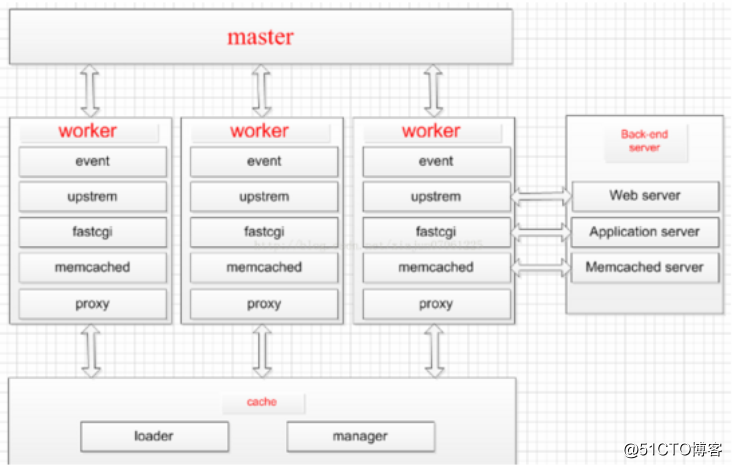
可以直接理解为 master 是管理员, work 进程才是为用户提供服务的!
(1):Nginx 运行工作进程个数,一般我们设置 CPU 的核心或者核心数 x2
如果不了解 cpu 的核数, 可以 top 命令之后按 1 也可以看出来,也可以查看/proc/cpuinfo 文
件#grep ^processor /proc/cpuinfo | wc -l
[root@www ~]# vi /usr/local/nginx1.10/conf/nginx.conf
workerprocesses 4;
[root@www ~]# /usr/local/nginx1.10/sbin/nginx -s reload
[root@www ~]# ps -aux | grep nginx | grep -v grep
root 9834 0.0 0.0 47556 1948 ? Ss 22:36 0:00 nginx: master process nginx
www 10135 0.0 0.0 50088 2004 ? S 22:58 0:00 nginx: worker process
www 10136 0.0 0.0 50088 2004 ? S 22:58 0:00 nginx: worker process
www 10137 0.0 0.0 50088 2004 ? S 22:58 0:00 nginx: worker process
www 10138 0.0 0.0 50088 2004 ? S 22:58 0:00 nginx: worker process
Nginx 运行 CPU 亲和力
比如 4 核配置
workerprocesses 4;
workercpuaffinity 0001 0010 0100 1000
比如 8 核配置
workerprocesses 8;
workercpuaffinity 00000001 00000010 00000100 00001000 00010000 00100000 01000000
10000000;
workerprocesses 最多开启 8 个, 8 个以上性能提升不会再提升了,而且稳定性变得更低,
所以 8 个进程够用了。
Nginx 最多可以打开文件数
workerrlimitnofile 65535;
这个指令是指当一个 nginx 进程打开的最多文件描述符数目,理论值应该是最多打开文件数
(ulimit -n)与 nginx 进程数相除,但是 nginx 分配请求并不是那么均匀,所以最好与 ulimit -n
的值保持一致。
注:
文件资源限制的配置可以在/etc/security/limits.conf 设置,针对 root/user 等各个用户或者
代表所有用户来设置。
soft nofile 65535
hard nofile 65535
用户重新登录生效(ulimit -n)
(2)Nginx 事件处理模型
events {
use epoll;
workerconnections 65535;
multiaccept on;
}
nginx 采用 epoll 事件模型,处理效率高
workconnections 是单个 worker 进程允许客户端最大连接数,这个数值一般根据服务器性
能和内存来制定,实际最大值就是 worker 进程数乘以 workconnections
实际我们填入一个 65535,足够了,这些都算并发值,一个网站的并发达到这么大的数量,
也算一个大站了!
multiaccept 告诉 nginx 收到一个新连接通知后接受尽可能多的连接
(3)开启高效传输模式
http {
include mime.types;
defaulttype application/octet-stream;
……
sendfile on;
tcpnopush on;
……
Include mime.types; //媒体类型, include 只是一个在当前文件中包含另一个文件内容的指令
defaulttype application/octet-stream; //默认媒体类型足够
sendfile on; //开启高效文件传输模式, sendfile 指令指定 nginx 是否调用 sendfile 函数来
输出文件,对于普通应用设为 on,如果用来进行下载等应用磁盘 IO 重负载应用,可设置为
off,以平衡磁盘与网络 I/O 处理速度,降低系统的负载。
注意:如果图片显示不正常把这个改成 off。
tcpnopush on; 必须在 sendfile 开启模式才有效,防止网路阻塞,积极的减少网络报文
段的数量(告诉 nginx 在一个数据包里发送所有头文件,而不一个接一个的发送。)
(4)连接超时时间
主要目的是保护服务器资源, CPU,内存,控制连接数,因为建立连接也是需要消耗资源的
keepalivetimeout 60;
tcpnodelay on;
clientheaderbuffersize 4k;
openfilecache max=102400 inactive=20s;
openfilecachevalid 30s;
openfilecacheminuses 1;
clientheadertimeout 15;
clientbodytimeout 15;
resettimedoutconnection on;
sendtimeout 15;
servertokens off;
clientmaxbodysize 10m;
keepalivedtimeout 客户端连接保持会话超时时间,超过这个时间,服务器断开这个链接
tcpnodelay;也是防止网络阻塞,不过要包涵在 keepalived 参数才有效
clientheaderbuffersize 4k;
客户端请求头部的缓冲区大小,这个可以根据你的系统分页大小来设置,一般一个请求头的
大小不会超过 1k,不过由于一般系统分页都要大于 1k,所以这里设置为分页大小。分页大
小可以用命令 getconf PAGESIZE 取得。
openfilecache max=102400 inactive=20s;
这个将为打开文件指定缓存,默认是没有启用的, max 指定缓存数量,建议和打开文件
数一致, inactive 是指经过多长时间文件没被请求后删除缓存。
openfilecachevalid 30s;
这个是指多长时间检查一次缓存的有效信息。
openfilecacheminuses 1;
openfilecache 指令中的 inactive 参数时间内文件的最少使用次数,如果超过这个数字,文
件描述符一直是在缓存中打开的,如上例,如果有一个文件在 inactive 时间内一次没被使用,
它将被移除。
clientheadertimeout 设置请求头的超时时间。我们也可以把这个设置低些,如果超过这个
时间没有发送任何数据, nginx 将返回 request time out 的错误
clientbodytimeout 设置请求体的超时时间。我们也可以把这个设置低些,超过这个时间没
有发送任何数据,和上面一样的错误提示
resettimeoutconnection 告诉 nginx 关闭不响应的客户端连接。这将会释放那个客户端所
占有的内存空间。
sendtimeout 响应客户端超时时间,这个超时时间仅限于两个活动之间的时间,如果超过
这个时间,客户端没有任何活动, nginx 关闭连接
servertokens 并不会让 nginx 执行的速度更快,但它可以关闭在错误页面中的 nginx 版本
数字,这样对于安全性是有好处的。
clientmaxbodysize 上传文件大小限制
(5)fastcgi 调优
fastcgiconnecttimeout 600;
fastcgisendtimeout 600;
fastcgireadtimeout 600;
fastcgibuffersize 64k;
fastcgibuffers 4 64k;
fastcgibusybufferssize 128k;
fastcgitempfilewritesize 128k;
fastcgitemppath /usr/local/nginx1.10/nginxtmp;
fastcgiintercepterrors on;
fastcgicachepath /usr/local/nginx1.10/fastcgicache levels=1:2 keyszone=cachefastcgi:128m
inactive=1d maxsize=10g;
Cache: 写入缓存区
Buffer: 读取缓存区
Fastcgi 是静态服务和动态服务的一个接口
fastcgiconnecttimeout 600; #指定连接到后端 FastCGI 的超时时间。
fastcgisendtimeout 600; #向 FastCGI 传送请求的超时时间。
fastcgireadtimeout 600; #指定接收 FastCGI 应答的超时时间。
fastcgibuffersize 64k; #指定读取 FastCGI 应答第一部分需要用多大的缓冲区, 默认的缓冲区
大小为 fastcgibuffers 指令中的每块大小,可以将这个值设置更小。
fastcgibuffers 4 64k; #指定本地需要用多少和多大的缓冲区来缓冲 FastCGI 的应答请求,如果
一个 php 脚本所产生的页面大小为 256KB,那么会分配 4 个 64KB 的缓冲区来缓存,如果页
面大小大于 256KB,那么大于 256KB 的部分会缓存到 fastcgitemppath 指定的路径中,但是
这并不是好方法,因为内存中的数据处理速度要快于磁盘。一般这个值应该为站点中 php
脚本所产生的页面大小的中间值,如果站点大部分脚本所产生的页面大小为 256KB,那么可
以把这个值设置为“8 32K”、 “4 64k”等。
fastcgibusybufferssize 128k; #建议设置为 fastcgibuffers 的两倍,繁忙时候的 buffer
fastcgitempfilewritesize 128k; #在写入 fastcgitemppath 时将用多大的数据块,默认
值是 fastcgibuffers 的两倍, 该数值设置小时若负载上来时可能报 502 Bad Gateway
fastcgitemppath #缓存临时目录
fastcgiintercepterrors on;# 这个指令指定是否传递 4xx 和 5xx 错误信息到客户端,或者允许
nginx 使用 errorpage 处理错误信息。
注: 静态文件不存在会返回 404 页面,但是 php 页面则返回空白页!!
fastcgicachepath /usr/local/nginx1.10/fastcgicache levels=1:2 keyszone=cachefastcgi:128m
inactive=1d maxsize=10g; # fastcgicache 缓存目录,可以设置目录层级,比如 1:2 会生成
16256 个子目录, cachefastcgi 是这个缓存空间的名字, cache 是用多少内存(这样热门的
内容 nginx 直接放内存,提高访问速度), inactive 表示默认失效时间, 如果缓存数据在失效
时间内没有被访问,将被删除, maxsize 表示最多用多少硬盘空间。
fastcgicache cachefastcgi; #表示开启 FastCGI 缓存并为其指定一个名称。开启缓存非常有
用,可以有效降低 CPU 的负载,并且防止 502 的错误放生。cachefastcgi 为 proxycachepath
指令创建的缓存区名称
fastcgicachevalid 200 302 1h; #用来指定应答代码的缓存时间,实例中的值表示将 200 和
302 应答缓存一小时,要和 fastcgicache 配合使用
fastcgicachevalid 301 1d; #将 301 应答缓存一天
fastcgicachevalid any 1m; #将其他应答缓存为 1 分钟
fastcgicacheminuses 1; #该指令用于设置经过多少次请求的相同 URL 将被缓存。
fastcgicachekey http://$host$requesturi; #该指令用来设置 web缓存的 Key值,nginx根据 Key值 md5 哈希存 储 .一 般根 据 $host( 域名 )、 $requesturi(请 求的路 径 ) 等变 量组 合成
proxycachekey 。
fastcgipass #指定 FastCGI 服务器监听端口与地址,可以是本机或者其它
总结:
nginx 的缓存功能有: proxycache / fastcgicache
proxycache 的作用是缓存后端服务器的内容,可能是任何内容,包括静态的和动态。
fastcgicache 的作用是缓存 fastcgi 生成的内容,很多情况是 php 生成的动态的内容。
proxycache 缓存减少了 nginx 与后端通信的次数,节省了传输时间和后端宽带。
fastcgicache 缓存减少了 nginx 与 php 的通信的次数,更减轻了 php 和数据库(mysql)的压力。
(6)gzip 调优
使用 gzip 压缩功能,可能为我们节约带宽,加快传输速度,有更好的体验,也为我们节约
成本,所以说这是一个重点。
Nginx 启用压缩功能需要你来 ngxhttpgzipmodule 模块, apache 使用的是 moddeflate
一般我们需要压缩的内容有:文本, js, html, css,对于图片,视频, flash 什么的不压缩,
同时也要注意,我们使用 gzip 的功能是需要消耗 CPU 的!
gzip on;
gzipminlength 2k;
gzipbuffers 4 32k;
gziphttpversion 1.1;
gzipcomplevel 6;
gziptypes text/plain text/css text/javascript application/json application/javascript
application/x-javascript application/xml;
gzipvary on;
gzipproxied any;
gzip on; #开启压缩功能
gzipminlength 1k; #设置允许压缩的页面最小字节数,页面字节数从 header 头的
Content-Length 中获取,默认值是 0,不管页面多大都进行压缩,建议设置成大于 1K,如果
小与 1K 可能会越压越大。
gzipbuffers 4 32k; #压缩缓冲区大小,表示申请 4个单位为 32K的内存作为压缩结果流缓存,
默认值是申请与原始数据大小相同的内存空间来存储 gzip 压缩结果。
gziphttpversion 1.1; #压缩版本, 用于设置识别 HTTP 协议版本,默认是 1.1,目前大部分浏
览器已经支持 GZIP 解压,使用默认即可
gzipcomplevel 6; #压缩比例,用来指定 GZIP 压缩比, 1 压缩比最小,处理速度最快, 9 压
缩比最大,传输速度快,但是处理慢,也比较消耗 CPU 资源。
gziptypes text/css text/xml application/javascript; #用来指定压缩的类型, ‘text/html’类型总是
会被压缩。
默认值: gziptypes text/html (默认不对 js/css 文件进行压缩)
#压缩类型,匹配 MIME 类型进行压缩
#不能用通配符 text/
#(无论是否指定)text/html 默认已经压缩
#设置哪压缩种文本文件可参考 conf/mime.types
gzipvary on; #vary header 支持,改选项可以让前端的缓存服务器缓存经过 GZIP 压缩的页
面,例如用 Squid 缓存经过 nginx 压缩的数据
(7) expires 缓存调优
缓存,主要针对于图片, css, js 等元素更改机会比较少的情况下使用,特别是图片,占用
带宽大,我们完全可以设置图片在浏览器本地缓存 365d, css, js, html 可以缓存个 10 来天,
这样用户第一次打开加载慢一点,第二次,就非常快了!缓存的时候,我们需要将需要缓存
的拓展名列出来, Expires 缓存配置在 server 字段里面
location ~ .(ico|jpe?g|gif|png|bmp|swf|flv)$ {
expires 30d;
#lognotfound off;
accesslog off;
}
location ~ .(js|css)$ {
expires 7d;
lognotfound off;
accesslog off;
}
注: lognotfound off;是否在 errorlog 中记录不存在的错误。默认是。
总结:
expire 功能优点 (1) expires 可以降低网站购买的带宽,节约成本 (2)同时提升用户访问
体验 (3)减轻服务的压力,节约服务器成本,是 web 服务非常重要的功能。 expire 功能
缺点: 被缓存的页面或数据更新了,用户看到的可能还是旧的内容,反而影响用户体验。 解
决办法: 第一个缩短缓存时间,例如: 1 天, 但不彻底,除非更新频率大于 1 天; 第二个
对缓存的对象改名。
网站不希望被缓存的内容 1)网站流量统计工具 2)更新频繁的文件(google 的 logo)
(8)防盗链
防止别人直接从你网站引用图片等链接,消耗了你的资源和网络流量,那么我们的解决办法
由几种: 1:水印,品牌宣传,你的带宽,服务器足够 2:防火墙,直接控制,前提是你知
道 IP 来源 3:防盗链策略 下面的方法是直接给予 404 的错误提示
location ~ ^.+.(jpg|gif|png|swf|flv|wma|wmv|asf|mp3|mmf|zip|rar)$ {
validreferers none blocked www.benet.com benet.com;
if ($invalidreferer) {
#return 302 http://www.benet.com/img/nolink.jpg;
return 404;
break;
}
accesslog off;
}
(9)内核参数优化
fs.file-max = 999999:这个参数表示进程(比如一个 worker 进程)可以同时打开的最大句柄
数,这个参数直线限制最大并发连接数,需根据实际情况配置。
net.ipv4.tcpmaxtwbuckets = 6000 #这个参数表示操作系统允许 TIMEWAIT 套接字数量
的最大值,如果超过这个数字, TIMEWAIT 套接字将立刻被清除并打印警告信息。该参数默
认为 180000,过多的 TIMEWAIT 套接字会使 Web 服务器变慢。
注: 主动关闭连接的服务端会产生 TIMEWAIT 状态的连接
net.ipv4.iplocalportrange = 1024 65000 #允许系统打开的端口范围。
net.ipv4.tcptwrecycle = 1 #启用 timewait 快速回收。
net.ipv4.tcptwreuse = 1 #开启重用。允许将 TIME-WAIT sockets 重新用于新的 TCP 连接。 这
对于服务器来说很有意义,因为服务器上总会有大量 TIME-WAIT 状态的连接。
net.ipv4.tcpkeepalivetime = 30:这个参数表示当 keepalive 启用时, TCP 发送 keepalive 消息
的频度。默认是 2 小时,若将其设置的小一些,可以更快地清理无效的连接。
net.ipv4.tcpsyncookies = 1 #开启 SYN Cookies,当出现 SYN 等待队列溢出时,启用 cookies 来
处理。
net.core.somaxconn = 40960 #web 应用中 listen 函数的 backlog 默认会给我们内核参数的
net.core.somaxconn 限制到 128,而 nginx 定义的 NGXLISTENBACKLOG 默认为 511,所以
有必要调整这个值。
注: 对于一个 TCP 连接, Server 与 Client 需要通过三次握手来建立网络连接.当三次握手成功
后,我们可以看到端口的状态由 LISTEN 转变为 ESTABLISHED,接着这条链路上就可以开始传送
数据了.每一个处于监听(Listen)状态的端口,都有自己的监听队列.监听队列的长度与如
somaxconn 参数和使用该端口的程序中 listen()函数有关
somaxconn 参数:定义了系统中每一个端口最大的监听队列的长度,这是个全局的参数,默认值
为 128, 对于一个经常处理新连接的高负载 web 服务环境来说,默认的 128 太小了。大多
数环境这个值建议增加到 1024 或者更多。大的侦听队列对防止拒绝服务 DoS ***也会有
所帮助。
net.core.netdevmaxbacklog = 262144 #每个网络接口接收数据包的速率比内核处理这些包
的速率快时,允许送到队列的数据包的最大数目。
net.ipv4.tcpmaxsynbacklog = 262144 #这个参数标示 TCP 三次握手建立阶段接受 SYN 请求
队列的最大长度,默认为 1024,将其设置得大一些可以使出现 Nginx 繁忙来不及 accept 新
连接的情况时, Linux 不至于丢失客户端发起的连接请求。
net.ipv4.tcprmem = 10240 87380 12582912#这个参数定义了 TCP 接受缓存(用于 TCP 接
受滑动窗口)的最小值、默认值、最大值。
net.ipv4.tcpwmem = 10240 87380 12582912:这个参数定义了 TCP 发送缓存(用于 TCP 发送
滑动窗口)的最小值、默认值、最大值。
net.core.rmemdefault = 6291456:这个参数表示内核套接字接受缓存区默认的大小。
net.core.wmemdefault = 6291456:这个参数表示内核套接字发送缓存区默认的大小。
net.core.rmemmax = 12582912:这个参数表示内核套接字接受缓存区的最大大小。
net.core.wmemmax = 12582912:这个参数表示内核套接字发送缓存区的最大大小。
net.ipv4.tcpsyncookies = 1:该参数与性能无关,用于解决 TCP 的 SYN ***。
下面贴一个完整的内核优化设置:
fs.file-max = 999999
net.ipv4.ipforward = 0
net.ipv4.conf.default.rpfilter = 1
net.ipv4.conf.default.acceptsourceroute = 0
kernel.sysrq = 0
kernel.coreusespid = 1
net.ipv4.tcpsyncookies = 1
kernel.msgmnb = 65536
kernel.msgmax = 65536
kernel.shmmax = 68719476736
kernel.shmall = 4294967296
net.ipv4.tcpmaxtwbuckets = 6000
net.ipv4.tcpsack = 1
net.ipv4.tcpwindowscaling = 1
net.ipv4.tcprmem = 10240 87380 12582912
net.ipv4.tcpwmem = 10240 87380 12582912
net.core.wmemdefault = 8388608
net.core.rmemdefault = 8388608
net.core.rmemmax = 16777216
net.core.wmemmax = 16777216
net.core.netdevmaxbacklog = 262144
net.core.somaxconn = 40960
net.ipv4.tcpmaxorphans = 3276800
net.ipv4.tcpmaxsynbacklog = 262144
net.ipv4.tcptimestamps = 0
net.ipv4.tcpsynackretries = 1
net.ipv4.tcpsynretries = 1
net.ipv4.tcptwrecycle = 1
net.ipv4.tcptwreuse = 1
net.ipv4.tcpmem = 94500000 915000000 927000000
net.ipv4.tcpfintimeout = 1
net.ipv4.tcpkeepalivetime = 30
net.ipv4.iplocalportrange = 1024 65000
执行 sysctl -p 使内核修改生效
(10) 关于系统连接数的优化:
linux 默认值 open files 为 1024
#ulimit -n
1024
说明 server 只允许同时打开 1024 个文件
使用 ulimit -a 可以查看当前系统的所有限制值,使用 ulimit -n 可以查看当前的最大打开文
件数。
新装的 linux 默认只有 1024 ,当作负载较大的服务器时,很容易遇到 error: too many open
files。因此,需要将其改大
在/etc/security/limits.conf 最后增加:
soft nofile 65535
hard nofile 65535
soft noproc 65535
hard noproc 65535
二、部署 LNMP
1、安装 php
(1)解决依赖关系
[root@www ~]# yum -y install libxml2-devel libcurl-devel openssl-devel bzip2-devel
安装 libmcrypt
[root@www ~]# tar zxf libmcrypt-2.5.7.tar.gz
[root@wwwr ~]# cd libmcrypt-2.5.7/
[root@www libmcrypt-2.5.7]# ./configure --prefix=/usr/local/libmcrypt && make && make install
(2)编译安装 php
[root@www ~]# tar zxf php-5.6.27.tar.gz
[root@www ~]# cd php-5.6.27/
[root@www php-5.6.27]# ./configure --prefix=/usr/local/php5.6 --with-mysql=mysqlnd
--with-pdo-mysql=mysqlnd --with-mysqli=mysqlnd --with-openssl --enable-fpm --enable-sockets
--enable-sysvshm --enable-mbstring --with-freetype-dir --with-jpeg-dir --with-png-dir --with-zlib
--with-libxml-dir=/usr --enable-xml --with-mhash --with-mcrypt=/usr/local/libmcrypt
--with-config-file-path=/etc --with-config-file-scan-dir=/etc/php.d --with-bz2
--enable-maintainer-zts
[root@www php-5.6.27]# make && make install
(3)提供 php 配置文件
[root@www php-5.6.27]# cp php.ini-production /etc /php.ini
(4)为 php-fpm 提供脚本
[root@www php-5.6.27]# cp sapi/fpm/init.d.php-fpm /etc/init.d/php-fpm
[root@www php-5.6.27]# chmod +x /etc/init.d/php-fpm
[root@www php-5.6.27]# chkconfig --add php-fpm
[root@www php-5.6.27]# chkconfig php-fpm on
(5)提供 php-fpm 配置文件并编辑:
#cp /usr/local/php5.6/etc/php-fpm.conf.default /usr/local/php5.6/etc/php-fpm.conf
[root@www ~]# vi /usr/local/php5.6/etc/php-fpm.conf
修改内容如下:
pid = run/php-fpm.pid
listen = 0.0.0.0:9000
pm.maxchildren = 50
pm.startservers = 5
pm.minspareservers = 5
pm.maxspareservers = 35
启动 php-fpm 服务:
[root@www ~]# service php-fpm start
Starting php-fpm done
[root@www ~]# netstat -anpt | grep php-fpm
tcp 0 0 0.0.0.0:9000 0.0.0.0: LISTEN
25456/php-fpm: mast
[root@www ~]# firewall-cmd --permanent --add-port=9000/tcp
success
[root@www ~]# firewall-cmd --reload
Success
在 nginx.conf 文件的 server 中添加下面内容支持 php
location ~ ..(php|php5)?$ {
root html;
fastcgipass 127.0.0.1:9000;
fastcgiindex index.php;
include fastcgi.conf;
fastcgicache cachefastcgi;
fastcgicachevalid 200 302 1h;
fastcgicachevalid 301 1d;
fastcgicachevalid any 1m;
fastcgicacheminuses 1;
fastcgicacheusestale error timeout invalidheader http500;
fastcgicachekey http://$host$requesturi;
}
下面是 nginx.conf 的一个完整配置文件
user www www;
workerprocesses 4;
workercpuaffinity 0001 0010 0100 1000;
errorlog logs/error.log;
#errorlog logs/error.log notice;
#errorlog logs/error.log info;
pid logs/nginx.pid;
events {
use epoll;
workerconnections 65535;
multiaccept on;
}
http {
include mime.types;
defaulttype application/octet-stream;
#logformat main ‘$remoteaddr - $remoteuser [$timelocal] "$request" ‘
#‘$status $bodybytessent "$httpreferer" ‘
#‘"$httpuseragent" "$httpxforwardedfor"‘;
#accesslog logs/access.log main;
sendfile on;
tcpnopush on;
keepalivetimeout 65;
tcpnodelay on;
clientheaderbuffersize 4k;
openfilecache max=102400 inactive=20s;
openfilecachevalid 30s;
openfilecacheminuses 1;
clientheadertimeout 15;
clientbodytimeout 15;
resettimedoutconnection on;
sendtimeout 15;
servertokens off;
clientmaxbodysize 10m;
fastcgiconnecttimeout 600;
fastcgisendtimeout 600;
fastcgireadtimeout 600;
fastcgibuffersize 64k;
fastcgibuffers 4 64k;
fastcgibusybufferssize 128k;
fastcgitempfilewritesize 128k;
fastcgitemppath /usr/local/nginx1.10/nginxtmp;
fastcgiintercepterrors on;
fastcgicachepath /usr/local/nginx1.10/fastcgicache
keyszone=cachefastcgi:128m inactive=1d maxsize=10g;
gzip on;
gzipminlength 2k;
gzipbuffers 4 32k;gziphttpversion 1.1;
gzipcomplevel 6;
gziptypes text/plain text/css text/javascript application/json application/javascript
application/x-javascript application/xml;
gzipvary on;
gzipproxied any;
server {
listen 80;
servername www.benet.com;
#charset koi8-r;
#accesslog logs/host.access.log main;
location ~ ^.+.(jpg|gif|png|swf|flv|wma|wmv|asf|mp3|mmf|zip|rar)$ {
validreferers none blocked www.benet.com benet.com;
if ($invalidreferer) {
#return 302 http://www.benet.com/img/nolink.jpg;
return 404;
break;
}
accesslog off;
}
location / {
root html;
index index.php index.html index.htm;
}
location ~ .(ico|jpe?g|gif|png|bmp|swf|flv)$ {
expires 30d;
#lognotfound off;
accesslog off;
}
location ~ .(js|css)$ {
expires 7d;
lognotfound off;
accesslog off;
}
location = /(favicon.ico|roboots.txt) {
accesslog off;
lognotfound off;
}
location /status {stubstatus on;
}
location ~ ..(php|php5)?$ {
root html;
fastcgipass 127.0.0.1:9000;
fastcgiindex index.php;
include fastcgi.conf;
fastcgicache cachefastcgi;
fastcgicachevalid 200 302 1h;
fastcgicachevalid 301 1d;
fastcgicachevalid any 1m;
fastcgicacheminuses 1;
fastcgicacheusestale error timeout invalidheader http500;
fastcgicachekey http://$host$requesturi;
}
#errorpage 404 /404.html;
#redirect server error pages to the static page /50x.htmlerrorpage 500 502 503 504 /50x.html;
location = /50x.html {
root html;
}
}
}
重载 nginx 服务
[root@www ~]# /usr/local/nginx1.10/sbin/nginx -s reload
三、验证、压力测试
(1)验证防盗链
使用 apache 做为一个测试站点,域名为 www.test.com,在测试页上做一个超链接,链接 nginx
站点的一张图片
[root@centos1 ~]# cat /var/www/html/index.html
<a href="http://www.benet.com/11.gif">lianjie</a>;
Nginx 站点的网页目录结如下
tree /usr/local/nginx1.10/html/
/usr/local/nginx1.10/html/
├── 11.gif
├── 50x.html
├── img
│ └── nolink.jpg
├── index.html
├── test.php
在 客 户 端 浏 览 器 中 输 入 www.test.com
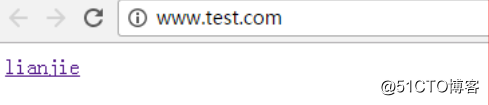
点击页面链接
从上图可以看到防盗链设置生效了
(2)验证 gzip 功能
使用谷歌浏览器测试访问,如下图显示结果:(提示:在访问测试页之前按 F12 键)
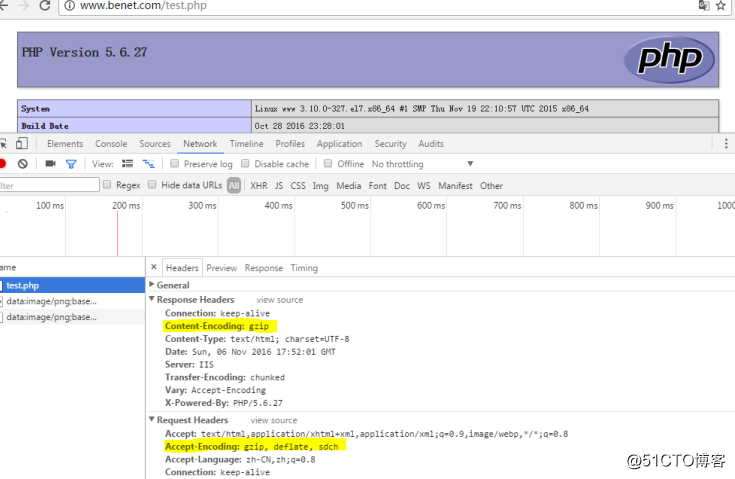
用户访问 test.php文件,在上图中 content-encoding:gzip表明响应给用户的数据是压缩传输。
(3)压力测试
安装 httpd-tools 软件包
[root@www ~]# yum -y install httpd-tools
[root@www ~]# ab -c 500 -n 50000 http://www.benet.com/index.html
This is ApacheBench, Version 2.3 <$Revision: 1430300 $>
Copyright 1996 Adam Twiss, Zeus Technology Ltd, http://www.zeustech.net/
Licensed to The Apache Software Foundation, http://www.apache.org/
Benchmarking www.benet.com (be patient)
Completed 5000 requests
Completed 10000 requests
Completed 15000 requests
Completed 20000 requests
Completed 25000 requests
Completed 30000 requests
Completed 35000 requests
Completed 40000 requests
Completed 45000 requests
Completed 50000 requests
Finished 50000 requests
Server Software: IIS
Server Hostname: www.benet.com
Server Port: 80
Document Path: /index.html
Document Length: 612 bytes
Concurrency Level: 500
Time taken for tests: 5.734 seconds
Complete requests: 50000
Failed requests: 0
Write errors: 0
Total transferred: 41800000 bytes
HTML transferred: 30600000 bytes
Requests per second: 8719.82 [#/sec] (mean)
Time per request: 57.341 [ms] (mean)
Time per request: 0.115 [ms] (mean, across all concurrent requests)
Transfer rate: 7118.92 [Kbytes/sec] received
Connection Times (ms)
min mean[+/-sd] median max
Connect: 1 25 4.2 25 38
Processing: 7 32 5.5 31 47
Waiting: 4 24 6.8 21 39
Total: 40 57 3.9 57 71
Percentage of the requests served within a certain time (ms)
50% 57
66% 59
75% 59
80% 60
90% 61
95% 62
98% 63
99% 64
100% 71 (longest request)
第二次压力测试,比较两次的差异
[root@www ~]# ab -c 1000 -n 100000 http://www.benet.com/index.html
This is ApacheBench, Version 2.3 <$Revision: 1430300 $>
Copyright 1996 Adam Twiss, Zeus Technology Ltd, http://www.zeustech.net/
Licensed to The Apache Software Foundation, http://www.apache.org/
Benchmarking www.benet.com (be patient)
Completed 10000 requests
Completed 20000 requests
Completed 30000 requests
Completed 40000 requests
Completed 50000 requests
Completed 60000 requests
Completed 70000 requests
Completed 80000 requests
Completed 90000 requests
Completed 100000 requests
Finished 100000 requests
Server Software: IIS
Server Hostname: www.benet.com
Server Port: 80
Document Path: /index.html
Document Length: 612 bytes
Concurrency Level: 1000
Time taken for tests: 12.010 seconds
Complete requests: 100000
Failed requests: 0
Write errors: 0
Total transferred: 83600000 bytes
HTML transferred: 61200000 bytes
Requests per second: 8326.49 [#/sec] (mean)
Time per request: 120.099 [ms] (mean)
Time per request: 0.120 [ms] (mean, across all concurrent requests)
Transfer rate: 6797.80 [Kbytes/sec] received
Connection Times (ms)
min mean[+/-sd] median max
Connect: 1 53 8.9 53 82
Processing: 17 67 11.4 66 98
Waiting: 0 49 14.3 43 84
Total: 70 119 6.5 120 140
Percentage of the requests served within a certain time (ms)
50% 120
66% 122
75% 123
80% 124
90% 126
95% 128
98% 129
99% 130
100% 140 (longest request)
(5)xcache 加速 php
安装 xcache
wget http://xcache.lighttpd.net/pub/Releases/3.2.0/xcache-3.2.0.tar.gz #下载
[root@www ~]# tar zxf xcache-3.2.0.tar.gz #解压
[root@www ~]# cd xcache-3.2.0/ #进入安装目录
[root@www xcache-3.2.0]# /usr/local/php5.6/bin/phpize #用 phpize 生成 configure 配置文件
[root@www xcache-3.2.0]# ./configure --enable-xcache --enable-xcache-coverager
--enable-xcache-optimizer --with-php-config=/usr/local/php5.6/bin/php-config #配置
[root@www xcache-3.2.0]# make && make install #编译、安装
Installing shared extensions:
/usr/local/php5.6/lib/php/extensions/no-debug-zts-20131226/
安装完成之后,出现下面的界面,记住以下路径,后面会用到
/usr/local/php5.6/lib/php/extensions/no-debug-zts-20131226/
2) 创建 xcache 缓存文件
touch /tmp/xcache
chmod 777 /tmp/xcache
3) 拷贝 xcache 后台管理程序到网站根目录
[root@www xcache-3.2.0]# cp -r htdocs/ /usr/local/nginx1.10/html/xcache
4) 配置 php 支持 xcache
vi / etc/php.ini #编辑配置文件,在最后一行添加以下内容
[xcache-common]
extension = /usr/local/php5.6/lib/php/extensions/no-debug-zts-20131226/xcache.so
[xcache.admin]
xcache.admin.enableauth = Off
[xcache]
xcache.shmscheme ="mmap"
xcache.size=60M
xcache.count =1
xcache.slots =8K
xcache.ttl=0
xcache.gcinterval =0
xcache.varsize=64M
xcache.varcount =1
xcache.varslots =8K
xcache.varttl=0
xcache.varmaxttl=0
xcache.vargcinterval =300
xcache.test =Off
xcache.readonlyprotection = Off
xcache.mmappath ="/tmp/xcache"
xcache.coredumpdirectory =""
xcache.cacher =On
xcache.stat=On
xcache.optimizer =Off
[xcache.coverager]
xcache.coverager =On
xcache.coveragedumpdirectory =""
测试
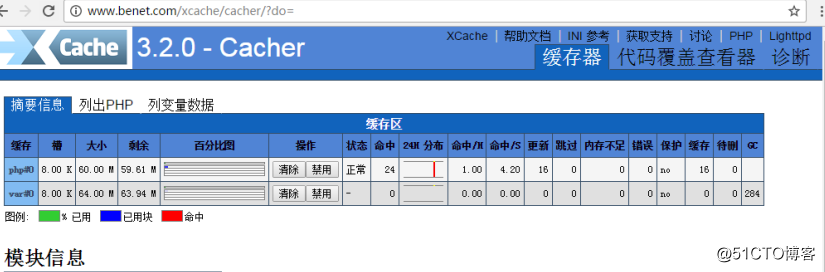
service php-fpm restart #重启 php-fpm
浏览器打开网站根目录下面的 xcache
http:// http://www.benet.com/xcache 可以看到如下页面:测试对 php 动态页面的压力测试
[root@www ~]# ab -c 1000 -n 100000 http://www.benet.com/test.php
This is ApacheBench, Version 2.3 <$Revision: 1430300 $>
Copyright 1996 Adam Twiss, Zeus Technology Ltd, http://www.zeustech.net/
Licensed to The Apache Software Foundation, http://www.apache.org/
Benchmarking www.benet.com (be patient)
Completed 10000 requests
Completed 20000 requests
Completed 30000 requests
Completed 40000 requests
Completed 50000 requests
Completed 60000 requests
Completed 70000 requests
Completed 80000 requests
Completed 90000 requests
Completed 100000 requests
Finished 100000 requests
Server Software: IIS
Server Hostname: www.benet.com
Server Port: 80
Document Path: /test.php
Document Length: 85102 bytes
Concurrency Level: 1000
Time taken for tests: 13.686 seconds
Complete requests: 100000
Failed requests: 0
Write errors: 0
Total transferred: 8527900000 bytes
HTML transferred: 8510200000 bytes
Requests per second: 7306.71 [#/sec] (mean)
Time per request: 136.861 [ms] (mean)
Time per request: 0.137 [ms] (mean, across all concurrent requests)
Transfer rate: 608504.46 [Kbytes/sec] received
Connection Times (ms)
min mean[+/-sd] median max
Connect: 0 17 5.5 17 81
Processing: 21 119 10.8 121 140
Waiting: 1 17 6.7 16 68
Total: 50 136 8.1 137 151
Percentage of the requests served within a certain time (ms)
50% 137
66% 139
75% 140
80% 141
90% 143
95% 144
98% 146
99% 148
100% 151 (longest request)
*
标签:poll uid enable tar zxvf water xca 窗口 sse 依赖关系
原文地址:http://blog.51cto.com/13555423/2300041
