标签:design tag content img layout lin main androi 效果
一、新建一个项目
选择empty activity,此时项目里面没有main.java的文件。
二、手动创建java文件
Project那儿选择android模式,在app/java/com....一般是第一个文件夹下,右击鼠标new->activity->empty activity。Activity Name、Layout Name随便取名,但是要取消外观支援档的勾即取消Generate Layout File前面的勾。接着在Launcher Activity前打勾,意思是以这个activity作为一个主要的activity,以此为进入点。点击Finish。
三、手动创建外观档文件
app/res,右击res,new->XML->Layout XML File。Layout File Name 随便取,不过不能有大写英文字母,一般有多个英文单词,中间以_分开。Root Tag选择类别为LinearLayout。点击Finish。
四、设计layout.xml
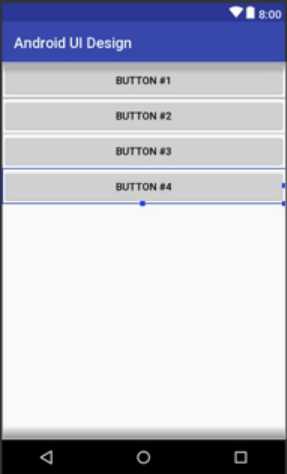
按住鼠标左键,拖动三个Button按钮到手机预览界面,点击Component Tree下的LinearLayout,在右侧Attributes下有一些设置。在LinearLayout标签下有个orientation选项,默认是horizaontal即水平排列,如果将其改为vertical,会发现Button按钮变成垂直排列了,且占满了竖直的空间,Button大小有点奇怪。在中间界面layout.xml下让其从Design切换到Text即文本模式,将第一个Button标签下的android:layout_weight="1"去掉,会发现最上面的按钮大小缩小了。将剩下两个Button下的这句话也去掉,会发现样子正常了。在将界面切换到Design模式,将orientation改回horizontal模式,三个按钮变成横排了,不过不再占据一整行,可以在拖动一个按钮进去。并在文本模式下将其weight删掉。回到Design界面,点选屏幕上最左侧的Button,在右侧text处为它取名为Button #1,并依次将后面三个按钮改名为Button #2,Button #3,Button #4,由于Button #4没有足够的位置,它的文字变成两行了。点选Button #1将其layout_width改为match_parent,那么Button #1就会占据一行,2,3,4个按钮都会不见。如果点击LinearLayout将orientation换成vertical,2,3,4个出现在下面垂直排列。依次点选Button2,3,4,将layout_width 都选择match_parent,则四个按钮会垂直排列,宽度就是一整行。
效果图如下:
layout.xml中text代码如下:
<?xml version="1.0" encoding="utf-8"?>
<LinearLayout xmlns:android="http://schemas.android.com/apk/res/android"
    android:layout_width="match_parent"
    android:layout_height="match_parent"
    android:orientation="vertical">

    <Button
        android:id="@+id/button4"
        android:layout_width="match_parent"
        android:layout_height="wrap_content"
        android:text="Button #1" />
    <!--android:layout_weight="1"-->
    android:text="Button" />

    <Button
        android:id="@+id/button3"
        android:layout_width="match_parent"
        android:layout_height="wrap_content"
        android:text="Button #2" />
    <!--android:layout_weight="1"-->
    android:text="Button" />

    <Button
        android:id="@+id/button2"
        android:layout_width="match_parent"
        android:layout_height="wrap_content"
        android:text="Button #3" />
    <!--android:layout_weight="1"-->
    android:text="Button" />

    <Button
        android:id="@+id/button"
        android:layout_width="match_parent"
        android:layout_height="wrap_content"
        android:text="Button #4" />
    <!--android:layout_weight="1"-->
    android:text="Button" />
</LinearLayout>
最后打开之前创建的main.java,在super.onCreate(saveInstanceState);后面加上setContentView(R.layout.layout);整个简单的程序就完成了,就以编译运行。
第三篇-以LinearLayout进行Android界面设计
标签:design tag content img layout lin main androi 效果
原文地址:https://www.cnblogs.com/smart-zihan/p/9824536.html