标签:switch 物理 set 地址 conda trunk cisc cisco ns2
拓扑图: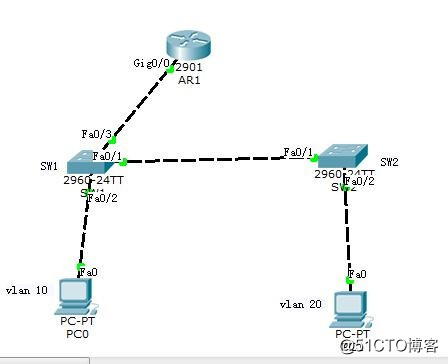
SW1:
SW1>enable
SW1#config t
Enter configuration commands, one per line.  End with CNTL/Z.
SW1(config)#hostname SW1
SW1(config)#vlan 10
SW1(config-vlan)#exit
SW1(config)#vlan 20
SW1(config-vlan)#exit
SW1(config)#vtp mode server      //配置sw1为服务器端
Device mode already VTP SERVER.
SW1(config)#vtp domain cisco       //配置vtp 的域名为Cisco
Domain name already set to cisco.
SW1(config)#vtp password cisco123  //配置密码
Password already set to cisco123
SW1(config)#service password-encryption   //明文密码加密
SW1(config)#interface f0/1
SW1(config-if)#switchport mode trunk  //配置两交换机间链路模式为trunk
SW1(config-if)#switchport trunk allowed vlan all
SW1(config-if)#no shutdown
SW1(config-if)#exit
SW1(config)#interface f0/2
SW1(config-if)#switchport mode access
SW1(config-if)#switchport access vlan 10
SW1(config-if)#no shutdown
SW1(config-if)#exit
SW1(config)#interface f0/3
SW1(config-if)#switchport mode trunk  //配置路由器与交换机相连链路为trunk
SW1(config-if)#switchport trunk allowed vlan all
SW1(config-if)#no shutdown
SW1(config-if)#exit
SW1(config)#
sw2:
SW2>enable
SW2#config t
Enter configuration commands, one per line.  End with CNTL/Z.
SW2(config)#hostname SW2
SW2(config)#vtp mode client
Device mode already VTP CLIENT.
SW2(config)#vtp domain cisco    //配置sw2为vtp客户端模式
Domain name already set to cisco.
SW2(config)#vtp password cisco123  //配置密码
Password already set to cisco123
SW2(config)#service password-encryption  //明文密码加密
SW2(config)#interface f0/1
SW2(config-if)#switchport mode trunk
SW2(config-if)#switchport trunk allowed vlan all
SW2(config-if)#no shutdown
SW2(config-if)#exit
SW2(config)#interface f0/2
SW2(config-if)#switchport mode access
SW2(config-if)#switchport access vlan 20
SW2(config-if)#no shutdown
SW2(config-if)#exit
SW2(config)#SW2(config)#do show vlan
VLAN Name Status Ports
---- -------------------------------- --------- -------------------------------
1 default active Fa0/3, Fa0/4, Fa0/5, Fa0/6
Fa0/7, Fa0/8, Fa0/9, Fa0/10
Fa0/11, Fa0/12, Fa0/13, Fa0/14
Fa0/15, Fa0/16, Fa0/17, Fa0/18
Fa0/19, Fa0/20, Fa0/21, Fa0/22
Fa0/23, Fa0/24, Gig1/1, Gig1/2
10 VLAN0010 active
20 VLAN0020 active Fa0/2
1002 fddi-default act/unsup
1003 token-ring-default act/unsup
1004 fddinet-default act/unsup
1005 trnet-default act/unsup
VLAN Type SAID MTU Parent RingNo BridgeNo Stp BrdgMode Trans1 Trans2
---- ----- ---------- ----- ------ ------ -------- ---- -------- ------ ------
1 enet 100001 1500 - - - - - 0 0
10 enet 100010 1500 - - - - - 0 0
20 enet 100020 1500 - - - - - 0 0
1002 fddi 101002 1500 - - - - - 0 0
1003 tr 101003 1500 - - - - - 0 0
1004 fdnet 101004 1500 - - - ieee - 0 0
1005 trnet 101005 1500 - - - ibm - 0 0
Remote SPAN VLANs
------------------------------------------------------------------------------
Primary Secondary Type Ports
------- --------- ----------------- ------------------------------------------
SW2(config)#由查看结果可知,SW2交换机已从SW1交换机学习到了VLAN 10和VLAN 20。
AR1:
AR1>enable
AR1#config t
Enter configuration commands, one per line.  End with CNTL/Z.
AR1(config)#hostname AR1
AR1(config)#interface g0/0   //进入物理接口
AR1(config-if)#no shutdown  //启用该接口
AR1(config-if)#interface g0/0.10  //进入子接口
AR1(config-subif)#encapsulation dot1q 10  // 将子接口封装到VLAN 10中
AR1(config-subif)#ip address 192.168.10.254 255.255.255.0
//配置IP地址
AR1(config-subif)#no shutdown   //启用子接口
AR1(config-subif)#exit
AR1(config)#interface g0/0.20
AR1(config-subif)#encapsulation dot1q 20   //将子接口封装到VLAN 20中
AR1(config-subif)#ip address 192.168.20.254 255.255.255.0
AR1(config-subif)#no shutdown
AR1(config-subif)#exit
AR1(config)#PC1:
192.168.10.1
255.255.255.0
192.168.10.254
PC2:
192.168.20.1
255.255.255.0
192.168.20.254
PC1 ping PC2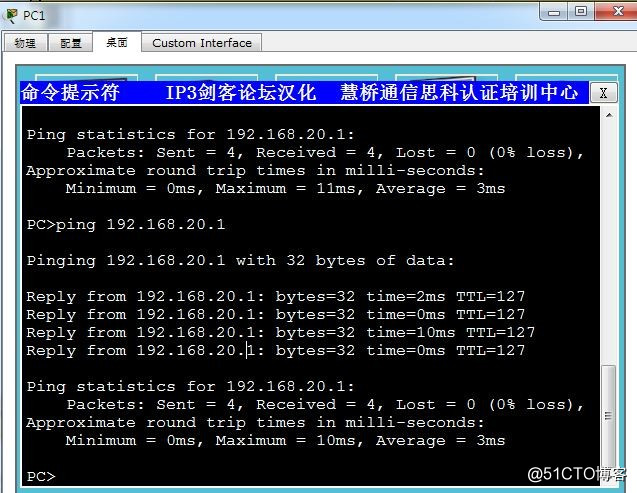
PC2 ping PC1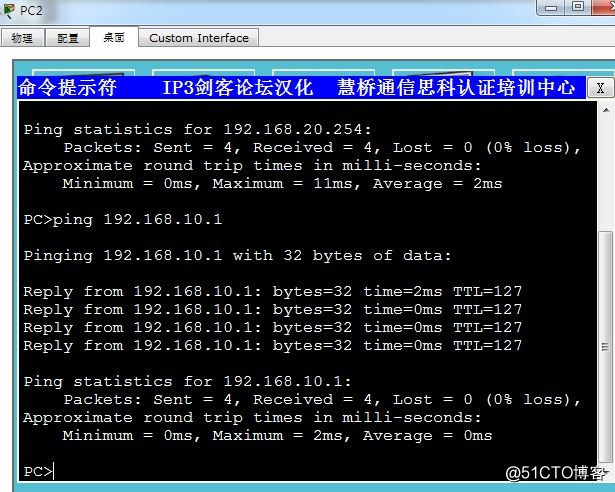
标签:switch 物理 set 地址 conda trunk cisc cisco ns2
原文地址:http://blog.51cto.com/12184141/2314326