标签:exe 个性 简单 ase DApp order eve tcl ada
BeanFactory作为Spring中容器功能的基础,用于存放所有已经加载的bean,为了保证程序上的高可扩展性,Spring针对BeanFactory做了大量的扩展,比如我们熟知的PostProcessor等都是在这里实现的。
在介绍之前,我们先了解下BeanFactoryPostProcessor的用法。
BeanFactoryPostProcessor接口跟BeanPostProcessor类似,可以对bean的定义(配置元数据)进行处理。也就是说,Spring IOC容器运行BeanFactoryPostProcessor在容器实际实例化任何其他的bean之前读取配置元数据,并有可能修改它。如果你愿意,你可以配置多个BeanFactoryPostProcessor。你还能通过设置“order”属性来控制BeanFactoryPostProcessor的执行次序(仅当BeanFactoryPostProcessor实现了Ordered接口时你才可以设置此属性,因此在实现BeanFactoryPostProcessor时,就应当考虑实现Ordered接口)。
如果你想改变实际的bean实例(例如从配置元数据创建的对象),那么你最好使用BeanPostProcessor。同样的,BeanFactoryPostProcessor的作用域范围是容器级别的。它只和你所使用的容器有关。如果你在容器中定义一个BeanFactoryPostProcessor,它仅仅对此容器中的bean进行后置处理。BeanFactoryPostProcessor不会对定义在另一个容器中的bean进行后置处理,即使这两个容器都是在同一层次上。在Spring中存在对于BeanFactoryPostProcessor的典型应用,比如PropertyPlaceholderConfigurer。
有时候,你会在Spring的bean描述文件中,看到类似如下的一些配置:
<bean id="user" class="com.joe.User">
    <property name="age">
        <value>${bean.message}</value>
    </property>
</bean>
其中出现了变量引用:${bean.message}。这就是Spring的分散配置,可以在另外的配置文件中为bean.message指定值。如在bean.property配置如下定义:
bean.message = Hi,can you find me ?
当访问名为user的bean时,age属性就会被设置为字符串“Hi,can you find me ?”,但Spring框架是怎么知道存在这样的配置文件的呢?这就要靠PropertyPlaceholderConfigurer这个类的bean:
<bean id="userHandler" class="org.Springframework.beans.factory.config.PropertyPlaceholderConfigurer">
    <property name="locations">
        <list>
            <value>config/bean.properties</value>
        </list>
    </property>
</bean>
在这个bean中指定了配置文件为config/bean.properties。到这里似乎已经找到答案了,其实不然,还有一个问题。这个userHandler只不过是Spring框架管理的一个bean,并没有被别的bean或者对象引用,Spring的BeanFactory是怎么知道要从这个bean中获取配置信息的呢?
PropertyPlaceholderConfigurer这个类间接继承了BeanFactoryPostProcessor接口。这是一个很特别的接口,当Spring加载任何实现了这个接口的bean的配置时,都会在bean工厂载入所有bean的配置之后执行PostProcessBeanFactory方法。在PropertyResourceConfigurer类中实现了PostProcessBeanFactory方法,在方法中先后调用了mergeProperties、convertProperties、processProperties这三个方法,分别得到配置,将得到的配置转换为合适的类型,最后将配置内容告知BeanFactory。
正是通过实现BeanFactoryPostProcessor接口,BeanFactory会在实例化任何bean之前获得配置信息,从而能够正确解析bean描述文件中的变量引用。
我们以实现一个BeanFactoryPostProcessor,去除潜在的“流氓”属性值的功能来展示自定义BeanFactoryPostProcessor的创建及使用,例如bean定义中留下bollocks这样的字眼。
public class ObsenityBeanFactoryPost implements BeanFactoryPostProcessor {

    private Set<String> obsenties;
    public ObsenityBeanFactoryPost(){
        this.obsenties = new HashSet<String>();
    }
    @Override
    public void postProcessBeanFactory(ConfigurableListableBeanFactory configurableListableBeanFactory) throws BeansException {
        String[] beanNames = configurableListableBeanFactory.getBeanDefinitionNames();
        for (String beanName:beanNames){
            BeanDefinition bd = configurableListableBeanFactory.getBeanDefinition(beanName);
            StringValueResolver resolver = new StringValueResolver() {
                @Override
                public String resolveStringValue(String strVal) {
                    if (isObscene(strVal)){
                        return "*******";
                    }
                    return strVal;
                }
            };
            BeanDefinitionVisitor visitor = new BeanDefinitionVisitor(resolver);
            visitor.visitBeanDefinition(bd);
        }
    }

    public boolean isObscene(Object value){
        String potential = value.toString().toUpperCase();
        return this.obsenties.contains(potential);
    }

    public void setObsenties(Set<String> obsenties) {
        this.obsenties.clear();
        for (String obscentity: obsenties){
            this.obsenties.add(obscentity.toUpperCase());
        }
    }
    //测试
    @SuppressWarnings("deprecation")
    public static void main(String[] args){
        ConfigurableListableBeanFactory beanFactory = new XmlBeanFactory(new ClassPathResource("spring.xml"));
        BeanFactoryPostProcessor bfpp = (BeanFactoryPostProcessor) beanFactory.getBean("bfpp");
        bfpp.postProcessBeanFactory(beanFactory);
        System.out.println(beanFactory.getBean("simpleBean").toString());
    }
}
定义bean:
public class SimpleBean {
    private String connection;
    private String password;
    private String username;

    public String getConnection() {
        return connection;
    }

    public void setConnection(String connection) {
        this.connection = connection;
    }

    public String getPassword() {
        return password;
    }

    public void setPassword(String password) {
        this.password = password;
    }

    public String getUsername() {
        return username;
    }

    public void setUsername(String username) {
        this.username = username;
    }

    @Override
    public String toString() {
        return "connection :" + connection + "  password :" + password + "  username :" + username;
    }
}
配置文件:
  <bean id="bfpp" class="com.joe.mytag.application.ObsenityBeanFactoryPost">
        <property name="obsenties">
            <set>
                <value>bollocks</value>
                <value>winky</value>
                <value>bum</value>
                <value>Microsoft</value>
            </set>
        </property>
    </bean>

    <bean id="simpleBean" class="com.joe.mytag.application.SimpleBean">
        <property name="connection" value="bollocks"/>
        <property name="password" value="imaginecup"/>
        <property name="username" value="Microsoft"/>
    </bean>
运行上述测试代码:
connection :******* password :imaginecup username :*******
可以看出通过ObsenityBeanFactoryPost 这个类Spring很好的实现了屏蔽掉obscenties定义的不该展示的属性。
了解了BeanFactoryPostProcessor的用法后便可以深入的研究BeanFactoryPostProcessor的调用过程了。

  1 public static void invokeBeanFactoryPostProcessors(
  2             ConfigurableListableBeanFactory beanFactory, List<BeanFactoryPostProcessor> beanFactoryPostProcessors) {
  3
  4         //如果有的话,首先调用beandefinitionregistrypostprocessor。
  5         Set<String> processedBeans = new HashSet<>();
  6         //对BeanDefinitionRegistry类型的处理
  7         if (beanFactory instanceof BeanDefinitionRegistry) {
  8             BeanDefinitionRegistry registry = (BeanDefinitionRegistry) beanFactory;
  9             List<BeanFactoryPostProcessor> regularPostProcessors = new ArrayList<>();
 10             List<BeanDefinitionRegistryPostProcessor> registryProcessors = new ArrayList<>();
 11             //硬编码注册后的处理器
 12             for (BeanFactoryPostProcessor postProcessor : beanFactoryPostProcessors) {
 13                 if (postProcessor instanceof BeanDefinitionRegistryPostProcessor) {
 14                     BeanDefinitionRegistryPostProcessor registryProcessor =
 15                             (BeanDefinitionRegistryPostProcessor) postProcessor;
 16                     //对于BeanDefinitionRegistryPostProcessor类型,在BeanFactoryPostProcessor的基础上还有自己定义的方法,需要先调用
 17                     registryProcessor.postProcessBeanDefinitionRegistry(registry);
 18                     registryProcessors.add(registryProcessor);
 19                 }
 20                 else {
 21                     //记录常规的BeanFactoryPostProcessor
 22                     regularPostProcessors.add(postProcessor);
 23                 }
 24             }
 25
 26
 27             List<BeanDefinitionRegistryPostProcessor> currentRegistryProcessors = new ArrayList<>();
 28
 29             // 配置注册的后处理器
 30             String[] postProcessorNames =
 31                     beanFactory.getBeanNamesForType(BeanDefinitionRegistryPostProcessor.class, true, false);
 32             //对后处理器进行分类
 33             for (String ppName : postProcessorNames) {
 34                 if (beanFactory.isTypeMatch(ppName, PriorityOrdered.class)) {
 35                     currentRegistryProcessors.add(beanFactory.getBean(ppName, BeanDefinitionRegistryPostProcessor.class));
 36                     processedBeans.add(ppName);
 37                 }
 38             }
 39             sortPostProcessors(currentRegistryProcessors, beanFactory);
 40             registryProcessors.addAll(currentRegistryProcessors);
 41             invokeBeanDefinitionRegistryPostProcessors(currentRegistryProcessors, registry);
 42             currentRegistryProcessors.clear();
 43
 44             // 接下来,调用实现Ordered的beandefinitionregistrypostprocessor。
 45             postProcessorNames = beanFactory.getBeanNamesForType(BeanDefinitionRegistryPostProcessor.class, true, false);
 46             for (String ppName : postProcessorNames) {
 47                 if (!processedBeans.contains(ppName) && beanFactory.isTypeMatch(ppName, Ordered.class)) {
 48                     currentRegistryProcessors.add(beanFactory.getBean(ppName, BeanDefinitionRegistryPostProcessor.class));
 49                     processedBeans.add(ppName);
 50                 }
 51             }
 52             sortPostProcessors(currentRegistryProcessors, beanFactory);
 53             registryProcessors.addAll(currentRegistryProcessors);
 54             invokeBeanDefinitionRegistryPostProcessors(currentRegistryProcessors, registry);
 55             currentRegistryProcessors.clear();
 56
 57             // 最后,调用所有其他beandefinitionregistrypostprocessor,直到没有其他处理器出现为止。
 58             boolean reiterate = true;
 59             while (reiterate) {
 60                 reiterate = false;
 61                 postProcessorNames = beanFactory.getBeanNamesForType(BeanDefinitionRegistryPostProcessor.class, true, false);
 62                 for (String ppName : postProcessorNames) {
 63                     if (!processedBeans.contains(ppName)) {
 64                         currentRegistryProcessors.add(beanFactory.getBean(ppName, BeanDefinitionRegistryPostProcessor.class));
 65                         processedBeans.add(ppName);
 66                         reiterate = true;
 67                     }
 68                 }
 69                 sortPostProcessors(currentRegistryProcessors, beanFactory);
 70                 registryProcessors.addAll(currentRegistryProcessors);
 71                 invokeBeanDefinitionRegistryPostProcessors(currentRegistryProcessors, registry);
 72                 currentRegistryProcessors.clear();
 73             }
 74
 75             //现在,调用到目前为止处理的所有处理器的postProcessBeanFactory回调。
 76             invokeBeanFactoryPostProcessors(registryProcessors, beanFactory);
 77             invokeBeanFactoryPostProcessors(regularPostProcessors, beanFactory);
 78         }
 79
 80         else {
 81             // 调用在上下文实例中注册的工厂处理器。
 82             invokeBeanFactoryPostProcessors(beanFactoryPostProcessors, beanFactory);
 83         }
 84
 85         // 对于配置中读取的BeanFactoryPostProcessor的处理
 86         String[] postProcessorNames =
 87                 beanFactory.getBeanNamesForType(BeanFactoryPostProcessor.class, true, false);
 88
 89
 90         List<BeanFactoryPostProcessor> priorityOrderedPostProcessors = new ArrayList<>();
 91         List<String> orderedPostProcessorNames = new ArrayList<>();
 92         List<String> nonOrderedPostProcessorNames = new ArrayList<>();
 93         //对处理器进行分类
 94         for (String ppName : postProcessorNames) {
 95             if (processedBeans.contains(ppName)) {
 96                 // 已经处理过
 97             }
 98             else if (beanFactory.isTypeMatch(ppName, PriorityOrdered.class)) {
 99                 priorityOrderedPostProcessors.add(beanFactory.getBean(ppName, BeanFactoryPostProcessor.class));
100             }
101             else if (beanFactory.isTypeMatch(ppName, Ordered.class)) {
102                 orderedPostProcessorNames.add(ppName);
103             }
104             else {
105                 nonOrderedPostProcessorNames.add(ppName);
106             }
107         }
108
109         // 首先,调用实现priorityorders的beanfactorypostprocessor。按照优先级进行排序
110         sortPostProcessors(priorityOrderedPostProcessors, beanFactory);
111         invokeBeanFactoryPostProcessors(priorityOrderedPostProcessors, beanFactory);
112
113         // 接下来,调用实现Ordered的beanfactorypostprocessor。
114         List<BeanFactoryPostProcessor> orderedPostProcessors = new ArrayList<>();
115         for (String postProcessorName : orderedPostProcessorNames) {
116             orderedPostProcessors.add(beanFactory.getBean(postProcessorName, BeanFactoryPostProcessor.class));
117         }
118         sortPostProcessors(orderedPostProcessors, beanFactory);
119         invokeBeanFactoryPostProcessors(orderedPostProcessors, beanFactory);
120
121         // 最后,调用所有其他beanfactorypostprocessor。
122         List<BeanFactoryPostProcessor> nonOrderedPostProcessors = new ArrayList<>();
123         for (String postProcessorName : nonOrderedPostProcessorNames) {
124             nonOrderedPostProcessors.add(beanFactory.getBean(postProcessorName, BeanFactoryPostProcessor.class));
125         }
126         //无序,直接调用
127         invokeBeanFactoryPostProcessors(nonOrderedPostProcessors, beanFactory);
128
129         // 清除缓存的合并bean定义,因为后处理器可能有修改原始元数据,例如替换值中的占位符……
130         beanFactory.clearMetadataCache();
131     }
从上述大量的代码中我们看到,对于BeanFactoryPostProcessor的处理主要分为两种情况进行处理:
? 对于BeanDefinitionRegistry类的特殊处理。
? 对普通的BeanFactoryPostProcessor进行处理。
而对于每种情况都需要考虑硬编码注入注册的后处理器的处理主要包括以下内容:
(1)对于硬编码注册的后处理器的处理,主要是通过AbstractApplicationContext中添加的处理器方法addBeanFactoryPostProcessor进行添加:
  public void addBeanFactoryPostProcessor(BeanFactoryPostProcessor postProcessor) {
        Assert.notNull(postProcessor, "BeanFactoryPostProcessor must not be null");
        this.beanFactoryPostProcessors.add(postProcessor);
    }
添加后的后处理器会存放在BeanFactoryPostProcessors中,而在处理BeanFactoryPostProcessor时候会首先检测BeanFactoryPostProcessors是否有数据。当然,BeanDefinitionRegistryPostProcessor继承自BeanFactoryPostProcessor,不但有BeanFactoryPostProcessor的特性,同时还有自己定义的个性化方法,也需要在此调用。所以,这里需要从BeanFactoryPostProcessors中挑出BeanDefinitionRegistryPostProcessor的后处理器,并进行其postProcessBeanDefinitionRegistry方法的激活。
(2)记录后处理器主要使用了三个List完成:
? registryPostProcessors:记录通过硬编码方式注册的BeanDefinitionRegistryPostProcessor类型的处理器。
? regularPostProcessors:记录通过硬编码方式注册的BeanFactoryPostProcessor类型的处理器。
? registryPostProcessorBeans:记录通过配置方式注册的BeanDefinitionRegistryPostProcessor类型的处理器。
(3)对以上记录的List中的后处理器进行统一调用BeanFactoryPostProcessor的postProcessBeanFactory方法。
(4)对BeanFactoryPostProcessors中非BeanDefinitionRegistryPostProcessor类型的后处理器进行统一的BeanFactoryPostProcessor的postProcessBeanFactory方法调用。
(5)不同BeanFactory的处理。
BeanDefinitionRegistryPostProcessor只对BeanDefinitionRegistry类型的ConfigurableListableBeanFactory有效,所以如果判断所示的BeanFactory并不是BeanDefinitionRegistry,那么便可以忽略BeanDefinitionRegistryPostProcessor,而直接处理BeanFactoryPostProcessor,获取的方式与上面的获取类似。
在这里还需要提到的是,对于硬编码方式手动添加的后处理器是不需要做任何排序的,但是在配置文件中读取的处理器,Spring并不保证读取的顺序。所以,为了保证用户的调用顺序的要求,Spring对于后处理器的调用支持按照PriorityOrdered或者Ordered的顺序调用。
上文提到了BeanFactoryPostProcessors的调用,我们来探索下BeanPostProcessor,但是这里并不是调用,而是注册。真正的调用其实是在bean的实例化阶段进行的。这是一个很重要的步骤,也是很多功能BeanFactory不支持的重要原因。Spring中大部分的功能都是通过后处理器的方式进行扩展的,这是Spring框架的一个特性,但是在BeanFactory中其实并没有实现后处理器的自动注册,所以在调用的时候如果没有进行手动注册其实是不能使用的。但是在ApplicationContext中却添加了自动注册功能,如定义下面这样一个后处理器:
public class MyInstantiationAwareBean implements InstantiationAwareBeanPostProcessor {
    @Override
    public Object postProcessBeforeInstantiation(Class<?> aClass, String s) throws BeansException {
        System.out.println("=========");
        return null;
    }

    @Override
    public boolean postProcessAfterInstantiation(Object o, String s) throws BeansException {
        return false;
    }

    @Override
    public PropertyValues postProcessPropertyValues(PropertyValues propertyValues, PropertyDescriptor[] propertyDescriptors, Object o, String s) throws BeansException {
        return null;
    }

    @Override
    public Object postProcessBeforeInitialization(Object o, String s) throws BeansException {
        return null;
    }

    @Override
    public Object postProcessAfterInitialization(Object o, String s) throws BeansException {
        return null;
    }
}
配置文件:
<bean class="com.joe.mytag.application.MyInstantiationAwareBean"></bean>
那么你会发现,当使用BeanFactory方式进行的Spring的bean的加载时是不会有任何改变的,但是使用ApplicationContext方式获取bean的时候会在获取每个bean的时候打印出“=======”,而这个特性就是在registerBeanPostProcessors方法中完成的。
public static void registerBeanPostProcessors(
            ConfigurableListableBeanFactory beanFactory, AbstractApplicationContext applicationContext) {

        String[] postProcessorNames = beanFactory.getBeanNamesForType(BeanPostProcessor.class, true, false);

        // 注册BeanPostProcessorChecker,它记录信息消息
        //bean是在BeanPostProcessor实例化期间创建的,
        int beanProcessorTargetCount = beanFactory.getBeanPostProcessorCount() + 1 + postProcessorNames.length;
        beanFactory.addBeanPostProcessor(new BeanPostProcessorChecker(beanFactory, beanProcessorTargetCount));

        // 使用priorityOrdered保证顺序
        List<BeanPostProcessor> priorityOrderedPostProcessors = new ArrayList<>();
        List<BeanPostProcessor> internalPostProcessors = new ArrayList<>();
        //使用ordered保证顺序
        List<String> orderedPostProcessorNames = new ArrayList<>();
        //无序BeanPostProcessor
        List<String> nonOrderedPostProcessorNames = new ArrayList<>();
        for (String ppName : postProcessorNames) {
            if (beanFactory.isTypeMatch(ppName, PriorityOrdered.class)) {
                BeanPostProcessor pp = beanFactory.getBean(ppName, BeanPostProcessor.class);
                priorityOrderedPostProcessors.add(pp);
                if (pp instanceof MergedBeanDefinitionPostProcessor) {
                    internalPostProcessors.add(pp);
                }
            }
            else if (beanFactory.isTypeMatch(ppName, Ordered.class)) {
                orderedPostProcessorNames.add(ppName);
            }
            else {
                nonOrderedPostProcessorNames.add(ppName);
            }
        }

        // 首先,注册实现priorityorders的beanpostprocessor。
        sortPostProcessors(priorityOrderedPostProcessors, beanFactory);
        registerBeanPostProcessors(beanFactory, priorityOrderedPostProcessors);

        // 接下来,注册实现有序的beanpostprocessor。
        List<BeanPostProcessor> orderedPostProcessors = new ArrayList<>();
        for (String ppName : orderedPostProcessorNames) {
            BeanPostProcessor pp = beanFactory.getBean(ppName, BeanPostProcessor.class);
            orderedPostProcessors.add(pp);
            if (pp instanceof MergedBeanDefinitionPostProcessor) {
                internalPostProcessors.add(pp);
            }
        }
        sortPostProcessors(orderedPostProcessors, beanFactory);
        registerBeanPostProcessors(beanFactory, orderedPostProcessors);

        // 注册所有常规beanpostprocessor。
        List<BeanPostProcessor> nonOrderedPostProcessors = new ArrayList<>();
        for (String ppName : nonOrderedPostProcessorNames) {
            BeanPostProcessor pp = beanFactory.getBean(ppName, BeanPostProcessor.class);
            nonOrderedPostProcessors.add(pp);
            if (pp instanceof MergedBeanDefinitionPostProcessor) {
                internalPostProcessors.add(pp);
            }
        }
        registerBeanPostProcessors(beanFactory, nonOrderedPostProcessors);

        // 重新注册所有内部beanpostprocessor。
        sortPostProcessors(internalPostProcessors, beanFactory);
        registerBeanPostProcessors(beanFactory, internalPostProcessors);

        // 重新注册后处理器,用于将内部bean检测为applicationlistener,将它移动到处理器链的末端(用于获取代理等)。
        beanFactory.addBeanPostProcessor(new ApplicationListenerDetector(applicationContext));
    }
注释配合上述代码,逻辑基本应该能够理清楚,这里再总结一下:
首先可以发现,对于BeanPostProcessor的处理与BeanFactoryPostProcessor的处理极为相似,但是似乎又有一些不一样的地方。经过反复的对比发现,对于BeanFactoryPostProcessor的处理区分两种情况,一种是硬编码的处理,一种是通过配置文件方式的处理。对于BeanFactoryPostProcessor的处理,不但要实现注册功能,而且还要实现对后处理器的激活操作,所以需要载入配置中的定义,再进行激活;而对于BeanPostProcessor并不需要马上调用,再说,硬编码的方式实现的功能是将后处理器提取并调用,这里并不需要调用,当然不需要考虑硬编码的方式了,这里的功能只需要将配置文件的BeanPostProcessor提取出来并注册进入BeanFactory就可以了。
对于BeanFactory的注册,也不是直接注册就可以的。在Spring中支持对于BeanPostProcessor的排序,比如根据PriorityOrdered进行排序,根据Ordered进行排序或者无序,而Spring在BeanPostProcessor的激活顺序的时候也会考虑对于顺序的问题而先进行排序。
在进行这段解析之前,我们先来回顾一下Spring的国际化的使用方法。
假设我们正在开发一个支持多国语言的Web应用程序,要求系统能够根据客户端的系统的语言类型返回对应的界面:英文的操作系统返回英文界面,而中文的操作系统返回中文界面,这便是典型的i18n国际化问题。对于有国际化的要求的系统来说,我们不能简单的采用硬编码的方式编写用户界面信息、报错信息等内容,而必须为这些需要国际化的信息进行特殊处理。简单来说,就是为每种语言提供一套相应的资源文件,并以规范化命名的方式保存在特定的目录中,有系统自动根据客户端的语言选择适合的资源文件。
国际化信息也称为本地化信息,一般需要两个条件才可以确定一个特定类型的本地化信息,它们分别是“语言类型”和“国家/地区类型”。如中文本地化信息既有中国大陆地区的中文,也有中国台湾、香港地区的中文,还有新加坡地区的中文。Java通过java.util.Locale类表示一个本地化对象,它允许通过语言参数和国家/地区参数创建一个确定的本地化对象。
java.util.Locale是表示语言和国家/地区信息的本地化类,它是创建国际化应用的基础。下面给出几个创建本地化对象的示例:
    //带有语言和国家/地区信息的本地化对象
    Locale locale = new Locale("zh","CN");
    //只有语言信息的本地化对象
    Locale locale1 = new Locale("zh");
    //等同于Locale("zh","CN")
    Locale locale2 = Locale.CHINA;
    //等同于Locale("zh")
    Locale locale3 = Locale.CHINESE;
    //获取本地系统默认的本地化对象
    Locale locale4 = Locale.getDefault();
JDK的java.util包中提供了几个支持本地化格式操作类:NumberFormat、DateFormat、MessageFormat,而在Spring中的国际化资源也就无非是对于这些类的封装操作,下面介绍下MessageFormat的用法帮助大家回顾:
public static void main(String[] args){
        //信息格式化串
        String pattern = "{0},你好!你于{1}在工商银行存入{2}元。";
        String pattern1 = "At {1,time,short} On {1,date,long}, {0} paid {2,number,currency}";

        //用于动态替换占位符的参数
        Object[] param = {"Joe",new GregorianCalendar().getTime(),1.0E3};

        //使用默认本地化对象格式化信息
        String message = MessageFormat.format(pattern,param);

        //使用指定的本地化对象格式化信息
        MessageFormat mf = new MessageFormat(pattern1,Locale.US);
        String mes = mf.format(param);
        System.out.println(message);
        System.out.println(mes);
    }
输出结果:
Joe,你好!你于19-1-4 下午2:36在工商银行存入1,000元。
At 2:36 PM On January 4, 2019, Joe paid $1,000.00
Spring定义了访问国际化信息的MessageSource接口,并提供了几个易用的实现类。
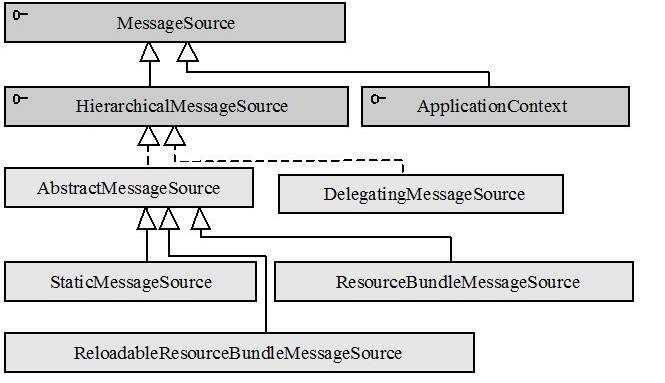
MessageSource分别被HierarchicalMessageSource和ApplicationContext接口扩展,这里主要看一下HierarchicalMessageSource接口的几个实现类。
HierarchicalMessageSource接口最重要的两个实现类是ResourceBundleMessageSource和ReloadableResourceBundleMessageSource。它们基于Java的ResourceBundle基础类实现,运行仅通过资源名加载国际化资源。ReloadableResourceBundleMessageSource提供了定时刷新功能,允许在不重启系统的情况下,更新资源的信息。StaticMessageSource主要用于程序测试,它允许通过编程的方式提供国际化信息。而DelegatingMessageSource是为方便操作父MessageSource而提供的代理类。
在了解了国际化的知识后,便可以进行源码的分析了:
initMessageSource中的方法主要功能是提取配置中定义的messageSource,并将其记录在Spring的容器中,也就是AbstractApplicationContext中,当然,如果用户未设置资源文件的话,Spring中也提供了默认的配置DelegatingMessageSource。
在initMessageSource中获取自定义的资源文件的方式为BeanFactory.getBean(MESSAGE_SOURCE_BEAN_NAME,MessageSource.class),在这里Spring使用了硬编码的方式硬性规定了自定义资源文件必须为message,否则便会获取不到自定义资源配置。
我们先来看一下Spring的时间监听的简单用法:
定义监听事件:
public class Event extends ApplicationEvent {

    private String message;

    public Event(Object source) {
        super(source);
    }

    public Event(Object source,String message){
        super(source);
        this.message = message;
    }

    public void print(){
        System.out.println(message);
    }
}
定义监听器:
public class EventListener implements ApplicationListener {
    @Override
    public void onApplicationEvent(ApplicationEvent applicationEvent) {
        if (applicationEvent instanceof Event){
            Event event = (Event) applicationEvent;
            event.print();
        }
    }
    //测试
    public static void main(String[] args){
        ApplicationContext ap = new ClassPathXmlApplicationContext("spring.xml");
        Event event = new Event("hello","Hello");
        ap.publishEvent(event);
    }
}
配置文件:
<bean id="listener" class="com.joe.mytag.application.EventListener"></bean>
运行上述测试代码:
Hello
当程序运行时,Spring会将发出的Event事件转给我们自定义的EventListener进行进一步的处理。
或许很多人一下子会反映出设计模式中的观察者模式,这的确是个典型的应用,但在此比较关心的是事件结束后及时处理。那么我们来看看ApplicationEventMulticaster是如何被初始化的,以确保功能的正确运行。
initApplicationEventMulticaster的方式比较简单,无非就是考虑两种情况。
? 如果用户自定义了事件广播器,那么使用用户自定义的事件广播器。
? 如果用户没有自定义事件广播器,那么使用默认的ApplicationEventMulticaster。
protected void initApplicationEventMulticaster() {
        ConfigurableListableBeanFactory beanFactory = getBeanFactory();
        if (beanFactory.containsLocalBean(APPLICATION_EVENT_MULTICASTER_BEAN_NAME)) {
            this.applicationEventMulticaster =
                    beanFactory.getBean(APPLICATION_EVENT_MULTICASTER_BEAN_NAME, ApplicationEventMulticaster.class);
            if (logger.isTraceEnabled()) {
                logger.trace("Using ApplicationEventMulticaster [" + this.applicationEventMulticaster + "]");
            }
        }
        else {
            this.applicationEventMulticaster = new SimpleApplicationEventMulticaster(beanFactory);
            beanFactory.registerSingleton(APPLICATION_EVENT_MULTICASTER_BEAN_NAME, this.applicationEventMulticaster);
            if (logger.isTraceEnabled()) {
                logger.trace("No ‘" + APPLICATION_EVENT_MULTICASTER_BEAN_NAME + "‘ bean, using " +
                        "[" + this.applicationEventMulticaster.getClass().getSimpleName() + "]");
            }
        }
    }
作为广播器,一定是用于存放监听器并在合适的时候调用监听器,那么我们不妨进入默认的广播器实现SimpleApplicationEventMulticaster来一探究竟。
public void multicastEvent(final ApplicationEvent event, @Nullable ResolvableType eventType) {
        ResolvableType type = (eventType != null ? eventType : resolveDefaultEventType(event));
        for (final ApplicationListener<?> listener : getApplicationListeners(event, type)) {
            Executor executor = getTaskExecutor();
            if (executor != null) {
                executor.execute(() -> invokeListener(listener, event));
            }
            else {
                invokeListener(listener, event);
            }
        }
    }
可以推断,当产生Spring事件的时候会默认使用 SimpleApplicationEventMulticaster的multicastEvent来广播事件,遍历所有监听器,并使用监听器中的onApplicationEvent方法来进行监听器的处理。而对于每个监听器来说其实都可以获取到产生的事件,但是是否进行处理则由事件监听器来决定。
上述介绍Spring的广播器时反复的提到了事件监听器,那么在Spring注册监听器的时候又做了哪些逻辑操作呢?
protected void registerListeners() {
        // 首先注册静态指定的监听器,也就是硬编码的监听器。
        for (ApplicationListener<?> listener : getApplicationListeners()) {
            getApplicationEventMulticaster().addApplicationListener(listener);
        }

        // 配置文件注册的监听器处理
        String[] listenerBeanNames = getBeanNamesForType(ApplicationListener.class, true, false);
        for (String listenerBeanName : listenerBeanNames) {
            getApplicationEventMulticaster().addApplicationListenerBean(listenerBeanName);
        }

        Set<ApplicationEvent> earlyEventsToProcess = this.earlyApplicationEvents;
        this.earlyApplicationEvents = null;
        if (earlyEventsToProcess != null) {
            for (ApplicationEvent earlyEvent : earlyEventsToProcess) {
                getApplicationEventMulticaster().multicastEvent(earlyEvent);
            }
        }
    }
参考:《Spring源码深度解析》 郝佳 编著:
标签:exe 个性 简单 ase DApp order eve tcl ada
原文地址:https://www.cnblogs.com/Joe-Go/p/10216951.html
