标签:coder evel function 文件中 duplicate des param restrict params
为什么要学?
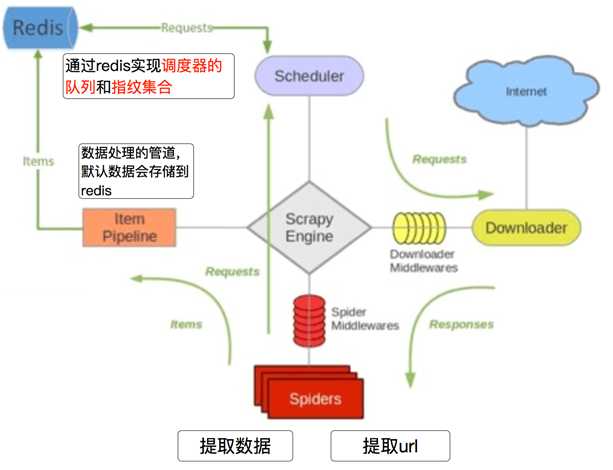
Scrapy_redis在scrapy的基础上实现了更多,更强大的功能。
有哪些功能体现?
request去重、爬虫持久化、实现分布式爬虫、断点续爬(带爬取的request存在redis中)、增量式爬虫(爬取过的生成指纹)
工作流程
先来看看之前的爬虫流程
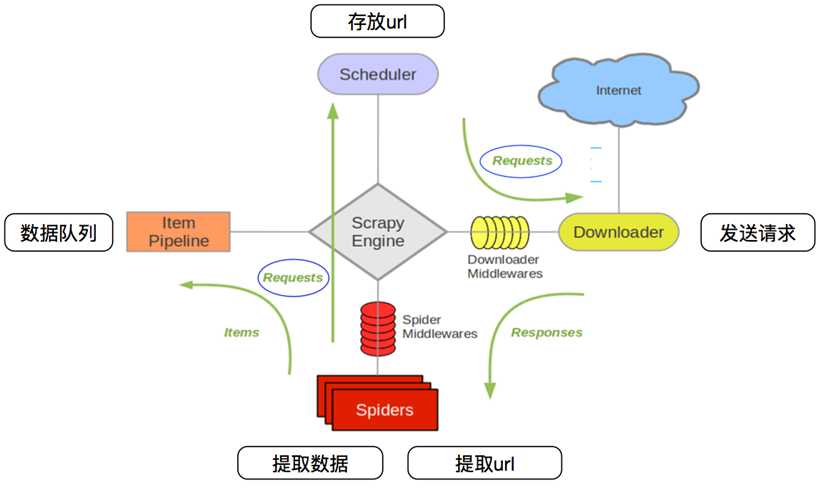
再来看看scrapy_redis的爬虫流程
安装:
pip install scrapy-redis
源码包安装:
git clone git://github.com/rolando/scrapy-redis
官方文档在:https://scrapy-redis.readthedocs.io/en/stable/index.html#running-the-example-project
scrapy_redis 的源码在github:https://github.com/rmax/scrapy-redis
它提供了三个demo在example-projec/example中

三个案例有

先来看第一个案例:
dmoz.py
from scrapy.linkextractors import LinkExtractor
from scrapy.spiders import CrawlSpider, Rule


class DmozSpider(CrawlSpider):
    """Follow categories and extract links."""
    name = ‘dmoz‘
    allowed_domains = [‘dmoz.org‘]
    start_urls = [‘http://www.dmoz.org/‘]

    rules = [
        Rule(LinkExtractor(
            restrict_css=(‘.top-cat‘, ‘.sub-cat‘, ‘.cat-item‘)
        ), callback=‘parse_directory‘, follow=True),
    ]

    def parse_directory(self, response):
        for div in response.css(‘.title-and-desc‘):
            yield {
                ‘name‘: div.css(‘.site-title::text‘).extract_first(),
                ‘description‘: div.css(‘.site-descr::text‘).extract_first().strip(),
                ‘link‘: div.css(‘a::attr(href)‘).extract_first(),
            }
这个案例很像我们自己写的crawlspider什么区别,所以接下来就要进行配置操作
先来看看官方的 Use the following settings in your project:
# 指定schedule队列
# Enables scheduling storing requests queue in redis.
SCHEDULER = "scrapy_redis.scheduler.Scheduler"


# 指定哪个去重方法给request对象去重
# Ensure all spiders share same duplicates filter through redis.
DUPEFILTER_CLASS = "scrapy_redis.dupefilter.RFPDupeFilter"

# Default requests serializer is pickle, but it can be changed to any module
# with loads and dumps functions. Note that pickle is not compatible between
# python versions.
# Caveat: In python 3.x, the serializer must return strings keys and support
# bytes as values. Because of this reason the json or msgpack module will not
# work by default. In python 2.x there is no such issue and you can use
# ‘json‘ or ‘msgpack‘ as serializers.
#SCHEDULER_SERIALIZER = "scrapy_redis.picklecompat"

# 队列中的内容是否持久保存,False:在关闭redis的时候清空redis
# Don‘t cleanup redis queues, allows to pause/resume crawls.
#SCHEDULER_PERSIST = True

# Schedule requests using a priority queue. (default)
#SCHEDULER_QUEUE_CLASS = ‘scrapy_redis.queue.PriorityQueue‘

# Alternative queues.
#SCHEDULER_QUEUE_CLASS = ‘scrapy_redis.queue.FifoQueue‘
#SCHEDULER_QUEUE_CLASS = ‘scrapy_redis.queue.LifoQueue‘

# Max idle time to prevent the spider from being closed when distributed crawling.
# This only works if queue class is SpiderQueue or SpiderStack,
# and may also block the same time when your spider start at the first time (because the queue is empty).
#SCHEDULER_IDLE_BEFORE_CLOSE = 10

# scrapy_redis实现的items保存到redis的pipeline
# Store scraped item in redis for post-processing.
ITEM_PIPELINES = {
    ‘scrapy_redis.pipelines.RedisPipeline‘: 300
}

# The item pipeline serializes and stores the items in this redis key.
#REDIS_ITEMS_KEY = ‘%(spider)s:items‘

# The items serializer is by default ScrapyJSONEncoder. You can use any
# importable path to a callable object.
#REDIS_ITEMS_SERIALIZER = ‘json.dumps‘

# 指定redis的地址
# Specify the host and port to use when connecting to Redis (optional).
#REDIS_HOST = ‘localhost‘
#REDIS_PORT = 6379


# 指定redis的地址
# Specify the full Redis URL for connecting (optional).
# If set, this takes precedence over the REDIS_HOST and REDIS_PORT settings.
#REDIS_URL = ‘redis://user:pass@hostname:9001‘

# Custom redis client parameters (i.e.: socket timeout, etc.)
#REDIS_PARAMS  = {}
# Use custom redis client class.
#REDIS_PARAMS[‘redis_cls‘] = ‘myproject.RedisClient‘

# If True, it uses redis‘ ``spop`` operation. This could be useful if you
# want to avoid duplicates in your start urls list. In this cases, urls must
# be added via ``sadd`` command or you will get a type error from redis.
#REDIS_START_URLS_AS_SET = False

# Default start urls key for RedisSpider and RedisCrawlSpider.
#REDIS_START_URLS_KEY = ‘%(name)s:start_urls‘

# Use other encoding than utf-8 for redis.
#REDIS_ENCODING = ‘latin1‘
所以我们需要做的就是在配置文件中添加这几行
# 去重
DUPEFILTER_CLASS = "scrapy_redis.dupefilter.RFPDupeFilter"
# 调度器
SCHEDULER = "scrapy_redis.scheduler.Scheduler"
# 调度器持久化
SCHEDULER_PERSIST = True

# 指定redis地址
REDIS_URL = "redis://192.168.226.150:6379"
ITEM_PIPELINES = {
    ‘example.pipelines.ExamplePipeline‘: 300,
    ‘scrapy_redis.pipelines.RedisPipeline‘: 400, # 保存数据到redis
}
在这里也贴上github上的settings:

# Scrapy settings for example project
#
# For simplicity, this file contains only the most important settings by
# default. All the other settings are documented here:
#
#     http://doc.scrapy.org/topics/settings.html
#
SPIDER_MODULES = [‘example.spiders‘]
NEWSPIDER_MODULE = ‘example.spiders‘

USER_AGENT = ‘scrapy-redis (+https://github.com/rolando/scrapy-redis)‘

DUPEFILTER_CLASS = "scrapy_redis.dupefilter.RFPDupeFilter"
SCHEDULER = "scrapy_redis.scheduler.Scheduler"
SCHEDULER_PERSIST = True
#SCHEDULER_QUEUE_CLASS = "scrapy_redis.queue.SpiderPriorityQueue"
#SCHEDULER_QUEUE_CLASS = "scrapy_redis.queue.SpiderQueue"
#SCHEDULER_QUEUE_CLASS = "scrapy_redis.queue.SpiderStack"

ITEM_PIPELINES = {
    ‘example.pipelines.ExamplePipeline‘: 300,
    ‘scrapy_redis.pipelines.RedisPipeline‘: 400,
}

LOG_LEVEL = ‘DEBUG‘

# Introduce an artifical delay to make use of parallelism. to speed up the
# crawl.
DOWNLOAD_DELAY = 1
接下来我们就运行,跟往常的运行命令一样,切换到example 下,执行命令
\example>scrapy crawl dmoz
然后就去redis中查看
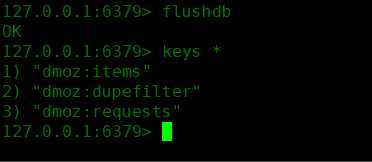
可以看到多了三个键
dmoz:items :存放获取到的item信息,在pipeline中开启RedisPipeline才会存入
dmoz:dupefilter :指纹集合,存放的是已经进入 scheduler 队列的 request 对象的指纹,指纹默认由请求方法,url和请求体组成
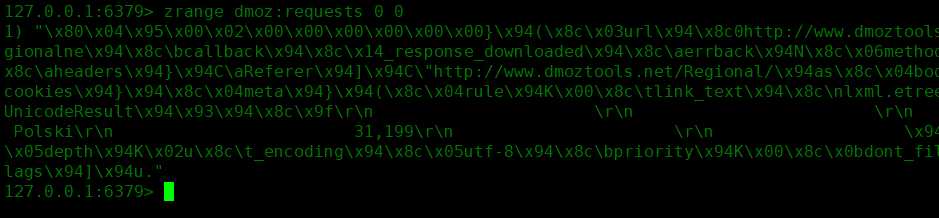
dmoz:requests :Scheduler队列,存放着待请求的 request 对象,获取的过程是pop操作,即获取一个会去除一个
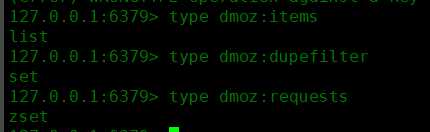
三个键的类型:
以及数据
items

dupefilter

requests
如果我们不想把数据存放到redis,而是放到其他的地方,应该怎么做?
先来测试一下redispiipeline 关闭的情况
#ITEM_PIPELINES = {
    # ‘example.pipelines.ExamplePipeline‘: 300,
    #‘scrapy_redis.pipelines.RedisPipeline‘: 400, # 保存数据到redis
#}
再看看redis数据库中这三个键如何变化,变化结果:
dmoz:requests 有变化(变多或者变少或者不变)
dmoz:dupefilter 变多
dmoz:items 不变
所以 redispipeline中仅仅实现了item数据存储到redis的过程,我们可以新建一个pipeline(或者修改默认的ExamplePipeline),让数据存储到其他地方。
接下来看一下 RedisPipeline 的源码段
from scrapy_redis.pipelines import RedisPipeline
    # 调用这个方法,实现数据的保存
    def process_item(self, item, spider):
    # 调用一个异步线程去处理这个item
        return deferToThread(self._process_item, item, spider)

    def _process_item(self, item, spider):
        key = self.item_key(item, spider)
        data = self.serialize(item)
       # 向dmoz:items中添加item
        self.server.rpush(key, data)
        return item
去重的方法,通过生成指纹识别:指纹默认由请求方法,url和请求体组成
- 使用sha1加密request得到指纹
- 把指纹存在redis的集合中
- 下一次新来一个request,同样的方式生成指纹,判断指纹是否存在reids的集合中
- fp = hashlib.sha1()
- fp.update(request.method)
- fp.update(request.body or b"")
- fp.update(url)
- fp.hexdigest()
判断数据是否存在redis的集合中,不存在插入
added = self.server.sadd(self.key, fp)
return added != 0
去重的的类 RFPDupeFilter :

主要是这三个方法:
request_seen:判断requests对象是否已经存在,如果没有就添加到“dmoz:dupefilter”
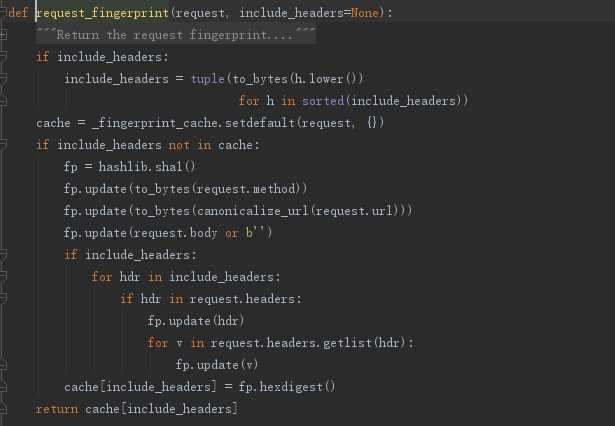
request_fingerprint:调用函数request_fingerprint
request_fingerprint:主要是对请求进行加密生成指纹
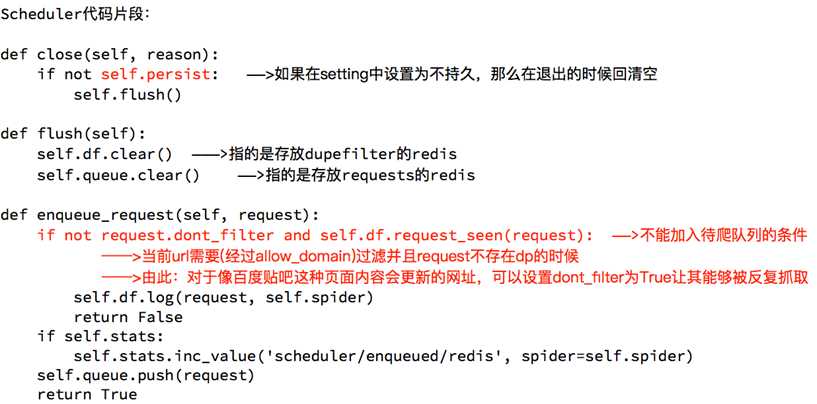
下面来看看调度器:
总结:
domz案例相当于之前的spider多了两个内容:
1、持久化
2、request去重的功能
通过源码以及setting中的配置来看,我们可以重写 去重 和 调度器的方法 ,还有存储数据的 pipeline 。在配置中改成我们重写的类就行。
标签:coder evel function 文件中 duplicate des param restrict params
原文地址:https://www.cnblogs.com/tangkaishou/p/10272546.html
