标签:方法 out arguments 用户 协程 __slots__ flask correct wsgi
from flask import Flask

"""
1 实例化对象 app
"""
app = Flask(__name__)

"""
2 设置路由
    将路由关系放在 app.url_map = {} 中
"""
@app.route("/index")
def index():
    return "index"

if —__name__ == "__main__":
"""
3 启动socket服务端
"""
    app.run()

"""
4 用户请求到来就会执行 __call__ 方法
"""
# 启动入口简约版代码
from werkzeug.wrappers import Response
from werkzeug.serving import run_simple

class Flask(object):
    def __call__(self,environ, start_response):
        response = Response(‘hello‘)
        return response(environ, start_response)

    def run(self):
        run_simple(‘127.0.0.1‘, 8000, self)
run_simple(host,port,self,**options)
会对第三个传入的参数加()进行执行
第三个参数如果是app对象就执行其 __call__ 方法
def __call__(self,environ, start_response):
    # environ 请求相关的所有数据 第一手的数据,由wsgi进行的初步封装
    # start_response 用于设置响应相关数据
    return wsgi_app(environ,start_response)
call 返回的是 wsgi_app 的执行结果
wsgi_app 里面做的事情就很多了。
我们一步一步来看

首先把请求相关的所有数据都 封装了到 一个 ctx 对象

而且通过 __init__ 可以看到 封装了 request 以及创建了一个 空的 session
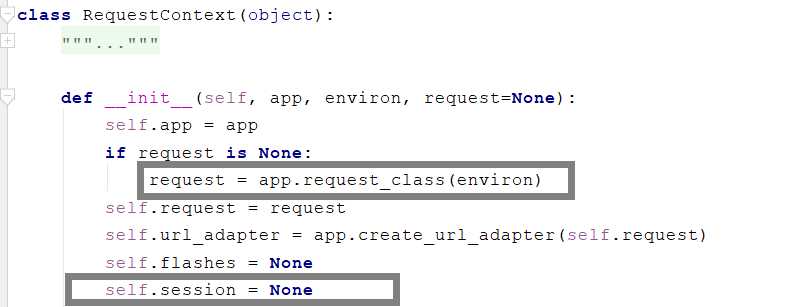
得到了 ctx 对象
创建ctx.request 以及 ctx.session = None

来看下 push 都做了什么

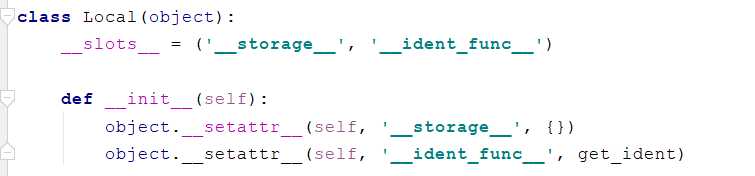
封了一个top,这是啥不知道,要继续看是个 LocalStack 对象
![]()

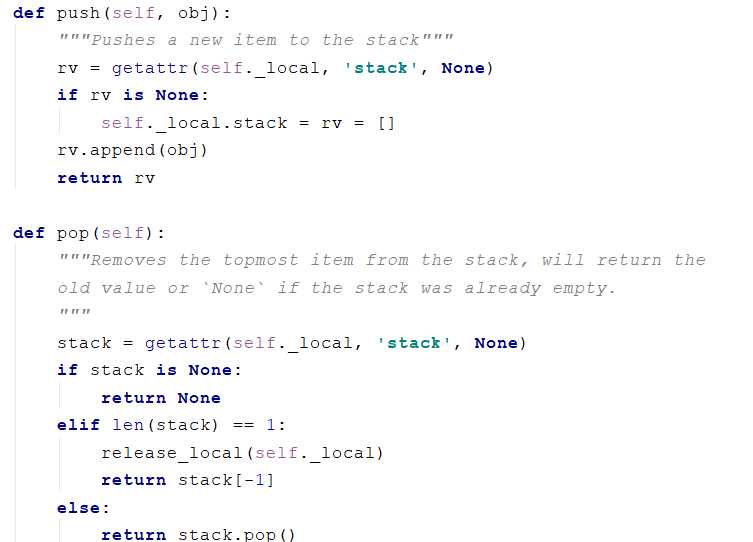
class LocalStack(object):

    """This class works similar to a :class:`Local` but keeps a stack
    of objects instead.  This is best explained with an example::

        >>> ls = LocalStack()
        >>> ls.push(42)
        >>> ls.top
        42
        >>> ls.push(23)
        >>> ls.top
        23
        >>> ls.pop()
        23
        >>> ls.top
        42

    They can be force released by using a :class:`LocalManager` or with
    the :func:`release_local` function but the correct way is to pop the
    item from the stack after using.  When the stack is empty it will
    no longer be bound to the current context (and as such released).

    By calling the stack without arguments it returns a proxy that resolves to
    the topmost item on the stack.

    .. versionadded:: 0.6.1
    """

    def __init__(self):
        self._local = Local()

    def __release_local__(self):
        self._local.__release_local__()

    def _get__ident_func__(self):
        return self._local.__ident_func__

    def _set__ident_func__(self, value):
        object.__setattr__(self._local, ‘__ident_func__‘, value)
    __ident_func__ = property(_get__ident_func__, _set__ident_func__)
    del _get__ident_func__, _set__ident_func__

    def __call__(self):
        def _lookup():
            rv = self.top
            if rv is None:
                raise RuntimeError(‘object unbound‘)
            return rv
        return LocalProxy(_lookup)

    def push(self, obj):
        """Pushes a new item to the stack"""
        rv = getattr(self._local, ‘stack‘, None)
        if rv is None:
            self._local.stack = rv = []
        rv.append(obj)
        return rv

    def pop(self):
        """Removes the topmost item from the stack, will return the
        old value or `None` if the stack was already empty.
        """
        stack = getattr(self._local, ‘stack‘, None)
        if stack is None:
            return None
        elif len(stack) == 1:
            release_local(self._local)
            return stack[-1]
        else:
            return stack.pop()

    @property
    def top(self):
        """The topmost item on the stack.  If the stack is empty,
        `None` is returned.
        """
        try:
            return self._local.stack[-1]
        except (AttributeError, IndexError):
            return None
这个 LocalStack 对象是什么我们也还是不知道,还需需要继续看,发现其实是个 Local 对象

看到Local 到这里发现应该是看到底了,这样稍微看下 local 对象就是在 __storage__ 里面存了个数据结构
这个数据结构是这样的,
__storage__ = {
    线程/协程id:{}
    线程/协程id:{}
    线程/协程id:{}
}
class Local(object):
    __slots__ = (‘__storage__‘, ‘__ident_func__‘)

    def __init__(self):
        object.__setattr__(self, ‘__storage__‘, {})
        object.__setattr__(self, ‘__ident_func__‘, get_ident)

    def __iter__(self):
        return iter(self.__storage__.items())

    def __call__(self, proxy):
        """Create a proxy for a name."""
        return LocalProxy(self, proxy)

    def __release_local__(self):
        self.__storage__.pop(self.__ident_func__(), None)

    def __getattr__(self, name):
        try:
            return self.__storage__[self.__ident_func__()][name]
        except KeyError:
            raise AttributeError(name)

    def __setattr__(self, name, value):
        ident = self.__ident_func__()
        storage = self.__storage__
        try:
            storage[ident][name] = value
        except KeyError:
            storage[ident] = {name: value}

    def __delattr__(self, name):
        try:
            del self.__storage__[self.__ident_func__()][name]
        except KeyError:
            raise AttributeError(name)
然后我们在回头看下 LocalStark 是干嘛的, 原来这货是帮助维护这个数据结构的,
会把 Local 的数据进一步维护成这样
__storage__ = {
    线程/协程id:{stack:[ctx]}  # 维护成一个栈
    线程/协程id:{stack:[ctx]}
    线程/协程id:{stack:[ctx]}
    线程/协程id:{stack:[ctx]}
}    # 都是通过 Localstack 来操作 local 里面的数据结构
而且 LocalStark 里面还有一系列的操作方法,由此可见 LocalStark 应该就是专门操作 Local 对象数据的
ok,走到头了回去接着往下走
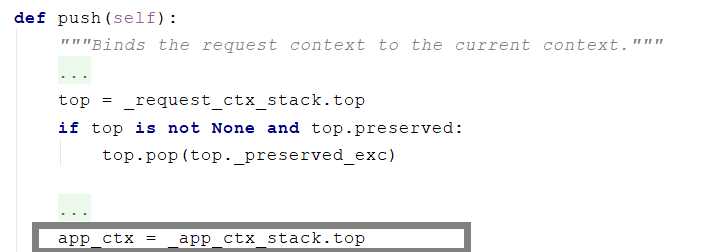
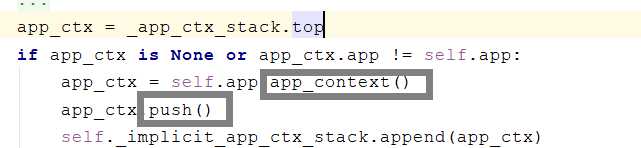
有封装了一个 app_ctx ,其实刚刚看 top 的时候就已经发现了 下面有个 app_ctx_stack 了
可见其实封装了两个 LocalStark 对象,分别是 请求相关的 以及 app相关的

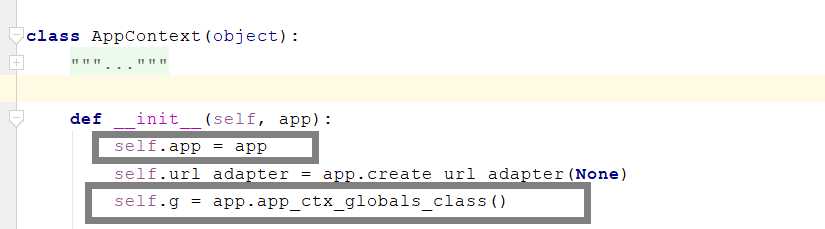
然后继续往下走,这里分装了 app_ctx 是 AppContext 的 对象,
里面封装了,app 和 g
![]()
看到了这里

这里就是对 session 的操作了。之前的 session 一直是 空,这里进行真正的赋值。
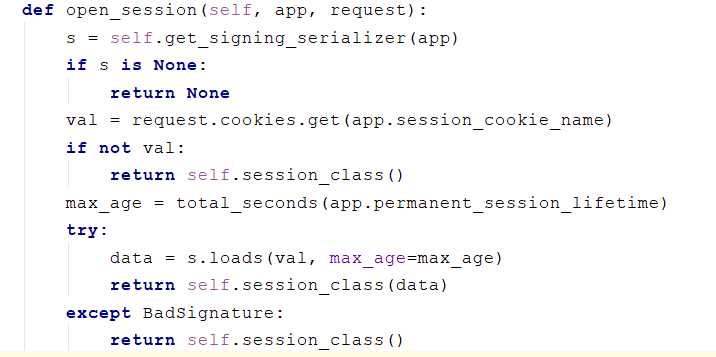
可见 session 的赋值是通过配置文件的 配置名字 取到 session ,然后解密反序列化生成字典重新赋值 ctx.session 的具体操作实现
至此,push() 的代码看完了。
分装了 两个 ctx :
- 请求上下文(ctx=RequestContext()):request/session
- App上下文(app_ctx=AppContext()): app/g
这两 ctx 都分别保存了两个 LocalStark 以及 两个 Local
以及 赋值了 ctx.session
这里就不详细看了。
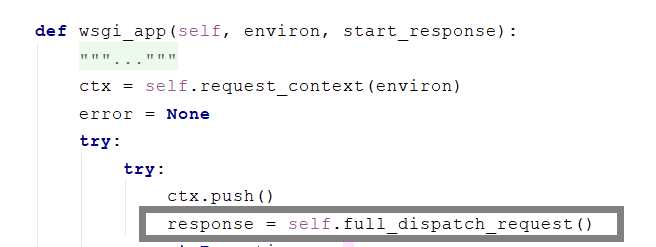
大概做了两件事,执行了处理视图函数,以及一系列善后工作,

视图函数执行完毕后,一次请求结束,把请求的 ctx 对象弹出,
在看过了 整体的 Flask 的一次请求的流程之后,
我们再来分析上下文管理 ,直接看到这个比较重点的地方把
两个 LocalStack 对象,以及重要的 request,session 的产生的地方。
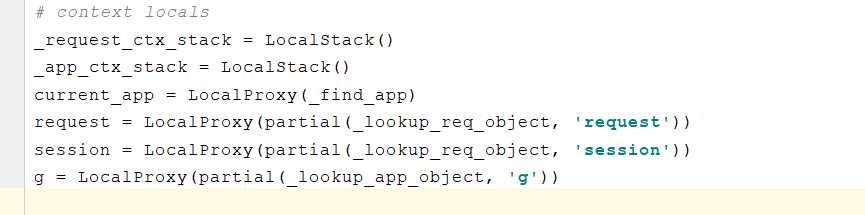
这里使用了 LocalProxy用于代理Local对象和LocalStack对象,以及偏函数
两个Local:
  local1 = {}

  local2 = {}

两个LocalStack:
  _request_ctx_stack
  _app_ctx_stack
对数据进行封装:
    ctx = RequestContext(request,session)
    app_ctx = AppContext(app,g)

保存数据
    将包含了(app,g)数据的app_ctx对象,利用 _app_ctx_stack(LocalStack())将app_ctx添加到Local中
        storage = {
            1231:{stack:[app_ctx(app,g),]}
        }

  将包含了request,session数据的ctx对象,利用_request_ctx_stack(LocalStack()),将ctx添加到Local中
        storage = {
            1231:{stack:[ctx(request,session),]}
        }
@app.route(‘/index‘)
def index():
    # 去请求上下文中获取值 _request_ctx_stack
    request.method
    session[‘xxx‘]

    # 去app上下文中获取值:_app_ctx_stack
    print(current_app)
    print(g)

    return "Index"
方式一:直接找LocalStack获取
        from flask.globals import _request_ctx_stack
        print(_request_ctx_stack.top.request.method)

方式二:通过代理LocalProx获取
        from flask import Flask,request
        print(request.method)
_app_ctx_stack.pop()
_request_ctx_stack.pop()
标签:方法 out arguments 用户 协程 __slots__ flask correct wsgi
原文地址:https://www.cnblogs.com/shijieli/p/10355856.html
