标签:mys let interface main void encoding tin 图片 variable
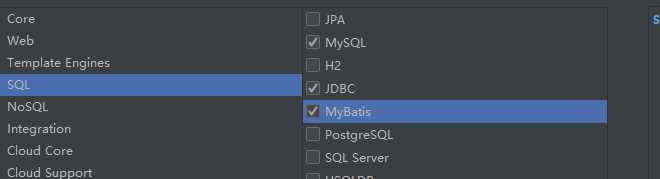
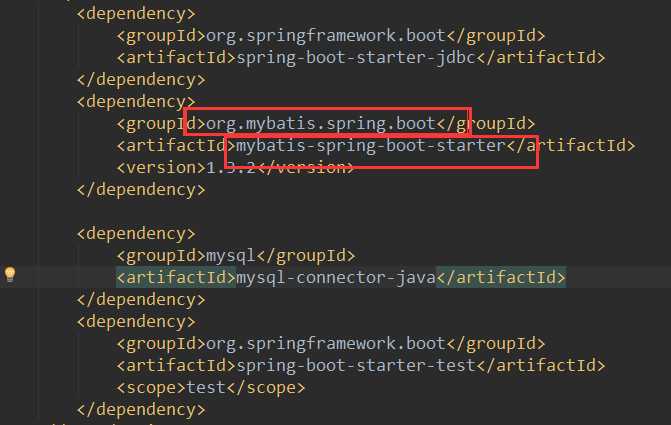
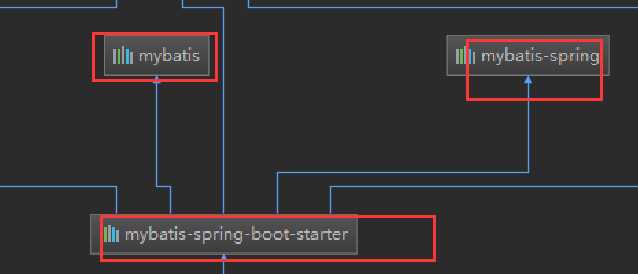
1)、创建工程需要的maven坐标
<dependency>
    <groupId>com.alibaba</groupId>
    <artifactId>druid</artifactId>
    <version>1.1.10</version>
</dependency>
spring.datasource.url=jdbc:mysql://127.0.0.1:3306/users?serverTimezone=GMT
spring.datasource.username=root
spring.datasource.password=1234
spring.datasource.driver-class-name=com.mysql.cj.jdbc.Driver
spring.datasource.type=com.alibaba.druid.pool.DruidDataSource
#其他配置
# 下面为连接池的补充设置,应用到上面所有数据源中
spring.datasource.initialSize=5
spring.datasource.minIdle=5
spring.datasource.maxActive=20
# 配置获取连接等待超时的时间
spring.datasource.maxWait=60000
# 配置间隔多久才进行一次检测,检测需要关闭的空闲连接,单位是毫秒
spring.datasource.timeBetweenEvictionRunsMillis=60000
# 配置一个连接在池中最小生存的时间,单位是毫秒
spring.datasource.minEvictableIdleTimeMillis=300000
spring.datasource.validationQuery=SELECT 1 FROM DUAL
spring.datasource.testWhileIdle=true
spring.datasource.testOnBorrow=false
spring.datasource.testOnReturn=false
# 配置监控统计拦截的filters,去掉后监控界面sql无法统计,‘wall‘用于防火墙
spring.datasource.filters=stat,wall
spring.datasource.logSlowSql=true
4)、Druid的后台监控.......
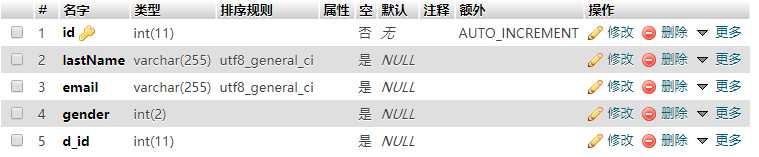
public class Employee {
    private Integer id;
    private String lastName;
    private Integer gender;
    private String email;
    private Integer dId;
...
}
public class Department {
    private Integer id;
    private String departmentName;
....
}

@Repository
//指定这是一个操作数据库的mapper
@Mapper
public interface DepartMapper {

    @Select("select * from department where id=#{id}")
    public Department getDeptById(Integer id);

    @Delete("delete from department where id=#{id}")
    public int deleteDeptById(Integer id);

    @Insert("insert into department(departmentName) values(#{departmentName})")
    public int insertDept(Department department);

    @Update("update department set department_name=#{departmentName} where id=#{id}")
    public int updateDept(Department department);
}
注解版本的都是用注解来进行标注,没有配置文件,所有的sql语句都在标签里面
controller类的实现方法:
@ResponseBody
@Controller
public class DeptController {
    @Autowired
    DepartMapper departMapper;

    //模拟查询
    @RequestMapping("/dept/{id}")
    public Department getDept(@PathVariable("id")Integer id){
        Department dept = departMapper.getDeptById(id);
        return dept;
    }

    //模拟插入
    @RequestMapping("/dept")
    public Department insertDept(Department department){
        departMapper.insertDept(department);
        return department;
    }
}
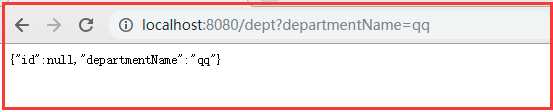
测试模拟插入:
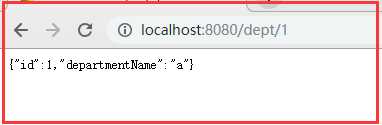
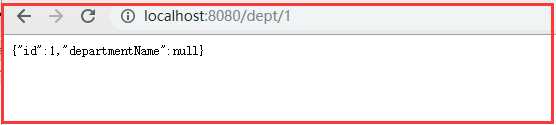
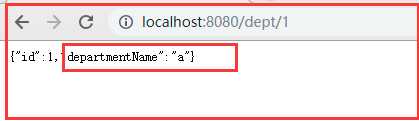
测试查询:
//使用自动生成的组件
@Options(useGeneratedKeys = true,keyProperty = "id")
@Insert("insert into department(departmentName) values(#{departmentName})")
public int insertDept(Department department);

问题:

此时的数据表列值发生改变
@Select("select * from department where id=#{id}")
public Department getDeptById(Integer id);
此时执行查询department_name是封装不到对象中的

@Bean
@ConditionalOnMissingBean
public SqlSessionFactory sqlSessionFactory(DataSource dataSource) throws Exception {
    SqlSessionFactoryBean factory = new SqlSessionFactoryBean();
    factory.setDataSource(dataSource);
    factory.setVfs(SpringBootVFS.class);
    if (StringUtils.hasText(this.properties.getConfigLocation())) {
        factory.setConfigLocation(this.resourceLoader.getResource(this.properties.getConfigLocation()));
    }

    org.apache.ibatis.session.Configuration configuration = this.properties.getConfiguration();
    if (configuration == null && !StringUtils.hasText(this.properties.getConfigLocation())) {
        configuration = new org.apache.ibatis.session.Configuration();
    }

    if (configuration != null && !CollectionUtils.isEmpty(this.configurationCustomizers)) {
        Iterator var4 = this.configurationCustomizers.iterator();

        while(var4.hasNext()) {
            ConfigurationCustomizer customizer = (ConfigurationCustomizer)var4.next();
            customizer.customize(configuration);
        }
    }
......
}
开启驼峰命名
自定义MyBatis的配置规则
@Configuration
public class MyBatisConfig {
    @Bean
    public ConfigurationCustomizer configurationCustomizer(){
        return new ConfigurationCustomizer() {
            @Override
            public void customize(org.apache.ibatis.session.Configuration configuration) {

                //开启驼峰命名发
                configuration.setMapUnderscoreToCamelCase(true);
            }
        };
    }
}
此时可以封装到对象
@MapperScan(value = "com.cr.mybatis.mapper")
@SpringBootApplication
public class MybatisApplication {

    public static void main(String[] args) {
        SpringApplication.run(MybatisApplication.class, args);
    }
}
@Repository
public interface EmployeeMapper {

    public Employee getById(Integer id);

    public void insertEmp(Employee employee);
}
mybatis配置文件:
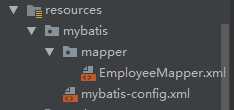
mybatis-config.xml
<?xml version="1.0" encoding="UTF-8" ?>
<!DOCTYPE configuration
        PUBLIC "-//mybatis.org//DTD Config 3.0//EN"
        "http://mybatis.org/dtd/mybatis-3-config.dtd">
<configuration>

    <settings>
        <setting name="mapUnderscoreToCamelCase" value="true"/>
    </settings>
</configuration>
EmployeeMapper.xml
<?xml version="1.0" encoding="UTF-8" ?>
<!DOCTYPE mapper
        PUBLIC "-//mybatis.org//DTD Mapper 3.0//EN"
        "http://mybatis.org/dtd/mybatis-3-mapper.dtd">
<mapper namespace="com.cr.mybatis.mapper.EmployeeMapper">

    <select id="getById"
            resultType="com.cr.mybatis.pojo.Employee">
        SELECT * FROM employee WHERE id=#{id}
    </select>

    <insert id="insertEmp">
        INSERT INTO employee(lastName,email,gender,d_id)
        VALUES (#{lastName},#{email},#{gender},#{dId})
    </insert>
</mapper>
#配置mybatis
#mybatis的配置文件
mybatis.config-location=classpath:mybatis/mybatis-config.xml
#mapper的配置文件
mybatis.mapper-locations=classpath:mybatis/mapper/*.xml
测试的controller类:
@ResponseBody
@Controller
public class EmpTest {
    @Autowired
    EmployeeMapper employeeMapper;

    //查询
    @RequestMapping("/emp/{id}")
    public Employee getEmp(@PathVariable("id") Integer id){
        Employee emp = employeeMapper.getById(id);
        return emp;
    }

    @RequestMapping("/emp")
    public Employee insert(Employee employee){
        employeeMapper.insertEmp(employee);
        return employee;
    }
}
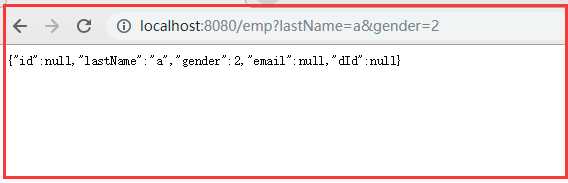
测试:

标签:mys let interface main void encoding tin 图片 variable
原文地址:https://www.cnblogs.com/Mrchengs/p/10358025.html