标签:com src use ash 创建模板 round turn vim mys
Python3+Django2.0基础入门demo
1、安装Python3环境
[root@openshift ~]# cat /etc/redhat-release
CentOS Linux release 7.4.1708 (Core)
默认为Python2.7,需要安装Python3
[root@openshift ~]#wget https://repo.continuum.io/archive/Anaconda3-5.0.1-Linux-x86_64.sh
[root@openshift ~]# yum install bzip2
[root@openshift ~]# chmod +x Anaconda3-5.0.1-Linux-x86_64.sh
[root@openshift ~]# ./Anaconda3-5.0.1-Linux-x86_64.sh
执行脚本有一个交互过程,依次输入yes—“enter”按键—yes
[root@openshift ~]# source /root/.bashrc
[root@openshift ~]# python -V
Python 3.6.3 :: Anaconda, Inc.
2、安装django2.0
[root@openshift ~]# yum install python-pip
[root@openshift ~]# pip install django==2.0
3、创建项目
[root@openshift ~]# cd /root/python3pro
[root@openshift python3pro]# django-admin startproject testblog
[root@openshift python3pro]# cd testblog/
[root@openshift testblog]# ls
manage.py testblog
[root@openshift testblog]# python manage.py startapp testapp
[root@openshift testblog]# ls
manage.py testapp testblog
[root@openshift testblog]#
4、配置访问基础
配置访问权限和添加app,设置settings文件,
ALLOWED_HOSTS = [‘*‘]
INSTALLED_APPS = [
‘django.contrib.admin‘,
‘testapp‘,
]
初始化数据库和后台访问账户密码
[root@openshift testblog]# python manage.py migrate
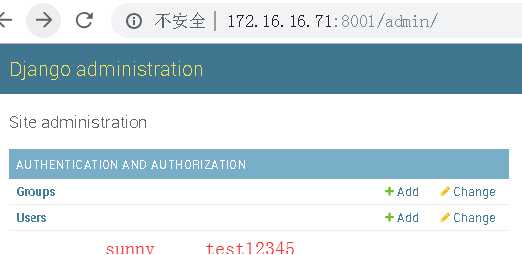
[root@openshift testblog]# python manage.py createsuperuser
Username (leave blank to use ‘root‘): sunny
Email address: 123@qq.com
Password:
Password (again):
设置账户密码 sunny test12345
5、访问Python3 Django2案例
[root@openshift testblog]# vim testapp/views.py 需要新增部分
from django.shortcuts import render
from django.http import HttpResponse
def index(request):
return HttpResponse(‘Python3 Django2‘)

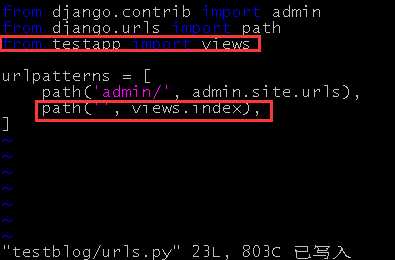
[root@openshift testblog]# vim testblog/urls.py 需要新增部分
from django.contrib import admin
from django.urls import path
from testone import views
urlpatterns = [
path(‘admin/‘, admin.site.urls),
#path(‘aa/‘, views.index),
path(‘‘, views.index),
]
启动项目,
[root@openshift testblog]# python manage.py runserver 0.0.0.0:8000
访问测试,
[root@openshift ~]# curl http://172.16.16.71:8001/
Python3 Django2
[root@openshift ~]# curl -I http://172.16.16.71:8001
HTTP/1.1 200 OK
后台访问:
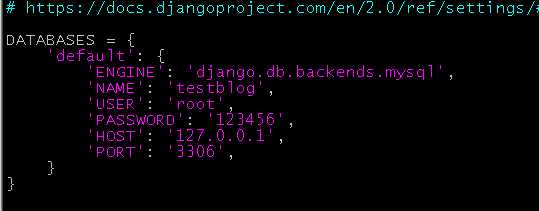
6、配置mysql数据库
创建数据库
[root@openshift testblog]# mysql -h127.0.0.1 -uroot -p123456 -e ‘create database testblog character set utf8 collate utf8_bin;‘ 创建testblog数据库
[root@openshift testblog]# mysql -h127.0.0.1 -uroot -p123456 -e ‘show create database testblog‘
+----------+------------------------------------------------------------------------------------+
| Database | Create Database |
+----------+------------------------------------------------------------------------------------+
| testblog | CREATE DATABASE `testblog` /*!40100 DEFAULT CHARACTER SET utf8 COLLATE utf8_bin */ |
+----------+------------------------------------------------------------------------------------+
配置数据库文件
Settings.py配置数据库
安装mysql数据库驱动
[root@openshift testblog]# pip install mysql-python
[root@openshift testblog]# pip install PyMySQL
删除db.sqlite数据,启用mysql数据库
[root@openshift testblog]# python manage.py migrate
[root@openshift testblog]# python manage.py createsuperuser
[root@openshift testblog]# python manage.py runserver 0.0.0.0:8001
查看生成的数据
[root@openshift]# mysql -h127.0.0.1 -uroot -p123456 -e ‘use testblog; show tables‘
+----------------------------+
| Tables_in_testblog |
+----------------------------+
| auth_group |
| ...... |
| django_migrations |
| django_session |
+----------------------------+
自此,完成了Python3+Django2.0环境初始化部署。
7、配置静态html页面
配置settings.py文件,
补充DIRS路径,末尾新增两行。
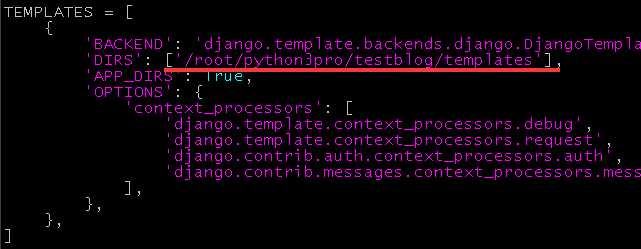
STATIC_URL = ‘/static/‘
TEMPLATE_DIRS = [ os.path.join(BASE_DIR, "templates"),]
STATICFILES_DIRS = [ os.path.join(BASE_DIR, "static"),]
配置视图
[root@openshift testblog]# vim testapp/views.py
from django.shortcuts import render
from django.http import HttpResponse
def index(request):
return render(request,‘article.html‘)
配置url,跟上述一致,不需要改变。
配置html文件,目录结构如下,
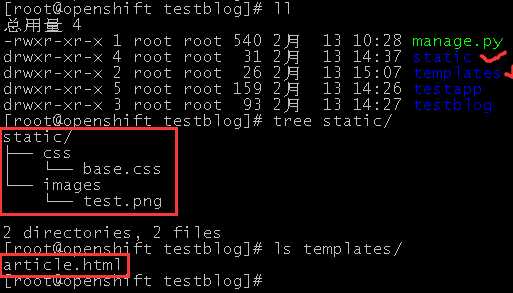
[root@openshift testblog]# cat templates/article.html
<!DOCTYPE>
<html>
<head>
<title>Django2.0测试</title>
<link href="/static/css/base.css" rel="stylesheet" type="text/css"/>
</head>
<body>
<h2 class="headtop">使用 vue 开发者工具调试</h2>
<ul class="content">
<li>1、遵循 MVVM 模式</li>
<li>2、编码简洁, 体积小, 运行效率高, 适合移动/PC 端开发</li>
<li>3、只关注 UI,可轻松引入 vue 插件或其它第三库开发项目</li>
</ul>
<div class="footer"><img src="/static/images/test.png"/></div>
</body>
</html>
[root@openshift testblog]#
[root@openshift testblog]# ls static/images/test.png
static/images/test.png
[root@openshift testblog]# cat static/css/base.css
.headtop{
height:60px;
line-height:60px;
text-align:center;
background:#e8e8e8;
}
.content{list-style-type :none;}
.content li {background:#fafafa;margin: 10px;}
.footer{margin-left: 100px;}
.footer img{width: 200px; height:100px;}
[root@openshift testblog]#
展示效果如下,
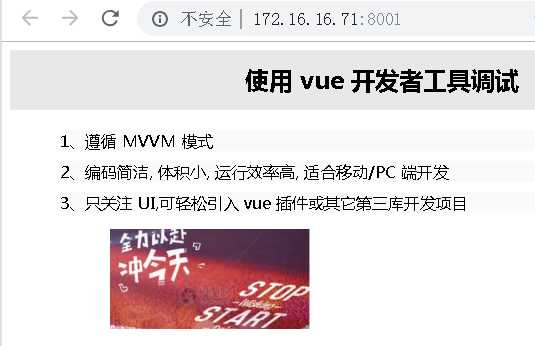
自此,完成静态页面部署工作。
8、简易博客系统部署
设计表,定义model
[root@openshift testblog]# vim testapp/models.py
from django.db import models
class BlogsPost(models.Model):
title = models.CharField(max_length = 150)
body = models.TextField()
timestamp = models.DateTimeField()
执行数据库同步
[root@openshift testblog]# python manage.py makemigrations testapp
Did you rename the testapp.BlogsPost model to Bloglists? [y/N] Y
Migrations for ‘testapp‘:
testapp/migrations/0002_auto_20190213_0405.py
- Rename model BlogsPost to Bloglists
[root@openshift testblog]#
通过后台admin管理,
[root@openshift testblog]# vim testapp/admin.py
from django.contrib import admin
from testapp.models import Bloglists
class BloglistsAdmin(admin.ModelAdmin):
list_display = [‘title‘, ‘body‘, ‘timestamp‘]
admin.site.register(Bloglists, BloglistsAdmin)
访问登录admin后台,
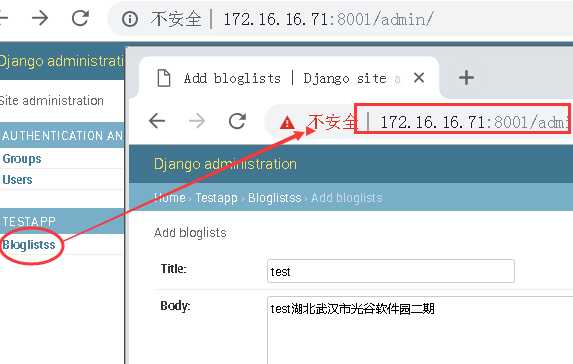
界面操作后,保存,数据存入数据库。
[root@openshift ~]# mysql -h127.0.0.1 -uroot -p123456 -e ‘use testblog; select * from testapp_bloglists‘
+----+--------------+------------------------------------------+---------------------+
| id | title | body | timestamp |
+----+--------------+------------------------------------------+---------------------+
| 1 | test | test湖北武汉市光谷软件园二期 | 2019-02-13 04:15:26 |
| 2 | 第二节课 | 熟悉掌握Django2.0使用方法 | 2019-02-13 04:30:54 |
+----+--------------+------------------------------------------+---------------------+
[root@openshift ~]#
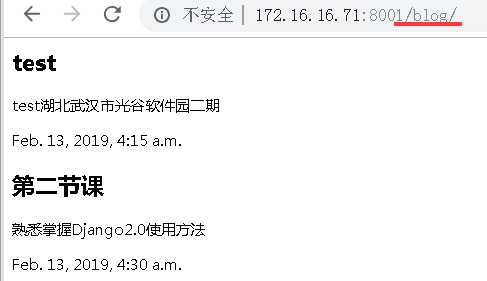
前端展示数据
创建视图
[root@openshift testblog]# vim testapp/views.py
from django.shortcuts import render
from django.http import HttpResponse
from testapp.models import Bloglists
def blog_index(request):
blog_list = Bloglists.objects.all()
return render(request,‘blog.html‘, {‘blog_list‘:blog_list})
创建url地址,
[root@openshift testblog]# vim testblog/urls.py
from testapp import views
urlpatterns = [
path(‘admin/‘, admin.site.urls),
path(‘‘, views.index),
path(‘blog/‘, views.blog_index),
]
创建模板,
[root@openshift testblog]# vim templates/blog.html
{% for blog in blog_list %}
<h2>{{ blog.title }}</h2>
<p>{{ blog.body }}</p>
<p>{{ blog.timestamp }}</p>
{% endfor %}
访问链接:
可以通过引入样式文件优化界面展示效果,自行优化。
自此完成了整个Python3+Django2.0项目部署整个过程。
标签:com src use ash 创建模板 round turn vim mys
原文地址:https://www.cnblogs.com/sunnyyangwang/p/10372385.html