标签:entity orm 校验 安装 ice rar 链接 t权限 create
摘自:https://blog.csdn.net/ty1121466568/article/details/81118468
本文为参考网上其他博文搭建出服务器后的步骤记录,如有冒犯,请私信!!!
1.2方法二:在Ubuntu下使用apt-get安装... 5
在Ubuntu下安装该软件的常用方法有两种,两种均能使该软件作为中转服务器使用,不过笔者在使用方法二安装的mosquitto时,有些配置没有生效,不知是否是笔者当时在配置是否有误还是该方式安装的不完全(该方式安装的mosquitto要比编译安装的少一些示例配置文件)。要想使用双向认证,单向认证等功能,推荐使用方法一。
step1.下载源码
Mosquitto官网:http://mosquitto.org/
Mosquitto最新的源码:http://mosquitto.org/files/source/
选择一个喜欢的版本即可,笔者在这里选择最新的1.5版
mosquitto-1.5.tar.gz
step2.解压源码
tar -xzvf mosquitto-1.5.tar.gz
step3.进入源码目录
cd mosquitto-1.5/
step4.编译和安装
make && make install
其中,make install需要root权限。
在安装过程中会由于缺失一些库而报错,直接百度,然后安装即可
可能遇到的问题及其解决方式:
【1】编译找不到openssl/ssl.h
【解决方法】——安装openssl
sudo apt-get install libssl-dev
【2】编译过程找不到ares.h
sudo apt-get install libc-ares-dev
【3】编译过程找不到uuid/uuid.h
sudo apt-get install uuid-dev
【4】使用过程中找不到libmosquitto.so.1
error while loading shared libraries: libmosquitto.so.1: cannot open shared object file: No such file or directory
【解决方法】——修改libmosquitto.so位置
# 创建链接
sudo ln -s /usr/local/lib/libmosquitto.so.1 /usr/lib/libmosquitto.so.1
# 更新动态链接库
sudo ldconfig
【5】make: g++:命令未找到
【解决方法】
安装g++编译器
sudo apt-get install g++
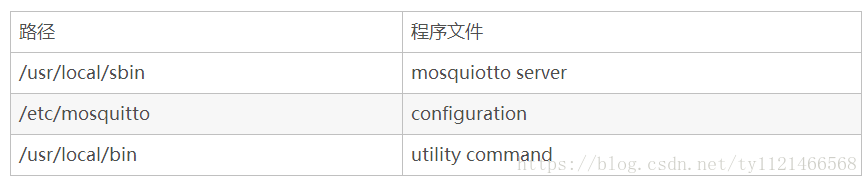
step5.程序安装位置:
step6.本机测试
打开一个终端,执行以下命令订阅主题"mqtt"
$mosquitto_sub -h localhost -t "mqtt"-v
打开另外一个终端,发布消息到主题 “mqtt”
$mosquitto_pub -h localhost -t "mqtt"-m "Hello MQTT"
现在你会看到消息被显示在前一个终端上了.
step7. 网络测试(test.mosquitto.org)
从test.mosquitto.org订阅所有主题,任何人发布的任何消息你都可以收到,你会看到大量有趣消息滚动在你的屏幕上。
你也可以发布一些有趣的消息,所有订阅的人也同样会收到。
$mosquitto_sub -h test.mosquitto.org -t "#" -v
当然,你也可以只订阅特定主题,用来接收你自己的消息
$mosquitto_sub -h test.mosquitto.org -t "msg_only_from_sgks" -v
在另外一个终端上发布消息到特定主题,消息"My cat is Luna"应该会显示在上一个终端上
$mosquitto_pub -h test.mosquitto.org -t "msg_only_from_sgks" -m "My cat is Luna"
step 1. 引入mosquitto仓库并更新
$sudo apt-add-repository ppa:mosquitto-dev/mosquitto-ppa
$sudo apt-get update
step 2. 执行以下命令安装mosquitto包
$sudo apt-get installmosquitto
step 3. 安装mosquitto开发包
$sudo apt-get installlibmosquitto-dev
step 4. 安装mosquitto客户端
$sudo apt-get installmosquitto-clients
step 5. 查询mosquitto是否正确运行
$sudo service mosquitto status
step 6. 本机测试
打开一个终端,执行以下命令订阅主题"mqtt"
$mosquitto_sub -h localhost -t "mqtt"-v
打开另外一个终端,发布消息到主题 “mqtt”
$mosquitto_pub -h localhost -t "mqtt"-m "Hello MQTT"
现在你会看到消息被显示在前一个终端上了.
step 7. 网络测试(test.mosquitto.org)
从test.mosquitto.org订阅所有主题,任何人发布的任何消息你都可以收到,你会看到大量有趣消息滚动在你的屏幕上。
你也可以发布一些有趣的消息,所有订阅的人也同样会收到。
$mosquitto_sub -h test.mosquitto.org -t "#" -v
当然,你也可以只订阅特定主题,用来接收你自己的消息
$mosquitto_sub -h test.mosquitto.org -t "msg_only_from_sgks" -v
在另外一个终端上发布消息到特定主题,消息"My cat is Luna"应该会显示在上一个终端上
$mosquitto_pub -h test.mosquitto.org -t "msg_only_from_sgks" -m "My cat is Luna"
使用如下shell 来生成证书:
  1 # * Redistributions in binary form must reproduce the above copyright
  2
  3 #   notice, this list of conditions and the following disclaimer in the
  4
  5 #   documentation and/or other materials provided with the distribution.
  6
  7 # * Neither the name of the axTLS project nor the names of its
  8
  9 #   contributors may be used to endorse or promote products derived
 10
 11 #   from this software without specific prior written permission.
 12
 13 #
 14
 15 # THIS SOFTWARE IS PROVIDED BY THE COPYRIGHT HOLDERS AND CONTRIBUTORS
 16
 17 # "AS IS" AND ANY EXPRESS OR IMPLIED WARRANTIES, INCLUDING, BUT NOT
 18
 19 # LIMITED TO, THE IMPLIED WARRANTIES OF MERCHANTABILITY AND FITNESS FOR
 20
 21 # A PARTICULAR PURPOSE ARE DISCLAIMED. IN NO EVENT SHALL THE COPYRIGHT OWNER OR
 22
 23 # CONTRIBUTORS BE LIABLE FOR ANY DIRECT, INDIRECT, INCIDENTAL,
 24
 25 # SPECIAL, EXEMPLARY, OR CONSEQUENTIAL DAMAGES (INCLUDING, BUT NOT LIMITED
 26
 27 # TO, PROCUREMENT OF SUBSTITUTE GOODS OR SERVICES; LOSS OF USE,
 28
 29 # DATA, OR PROFITS; OR BUSINESS INTERRUPTION) HOWEVER CAUSED AND ON ANY THEORY
 30
 31 # OF LIABILITY, WHETHER IN CONTRACT, STRICT LIABILITY, OR TORT (INCLUDING
 32
 33 # NEGLIGENCE OR OTHERWISE) ARISING IN ANY WAY OUT OF THE USE OF
 34
 35 # THIS SOFTWARE, EVEN IF ADVISED OF THE POSSIBILITY OF SUCH DAMAGE.
 36
 37 #
 38
 39
 40
 41 #
 42
 43 # Generate the certificates and keys for testing.
 44
 45 #
 46
 47
 48
 49
 50
 51 PROJECT_NAME="TLS Project"
 52
 53
 54
 55 # Generate the openssl configuration files.
 56
 57 cat > ca_cert.conf << EOF
 58
 59 [ req ]
 60
 61 distinguished_name     = req_distinguished_name
 62
 63 prompt                 = no
 64
 65
 66
 67 [ req_distinguished_name ]
 68
 69  O                      = $PROJECT_NAME Dodgy Certificate Authority
 70
 71 EOF
 72
 73
 74
 75 cat > server_cert.conf << EOF
 76
 77 [ req ]
 78
 79 distinguished_name     = req_distinguished_name
 80
 81 prompt                 = no
 82
 83
 84
 85 [ req_distinguished_name ]
 86
 87  O                      = $PROJECT_NAME
 88
 89  CN                     = 192.168.111.100
 90
 91 EOF
 92
 93
 94
 95 cat > client_cert.conf << EOF
 96
 97 [ req ]
 98
 99 distinguished_name     = req_distinguished_name
100
101 prompt                 = no
102
103
104
105 [ req_distinguished_name ]
106
107  O                      = $PROJECT_NAME Device Certificate
108
109  CN                     = 192.168.111.101
110
111 EOF
112
113
114
115 mkdir ca
116
117 mkdir server
118
119 mkdir client
120
121 mkdir certDER
122
123
124
125 # private key generation
126
127 openssl genrsa -out ca.key 1024
128
129 openssl genrsa -out server.key 1024
130
131 openssl genrsa -out client.key 1024
132
133
134
135 # cert requests
136
137 openssl req -out ca.req -key ca.key -new 138
139             -config ./ca_cert.conf
140
141 openssl req -out server.req -key server.key -new 142
143             -config ./server_cert.conf
144
145 openssl req -out client.req -key client.key -new 146
147             -config ./client_cert.conf
148
149
150
151 # generate the actual certs.
152
153 openssl x509 -req -in ca.req -out ca.crt 154
155             -sha1 -days 5000 -signkey ca.key
156
157 openssl x509 -req -in server.req -out server.crt 158
159             -sha1 -CAcreateserial -days 5000 160
161             -CA ca.crt -CAkey ca.key
162
163 openssl x509 -req -in client.req -out client.crt 164
165             -sha1 -CAcreateserial -days 5000 166
167             -CA ca.crt -CAkey ca.key
168
169
170
171 openssl x509 -in ca.crt -outform DER -out ca.der
172
173 openssl x509 -in server.crt -outform DER -out server.der
174
175 openssl x509 -in client.crt -outform DER -out client.der
176
177
178
179 mv ca.crt ca.key ca/
180
181 mv server.crt server.key server/
182
183 mv client.crt client.key client/
184
185
186
187 mv ca.der server.der client.der certDER/
188
189
190
191 rm *.conf
192
193 rm *.req
194
195 rm *.srl
将上述代码保存为makefile.sh
做如下修改,终端执行。
- 修改 CN 域中 IP 地址为你主机/设备的 IP 地址
- [可选]加密位数 1024 修改为你需要的加密位数
进行如下测试,以验证证书是否可用:
$openssl verify -CAfile ca/ca.crt server/server.crt
$openssl verify -CAfile ca/ca.crt client/client.crt
结果如下:
step 1.进入配置文件
sudo vim /etc/mosquitto/mosquitto.conf
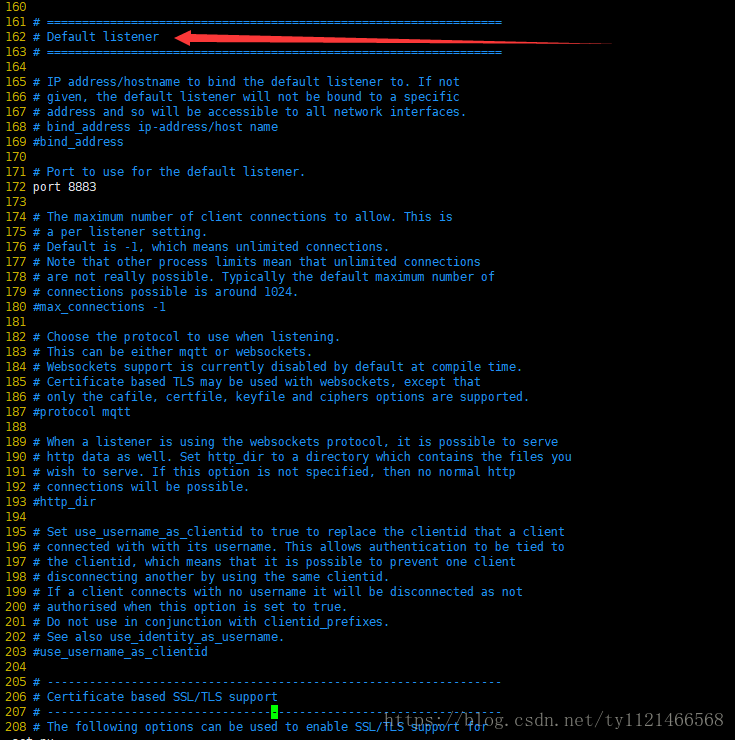
step 2.找到 Default listener,在该栏下进行如下配置
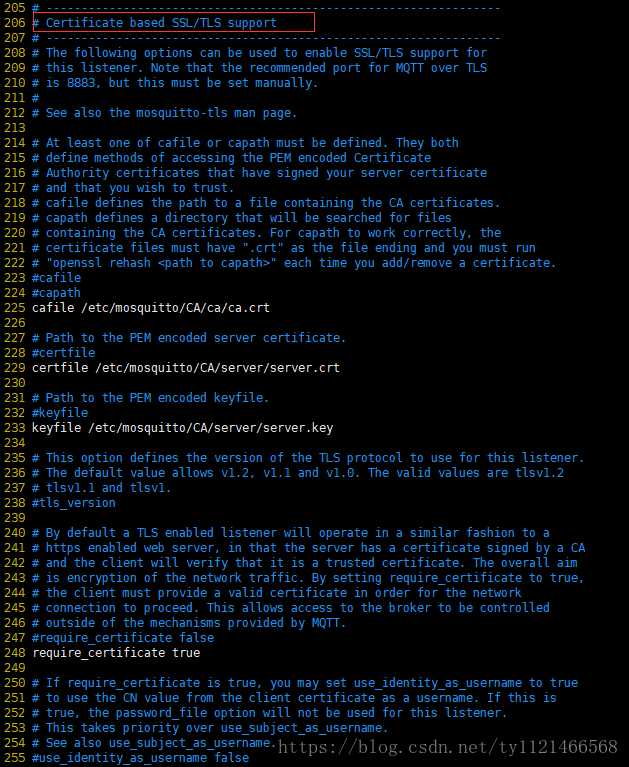
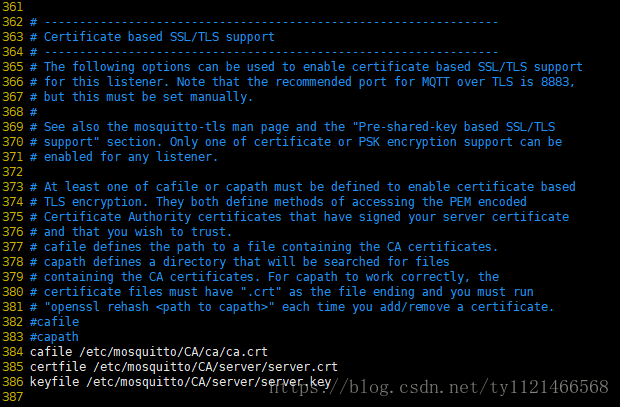
再找到Certificate based SSL/TLS support字段.
即:
|
port 8883 cafile /etc/mosquitto/CA/ca.crt certfile /etc/mosquitto/CA/server/server.crt keyfile /etc/mosquitto/CA/server/server.key require_certificate true use_identity_as_username true
|
根据自己路径不同配置校验文件路径,笔者是把文件放在/etc/mosquitto/CA/下
注意!!!
根据单向认证和双向认证需要,可能需修改的字段有:
a) port 8883 // MQTT服务器将选择此端口 listen
b) cafile /etc/mosquitto/CA/ca.crt
双向认证必须配置为你的CA证书
单向认证(通常认为是client校验server证书,下同)可选配置
单向认证中,server 和 client 端 ca 配置必须保持一致。即 server 若配置 ca.crt ,则 client 必须配置 ca.crt, server 不配置ca.crt ,client 也不可配置 ca.crt
路径必须为绝对路径!!!
c) certfile /etc/mosquitto/CA/server/server.crt
单项认证和双向认证都必须配置为你的server证书
d) keyfile /etc/mosquitto/CA/server/server.key
单项认证和双向认证都必须配置为你的server私钥
e) require_certificate true
单向认证需设置为 false,注释此行,默认也是 false
双向认证必须配置为true
f) use_identity_as_username true
单向认证设置为 false,注释此行,默认也是 false
双向认证通常设置为true
step 3.重启服务
mosquitto -c /etc/mosquitto/mosquitto.conf
如果提示端口被占用,先ps出mosquitto,再kill掉
ps -aux | grep "mosquitto"
kill -9 XXXXX
单向认证只需要注释两行即可:
#require_certificate true
#use_identity_as_username true
如下:
|
port 8883 cafile /etc/mosquitto/CA/ca/ca.crt certfile /etc/mosquitto/CA/server/server.crt keyfile /etc/mosquitto/CA/server/server.key
|
step 1.
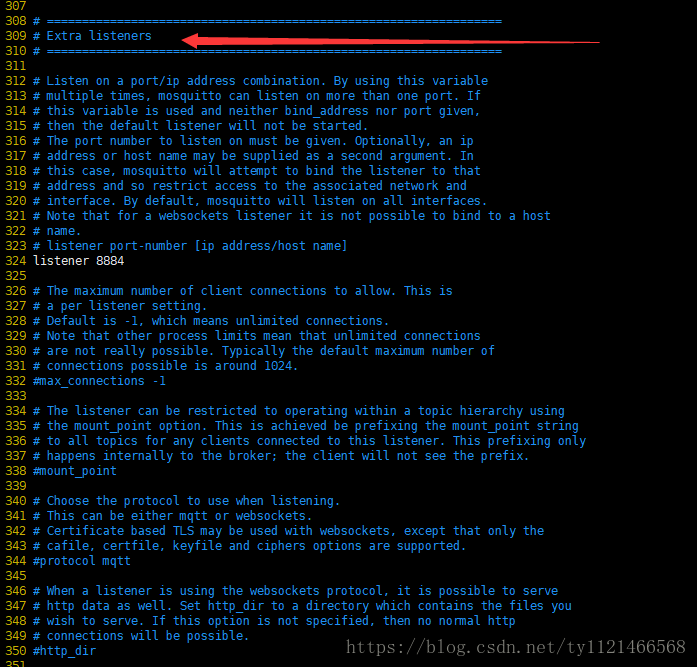
在先将/etc/mosquitto/mosquitto.conf 文件按2.4节配置默认打开双向认证,再找到 Extra listener字段
进行如下配置,打开另一个端口用作单向认证
step 2.
再在该字段下找到Certificate based SSL/TLS support字段
step 3.重启服务
mosquitto -c /etc/mosquitto/mosquitto.conf
如果提示端口被占用,先ps出mosquitto,再kill掉
ps -aux | grep "mosquitto"
kill -9 XXXXX
step 1.进入到CA证书目录下:
step 2.双向:
终端一:订阅
mosquitto_sub -h 10.30.11.47 -p 8883 -t "mqtt/server/topic" --cafile ./ca/ca.crt --cert ./client/client.pem --key ./client/client.key &
终端二:发布
mosquitto_pub -h 10.30.11.47 -p 8883 -t "mqtt/server/topic" -m "hello,world!" --cafile ./ca/ca.crt --cert ./server/server.pem --key ./server/server.key
step 3. 单向
终端一:订阅
mosquitto_sub -h 10.30.11.47 -p 8884 -t "mqtt/server/topic" --cafile ./ca/ca.crt &
终端二:发布
mosquitto_pub -h 10.30.11.47 -p 8884 -t "mqtt/server/topic" -m " hello,world!" --cafile ./ca/ca.crt
基于mosquitto的MQTT服务器---SSL/TLS 单向认证+双向认证
标签:entity orm 校验 安装 ice rar 链接 t权限 create
原文地址:https://www.cnblogs.com/LiuYanYGZ/p/10376628.html