标签:label cells etop remove nsobject val 文件中 rect base
今天讨论这个话题是比较大的,是关于iOS的架构方面的问题,随着开发的时间的不断增加,经过的项目也会不断地增加。很多时候会看到同事说,这是哪一个sb写的代码,为什么要放到这里,等等话语。说的这些问题,本篇博客我们来讲解MVC代码存在的耦合性慢慢衍生出MVP架构模式,然后再讲述MVVM模式以及RAC的介绍,主要是带着代码去讲解,希望通过这篇博客,大家可以增加对架构模式的理解,以及可以自由的选择架构模式。
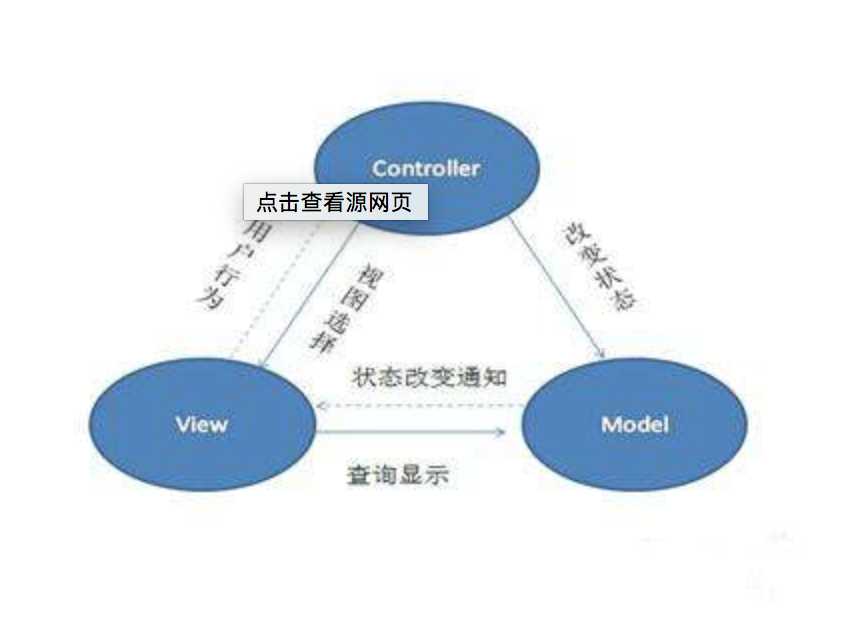
在MVC,MVP以及MVVM中,大家可能对MVC架构模式更熟悉!下面是大家非常熟悉的一张图。
在代码里面体验可能是这样,下面我们以一个列表展示MVC方式的显示。
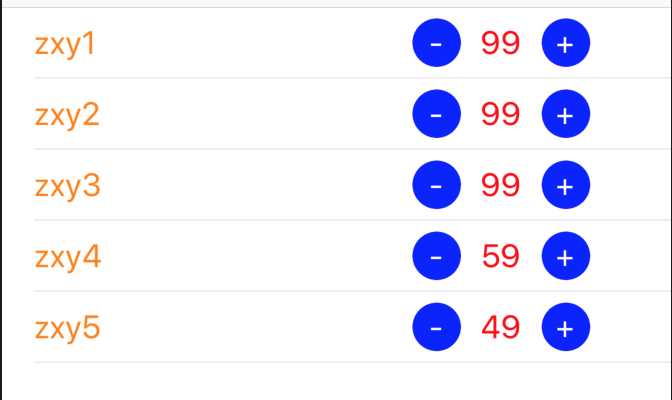
举例:下面我们要实现下面的简单界面!
在控制器Controller中,完成对数据的请求,以及数据源的展示!
- (void)loadData{

    NSArray *temArray =
    @[
      @{@"name":@"zxy1",@"imageUrl":@"http://hello",@"num":@"99"},
      @{@"name":@"zxy2",@"imageUrl":@"http://hello",@"num":@"99"},
      @{@"name":@"zxy3",@"imageUrl":@"http://hello",@"num":@"99"},
      @{@"name":@"zxy4",@"imageUrl":@"http://hello",@"num":@"59"},
      @{@"name":@"zxy5",@"imageUrl":@"http://hello ",@"num":@"49"}];
    for (int i = 0; i<temArray.count; i++) {
        Model *m = [Model modelWithDictionary:temArray[i]];
        [self.dataArray addObject:m];
    }
}

#pragma mark - tableViewDataSource

- (NSInteger)tableView:(UITableView *)tableView numberOfRowsInSection:(NSInteger)section{
    return self.dataArray.count;
}
- (UITableViewCell *)tableView:(UITableView *)tableView cellForRowAtIndexPath:(NSIndexPath *)indexPath{
MVCTableViewCell *cell = [tableView dequeueReusableCellWithIdentifier:reuserId forIndexPath:indexPath];
cell.model = self.dataArray[indexPath.row];
return cell;
}
在viewDidload里面完成初始化!
- (void)viewDidLoad {
    [super viewDidLoad];
    [self loadData];
    [self.view addSubview:self.tableView];
    self.tableView.delegate = self;
    self.tableView.dataSource = self;

}
上面的cell的cell.model = self.dataArray[indexPath.row]会出发view的setModel方法,进行赋值!
view里面包括数据model,完成对显示层的赋值!
#import <UIKit/UIKit.h>
#import "Model.h"

@interface MVCTableViewCell : UITableViewCell
@property (nonatomic, strong) UIButton *subBtn;
@property (nonatomic, strong) UILabel *nameLabel;
@property (nonatomic, strong) UILabel *numLabel;
@property (nonatomic, strong) UIButton *addBtn;
@property (nonatomic, assign) int num;
@property (nonatomic, strong) NSIndexPath *indexPath;
@property (nonatomic, strong) Model *model;

@end
在view通过setModel:进行赋值
- (void)setupUI{
    [self.contentView addSubview:self.nameLabel];
    [self.contentView addSubview:self.subBtn];
    [self.contentView addSubview:self.numLabel];
    [self.contentView addSubview:self.addBtn];
    self.num = 0;
}

- (void)setModel:(Model *)model{

    _model = model;
    self.nameLabel.text = model.name;
    self.numLabel.text  = model.num;
}
在请求的数据中,声明属性
@interface Model : NSObject
@property (nonatomic, copy) NSString *name;
@property (nonatomic, copy) NSString *imageUrl;
@property (nonatomic, copy) NSString *num;

@end
上面就是简单的MVC的代码结构,我相信很多人都写过类似的代码!但是上面的代码对于大工程项目来说,耦合性太高,下面来讲述MVC封装和解耦!
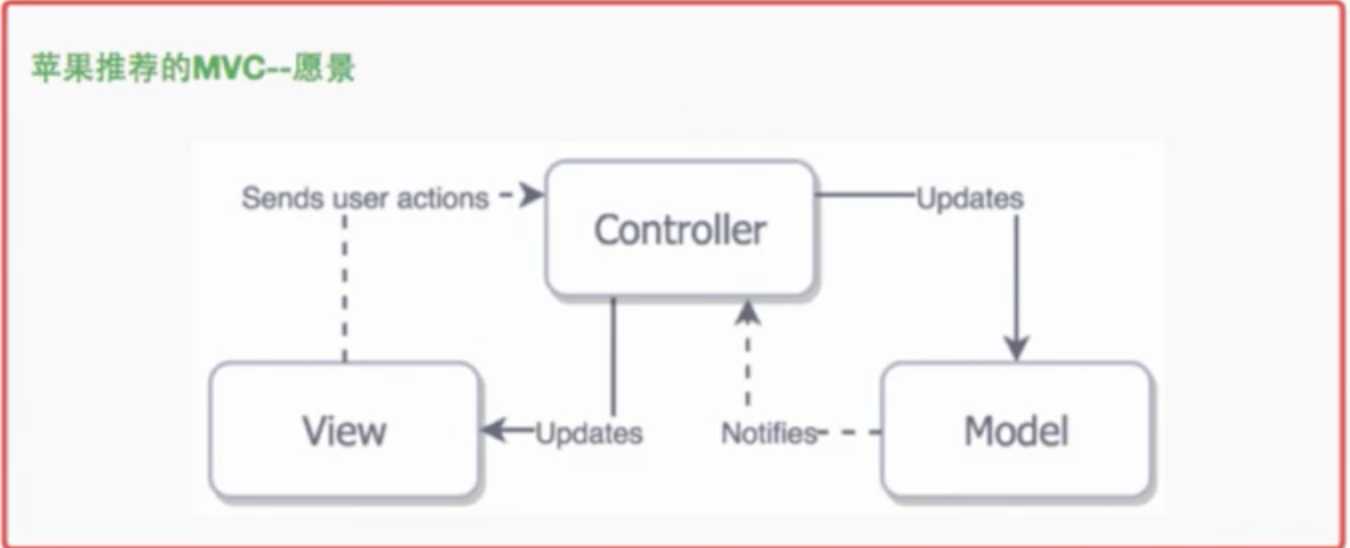
而苹果愿景中的MVC是这样的。
但在上面实际的MVC操作中,比如上面
- (UITableViewCell *)tableView:(UITableView *)tableView cellForRowAtIndexPath:(NSIndexPath *)indexPath{
    MVCTableViewCell *cell = [tableView dequeueReusableCellWithIdentifier:reuserId forIndexPath:indexPath];
    cell.model = self.dataArray[indexPath.row];
    return cell;
}
cell.model = self.dataArray[indexPath.row];这句代码不是不对,而是不好,cell---Model造成了强引用,耦合性特别高。
仔细看上面MVC结构的代码,数据还是自己自定义数据,还没有加入网络请求以及业务处理,就看出来Controller就会变得非常臃肿,如下图:
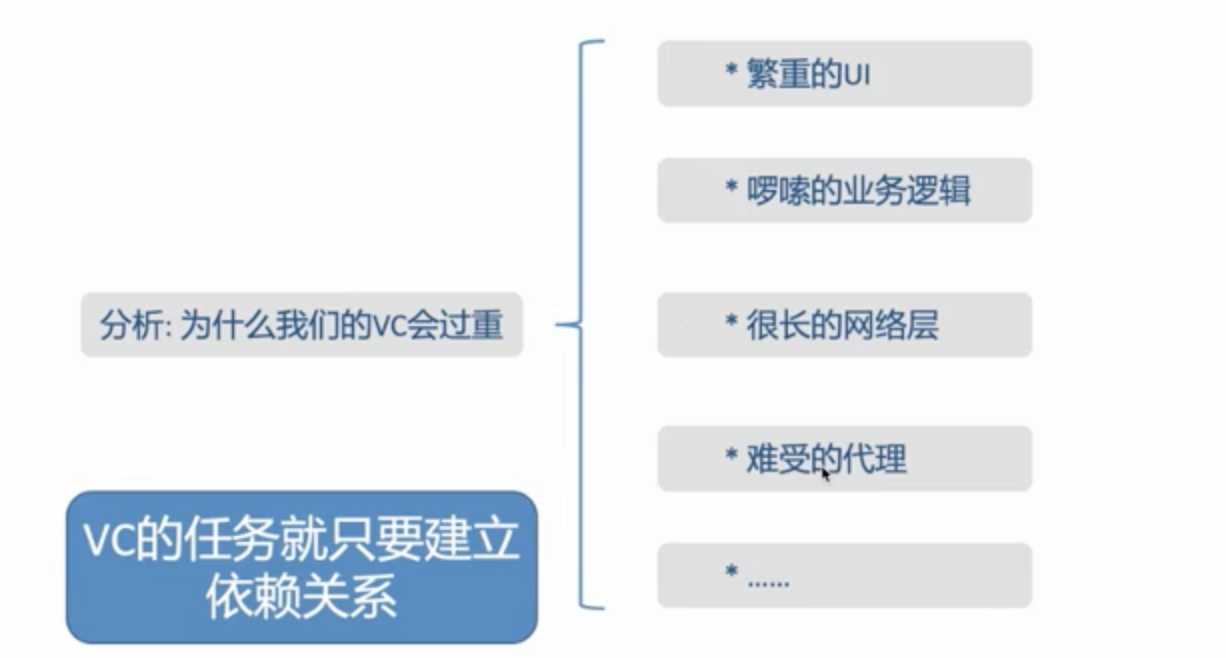
对于tableView或者CollectionView的数据源代码看起来非常臃肿,下面我们针对数据源进行封装以及解耦。
针对数据源方法,我们新建立一个LMDataSource类,用于数据源方法的封装
#import <Foundation/Foundation.h>
#import <UIKit/UIKit.h>

//声明一个block,用于回调cell,model,下标
typedef void (^CellConfigureBefore)(id cell, id model, NSIndexPath * indexPath);

@interface LMDataSource : NSObject<UITableViewDataSource,UICollectionViewDataSource>

@property (nonatomic, strong)  NSMutableArray *dataArray;;

//自定义
- (id)initWithIdentifier:(NSString *)identifier configureBlock:(CellConfigureBefore)before;

//
@property (nonatomic, strong) IBInspectable NSString *cellIdentifier;

@property (nonatomic, copy) CellConfigureBefore cellConfigureBefore;


- (void)addDataArray:(NSArray *)datas;

- (id)modelsAtIndexPath:(NSIndexPath *)indexPath;

@end
在LMDataSource.m中进行实现相应代码:
#import "LMDataSource.h"

@implementation LMDataSource

- (id)initWithIdentifier:(NSString *)identifier configureBlock:(CellConfigureBefore)before {
    if(self = [super init]) {
        _cellIdentifier = identifier;
        _cellConfigureBefore = [before copy];
    }
    return self;
}

- (void)addDataArray:(NSArray *)datas{
    if(!datas) return;
    if (self.dataArray.count>0) {
        [self.dataArray removeAllObjects];
    }
    [self.dataArray addObjectsFromArray:datas];
}

- (id)modelsAtIndexPath:(NSIndexPath *)indexPath {
    return self.dataArray.count > indexPath.row ? self.dataArray[indexPath.row] : nil;
}

#pragma mark UITableViewDataSource

- (NSInteger)tableView:(UITableView *)tableView numberOfRowsInSection:(NSInteger)section
{
    return !self.dataArray  ? 0: self.dataArray.count;
}

- (UITableViewCell *)tableView:(UITableView *)tableView cellForRowAtIndexPath:(NSIndexPath *)indexPath
{
    UITableViewCell *cell = [tableView dequeueReusableCellWithIdentifier:self.cellIdentifier forIndexPath:indexPath];
    id model = [self modelsAtIndexPath:indexPath];
    if(self.cellConfigureBefore) {
        self.cellConfigureBefore(cell, model,indexPath);
    }

    return cell;
}

#pragma mark UICollectionViewDataSource

- (NSInteger)collectionView:(UICollectionView *)collectionView numberOfItemsInSection:(NSInteger)section{
    return !self.dataArray  ? 0: self.dataArray.count;
}

- (UICollectionViewCell *)collectionView:(UICollectionView *)collectionView cellForItemAtIndexPath:(NSIndexPath *)indexPath
{
    UICollectionViewCell *cell = [collectionView dequeueReusableCellWithReuseIdentifier:self.cellIdentifier forIndexPath:indexPath];
    id model = [self modelsAtIndexPath:indexPath];

    if(self.cellConfigureBefore) {
        self.cellConfigureBefore(cell, model,indexPath);
    }

    return cell;
}

- (NSMutableArray *)dataArray{
    if (!_dataArray) {
        _dataArray = [NSMutableArray arrayWithCapacity:5];
    }
    return _dataArray;

}

@end
然后我们针对请求数据进行封装到另一个类Util中
#import <Foundation/Foundation.h>
#import "Model.h"
#import <YYKit.h>

@interface Util : NSObject
@property (nonatomic, strong) NSMutableArray    *dataArray;
@end
实现方法
#import "Util.h"

@implementation Util

- (instancetype)init{
    self = [super init];
    if (self) {

        [self loadData];
    }
    return self;
}

- (void)loadData{

    NSArray *temArray =
    @[
      @{@"name":@"zxy1",@"imageUrl":@"http://hello",@"num":@"99"},
      @{@"name":@"zxy2",@"imageUrl":@"http://hello",@"num":@"99"},
      @{@"name":@"zxy3",@"imageUrl":@"http://hello",@"num":@"99"},
      @{@"name":@"zxy4",@"imageUrl":@"http://hello",@"num":@"59"},
      @{@"name":@"zxy5",@"imageUrl":@"http://hello ",@"num":@"49"}];
    for (int i = 0; i<temArray.count; i++) {
        Model *m = [Model modelWithDictionary:temArray[i]];
        [self.dataArray addObject:m];
    }
}

#pragma mark - lazy

- (NSMutableArray *)dataArray{
    if (!_dataArray) {
        _dataArray = [NSMutableArray arrayWithCapacity:10];
    }
    return _dataArray;
}

@end
上面已经将数据源方法和请求数据封装了,所以在Controller就会变成
#import "MVCViewController.h"
#import "LMDataSource.h"
#import "MVCTableViewCell.h"
#import "Util.h"
#import "Model.h"
#import <YYKit.h>

static NSString *const reuserId = @"reuserId";

@interface MVCViewController ()<UITableViewDelegate,UITableViewDataSource>
@property (nonatomic, strong) UITableView       *tableView;
@property (nonatomic, strong) NSMutableArray    *dataArray;
@property (nonatomic, strong) LMDataSource      *dataSource;
@property (nonatomic, strong) Util           *pt;

@end

@implementation MVCViewController

/**
 1: 耦合性强
 2: cell服用  UI <---> model (双向绑定)
 3: VC 好重 : adapter
 */


- (void)viewDidLoad {
    [super viewDidLoad];

//    [self loadData];
    self.dataSource = [[LMDataSource alloc] initWithIdentifier:reuserId configureBlock:^(MVCTableViewCell *cell, Model *model, NSIndexPath *indexPath) {
        cell.model = model;
    //cell.numLabel.text = model.num;
    //cell.nameLabel.text = model.name;

    }];

    self.pt = [[Util alloc] init];
    [self.dataSource addDataArray:self.pt.dataArray];
    self.view.backgroundColor = [UIColor whiteColor];
    [self.view addSubview:self.tableView];
    self.tableView.dataSource = self.dataSource;
//    self.tableView.delegate = self;
//    self.tableView.dataSource = self;
//
}

//- (void)loadData{
//
//    NSArray *temArray =
//    @[
//      @{@"name":@"zxy1",@"imageUrl":@"http://hello",@"num":@"99"},
//      @{@"name":@"zxy2",@"imageUrl":@"http://hello",@"num":@"99"},
//      @{@"name":@"zxy3",@"imageUrl":@"http://hello",@"num":@"99"},
//      @{@"name":@"zxy4",@"imageUrl":@"http://hello",@"num":@"59"},
//      @{@"name":@"zxy5",@"imageUrl":@"http://hello ",@"num":@"49"}];
//    for (int i = 0; i<temArray.count; i++) {
//        Model *m = [Model modelWithDictionary:temArray[i]];
//        [self.dataArray addObject:m];
//    }
//}

#pragma mark - tableViewDataSource

//- (NSInteger)tableView:(UITableView *)tableView numberOfRowsInSection:(NSInteger)section{
//    return self.dataArray.count;
//}
//
//
//- (UITableViewCell *)tableView:(UITableView *)tableView cellForRowAtIndexPath:(NSIndexPath *)indexPath{
//    MVCTableViewCell *cell = [tableView dequeueReusableCellWithIdentifier:reuserId forIndexPath:indexPath];
//    cell.model = self.dataArray[indexPath.row];
//    return cell;
//}
//
//
//#pragma mark - tableViewDelegate
//
//- (void)tableView:(UITableView *)tableView didSelectRowAtIndexPath:(NSIndexPath *)indexPath{
//    [tableView deselectRowAtIndexPath:indexPath animated:YES];
//}
发现原本Controller很繁杂的代码,现在就会变得非常少。但是发现View和Model还是没有彻底解耦。
下面我们讲述另外一种架构模式。
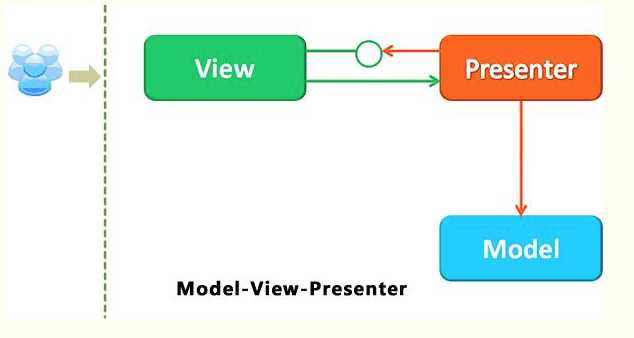
MVP(Model-View-Presenter),是MVC架构模式的变形。因为UI是经常变化的,同样的数据可能有很多种显示方式,业务层也是比较容易变化的,我们希望UI的逻辑及业务逻辑和数据隔离出来,而MVP就是个很好地选择。
Presenter代替了Controller,但是比Controller担任更多的任务。Presenter处理事件,执行相应的逻辑而这些逻辑映射到Model的Command用来操作Model,处理UI如何工作的代码都会放到了Utiler上。
Model和View使用Observer观察者模式进行通信;而Presenter和View是使用Mediator模式进行沟通;Presenter使用Command模式来操作Model。
对待处理流程中:
MVC中,用户的请求会先到达控制器Controller,控制器Controller从Model里面获取数据,然后选中合适的View,将数据呈现在View上;但是在MVP中,用户的请求首先会到达View中,View进行传递请求到指定的Presenter,Presenter从Model获取后,再把处理结果通过接口传到View上。
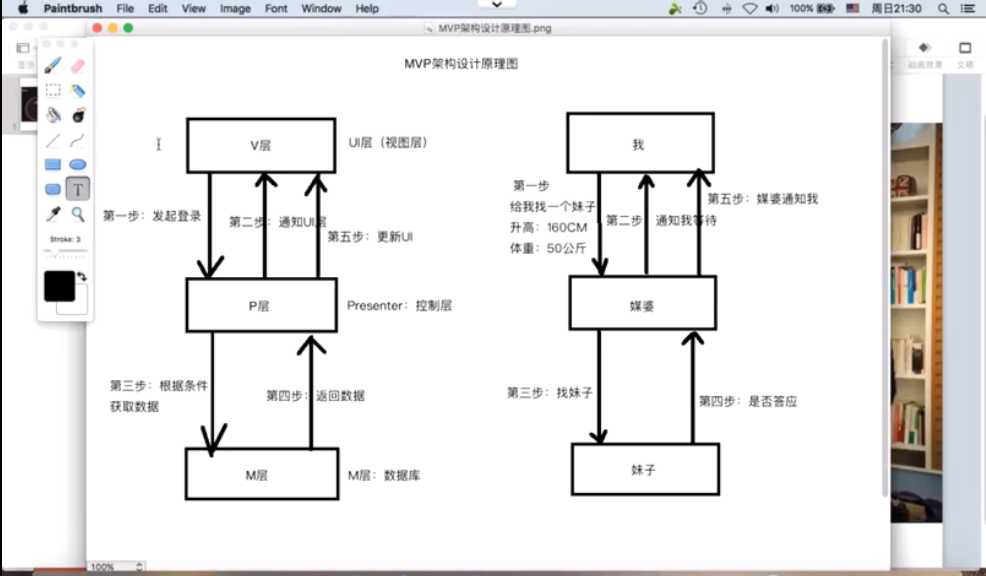
下面是MVP(Model-View-Utiler)交互图
在上面的MVC 中,数据库以及网络都会交给UIViewController,这样不便于团队开发,耦合性很高;MVP的诞生也是为了解决这个问题,将模块独立,数据是数据,UI是UI,完全隔离,做UI开发的专心做UI开发,数据库维护的专门维护数据库,我们就通过P层(中介将UI层和数据层关联),类似于下面:
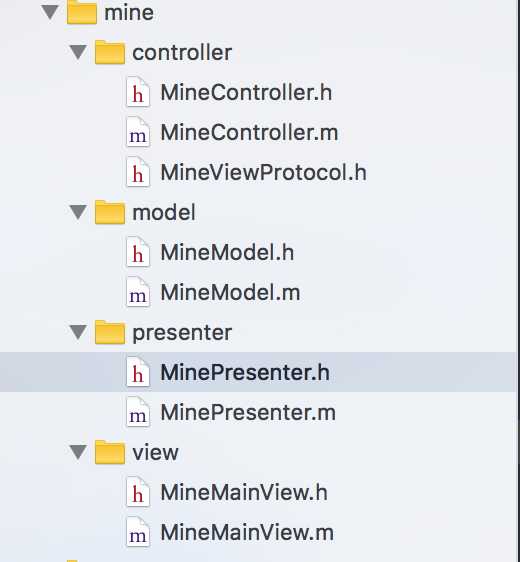
在控制器里面完成主要view的加载。
#import <UIKit/UIKit.h>
@interface MineController : UIViewController

@end


#import "MineController.h"
#import "MineMainView.h"
@interface MineController ()
@property (nonatomic,strong)MineMainView *mainView;
@end

@implementation MineController

- (void)viewDidLoad {
    [super viewDidLoad];
    [self.view addSubview:self.mainView];
}
#pragma mark - lazy load
- (MineMainView *)mainView{
    if (!_mainView) {
        _mainView = [[MineMainView alloc] initWithFrame:CGRectZero];
    }
    return _mainView;
}
@end
声明一个协议MineViewProtocol,完成成功或者失败赋值
#import <Foundation/Foundation.h>
#import "MineModel.h"
@protocol MineViewProtocol <NSObject>
- (void)onGetMineInfoSuccess:(MineModel *)model;

- (void)onGetMineInfoFail:(NSInteger) errorCode des:(NSString *)des;
@end
Model和MVC的Model一样,声明属性。
#import <Foundation/Foundation.h>

@interface MineModel : NSObject
@property (nonatomic,copy) NSString *name;
@property (nonatomic,copy) NSString *address;
@property (nonatomic,copy) NSString *birthday;
@end


#import "MineModel.h"
@implementation MineModel

@end
View进行UI的显示,拿到数据之后,可以实现接口完成对UI界面的赋值。
#import <UIKit/UIKit.h>
/**
 如果MineMainView是一个共用页面,并且需要其他数据资源,可以将presenter写在view里面
 */
@interface MineMainView : UIView

@end


#import "MineMainView.h"
#import "MinePresenter.h"

@interface MineMainView()<MineViewProtocol>
@property (nonatomic,strong)MinePresenter *presenter;
@end

@implementation MineMainView
- (instancetype)init
{
    self = [super init];
    if (self) {
        [self.presenter getMineInfoWithURLString:@"mine" param:@{}];
    }
    return self;
}

#pragma mark - lazy load
- (MinePresenter *)presenter{
    if (!_presenter) {
        _presenter = [[MinePresenter alloc] initWithView:self];
    }
    return _presenter;
}
#pragma MineViewProtocol

- (void)onGetMineInfoSuccess:(MineModel *)model{
    //这里做一些与UI相关的事情,完成对UI的赋值,避免了view与model的强依赖
}

- (void)onGetMineInfoFail:(NSInteger) errorCode des:(NSString *)des{

}
@end
#import "HttpPresenter.h"
#import "MineViewProtocol.h"

@interface MinePresenter : HttpPresenter <id<MineViewProtocol>>
//用于请求数据
- (void)getMineInfoWithURLString:(NSString *)URLString param:(NSDictionary *)param;
@end
在相应的实现中
#import "MinePresenter.h"
#import "MineModel.h"
#import "HKHttpResponse.h"
@implementation MinePresenter
- (void)getMineInfoWithURLString:(NSString *)URLString param:(NSDictionary *)param{
    [self.httpClient get:URLString parameters:param];
}
#pragma mark - HttpResponseHandle

//用来回调,触发view代理,完成赋值
- (void)onSuccess:(id )responseObject{
    HKHttpResponse * responseObj = (HKHttpResponse *)responseObject;
    MineModel *model = [MineModel yy_modelWithJSON:responseObj.content];
    if ([_view respondsToSelector:@selector(onGetMineInfoSuccess:)]) {
        [_view onGetMineInfoSuccess:model];
    }
}

- (void)onFail:(id)clientInfo errCode:(NSInteger)errCode errInfo:(NSString *)errInfo{
    if ([_view respondsToSelector:@selector(onGetMineInfoFail:des:)]) {
        [_view onGetMineInfoFail:errCode des:errInfo];
    }
}
@end
上面就是简单的MVP的项目使用和简单的架构结构。如果嵌套层次比较多,页面比较复杂,传值比较频繁,不推荐用MVP架构方式,而需求非常清晰,嵌套层次比较少可以尝试用MVP。
MVVM架构中,组件就会随之变成Model-View-ViewModel,如下图:
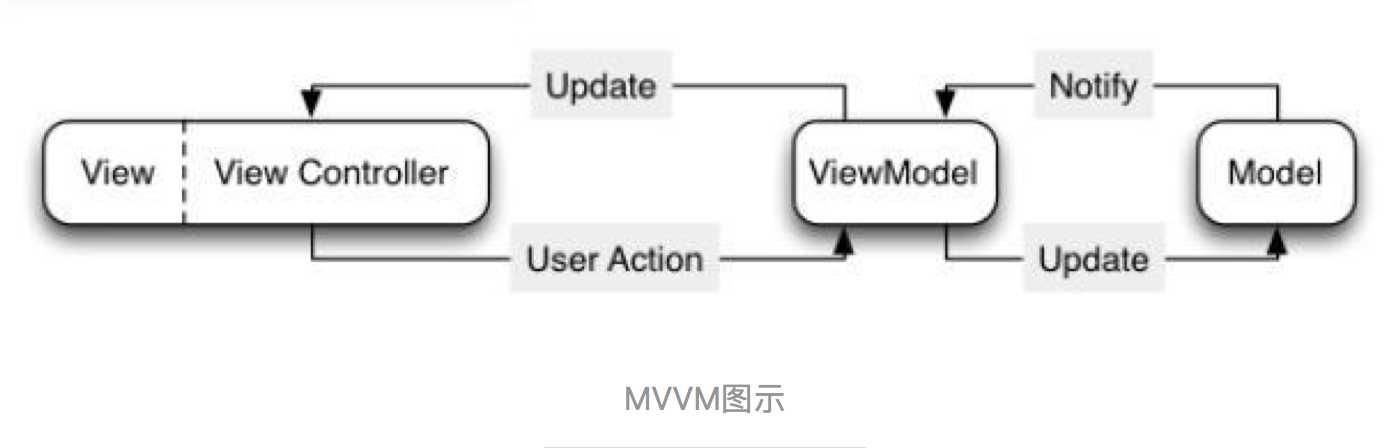
ViewModel是MVC新引入的视图模型,用于显示逻辑,验证逻辑和网络请求存放的地方。但需要注意的是视图本身不应该放在VM中,换句话说就是VM代码中不要引入UIKit.h,这样解决了VC臃肿的问题,然后VM包含所有的展示逻辑但不会引用V,所以这样是可以通过编程充分测试。
我们来一起看一下在具体代码中的使用:
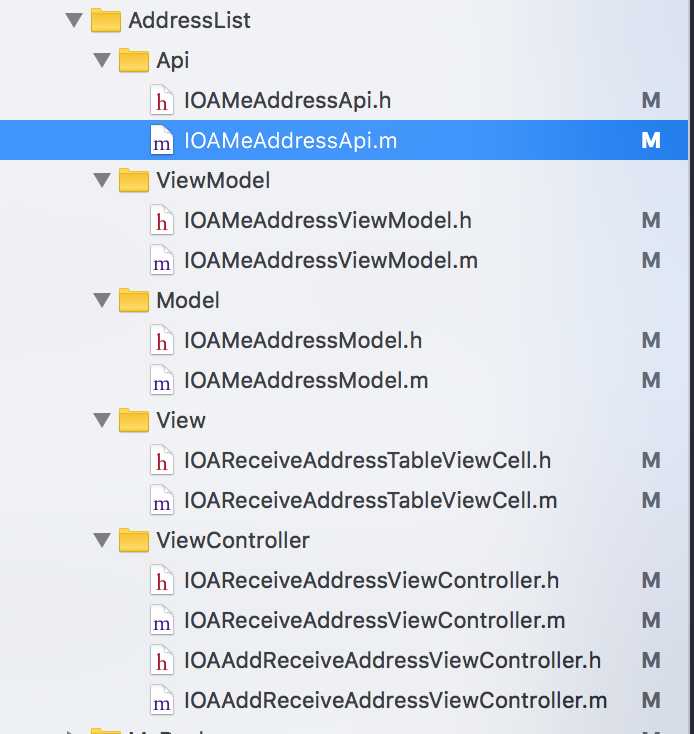
下面我们一一讲解各个文件夹的使用:
对于Api文件夹,我们首先看一下此类包含的内容:请求参数的配置
#import "IOARequest.h"
#import "IOAMeAddressModel.h"

// 新增地址
@interface IOAMeAddAddressRequest: IOARequest
@property (nonatomic, strong) IOAMeAddressModel *addressModel;
@end

// 设置默认收货地址
@interface IOAMeSetDefaultAddressRequest: IOARequest
@property (nonatomic, copy) NSString *addressId;
@end

// 收货地址列表
@interface IOAMeAddressListRequest: IOARequest

@end

// 删除收货地址
@interface IOAMeDeleteAddressRequest: IOAMeSetDefaultAddressRequest
//@property (nonatomic, strong) NSString *addressId;
@end
然后IOAMeAddressApi.m中
#import "IOAMeAddressApi.h"

// 新增地址
@implementation IOAMeAddAddressRequest
- (id)requestArgument {
    NSMutableDictionary *dic = [IOAApiManager getParametersWithService:@"App.Users...."];
    self.addressModel.province = self.addressModel.pId;
    self.addressModel.city = self.addressModel.cId;
    self.addressModel.district = self.addressModel.aId;

    if (self.addressModel.city == nil) {
        self.addressModel.city = @"";
    }
    if (self.addressModel.district == nil) {
        self.addressModel.district = @"";
    }
    NSDictionary *temp = [self.addressModel yy_modelToJSONObject];
    [dic addEntriesFromDictionary:temp];
    return dic;
}
@end

// 设置默认收货地址
@implementation IOAMeSetDefaultAddressRequest
- (id)requestArgument {
    NSMutableDictionary *dic = [IOAApiManager getParametersWithService:@"App.Users......"];
    if (self.addressId) {
        [dic setObject:self.addressId forKey:@"address_id"];
    }
    return dic;
}
@end


// 收货地址列表
@implementation IOAMeAddressListRequest
- (id)requestArgument {
    NSMutableDictionary *dic = [IOAApiManager getParametersWithService:@"App.Users......"];
    return dic;
}
@end

// 删除收货地址
@implementation IOAMeDeleteAddressRequest
- (id)requestArgument {
    NSMutableDictionary *dic = [IOAApiManager getParametersWithService:@"App.Users....."];
    if (self.addressId) {
        [dic setObject:self.addressId forKey:@"address_id"];
    }
    return dic;
}
@end
这个类IOAMeAddressApi用于ViewModel中发送请求的请求体参数的配置,没有太多的难度,仅仅为了防止ViewModel臃肿。
Model用于请求数据属性的声明(IOAMeAddressModel继承于IOAUserAddressBaseModel)
/*
 address_id    地址ID
 consignee    收货人
 country    国家
 province    省份
 city    城市
 district    地区
 twon    乡镇
 address    地址
 zipcode    邮政编码
 name    姓名
 mobile    手机
 telephone    电话号码
 address_alias    地址别名
 is_default    默认收货地址
 */
@interface IOAMeAddressModel : IOAUserAddressBaseModel

@property (nonatomic, copy) NSString *consignee;
@property (nonatomic, copy) NSString *zipcode;
@property (nonatomic, copy) NSString *address_id;
@property (nonatomic, copy) NSString *twon;
@property (nonatomic, copy) NSString *address_alias;
@property (nonatomic, copy) NSString *is_default;
@property (nonatomic, copy) NSString *telephone;
@property (nonatomic, copy) NSString *country;
@end
在上面声明了属性,如果有需要特殊处理的属性,看一下实现方法
#import "IOAMeAddressModel.h"

@implementation IOAMeAddressModel

+ (NSDictionary *)modelCustomPropertyMapper {
    return @{
             @"pId" : @"p_id",
             @"cId" : @"c_id",
             @"aId" : @"d_id"
             };
}

// 根据code获取地址
- (NSString *)getAddress {
    NSMutableString *address = [NSMutableString string];
    if (self.province.length) {
        [address appendString:self.province];
    }
    if (self.city.length && ![self.city isEqualToString:@"0"]) {
        [address appendString:@"-"];
        [address appendString:self.city];
    }
    if (self.district.length && ![self.district isEqualToString:@"0"]) {
        [address appendString:@"-"];
        [address appendString:self.district];
    }

    return address;
}

@end
上面红色方法modelCustomPropertyMapper是yyModel中的,用于解决json解析文件中关键字和定义声明的属性不一致的问题。
ViewModel在这个项目中用于完成对数据的请求和解析。就以新增收获地址接口来说:
@interface IOAMeAddressViewModel : NSObject

// 新增修改收货地址
- (void)requestForAddAddress:(IOAMeAddressModel *)addressModel callback:(void (^)(IOAResponse *response))callback;

@end
看一下实现方法
#import "IOAMeAddressViewModel.h"

@implementation IOAMeAddressViewModel
// 新增收货地址
- (void)requestForAddAddress:(IOAMeAddressModel *)addressModel callback:(void (^)(IOAResponse *response))callback {
    IOAMeAddAddressRequest *api = [[IOAMeAddAddressRequest alloc] init];
    api.addressModel = addressModel;
    [api startWithCompletionBlockWithSuccess:^(IOARequest *request) {
        id dic = request.responseObject[@"data"];
        IOAResponse *response = [IOAResponse responseWithRequest:request];

        if (!dic) {
            if (callback) {
                callback(response);
            }
            return;
        }
        if ([dic isKindOfClass:[NSNumber class]] || [dic isKindOfClass:[NSString class]]) {
            if (![dic boolValue]) {
                if (callback) {
                    callback(response);
                }
                return;
            }
        }
        response.success = YES;
        if (callback) {
            callback(response);
        }
    } failure:^(IOARequest *request) {
        IOAResponse *response = [IOAResponse responseWithRequest:request];

        if (callback) {
            callback(response);
        }
    }];
}
上面startWithCompletionBlockWithSuccess方法是自己对网络第三方框架YTKNetwork的封装,大家想用本项目封装网络框架可以在下面地方下载。https://github.com/zxy1829760/YTKNetwork-
ViewController完成对整个布局的初始化以及触发请求。
NSString *kCellIdentifier = @"IOAReceiveAddressTableViewCell";

@interface IOAReceiveAddressViewController () <IOACellDelegate>
@property (nonatomic, strong) UIButton *addAddress;

//@property (nonatomic, assign) NSUInteger select;
@property (nonatomic, strong) IOAMeAddressViewModel *viewModel;
@end

@implementation IOAReceiveAddressViewController

- (void)dealloc {

}

- (void)viewDidLoad {
    [super viewDidLoad];
    self.title = @"管理收货地址";
    self.view.backgroundColor = [UIColor whiteColor];

    [self.dataSource removeAllObjects];
}

- (void)didReceiveMemoryWarning {
    [super didReceiveMemoryWarning];
}


- (void)viewWillAppear:(BOOL)animated {
    [super viewWillAppear:animated];
    [self requestForAddressList];
}

- (void)viewDidAppear:(BOOL)animated {
    [super viewDidAppear:animated];
}

#pragma mark - IOAProtocol
- (void)addSubViews {
    [super addSubViews];
    [self.view addSubview:self.addAddress];
}

- (void)prepare {
    CGFloat height = 44;

    [self.addAddress mas_makeConstraints:^(MASConstraintMaker *make) {
        make.left.right.equalTo(self.view);
        make.bottom.equalTo(self.view).offset(-BottomHeightOffset);
//        make.bottom.equalTo(self.view.mas_safeAreaLayoutGuideBottom);
//        make.bottom.equalTo(self.view);
        make.height.mas_equalTo(height);
    }];

    [self.tableView mas_makeConstraints:^(MASConstraintMaker *make) {
        make.left.right.equalTo(self.view);
        make.bottom.equalTo(self.addAddress.mas_top);
        make.top.equalTo(self.view).offset(TopHeightOffset);
//        make.top.equalTo(self.view);
//        make.top.equalTo(self.view.mas_safeAreaLayoutGuideTop);
    }];
}

#pragma mark - UITableViewDataSource
- (NSInteger)numberOfSectionsInTableView:(UITableView *)tableView {
    return self.dataSource.count;
}
- (NSInteger)tableView:(UITableView *)tableView numberOfRowsInSection:(NSInteger)section {
    return 1;
}
- (UITableViewCell *)tableView:(UITableView *)tableView cellForRowAtIndexPath:(NSIndexPath *)indexPath {
    IOAReceiveAddressTableViewCell *cell = [tableView dequeueReusableCellWithIdentifier:kCellIdentifier forIndexPath:indexPath];
    cell.cellDelegate = self;
    cell.selectionStyle = UITableViewCellSelectionStyleNone;
    [cell update:self.dataSource[indexPath.section]];

    return cell;
}


- (void)registerClasses {
    [self.tableView registerClass:[IOAReceiveAddressTableViewCell class] forCellReuseIdentifier:kCellIdentifier];
}

- (void)clickedEmptyPage:(id)object {
    [self requestForAddressList];
}

#pragma mark - IOARefreshAndLoadMoreDelegate
- (void)refresh:(id<IOARefreshAndLoadMoreDelegate>)collection {
    [self requestForAddressList];
}

#pragma mark - CellDelegate
- (void)clickOn:(id)sender {
    IOAInfoTableViewCell *cell = sender;
    NSIndexPath *indexPath = [self.tableView indexPathForCell:cell];

    IOAMeAddressModel *model = self.dataSource[indexPath.section];
    if (cell.clickType == kInfoCellClickDelete) {
        [self requestForDeleteAddress:model.address_id withIndexPaht:indexPath];
    }
    else if (cell.clickType == kInfoCellClickEdit) {
        IOAAddReceiveAddressViewController *vc = [IOAAddReceiveAddressViewController new];
        vc.isEdit = YES;
        vc.addressModel = model;
        [self.navigationController pushViewController:vc animated:YES];
    }
    else {
//        IOAMeAddressModel *model = self.dataSource[indexPath.section];
        if ([model.is_default boolValue]) {
            [self.tableView reloadData];
            return;
        }
        model.is_default = [NSString stringWithFormat:@"%d", 1];
        [self requestForSetDefaultAddress:model];
    }
}

#pragma mark - Actions
- (void)clickAddAdress:(UIButton *)sender {
    IOAAddReceiveAddressViewController *vc = [IOAAddReceiveAddressViewController new];
    [self.navigationController pushViewController:vc animated:YES];
}

#pragma mark - Api
- (void)requestForAddressList {
    [self dismissEmptyPage];
    [self startProgress];
    [self.viewModel requestForAddressList:^(IOAResponse *response) {
        dispatch_async(dispatch_get_main_queue(), ^{
            [self stopProgress];
            NSArray<IOAMeAddressModel *> *addressList = response.responseObject;
            if (addressList) {
                [self.dataSource removeAllObjects];
                [self.dataSource addObjectsFromArray:addressList];
                [self.tableView reloadData];

                if (self.dataSource.count == 0) {
                    [self showNoDatasPage];
                    return ;
                }
            }
            else {
                if ([response isNoNetwork] && self.dataSource.count == 0) {
                    [self showNoNetworkPage];
                    return;
                }
                if ([response isExpiryToken]) {
                    [self showLoginViewController];
                    return;
                }
                if ([response alertOrNot]) {
                    if (response.responseMessage.length > 0) {
                        [self.view makeToast:response.responseMessage];
                        return;
                    }
                    [self.view makeToast:@"获取失败"];
                }
            }
        });
    }];
}
上面就是MVVM代码在实际项目中的使用。本篇博客会不断更新,因为框架的东西很难学完,慢慢优化。
下一篇我们将讲述MVVM+RAC的结合使用,以及了解RAC底层实现逻辑。
标签:label cells etop remove nsobject val 文件中 rect base
原文地址:https://www.cnblogs.com/guohai-stronger/p/10384341.html