标签:外部 work 目的 alt code shu add switch ospf
1. 掌握 OSPFv3(v2) 的配置方法
2. 掌握在帧中继环境下 OSPFv3 (v2)的配置方法
3. 掌握 OSPFv3(v2) NSSA 的配置方法
4. 掌握外部路由汇总的配置
5. 掌握区域间路由的汇总配置
实验拓扑图
IPv4地址表
|
Device |
Interface |
IP Address |
|
R1 |
F 0/0 |
10.1.118.1 |
|
S 1/2 |
192.168.118.1 |
|
|
R3 |
S 1/0 |
192.168.118.3 |
|
R4 |
S 1/1 |
192.168.118.4 |
|
R5 |
F 0/0 |
10.1.118.5 |
|
S 1/0 |
10.3.118.5 |
|
|
R6 |
F 0/0 |
10.1.118.6 |
|
F 0/1 |
10.2.118.6 |
|
|
R8 |
F 0/1 |
10.2.118.8 |
|
S 1/0 |
10.3.118.8 |
步骤1:开启帧中继交换功能
R2(config)#frame-relay switching
步骤2:配置接口封装
R2(config)#int s 1/2
R2(config-if)#no shutdown
R2(config-if)#clock rate 128000
R2(config-if)#encapsulation frame-relay
R2(config)#int s 1/0
R2(config-if)#no shutdown
R2(config-if)#clock rate 128000
R2(config-if)#encapsulation frame-relay
R2(config)#int s 1/1
R2(config-if)#no shutdown
R2(config-if)#clock rate 128000
R2(config-if)#encapsulation frame-relay
(3) 步骤3:配置LMI类型
R2(config)#int s 1/2
R2(config-if)#frame-relay lmi-type cisco
R2(config-if)#frame-relay intf-type dce
R2(config)#int s 1/0
R2(config-if)#frame-relay lmi-type cisco
R2(config-if)#frame-relay intf-type dce
R2(config)#int s 1/1
R2(config-if)#frame-relay lmi-type cisco
R2(config-if)#frame-relay intf-type dce
(4) 步骤4:配置帧中继交换表
R2(config)#int s 1/2
R2(config-if)#frame-relay route 103 interface s 1/0 301
R2(config-if)#frame-relay route 104 interface s 1/1 401
R2(config)#int Serial 1/0
R2(config-if)#frame-relay route 301 interface Serial1/2 103
R2(config)#int Serial 1/1
R2(config-if)#frame-relay route 401 interface Serial1/2 104
show frame-relay route
帧中继交换机

(5)步骤5:R1、R3、R4配置,使能互通
R1(config)#int s 1/2
R1(config-if)#ip address 192.168.118.1 255.255.255.0
R1(config-if)#no sh
R1(config-if)#encapsulation frame-relay
R1(config-if)#frame-relay lmi-type cisco
R1(config-if)#no frame-relay inverse-arp //关闭自动映射
R1(config-if)#frame-relay map ip 192.168.118.3 103 broadcast
R1(config-if)#frame-relay map ip 192.168.118.4 104 broadcast
R3(config)#int s 1/0
R3(config-if)#ip address 192.168.118.3 255.255.255.0
R3(config-if)#no sh
R3(config-if)#encapsulation frame-relay
R3(config-if)#no frame-relay inverse-arp
R3(config-if)#frame-relay map ip 192.168.118.1 301 broadcast
R4(config)#int s 1/1
R4(config-if)#ip address 192.168.118.4 255.255.255.0
R4(config-if)#no sh
R4(config-if)#encapsulation frame-relay
R4(config-if)#no frame-relay inverse-arp
R4(config-if)#frame-relay map ip 192.168.118.1 401 broadcast
ping测试
R1pingR3、R4
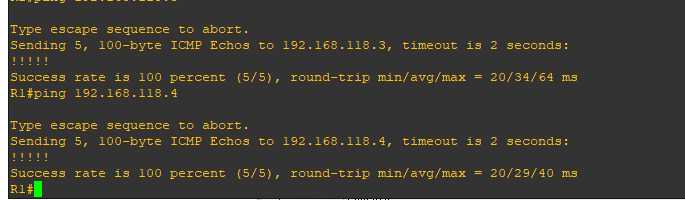
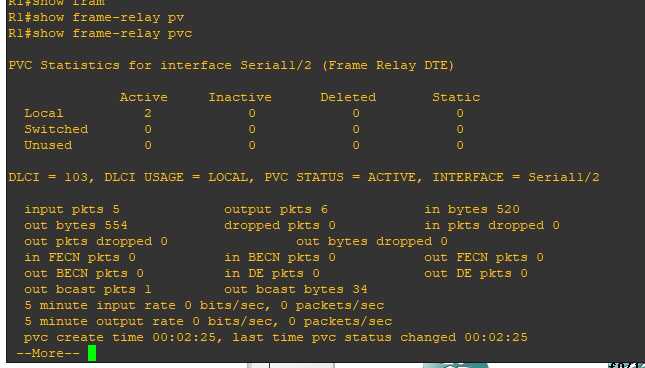
R1#show frame-relay PVC
步骤6:配置ospf
先配置外部路由器ospf (R6、R1为例,R5.R8同理)
R6(config)#router ospf 1
R6(config-router)#router-id 6.6.6.6
R6 (config-router)#area 1 nssa――配置区域 1 为 NSSA 区域
R6(config)#interface loopback 0
R6(config-if)#ip add 6.6.6.6 255.255.255.255
R6(config)#int f 0/0
R6(config-if)#ip add 10.1.118.6 255.255.255.0
R6(config-if)#no shut
R6(config-if)#ip ospf 1 area 0
R6(config-if)#int f 0/1
R6(config-if)#ip add 11.1.118.6 255.255.255.0
R6(config-if)#no sh
R6(config-if)#ip ospf 1 area 1
R6(config-if)#ex
R6(config)#router ospf 1
R6(config-router)#network 6.6.6.6 0.0.0.0 area 0
R6(config-router)#network 10.1.118.0 0.0.0.255 area 0
R6(config-router)#network 10.2.118.0 0.0.0.255 area 1
R1(config)#router ospf 1
R1(config-router)#router-id 1.1.1.1
R1(config)#interface loopback 0
R1(config-if)#ip add 1.1.1.1 255.255.255.255
R1(config)#int f 0/0
R1(config-if)#ip add 10.1.118.1 255.255.255.0
R1(config-if)#no sh
R1(config-if)#ip ospf 1 area 0
R1(config-if)#int s 1/0
R1(config-if)#ip ospf 1 area 0
R1(config-if)#ex
R1(config)#router ospf 1
R1(config-router)#network 1.1.1.1 0.0.0.0 area 0
R1(config-router)#network 10.1.118.0 0.0.0.255 area 0
R1(config-router)#network 192.168.118.0 0.0.0.255 area 2
R1(config-router)#neighbor 192.168.118.3
R1(config-router)#neighbor 192.168.118.4
步骤7:配置帧中继中路由器的ospf (R3为例,R4同理)
R3(config)#router ospf 1
R3(config-router)#router-id 3.3.3.3
R3(config-router)#ex
R3(config)#int loopback 0
R3(config-if)#ip add 3.3.3.3 255.255.255.255
R3(config-if)#ip ospf 1 area 2
R3(config-if)#int s 1/0
R3(config-if)# ip ospf 1 area 2
R3(config-if)# ip ospf priority 0
R3(config)#router ospf 1
R3(config-router)#network 3.3.3.3 0.0.0.0 area 2
R3(config-router)#network 192.168.118.0 0.0.0.255 area 2
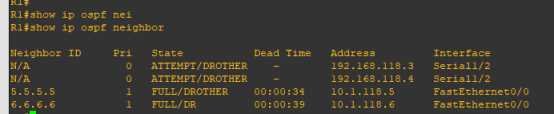
已完成OSPFv2配置,在R1上查ospf邻居关系
R1#show ipv6 ospf neighbor
路由器3、4的邻居关系添加不进
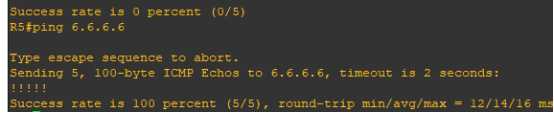
测试路由通断情况
在R5上测试得出结果如下(从内部到外部皆ping通,实验完成)

对OSPF还不够熟练,依然有许多要继续努力的地方。OSPFv3帧中继无法添加邻居关系,占时先不上传,待日后完成后上传。
标签:外部 work 目的 alt code shu add switch ospf
原文地址:https://www.cnblogs.com/hcb-/p/10758705.html