标签:war default 不同的 技术 intercept parent 连接点 逗号 rac
前面的文章中对SpringAOP进行了简单的实践,本章将说明在实际的开发中如何对切面进行配置使用.1,直接使用Advice来作用到目标类的所有方法上
<!--配置Advice-->
<bean id="customAdvice" class=""/>
<!--目标对象-->
<bean id="target" class=""/>
<!--配置代理工厂-->
<bean id="proxy" class="org.springframework.aop.framework.ProxyFactoryBean"
    p:proxyInterfaces="com.xx.MyInterface" <!--指定代理的接口-->
    p:interceptorNames="customAdvice" <!--指定增强-->
    p:target-ref="target"/>  <!--指定要代理的bean-->
proxyInterfaces(interfaces):代理索要实现的接口,多个可用逗号分隔;
interceptorNames:目标对象列表,多个可用逗号分隔;
singleton:返回的代理是否为单例,默认是;
optimize属性设置为true,强制使用CGLib动态代理。
还可以使用属性proxyTargetClass指明是否是对类进行代理而不是接口, 当设置为true时,使用CGlib动态代理并且无需再设置proxyInterfaces属性,即便设置也会被忽略;
除了上面说到的使用逗号来分隔多个增强外,还可以像下面这样使用
<property name="interceptorNames">
    <list>
        <idref local="advice1" />
        <idref local="advice2" />
    </list>
</property>
2,通过自定义切面来应用增强
<bean id="customAdvice" class=""/>
<bean id="customAdvisor" class="com.custom.xx"
    p:advice-ref="customAdvice"/>  <!--定义切面-->

<bean id="base" abstract="true"  <!--定义公共配置类-->
    class="org.springframework.aop.framework.ProxyFactoryBean"
    p:interceptorNames="customAdvisor" />

<bean id="proxy1" parent="base" p:target-ref="" />
<bean id="proxy2" parent="base" p:target-ref="" />
3,通过正则切面来应用增强
<bean id="regexAdvisor"
    class="org.springframework.aop.support.RegexpMethonPointcutAdvisor"
    p:advice-ref="customAdvice"
    <property name="patterns">
        <list>
            <value>.*insert*</value>
        </list>
    </property>
</bean>

<bean id="proxy"
    class="org.springframework.aop.framework.ProxyFactoryBean"
    p:interceptorNames="regexAdvisor"
    p:target-ref=""
p:proxyTargetClass="true"/> 上面的配置都需要显示的配置代理对象,对于小型的应用或不嫌麻烦的话还是可以接受的,大如果面对中大型的系统来讲,通过上面的配置来达到目的既容易出错,更是十分的麻烦,所以Spring提供了自动代理机制,从而让开发人员从烦乱的配置中解脱出来。
自动代理机制是基于BeanPostProcessor实现,自动代创建器根据 一些规则来自动在容器中实例化Bean时为匹配的Bean生成代理实例。其代理创建器主要分为3类
1,基于Bean配置名规则的自动代理创建器:允许为一组特定配置名的Bean自动创建代理实例,实现类为BeanNameAutoProxyCreator
2,基于Advisor匹配机制的自动代理创建器:它对容器中所有的Advisor进行扫描,自动将这些切面应用到匹配的Bean中(为目标Bean创建代理实例),实现类为DefaultAdvisorAutoProxyCreator.
3,基于Bean中AspectJ注解的自动代理创建器:为包含AspectJ注解的Bean自动创建代理实例,实现类为AnnotationAwareAspectJAutoProxyCreator.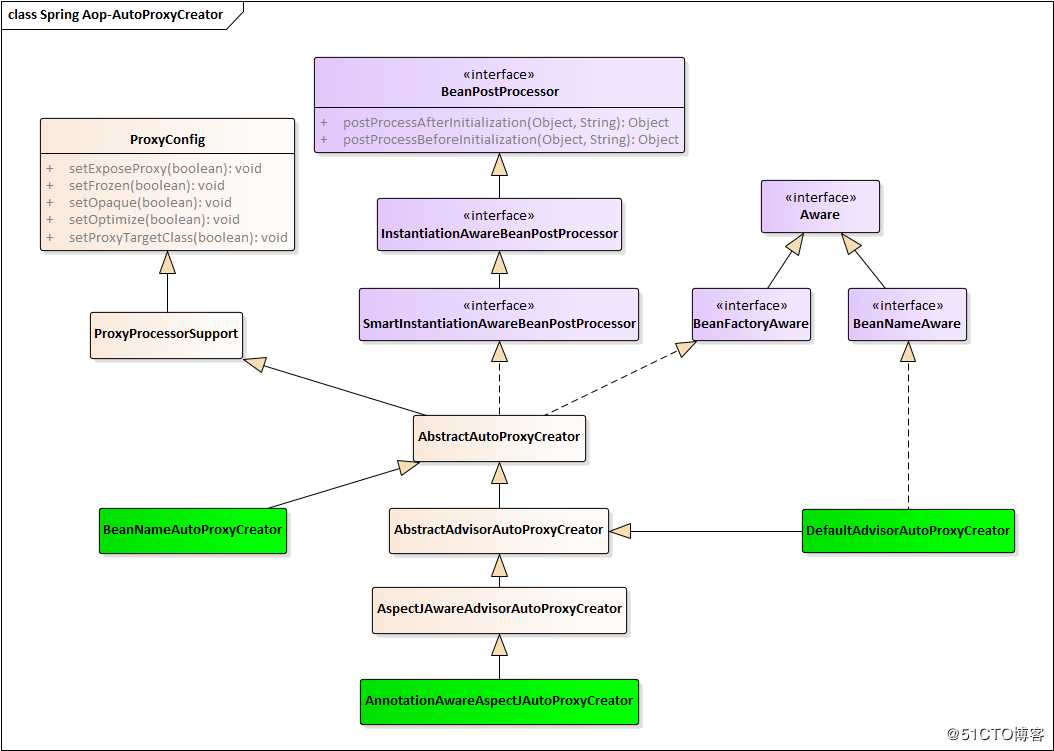
<bean class="org.springframework.aop.framework.autoproxy.BeanNameAutoProyCreator"
    p:beanNames="*er"
    p:interceptorNames=""
p:optimize="true" /><bean id="regexAdrisor" class="" />
<bean class="org.springframework.aop.framework.autoproxy.DefaultAdvisorAutoProxyCreator" />1)XML配置来启用AnnotationAwareAspectJAutoProxyCreator
<!--使用@AspectJ注解定义的切面类-->
<bean id="aspectJAnnotationBean" class="" />
<!--自动代理创建器,自动将@AspectJ注解切面类织入目标bean中-->
<bean class="org.springframework.aop.framework.autoproxy.AnnotationAwareAspectJAutoProxyCreator"  />
2)使用Schema的aop命名空间进行配置
<!--基于@AspectJ切面的驱动器-->
<aop:aspectj-autoproxy/>

<!--使用@AspectJ注解定义的切面类-->
<bean class="com.xx.customAspectJAdvisor" />
3)还可以使用注解的方式来装配
<!-- 使用注解来装配(等同schema方式)-->
@EnableAspectJAutoProxy(exposeProxy=true)

<!--使用@AspectJ注解定义的切面类-->
<bean id="aspectJAnnotationBean" class="" />
切面类举例:
@Aspect
@Component
public class CustomAspect {
    /*
        执行getName方法后执行
    */
    @AfterReturning(returning = "result", pointcut = "execution(* com.xx.getName())")
    public void singeLoginAfter(String result) throws Exception {
        //TODO
    }

    /*
        使用注解CustomAnnoation的方法执行后
    */
    @AfterReturning("@annotation(com.xx.annotation.CustomAnnoation)")
    public void refreshLinkGroupCache(JoinPoint joinPoint) {

    }
}1,如果增强在同一个切面类中申明,则依照增强在连接点上的织入顺序进行织入
2,如果增强位于不同的切面类中,且这些切面类都实现了org.springframework.core.Ordered接口,则有切口方法的顺序号决定(顺序号小的先织入)
3,如果增强位于不同的切面类中,且这些切面类没有实现了org.springframework.core.Ordered接口,则织入的顺序不确定
标签:war default 不同的 技术 intercept parent 连接点 逗号 rac
原文地址:https://blog.51cto.com/dengshuangfu/2412495