1.main.xml
|
1
2
3
4
5
6
7
8
9
10
11
12
13
14
15
16
17
18
19
20
21
22
23
|
<?xml version="1.0" encoding="utf-8"?> <LinearLayout xmlns:android="http://schemas.android.com/apk/res/android" android:orientation="vertical" android:layout_width="fill_parent" android:layout_height="fill_parent" > <TextView android:layout_width="fill_parent" android:layout_height="wrap_content" android:text="Welcome to Mr Wei‘s Blog." /> <WebView android:id="@+id/webview" android:layout_width="fill_parent" android:layout_height="wrap_content" /> <Button android:id="@+id/button" android:layout_width="fill_parent" android:layout_height="wrap_content" android:text="Change the webview content" /> </LinearLayout> |
2.demo.html
|
1
2
3
4
5
6
7
8
9
10
11
12
13
14
15
16
|
<html> <mce:script language="javascript"><!-- function fillContent(){ document.getElementById("content").innerHTML = "This Content is showed by Android invoke Javascript function."; } // --></mce:script> <body> <p><a onClick="window.demo.startMap()" href="">Start GoogleMap</a></p> <p id="content"></p> <p>A Demo ----Android and Javascript invoke each other.</p> <p>Author:Frankiewei</p> </body> </html> |
3.WebViewDemo.java
|
1
2
3
4
5
6
7
8
9
10
11
12
13
14
15
16
17
18
19
20
21
22
23
24
25
26
27
28
29
30
31
32
33
34
35
36
37
38
39
40
41
42
43
44
45
46
|
package com.tutor.webwiewdemo;import android.app.Activity;import android.content.ComponentName;import android.content.Intent;import android.os.Bundle;import android.view.View;import android.webkit.WebSettings;import android.webkit.WebView;import android.widget.Button;public class WebViewDemo extends Activity { private WebView mWebView; private Button mButton; public void onCreate(Bundle savedInstanceState) { super.onCreate(savedInstanceState); setContentView(R.layout.main); setupViews(); } //初始化 private void setupViews() { mWebView = (WebView) findViewById(R.id.webview); WebSettings mWebSettings = mWebView.getSettings(); //加上这句话才能使用javascript方法 mWebSettings.setJavaScriptEnabled(true); //增加接口方法,让html页面调用 mWebView.addJavascriptInterface(new Object() { //这里我定义了一个打开地图应用的方法 public void startMap() { Intent mIntent = new Intent(); ComponentName component = new ComponentName( "com.google.android.apps.maps", "com.google.android.maps.MapsActivity"); mIntent.setComponent(component); startActivity(mIntent); } }, "demo"); //加载页面 mWebView.loadUrl("file:///android_asset/demo.html"); mButton = (Button) findViewById(R.id.button); //给button添加事件响应,执行JavaScript的fillContent()方法 mButton.setOnClickListener(new Button.OnClickListener() { public void onClick(View v) { mWebView.loadUrl("javascript:fillContent()"); } }); }} |
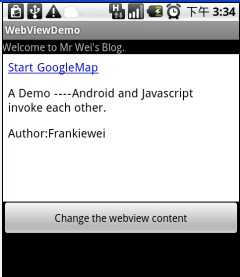
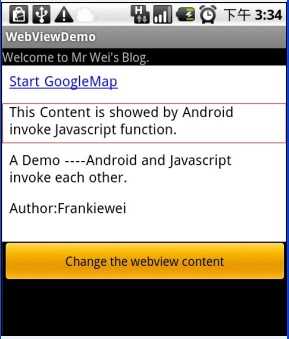
首界面 点击按钮时,html内容改变
MainActivity.java
|
1
2
3
4
5
6
7
8
9
10
11
12
13
14
15
16
17
18
19
20
21
22
23
24
25
26
27
28
29
30
31
|
package com.example.jsdemo;import android.os.Bundle;import android.support.v7.app.AppCompatActivity;import android.webkit.WebSettings;import android.webkit.WebView;public class MainActivity extends AppCompatActivity { private WebView wView; @Override protected void onCreate(Bundle savedInstanceState) { super.onCreate(savedInstanceState); setContentView(R.layout.activity_main); wView = (WebView) findViewById(R.id.wView); wView.loadUrl("file:///android_asset/demo1.html"); WebSettings webSettings = wView.getSettings(); //①设置WebView允许调用js webSettings.setJavaScriptEnabled(true); webSettings.setDefaultTextEncodingName("UTF-8"); //②设置支持js调用java wView.addJavascriptInterface(new AndroidAndJSInterface(),"Android""); } class AndroidAndJSInterface{ @JavascriptInterface public void showToast(){ Toast.makeText(MainActivity.this, "我被js调用了", Toast.LENGTH_SHORT).show(); } }} |
注意:解决该WebView.addJavascriptInterface接口不起作用的两种办法
①针对版本改成16
②在JavaScript接口类的方法加上@JavascriptInterface注解
2.JavaScript调用Java对象示例
demo1.html
|
1
|
<input type="button" value="点击Android被调用" onclick="window.Android.showToast()" /> |