标签:关注 bug void map bsp 中转 源码分析 ica 载器
推荐阅读:
LeakCanary 与 鹅场Matrix ResourceCanary对比分析
Android插件化已经出来好几年了,各大厂都出了各自方案,引用Wiki中VirtualAPK和其他开源框架的对比如下:
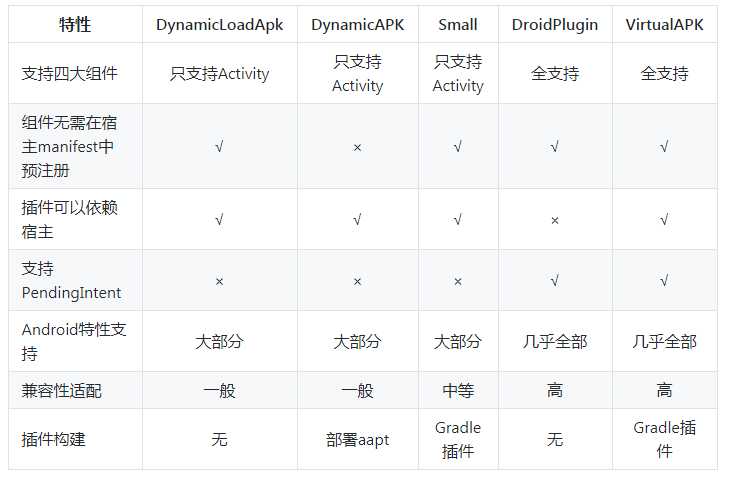
VirtualAPK是滴滴出行自研的一款优秀的插件化框架,主要有如下几个特性。
四大组件均不需要在宿主manifest中预注册,每个组件都有完整的生命周期。
theme和LaunchMode,支持透明主题;start、stop、bind和unbind,并支持跨进程bind插件中的Service;CRUD和call方法等,支持跨进程访问插件中的Provider。自定义View,支持自定义属性和style,支持动画;PendingIntent以及和其相关的Alarm、Notification和AppWidget;Application以及插件manifest中的meta-data;so。 VirtualAPK对插件没有额外的约束,原生的apk即可作为插件。插件工程编译生成apk后,即可通过宿主App加载,每个插件apk被加载后,都会在宿主中创建一个单独的LoadedPlugin对象。如下图所示,通过这些LoadedPlugin对象,VirtualAPK就可以管理插件并赋予插件新的意义,使其可以像手机中安装过的App一样运行。 
通常情况,我们可能在Applicaton中做的事情,如下:
1.onCreate中做三方库的初始化
2.registerActivityLifeCycleCallbacks监控
3.ComponentCallbacks2支持,做些资源清理动作
4.attachBaseContext() 中 multiDex install(插件不需要考虑)
从前3方面,看看VitualAPK支持哪些?
在PluginManager加载Plugin,构建LoadedPlugin事,就构建了插件Application,代码如下:
protected Application makeApplication(boolean forceDefaultAppClass, Instrumentation instrumentation) throws Exception {
     if (null != this.mApplication) {
            return this.mApplication;
     }

     String appClass = this.mPackage.applicationInfo.className;
     if (forceDefaultAppClass || null == appClass) {
          appClass = "android.app.Application";
     }

     this.mApplication = instrumentation.newApplication(this.mClassLoader, appClass, this.getPluginContext());
     // inject activityLifecycleCallbacks of the host application
     //宿主Application 监控插件Activity的生命周期
     mApplication.registerActivityLifecycleCallbacks(new ActivityLifecycleCallbacksProxy());
     //插件Application.onCreate()回调
     instrumentation.callApplicationOnCreate(this.mApplication);
     return this.mApplication;
}
从源码可以看到,在构建插件Appliation后就回调了其onCreate方法,ActivityLifecycleCallbacksProxy反射获取了宿主Application的mActivityLifecycleCallbacks,在插件Activity生命周期监控回调也派发到宿主Activity生命周期监控中。
先看看ActivityLifecycleCallbacks机制,Activity生命周期关键代码如下:
public class Activity {
     protected void onCreate(@Nullable Bundle savedInstanceState) {
         ...
         //派发ActivityLifeCallbacks.onActivityCreated()方法
         getApplication().dispatchActivityCreated(this, savedInstanceState);
         ...
    }
    protected void onStart() {
        ...
         //派发ActivityLifeCallbacks.onActivityStarted()方法
         getApplication().dispatchActivityStarted(this);
        ...
    }

   ...
}
显而易见,Activity的生命周期监控都是其Activity生命周期函数中派发。从后文Activity支持分析中,显然插件Application可以监控到插件的Activity生命周期。
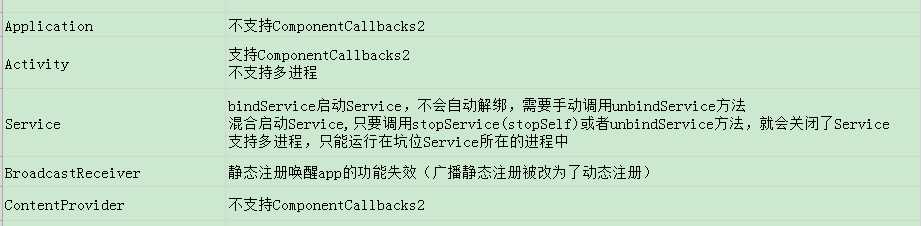
Application,Activity,Service,ContentProvider都实现了ComponentCallbacks2
//ComponentCallbacks2的接口函数
void onTrimMemory()
void onConfigurationChanged(Configuration newConfig);
void onLowMemory();
而这些函数都由ActivtyThread.mH发送异步消息,调用相应对应函数,而ActvityThread维护Application,Service,Activity,ContentProvider的相关记录,能够回调ComponentCallbacks2接口相应方法,但是插件Application并没有在ActivityThread记录过,而在LoadedPlugin中,并没有对ComponentCallbacks2进行相应的处理,所以VitualAPK并不支持插件Application的ComponentCallbacks2,而插件Activity,Service,ContentProvider是否支持ComponentCallbacks2,见后文。
需要考虑如下问题:
1.怎样启动Activity
2.怎样加载activity
3.加载资源
4.怎样保证生命周期
5.是否支持多进程
6.ComponentCallbacks2支持,做些资源清理动作
1.启动Activity
正常情况下,Activity启动调用了 Instrumentation.execStartActivity方法,完成AMS远程Activity,再由mh发送异步activity启动消息,从binder线程池环境切换到ActivityThread主线程环境,开始正真的activity启动。插件里activity没有宿主AndroidManifest.xml注册,常规方法是没法启动插件activity的。对于插件 Activity 启动,VitualApk采用的是宿主 manifest 中占坑的方式来绕过系统校验,然后再加载真正的activity。
什么是占坑?就是构造一系列假的 Activity 替身,在 AndroidMainfest.xml 里面进行注册,以绕过检测,然后到了真正启动 Activity 的时候,再把它变回,去启动真正的目标 Activity。那么这一步是怎么做的呢?
真坑注册如下:
    <application>
        <activity android:exported="false" android:name="com.didi.virtualapk.delegate.StubActivity" android:launchMode="standard"/>
        <!-- Stub Activities -->
        <activity android:exported="false" android:name=".A$1" android:launchMode="standard"/>
        <activity android:exported="false" android:name=".A$2" android:launchMode="standard"
            android:theme="@android:style/Theme.Translucent" />

        <!-- Stub Activities -->
        <activity android:exported="false" android:name=".B$1" android:launchMode="singleTop"/>
        <activity android:exported="false" android:name=".B$2" android:launchMode="singleTop"/>
        <activity android:exported="false" android:name=".B$3" android:launchMode="singleTop"/>
        <activity android:exported="false" android:name=".B$4" android:launchMode="singleTop"/>
        <activity android:exported="false" android:name=".B$5" android:launchMode="singleTop"/>
        <activity android:exported="false" android:name=".B$6" android:launchMode="singleTop"/>
        <activity android:exported="false" android:name=".B$7" android:launchMode="singleTop"/>
        <activity android:exported="false" android:name=".B$8" android:launchMode="singleTop"/>

        <!-- Stub Activities -->
        <activity android:exported="false" android:name=".C$1" android:launchMode="singleTask"/>
        <activity android:exported="false" android:name=".C$2" android:launchMode="singleTask"/>
        <activity android:exported="false" android:name=".C$3" android:launchMode="singleTask"/>
        <activity android:exported="false" android:name=".C$4" android:launchMode="singleTask"/>
        <activity android:exported="false" android:name=".C$5" android:launchMode="singleTask"/>
        <activity android:exported="false" android:name=".C$6" android:launchMode="singleTask"/>
        <activity android:exported="false" android:name=".C$7" android:launchMode="singleTask"/>
        <activity android:exported="false" android:name=".C$8" android:launchMode="singleTask"/>

        <!-- Stub Activities -->
        <activity android:exported="false" android:name=".D$1" android:launchMode="singleInstance"/>
        <activity android:exported="false" android:name=".D$2" android:launchMode="singleInstance"/>
        <activity android:exported="false" android:name=".D$3" android:launchMode="singleInstance"/>
        <activity android:exported="false" android:name=".D$4" android:launchMode="singleInstance"/>
        <activity android:exported="false" android:name=".D$5" android:launchMode="singleInstance"/>
        <activity android:exported="false" android:name=".D$6" android:launchMode="singleInstance"/>
        <activity android:exported="false" android:name=".D$7" android:launchMode="singleInstance"/>
        <activity android:exported="false" android:name=".D$8" android:launchMode="singleInstance"/>

    </application>
可以发现,在清单里面注册了一堆假的 StubActivity。 ABCD分别对应不同的启动模式,那么,我们启动插件的 Activity 的时候,是如何把它改为清单里面已注册的这些假的 Activity 名呢?
构建PluginManager时,Hook 了一个 VAInstrumentation 以替代系统的 Instrumentation,并ActivityThread.mH设置了callback,拦截处理Activity启动请求。
    protected void hookInstrumentationAndHandler() {
        try {
            ActivityThread activityThread = ActivityThread.currentActivityThread();
            Instrumentation baseInstrumentation = activityThread.getInstrumentation();

            //Hook instrumentation,重设ActivityThread的mInstrmentation
            final VAInstrumentation instrumentation = createInstrumentation(baseInstrumentation);
            Reflector.with(activityThread).field("mInstrumentation").set(instrumentation);

            //Hook Handler mh,设置其mCallback,拦截Activity启动消息
            Handler mainHandler = Reflector.with(activityThread).method("getHandler").call();
            Reflector.with(mainHandler).field("mCallback").set(instrumentation);
            this.mInstrumentation = instrumentation;
            Log.d(TAG, "hookInstrumentationAndHandler succeed : " + mInstrumentation);
        } catch (Exception e) {
            Log.w(TAG, e);
        }
    }
VAInstrumentation 相关的代码如下:
 public ActivityResult execStartActivity(...) {
        injectIntent(intent);
        return mBase.execStartActivity(...);
}

protected void injectIntent(Intent intent) {
    //确定Intent Component targetActivity的packageName,从已经加载的插件中检索
    mPluginManager.getComponentsHandler().transformIntentToExplicitAsNeeded(intent);
    // null component is an implicitly intent
    if (intent.getComponent() != null) {
         Log.i(TAG, String.format("execStartActivity[%s : %s]", intent.getComponent().getPackageName(), intent.getComponent().getClassName()));
         // resolve intent with Stub Activity if needed 用那些注册的假的StubActivity来替换真实的Activity,以绕过检测
         this.mPluginManager.getComponentsHandler().markIntentIfNeeded(intent);
    }
}
绕过了系统的检测,通过mH发送LAUNCH_ACTIVITY的异步消息,由于Hook的时候设置了callback,拦截了LAUNCH_ACTIVITY,给Intent设置了插件的Theme,classloader,然后按照mH原有的逻辑走。
提个问题,通过adb shell dumpsys activity activities可以看到插件Activity? 显然只能看到坑位Activity,因为在AMS登记的是坑位Activity,验证如下:
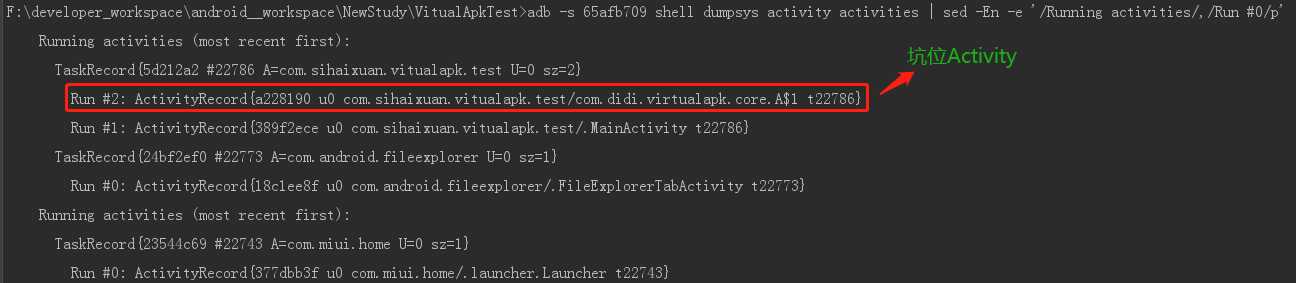
2.加载activity
当ActivityThread使用Instrumentation.newActivity,构造activity,自然是调用VAInstrumentation的newActivity方法,代码如下:
    public Activity newActivity(ClassLoader cl, String className, Intent intent) throws InstantiationException, IllegalAccessException, ClassNotFoundException {
        try {
            //先使用host 的 classloader加载类
            cl.loadClass(className);
            Log.i(TAG, String.format("newActivity[%s]", className));

        } catch (ClassNotFoundException e) {
            //根据intent 从加载的插件中检索到 插件Activity
            ComponentName component = PluginUtil.getComponent(intent);

            if (component == null) {
                return newActivity(mBase.newActivity(cl, className, intent));
            }


            String targetClassName = component.getClassName();
            Log.i(TAG, String.format("newActivity[%s : %s/%s]", className, component.getPackageName(), targetClassName));

            LoadedPlugin plugin = this.mPluginManager.getLoadedPlugin(component);

            if (plugin == null) {
                // Not found then goto stub activity.
                boolean debuggable = false;
                try {
                    Context context = this.mPluginManager.getHostContext();
                    debuggable = (context.getApplicationInfo().flags & ApplicationInfo.FLAG_DEBUGGABLE) != 0;
                } catch (Throwable ex) {

                }

                if (debuggable) {
                    throw new ActivityNotFoundException("error intent: " + intent.toURI());
                }

                Log.i(TAG, "Not found. starting the stub activity: " + StubActivity.class);
                return newActivity(mBase.newActivity(cl, StubActivity.class.getName(), intent));
            }

       //插件的Activity,使用插件自己的classloader,用插件Activity类,替换坑位Activity类名
            Activity activity = mBase.newActivity(plugin.getClassLoader(), targetClassName, intent);
            activity.setIntent(intent);

            // for 4.1+ 把插件Activity的Resources设置为Resources
            Reflector.QuietReflector.with(activity).field("mResources").set(plugin.getResources());

            return newActivity(activity);
        }

        return newActivity(mBase.newActivity(cl, className, intent));
    }
优先使用宿主host的classloader加载Activity,找不到,若是插件Activity,替换坑位Activity,使用插件的classloader加载。
那么插件的classloader是怎样构建的,代码如下:
protected ClassLoader createClassLoader(Context context, File apk, File libsDir, ClassLoader parent) throws Exception {
     File dexOutputDir = getDir(context, Constants.OPTIMIZE_DIR);
     String dexOutputPath = dexOutputDir.getAbsolutePath();
     //插件classloder的 parent 为宿主host的classloader
     //插件plugin可以加载宿主host的class,宿主host不能插件plugin的class
     DexClassLoader loader = new DexClassLoader(apk.getAbsolutePath(), dexOutputPath, libsDir.getAbsolutePath(), parent);


     //开启加载器组合,插件的dex,so文件都设置host classloader的dexPathList(见BaseDexClassLoader)
     //这样host与plugin,plugin与plugin之间可以互相加载对方的class了
     if (Constants.COMBINE_CLASSLOADER) {
        DexUtil.insertDex(loader, parent, libsDir);
     }

      return loader;
}
VirtualApk始终开启COMBINE_CLASSLOADER,也就是说host与plugin,plugin与plugin之间可以互相加载对方的class了。
3.资源加载
在VAInstrumentation.newActivity中,插件Activty的mResources 被设置为对应插件的Resources
Reflector.QuietReflector.with(activity).field("mResources").set(plugin.getResources());
那么看看插件的Resources是怎样构建的,代码如下:
 if (Constants.COMBINE_RESOURCES) {
      //资源组合开启,则把插件的apk路径添加宿主Resources的相关的参数,并把插件resources替换为宿主的resrouces,
      //这个过程很复杂,需要同步所有应用Resources地方,需要兼容 系统版本api和rom
      return ResourcesManager.createResources(context, packageName, apk);
 } else {
      //插件只能访问自身的Resource资源
      Resources hostResources = context.getResources();
      AssetManager assetManager = createAssetManager(context, apk);
      return new Resources(assetManager, hostResources.getDisplayMetrics(), hostResources.getConfiguration());
}
VirtualApk始终开启COMBINE_RESOURCES,也就是说host与plugin,plugin与plugin之间可以互相加载对方的Reources资源了。
4.生命周期回调
ActivtyThread维护这启动的activity集合ArrayMap<IBinder, ActivityClientRecord> mActivities,自然而然生命周期也就同步了,需要注意的是:在调度插件的onCreate生命周期函数需要需要设置插件Activity的mBase,mResource,mApplication等,因为在Activity实例化后,进行attch动作,需要重置为插件对应的配置。
protected void injectActivity(Activity activity) {
    final Intent intent = activity.getIntent();
    if (PluginUtil.isIntentFromPlugin(intent)) {
         Context base = activity.getBaseContext();
         try {
             LoadedPlugin plugin = this.mPluginManager.getLoadedPlugin(intent);
             Reflector.with(base).field("mResources").set(plugin.getResources());
             Reflector reflector = Reflector.with(activity);
             reflector.field("mBase").set(plugin.createPluginContext(activity.getBaseContext()));
             reflector.field("mApplication").set(plugin.getApplication());

             // set screenOrientation
             ActivityInfo activityInfo = plugin.getActivityInfo(PluginUtil.getComponent(intent));
             if (activityInfo.screenOrientation != ActivityInfo.SCREEN_ORIENTATION_UNSPECIFIED) {
                 activity.setRequestedOrientation(activityInfo.screenOrientation);
             }

             // for native activity
             ComponentName component = PluginUtil.getComponent(intent);
             Intent wrapperIntent = new Intent(intent);
             wrapperIntent.setClassName(component.getPackageName(), component.getClassName());
             activity.setIntent(wrapperIntent);

       } catch (Exception e) {
                Log.w(TAG, e);
       }
   }
}
5.是否多进程
插件Activity在其他进程中启动
<activity android:name=".OtherProcessActivity" android:process=":other"、>
打开该插件Activity,会创建该界面,adb查看相关进程,结果如下:

没发现:other相关的进程,想想也是,坑位Activity都没有设置android:Process,只能运行在主进程中。
.6.支持ComponentCallbacks2,做些资源清理动作
插件Activity在ActivityThread有登记,收集的ComponentCallbacks2接口,包括了插件Activity,所以能派发到插件Activity|。
三、Service支持
需要考虑如下问题:
1.Service启动
2.是否支持对进程
3.Service生命周期
4.是否支持ComponentCallbacks2,做些资源清理动作
1.Service启动
动态代理AMS,拦截service相关的请求,将其中转给Service Runtime去处理,Service Runtime会接管系统的所有操作
public class ActivityManagerProxy implements InvocationHandler {
     if ("startService".equals(method.getName())) {
            try {
                return startService(proxy, method, args);
            } catch (Throwable e) {
                Log.e(TAG, "Start service error", e);
            }
        } else if ("stopService".equals(method.getName())) {
            try {
                return stopService(proxy, method, args);
            } catch (Throwable e) {
                Log.e(TAG, "Stop Service error", e);
            }
        } else if ("stopServiceToken".equals(method.getName())) {
            try {
                return stopServiceToken(proxy, method, args);
            } catch (Throwable e) {
                Log.e(TAG, "Stop service token error", e);
            }
        } else if ("bindService".equals(method.getName())) {
            try {
                return bindService(proxy, method, args);
            } catch (Throwable e) {
                Log.w(TAG, e);
            }
        } else if ("unbindService".equals(method.getName())) {
            try {
                return unbindService(proxy, method, args);
            } catch (Throwable e) {
                Log.w(TAG, e);
            }
        } else if ("getIntentSender".equals(method.getName())) {
            try {
                getIntentSender(method, args);
            } catch (Exception e) {
                Log.w(TAG, e);
            }
        } else if ("overridePendingTransition".equals(method.getName())){
            try {
                overridePendingTransition(method, args);
            } catch (Exception e){
                Log.w(TAG, e);
            }
        }

        try {
            // sometimes system binder has problems.
            return method.invoke(this.mActivityManager, args);
        } catch (Throwable th) {
            ...
        }
  protected ComponentName startDelegateServiceForTarget(Intent target, ServiceInfo serviceInfo, Bundle extras, int command) {
       //把插件Service相关操作的Intent 转为为 坑位Service相关命令派发的Intent
        Intent wrapperIntent = wrapperTargetIntent(target, serviceInfo, extras, command);
      return mPluginManager.getHostContext().startService(wrapperIntent);
  }
}
Service runtime也注册两个坑位Service,由坑位Service分发插件Service的相关操作,一个LocalService,用来派发与宿主同进程的插件service操作,一个是RemoteService,用来派发与宿主不同进程的插件service操作,插件service并没有在AMS、ActivityThread登记过,由Service runtime自身维护。
2.是否支持多进程
RemoteService用来派发与宿主不同进程的插件service操作,只不过插件Service运行在RemoteService所在的:daemon,没有运行在插件Service指定的进程上。
3.Service生命周期
坑位Service在派发插件Service操作的时候,会回调相应的生命周期的周期函数。
需要注意以下两点:
1)通常情况下bindService启动Service,该Service的生命周期跟绑定着生命周期一致,但是插件Service有VitualAPK Service runtime维护,runtime没有做插件Serice跟绑定者生命周期一致处理,需要手动调用unbindService,关闭该Service。
2)通常情况下startService和bindService或者使用,关闭Service需要调用stop和unbind方法,而插件Service混合启动,只需要调用stop或者unbind方法就可以关闭Service|。
4.不支持ComponentCallbacks2,做些资源清理动作
插件Service没有在ActivityThread登记,收集的ComponentCallbacks2没有包括插件Service,所以插件不知ComponentCallbacks2。
四、BroadcastReceiver支持
BroadcastRecevier注册分为动态注册和静态注册。
插件BroadcastRecevier的动态注册,只需要能够加载到插件BroadcastReceiver类即可,在前文分析中插件与宿主、插件与插件的classloader都可以加载对方的类,显然VitaulAPK是支持插件的动态注册。
插件BroadcastRecevier的静态注册,即在插件的AndroidManifest.xml中注册,VituaAPK在加载插件时,通过PackageParserCompat的parsePackage方法解析了AndroidManifest.xml中Application和四大组件信息,
然后反射实例化插件BroadcastRecevier把插件的静态注册改为动态注册,代码如下:
 public LoadedPlugin(PluginManager pluginManager, Context context, File apk) throws Exception {
       this.mPackage = PackageParserCompat.parsePackage(context, apk, PackageParser.PARSE_MUST_BE_APK);
       this.mPackageInfo.packageName = this.mPackage.packageName;
    if (pluginManager.getLoadedPlugin(mPackageInfo.packageName) != null) {
        throw new RuntimeException("plugin has already been loaded : " + mPackageInfo.packageName);
    }
   // Register broadcast receivers dynamically
    Map<ComponentName, ActivityInfo> receivers = new HashMap<ComponentName, ActivityInfo>();
    for (PackageParser.Activity receiver : this.mPackage.receivers) {
        receivers.put(receiver.getComponentName(), receiver.info);
        //反射实例化BroadcastReceiver
        BroadcastReceiver br = BroadcastReceiver.class.cast(getClassLoader().loadClass(receiver.getComponentName().getClassName()).newInstance());
        for (PackageParser.ActivityIntentInfo aii : receiver.intents) {
            this.mHostContext.registerReceiver(br, aii);//动态注册
        }
     }
    this.mReceiverInfos = Collections.unmodifiableMap(receivers);
    this.mPackageInfo.receivers = receivers.values().toArray(new ActivityInfo[receivers.size()]);

}
当然插件的静态注册,在唤醒app的广播接收中会失效。
五、ContentProvider支持
ContentProvider是数据共享型组件,进程间和进程内均可共享,由ContentResolver统一管理访问ContentProvider,我们通过使用context.getContentResolver(),context的实例为contextImpl,ContentResolver通过IContentProvider远程服务代理访问ContentProvider服务接口增删改查。IContentProvider服务代理从ActivityThread中获取,如下:
public final IContentProvider acquireProvider(
            Context c, String auth, int userId, boolean stable) {
     //从本进程中获取
        final IContentProvider provider = acquireExistingProvider(c, auth, userId, stable);
        if (provider != null) {
            return provider;
        }

        // There is a possible race here.  Another thread may try to acquire
        // the same provider at the same time.  When this happens, we want to ensure
        // that the first one wins.
        // Note that we cannot hold the lock while acquiring and installing the
        // provider since it might take a long time to run and it could also potentially
        // be re-entrant in the case where the provider is in the same process.
        IActivityManager.ContentProviderHolder holder = null;
        try {
            //从ams中获取
            holder = ActivityManagerNative.getDefault().getContentProvider(
                    getApplicationThread(), auth, userId, stable);
        } catch (RemoteException ex) {
            throw ex.rethrowFromSystemServer();
        }
        if (holder == null) {
            Slog.e(TAG, "Failed to find provider info for " + auth);
            return null;
        }

        // Install provider will increment the reference count for us, and break
        // any ties in the race.
        holder = installProvider(c, holder, holder.info,
                true /*noisy*/, holder.noReleaseNeeded, stable);
        return holder.provider;
    }
可以IContentProvider的来源,ActivityThread和AMS,优先从本进程中获取。在应用的启动时候,ContentProvider也跟着启动,在AMS中有相应的记录,
插件ContentProvider在AMS中没有记录,VitualApk使用代理转发,宿主坑位ContentProvider拦截了ContentProvider操作,由坑位ContentProvider派发到具体的插件ContentProvider,代码如下:
public class RemoteContentProvider extends ContentProvider {
    private static final String TAG = Constants.TAG_PREFIX + "RemoteContentProvider";

    public static final String KEY_PKG = "pkg";
    public static final String KEY_PLUGIN = "plugin";
    public static final String KEY_URI = "uri";

    public static final String KEY_WRAPPER_URI = "wrapper_uri";

    private static Map<String, ContentProvider> sCachedProviders = new HashMap<>();

    @Override
    public Cursor query(Uri uri, String[] projection, String selection, String[] selectionArgs, String sortOrder) {
        //获取插件的ContentProvider
        ContentProvider provider = getContentProvider(uri);
        Uri pluginUri = Uri.parse(uri.getQueryParameter(KEY_URI));
        if (provider != null) {
            return provider.query(pluginUri, projection, selection, selectionArgs, sortOrder);
        }

        return null;
    }

    @Override
    public Uri insert(Uri uri, ContentValues values) {
        //获取插件的ContentProvider
        ContentProvider provider = getContentProvider(uri);
        Uri pluginUri = Uri.parse(uri.getQueryParameter(KEY_URI));
        if (provider != null) {
            return provider.insert(pluginUri, values);
        }

        return uri;
    }

    @Override
    public int delete(Uri uri, String selection, String[] selectionArgs) {
        //获取插件的ContentProvider
        ContentProvider provider = getContentProvider(uri);
        Uri pluginUri = Uri.parse(uri.getQueryParameter(KEY_URI));
        if (provider != null) {
            return provider.delete(pluginUri, selection, selectionArgs);
        }

        return 0;
    }

    @Override
    public int update(Uri uri, ContentValues values, String selection, String[] selectionArgs) {
        //获取插件的ContentProvider
        ContentProvider provider = getContentProvider(uri);
        Uri pluginUri = Uri.parse(uri.getQueryParameter(KEY_URI));
        if (provider != null) {
            return provider.update(pluginUri, values, selection, selectionArgs);
        }

        return 0;
    }

    @Override
    public int bulkInsert(Uri uri, ContentValues[] values) {
        ContentProvider provider = getContentProvider(uri);
        Uri pluginUri = Uri.parse(uri.getQueryParameter(KEY_URI));
        if (provider != null) {
            return provider.bulkInsert(pluginUri, values);
        }

        return 0;
    }


 ...

}
插件中ContentProvider没有经过Android Framework层,由坑位ContentProvider维护。
插件有自己的ContentResolver:PluginContentResolver,插件访问ContentProvider时,先从插件管理器中找对应ProviderInfo,找到了则用插件的IContentProvider,否则使用宿主的IContentProvider。
@Override
protected IContentProvider acquireProvider(Context context, String auth) {
   if (mPluginManager.resolveContentProvider(auth, 0) != null) {
       return mPluginManager.getIContentProvider();
    }
    return super.acquireProvider(context, auth);
}

@Override
protected IContentProvider acquireExistingProvider(Context context, String auth) {
    if (mPluginManager.resolveContentProvider(auth, 0) != null) {
        return mPluginManager.getIContentProvider();
    }
    return super.acquireExistingProvider(context, auth);
}

@TargetApi(Build.VERSION_CODES.JELLY_BEAN)
@Override
protected IContentProvider acquireUnstableProvider(Context context, String auth) {
   if (mPluginManager.resolveContentProvider(auth, 0) != null) {
     return mPluginManager.getIContentProvider();
   }
   return super.acquireUnstableProvider(context, auth);
}
那么插件中IContentProvider,怎来的了?宿主坑位ContentProvider,在ActivityThread中肯定存在对应IContentProvider,插件IContentProvider,对其进行动态代理构建了一个。
protected void hookIContentProviderAsNeeded() {
        Uri uri = Uri.parse(RemoteContentProvider.getUri(mContext));
        mContext.getContentResolver().call(uri, "wakeup", null, null);
        try {
            Field authority = null;
            Field provider = null;
            ActivityThread activityThread = ActivityThread.currentActivityThread();
            Map providerMap = Reflector.with(activityThread).field("mProviderMap").get();
            Iterator iter = providerMap.entrySet().iterator();
            while (iter.hasNext()) {
                Map.Entry entry = (Map.Entry) iter.next();
                Object key = entry.getKey();
                Object val = entry.getValue();
                String auth;
                if (key instanceof String) {
                    auth = (String) key;
                } else {
                    if (authority == null) {
                        authority = key.getClass().getDeclaredField("authority");
                        authority.setAccessible(true);
                    }
                    auth = (String) authority.get(key);
                }
                if (auth.equals(RemoteContentProvider.getAuthority(mContext))) {
                    if (provider == null) {
                        provider = val.getClass().getDeclaredField("mProvider");
                        provider.setAccessible(true);
                    }
                    //插件IContentProvider
                    IContentProvider rawProvider = (IContentProvider) provider.get(val);
                    IContentProvider proxy = IContentProviderProxy.newInstance(mContext, rawProvider);
                    mIContentProvider = proxy;
                    Log.d(TAG, "hookIContentProvider succeed : " + mIContentProvider);
                    break;
                }
            }
        } catch (Exception e) {
            Log.w(TAG, e);
        }
    }
IContentProviderProxyi的nvoke函数首先将访问插件的Uri转到宿主占坑Uri
@Override
public Object invoke(Object proxy, Method method, Object[] args) throws Throwable {
   Log.v(TAG, method.toGenericString() + " : " + Arrays.toString(args));

   //插件Uri转为宿主占坑Uri
   wrapperUri(method, args);

   try {
        return method.invoke(mBase, args);
    } catch (InvocationTargetException e) {
        throw e.getTargetException();
    }
}
插件的Uri转到宿主占坑Uri,代码如下:
//
public static Uri wrapperUri(LoadedPlugin loadedPlugin, Uri pluginUri) {
    String pkg = loadedPlugin.getPackageName();
    String pluginUriString = Uri.encode(pluginUri.toString());
    StringBuilder builder = new StringBuilder(RemoteContentProvider.getUri(loadedPlugin.getHostContext()));
    builder.append("/?plugin=" + loadedPlugin.getLocation());
    builder.append("&pkg=" + pkg);
    builder.append("&uri=" + pluginUriString);
    Uri wrapperUri = Uri.parse(builder.toString());
    return wrapperUri;
}
1.Activity 采用宿主manifest中占坑的方式来绕过系统校验,然后再加载真正的activity;
2.Service 动态代理AMS,拦截service相关的请求,将其中转给Service Runtime去处理,Service Runtime会接管系统的所有操作;
3.Receiver 将插件中静态注册的receiver重新注册一遍;
4.ContentProvider 动态代理IContentProvider,拦截provider相关的请求,将其中转给Provider Runtime去处理,Provider Runtime会接管系统的所有操作。
插件组件需要注意的地方:
参考资料:
VirtualApk源码分析-BroadcastReceiver插件化
VirtualApk源码分析-ContentProvider插件化
如果您对博主的更新内容持续感兴趣,请关注公众号!

标签:关注 bug void map bsp 中转 源码分析 ica 载器
原文地址:https://www.cnblogs.com/sihaixuan/p/11166196.html